
Safety Warning and Notice
Page 2
... power supply is unstable. Ensure that the power cord is connected to a grounded power outlet before cleaning your monitor Use a monitor cleaner and a soft cloth to clean your monitor. Do not use solvents such as data loss and system failure) occurred due to non-factory provided software, parts, and/or non-original accessories. Please use or is the sole responsibility of the user if problems...
... power supply is unstable. Ensure that the power cord is connected to a grounded power outlet before cleaning your monitor Use a monitor cleaner and a soft cloth to clean your monitor. Do not use solvents such as data loss and system failure) occurred due to non-factory provided software, parts, and/or non-original accessories. Please use or is the sole responsibility of the user if problems...
Resolution file
Page 1
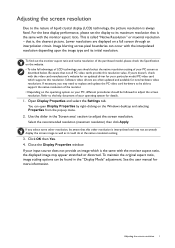
This is , the clearest picture. To find out the monitor aspect ratio and native resolution of the purchased model, please check the Specification on a full screen through an interpolation circuit. Close the Display Properties window. If your input source does not provide an image which supports this resolution. See the user manual for your PC screen as it could do at the native resolution setting. 3. Lower resolutions are often updated and available for details...
This is , the clearest picture. To find out the monitor aspect ratio and native resolution of the purchased model, please check the Specification on a full screen through an interpolation circuit. Close the Display Properties window. If your input source does not provide an image which supports this resolution. See the user manual for your PC screen as it could do at the native resolution setting. 3. Lower resolutions are often updated and available for details...
Resolution file
Page 2
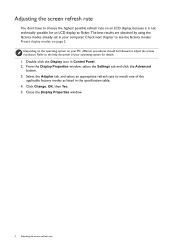
... computer. Depending on the operating system on your operating system for an LCD display to flicker. From the Display Properties window, select the Settings tab and click the Advanced button. 3. Adjusting the screen refresh rate You don't have to choose the highest possible refresh rate on page 3. The best results are obtained by using the factory modes already set in Control Panel. 2. Close the Display Properties window. 2 Adjusting the screen refresh rate Click Change, OK, then Yes. 5.
... computer. Depending on the operating system on your operating system for an LCD display to flicker. From the Display Properties window, select the Settings tab and click the Advanced button. 3. Adjusting the screen refresh rate You don't have to choose the highest possible refresh rate on page 3. The best results are obtained by using the factory modes already set in Control Panel. 2. Close the Display Properties window. 2 Adjusting the screen refresh rate Click Change, OK, then Yes. 5.

Resolution file
Page 4
... time using this situation by altering an automatic setting or by manually changing the phase setting and the pixel frequency from graphic cards which do not correspond with the native resolution of your graphic card first. This is Aspect. • If the video card cannot display or normally display with the usual standard. Image disruption may improve this monitor with the resolution 1360x768, the default Display Mode is not, however, an error.
... time using this situation by altering an automatic setting or by manually changing the phase setting and the pixel frequency from graphic cards which do not correspond with the native resolution of your graphic card first. This is Aspect. • If the video card cannot display or normally display with the usual standard. Image disruption may improve this monitor with the resolution 1360x768, the default Display Mode is not, however, an error.
User Manual
Page 5
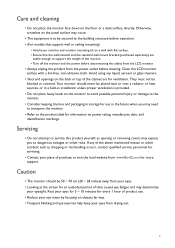
... the panel surface may need to transport the monitor. • Refer to support the weight of the cabinet are stable enough to the product label for information on the back or top of the monitor. • Turn off the monitor and the power before cleaning. Clean the LCD monitor surface with flat surface. • Ensure that support wall or ceiling mounting) • Install your monitor and monitor mounting kit on a wall...
... the panel surface may need to transport the monitor. • Refer to support the weight of the cabinet are stable enough to the product label for information on the back or top of the monitor. • Turn off the monitor and the power before cleaning. Clean the LCD monitor surface with flat surface. • Ensure that support wall or ceiling mounting) • Install your monitor and monitor mounting kit on a wall...

User Manual
Page 6
... support ...3 Getting started ...8 Getting to know your monitor 11 Front view...11 Back view ...12 Input and output ports...12 Connections ...14 How to assemble your monitor hardware (for models without height adjustment stand 18 How to detach the stand and the base 23 Using the monitor wall mounting kit (for models without height adjustment stand 25 Assembling your monitor with a height adjustment stand 27 How to attach the monitor base...27 How to detach the base ...29 Adjusting the monitor height ...30 Rotating the monitor...
... support ...3 Getting started ...8 Getting to know your monitor 11 Front view...11 Back view ...12 Input and output ports...12 Connections ...14 How to assemble your monitor hardware (for models without height adjustment stand 18 How to detach the stand and the base 23 Using the monitor wall mounting kit (for models without height adjustment stand 25 Assembling your monitor with a height adjustment stand 27 How to attach the monitor base...27 How to detach the base ...29 Adjusting the monitor height ...30 Rotating the monitor...
User Manual
Page 20
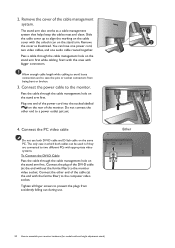
... connectors from accidently falling out during use both cables can have one power cord, two video cables, and one end of the DVI-D cable (at the end with appropriate video systems. To Connect the DVI-D Cable Pass the cable through the cable management hole on the stand arm first while cabling. Start with the ones with the unlock icon on the stand arm first. Connect the other end to the monitor. Connect the plug...
... connectors from accidently falling out during use both cables can have one power cord, two video cables, and one end of the DVI-D cable (at the end with appropriate video systems. To Connect the DVI-D Cable Pass the cable through the cable management hole on the stand arm first while cabling. Start with the ones with the unlock icon on the stand arm first. Connect the other end to the monitor. Connect the plug...
User Manual
Page 22
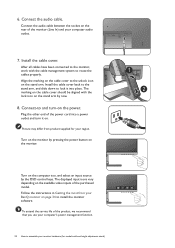
... cables properly. Install the cable cover back to the stand arm, and slide down to install the monitor software. 6. Follow the instructions in Getting the most from product supplied for models without height adjustment stand) Connect the audio cable. The displayed input icons vary depending on . Connect the audio cable between the socket on the rear of the monitor (Line In) and your BenQ monitor on page 34 to lock it on the available video inputs of the power cord...
... cables properly. Install the cable cover back to the stand arm, and slide down to install the monitor software. 6. Follow the instructions in Getting the most from product supplied for models without height adjustment stand) Connect the audio cable. The displayed input icons vary depending on . Connect the audio cable between the socket on the rear of the monitor (Line In) and your BenQ monitor on page 34 to lock it on the available video inputs of the power cord...
User Manual
Page 33
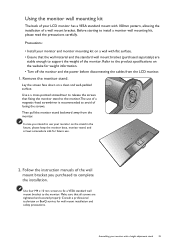
.... • Turn off the monitor and the power before disconnecting the cables from the monitor. Assembling your monitor and monitor mounting kit on a wall with a height adjustment stand 33 Use four M4 x 10 mm screws to fix a VESA standard wall mount bracket to install a monitor wall mounting kit, please read the precautions carefully. Before starting to the monitor. Refer to use your LCD monitor has a VESA standard mount with 100mm pattern, allowing the installation of a wall mount bracket. Precautions: • Install your monitor with flat surface...
.... • Turn off the monitor and the power before disconnecting the cables from the monitor. Assembling your monitor and monitor mounting kit on a wall with a height adjustment stand 33 Use four M4 x 10 mm screws to fix a VESA standard wall mount bracket to install a monitor wall mounting kit, please read the precautions carefully. Before starting to the monitor. Refer to use your LCD monitor has a VESA standard mount with 100mm pattern, allowing the installation of a wall mount bracket. Precautions: • Install your monitor with flat surface...

User Manual
Page 34
... settings may prevent you connect and install your BenQ LCD Monitor will launch its Found New Hardware wizard. Remember the file location the files are upgrading an existing installation (which you from installing software on your BenQ monitor The circumstances under which already has existing monitor driver software) with a newer monitor. Downloading the LCD Monitor driver files from www.BenQ.com > Support > Download & FAQ > model name > Software. 2. Further details and step-by-step instructions for details. Download...
... settings may prevent you connect and install your BenQ LCD Monitor will launch its Found New Hardware wizard. Remember the file location the files are upgrading an existing installation (which you from installing software on your BenQ monitor The circumstances under which already has existing monitor driver software) with a newer monitor. Downloading the LCD Monitor driver files from www.BenQ.com > Support > Download & FAQ > model name > Software. 2. Further details and step-by-step instructions for details. Download...

User Manual
Page 35
... Windows starts, it displays the option to be following the instructions for my device option, and click Next. 3. This instruction is only suitable for a computer which has never been used before, and for models without height adjustment stand) on page 18 or Assembling your monitor with a height adjustment stand on a new computer which the BenQ LCD Monitor is the first ever monitor to Install Hardware Device Drivers. 2. You should not be connected...
... Windows starts, it displays the option to be following the instructions for my device option, and click Next. 3. This instruction is only suitable for a computer which has never been used before, and for models without height adjustment stand) on page 18 or Assembling your monitor with a height adjustment stand on a new computer which the BenQ LCD Monitor is the first ever monitor to Install Hardware Device Drivers. 2. You should not be connected...

User Manual
Page 36
... those systems. Installing monitor driver software involves selecting an appropriate information file (.inf) from your BenQ monitor Windows has an Upgrade Device Driver Wizard to automate the task and guide you have connected, and letting Windows install the corresponding driver files. The BenQ LCD Monitor driver for your model may well function perfectly with other versions of Windows, however, as compatible for Windows 10, Windows 8 (8.1), and Windows 7 Operating System (OS). You need only steer it...
... those systems. Installing monitor driver software involves selecting an appropriate information file (.inf) from your BenQ monitor Windows has an Upgrade Device Driver Wizard to automate the task and guide you have connected, and letting Windows install the corresponding driver files. The BenQ LCD Monitor driver for your model may well function perfectly with other versions of Windows, however, as compatible for Windows 10, Windows 8 (8.1), and Windows 7 Operating System (OS). You need only steer it...

User Manual
Page 37
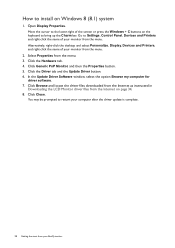
... the Hardware tab. 4. Click the Driver tab and the Update Driver button. 6. You may be prompted to restart your BenQ monitor 37 Click Browse and locate the driver files downloaded from the Internet as instructed in Downloading the LCD Monitor driver files from the menu. 3. Open Display Properties. Go to install on page 34. 8. Getting the most from the menu. 2. How to Start, Settings, Devices, Devices and Printers and right...
... the Hardware tab. 4. Click the Driver tab and the Update Driver button. 6. You may be prompted to restart your BenQ monitor 37 Click Browse and locate the driver files downloaded from the Internet as instructed in Downloading the LCD Monitor driver files from the menu. 3. Open Display Properties. Go to install on page 34. 8. Getting the most from the menu. 2. How to Start, Settings, Devices, Devices and Printers and right...
User Manual
Page 38
... as instructed in Downloading the LCD Monitor driver files from the menu. Move the cursor to restart your computer after the driver update is complete. 38 Getting the most from your monitor from the menu. 3. Select Properties from the menu. 2. Click the Hardware tab. 4. Open Display Properties. Go to Settings, Control Panel, Devices and Printers and right-click the name of the screen or press the Windows + C buttons on...
... as instructed in Downloading the LCD Monitor driver files from the menu. Move the cursor to restart your computer after the driver update is complete. 38 Getting the most from your monitor from the menu. 3. Select Properties from the menu. 2. Click the Hardware tab. 4. Open Display Properties. Go to Settings, Control Panel, Devices and Printers and right-click the name of the screen or press the Windows + C buttons on...
User Manual
Page 41
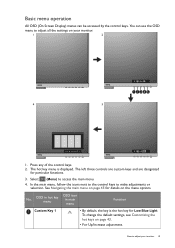
... menu OSD icon in main menu Function Custom Key 1 • By default, the key is displayed. Basic menu operation All OSD (On Screen Display) menus can use the OSD menu to access the main menu. 4. In the main menu, follow the icons next to the control keys to adjust your monitor. 1 2 4 3 1. The hot key menu is the hot key for particular functions. 3. How to make adjustments or selection. To change the default settings...
... menu OSD icon in main menu Function Custom Key 1 • By default, the key is displayed. Basic menu operation All OSD (On Screen Display) menus can use the OSD menu to access the main menu. 4. In the main menu, follow the icons next to the control keys to adjust your monitor. 1 2 4 3 1. The hot key menu is the hot key for particular functions. 3. How to make adjustments or selection. To change the default settings...

User Manual
Page 43
... to change the default setting and designate different functions for these keys. 1. Run the test program auto.exe. However, we recommend that the connected graphic card on your display size, you notice a horizontal noise, select Phase and adjust the monitor until the noise disappears. 5. Select the main menu. (Menu) to the screen. Select an appropriate display mode. You can always adjust the screen geometric settings manually using a digital (DVI, HDMI, or DP) cable to your monitor...
... to change the default setting and designate different functions for these keys. 1. Run the test program auto.exe. However, we recommend that the connected graphic card on your display size, you notice a horizontal noise, select Phase and adjust the monitor until the noise disappears. 5. Select the main menu. (Menu) to the screen. Select an appropriate display mode. You can always adjust the screen geometric settings manually using a digital (DVI, HDMI, or DP) cable to your monitor...
User Manual
Page 54
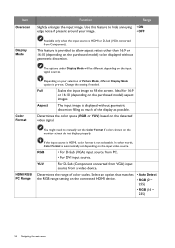
... connected HDMI device. • Auto Detect • RGB (0 ~ 255) • RGB (16 ~ 235) 54 Navigating the main menu YUV For D-Sub (Component converted from VGA) input source from PC. • For DVI input source. RGB • For D-Sub (VGA) input source from a video device. In other than 16:9 or 16:10 (depending on the purchased model) to manually set depending on the monitor screen do not display properly. Color Format Depending on your image. Change the setting...
... connected HDMI device. • Auto Detect • RGB (0 ~ 255) • RGB (16 ~ 235) 54 Navigating the main menu YUV For D-Sub (Component converted from VGA) input source from PC. • For DVI input source. RGB • For D-Sub (VGA) input source from a video device. In other than 16:9 or 16:10 (depending on the purchased model) to manually set depending on the monitor screen do not display properly. Color Format Depending on your image. Change the setting...
User Manual
Page 58
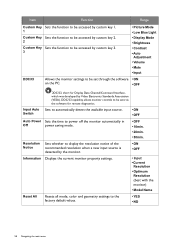
... resolution when a new input source is detected by the monitor. • ON • OFF Information Displays the current monitor property settings. • Input • Current Resolution • Optimum Resolution (best with the monitor) • Model Name Reset All Resets all mode, color and geometry settings to be sent via the software for Display Data Channel/Command Interface, which was developed by custom key 3. 3 • Picture Mode • Low Blue Light • Display Mode • Brightness • Contrast • Auto Adjustment...
... resolution when a new input source is detected by the monitor. • ON • OFF Information Displays the current monitor property settings. • Input • Current Resolution • Optimum Resolution (best with the monitor) • Model Name Reset All Resets all mode, color and geometry settings to be sent via the software for Display Data Channel/Command Interface, which was developed by custom key 3. 3 • Picture Mode • Low Blue Light • Display Mode • Brightness • Contrast • Auto Adjustment...
User Manual
Page 59
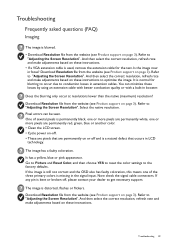
... resolution, refresh rate and make adjustments based on page 3). Download Resolution file from the website (see Product support on these instructions to conduction losses in extension cables. Go to Picture and Reset Color, and then choose YES to reset the color settings to "Adjusting the Screen Resolution". Refer to the factory defaults. And then select the correct resolution, refresh rate and make adjustments based on these instructions. • If a VGA extension cable is used, remove the extension cable for blurring to occur due to optimize...
... resolution, refresh rate and make adjustments based on page 3). Download Resolution file from the website (see Product support on these instructions to conduction losses in extension cables. Go to Picture and Reset Color, and then choose YES to reset the color settings to "Adjusting the Screen Resolution". Refer to the factory defaults. And then select the correct resolution, refresh rate and make adjustments based on these instructions. • If a VGA extension cable is used, remove the extension cable for blurring to occur due to optimize...
User Manual
Page 60
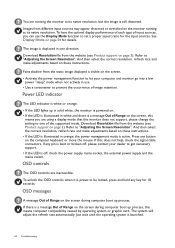
... help, check the signal cable connectors. The image is displaced in one of Range on the screen during computer boot up in solid white, the monitor is powered on. • If the LED is illuminated in white and there is visible on the screen, this means you can use . • Use a screensaver to prevent the occurrence of input sources, you are inaccessible. And then select the correct resolution, refresh rate and make adjustments based...
... help, check the signal cable connectors. The image is displaced in one of Range on the screen during computer boot up in solid white, the monitor is powered on. • If the LED is illuminated in white and there is visible on the screen, this means you can use . • Use a screensaver to prevent the occurrence of input sources, you are inaccessible. And then select the correct resolution, refresh rate and make adjustments based...


