
User Guide
Page 2
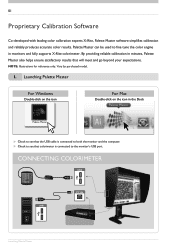
... that will meet and go beyond your expectations. By providing reliable calibration in monitors and fully supports X-Rite colorimeter. I. XX Check to see that colorimeter is connected to the monitor's USB port. Launching Palette Master For Windows Double-click on the...USB cable is connected to both the monitor and the computer. CONNECTING COLORIMETER USB USB PC IN Launching Palette Master 01 Proprietary Calibration Software Co-developed with leading color calibration experts X-Rite, Palette Master software simplifies calibration and reliably produces accurate color results. ...
... that will meet and go beyond your expectations. By providing reliable calibration in monitors and fully supports X-Rite colorimeter. I. XX Check to see that colorimeter is connected to the monitor's USB port. Launching Palette Master For Windows Double-click on the...USB cable is connected to both the monitor and the computer. CONNECTING COLORIMETER USB USB PC IN Launching Palette Master 01 Proprietary Calibration Software Co-developed with leading color calibration experts X-Rite, Palette Master software simplifies calibration and reliably produces accurate color results. ...
User Guide
Page 3
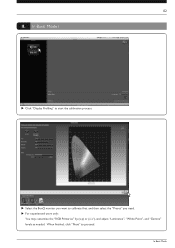
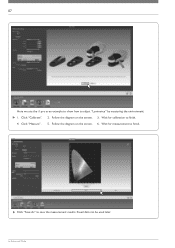
XX Select the BenQ monitor you want to proceed. When finished, click "Next" to calibrate first, and then select the "Preset" you need. 02 II. In Basic Mode In Basic Mode i XX Click "Display Profiling" to start the calibration process. XX For experienced users only: You may customize the "RGB Primaries" by (x,y) or (u',v'), and adjust "Luminance", "White Point", and "Gamma" levels as needed.
XX Select the BenQ monitor you want to proceed. When finished, click "Next" to calibrate first, and then select the "Preset" you need. 02 II. In Basic Mode In Basic Mode i XX Click "Display Profiling" to start the calibration process. XX For experienced users only: You may customize the "RGB Primaries" by (x,y) or (u',v'), and adjust "Luminance", "White Point", and "Gamma" levels as needed.
User Guide
Page 4
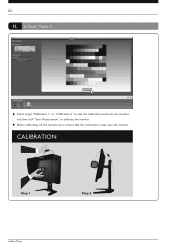
CALIBRATION Step 1 In Basic Mode Step 2 03 II. In Basic Mode ii XX Select target "Calibration 1" or "Calibration 2" to save the calibration result into the monitor, and then click "Start Measurement" to ensure that the colorimeter snaps onto the monitor. XX Before calibrating, tilt the monitor up to calibrate the monitor.
CALIBRATION Step 1 In Basic Mode Step 2 03 II. In Basic Mode ii XX Select target "Calibration 1" or "Calibration 2" to save the calibration result into the monitor, and then click "Start Measurement" to ensure that the colorimeter snaps onto the monitor. XX Before calibrating, tilt the monitor up to calibrate the monitor.
User Guide
Page 5
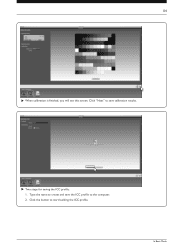
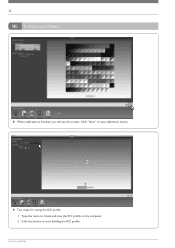
Click the button to the computer. 2. XX Two steps for saving the ICC profile: 1. Type the name to create and save calibration results. In Basic Mode 04 XX When calibration is finished, you will see this screen. Click "Next" to save the ICC profile to start building the ICC profile.
Click the button to the computer. 2. XX Two steps for saving the ICC profile: 1. Type the name to create and save calibration results. In Basic Mode 04 XX When calibration is finished, you will see this screen. Click "Next" to save the ICC profile to start building the ICC profile.
User Guide
Page 8
Wait for calibration to save the measurement results. Click "Calibrate". 2. 07 Here we use the i1 pro as an example to show how to finish. Wait for measurement to adjust "Luminance" by measuring the environment: 1. Click "Measure". 5. XX Click "Save As" to finish. 4. Follow the diagram on the screen. 3. In Advanced Mode Saved data can be used later. Follow the diagram on the screen. 6.
Wait for calibration to save the measurement results. Click "Calibrate". 2. 07 Here we use the i1 pro as an example to show how to finish. Wait for measurement to adjust "Luminance" by measuring the environment: 1. Click "Measure". 5. XX Click "Save As" to finish. 4. Follow the diagram on the screen. 3. In Advanced Mode Saved data can be used later. Follow the diagram on the screen. 6.

User Guide
Page 10
A larger set size usually provides better accuracy, but the default setting (ICC V4) is recommended. 1. In Advanced Mode When your project. 5. 09 III. In Advanced Mode ii XX You can change the type of ICC profile you want to use, but takes longer to measure. 4. You may add specific Pantone targets to your requirements. 3. Select "Patch set size" according to make the calibration results accurate for your settings are in place, click "Next". Set "Patch set ". 2.
A larger set size usually provides better accuracy, but the default setting (ICC V4) is recommended. 1. In Advanced Mode When your project. 5. 09 III. In Advanced Mode ii XX You can change the type of ICC profile you want to use, but takes longer to measure. 4. You may add specific Pantone targets to your requirements. 3. Select "Patch set size" according to make the calibration results accurate for your settings are in place, click "Next". Set "Patch set ". 2.

User Guide
Page 11
XX Before calibrating, tilt the monitor up to calibrate the monitor. CALIBRATION Step 1 Step 2 In Advanced Mode 10 XX Select target "Calibration 1" or "Calibration 2" to save the calibration result into the monitor, and then click "Start Measurement" to ensure that the colorimeter snaps onto the monitor.
XX Before calibrating, tilt the monitor up to calibrate the monitor. CALIBRATION Step 1 Step 2 In Advanced Mode 10 XX Select target "Calibration 1" or "Calibration 2" to save the calibration result into the monitor, and then click "Start Measurement" to ensure that the colorimeter snaps onto the monitor.
User Guide
Page 12
In Advanced Mode 11 III. In Advanced Mode ii XX When calibration is finished, you will see this screen. Type the name to create and save calibration results. 1 2 XX Two steps for saving the ICC profile: 1. Click the button to the computer. 2. Click "Next" to save the ICC profile to start building the ICC profile.
In Advanced Mode 11 III. In Advanced Mode ii XX When calibration is finished, you will see this screen. Type the name to create and save calibration results. 1 2 XX Two steps for saving the ICC profile: 1. Click the button to the computer. 2. Click "Next" to save the ICC profile to start building the ICC profile.
User Guide
Page 18
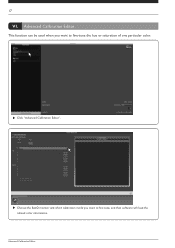
XX Click "Advanced Calibration Editor". Advanced Calibration Editor XX Choose the BenQ monitor and which calibration mode you want to fine-tune the hue or saturation of one particular color. Advanced Calibration Editor This function can be used when you want to fine tune, and then software will load the related color information. 17 VI.
XX Click "Advanced Calibration Editor". Advanced Calibration Editor XX Choose the BenQ monitor and which calibration mode you want to fine-tune the hue or saturation of one particular color. Advanced Calibration Editor This function can be used when you want to fine tune, and then software will load the related color information. 17 VI.
User Guide
Page 19
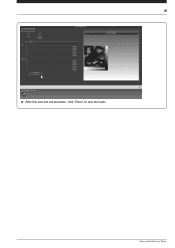
18 XX After fine tune hue and saturation , click "Done" to save the result. Advanced Calibration Editor
18 XX After fine tune hue and saturation , click "Done" to save the result. Advanced Calibration Editor
User Guide
Page 20
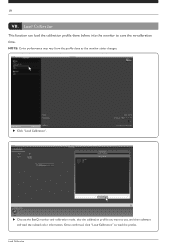
Once confirmed, click "Load Calibration" to save the re-calibration time. Load Calibration This function can load the calibration profile done before into the monitor to load the profile. XX Choose the BenQ monitor and calibration mode, also the calibration profile you want to use, and then software will load the related color information. XX Click "Load Calibration". Load Calibration 19 VII. NOTE: Color performance may vary from the profile done as the monitor status changes.
Once confirmed, click "Load Calibration" to save the re-calibration time. Load Calibration This function can load the calibration profile done before into the monitor to load the profile. XX Choose the BenQ monitor and calibration mode, also the calibration profile you want to use, and then software will load the related color information. XX Click "Load Calibration". Load Calibration 19 VII. NOTE: Color performance may vary from the profile done as the monitor status changes.
User Guide
Page 21
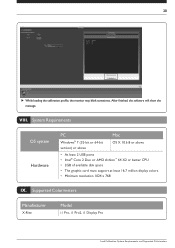
Supported Colorimeters Manufacturer X-Rite Model i1 Pro, i1 Pro2, i1 Display Pro Load Calibration, System Requirements, and Supported Colorimeters System Requirements OS system Hardware PC Mac Windows® 7 (32-bit or 64-bit version) or above OS X 10.6.8 or ... disk space • The graphic card must support at least 16.7 million display colors. • Minimum resolution 1024 x 768 IX. 20 XX While loading the calibration profile, the monitor may blink sometimes. VIII. After finished, the software will show the message.
Supported Colorimeters Manufacturer X-Rite Model i1 Pro, i1 Pro2, i1 Display Pro Load Calibration, System Requirements, and Supported Colorimeters System Requirements OS system Hardware PC Mac Windows® 7 (32-bit or 64-bit version) or above OS X 10.6.8 or ... disk space • The graphic card must support at least 16.7 million display colors. • Minimum resolution 1024 x 768 IX. 20 XX While loading the calibration profile, the monitor may blink sometimes. VIII. After finished, the software will show the message.