
GL2450 Series User Manual
Page 5
BenQ LCD Monitor Monitor Stand (for models without height adjustment stand) Monitor Base (for models without height adjustment stand) Monitor Base (for models with height adjustment stand) Quick Start Guide CD-ROM Power Cord (Picture may differ from product supplied for a replacement. Getting started When unpacking please check you have the following items. If any are missing or damaged, please contact the place of purchase for your region.) Getting started 5
BenQ LCD Monitor Monitor Stand (for models without height adjustment stand) Monitor Base (for models without height adjustment stand) Monitor Base (for models with height adjustment stand) Quick Start Guide CD-ROM Power Cord (Picture may differ from product supplied for a replacement. Getting started When unpacking please check you have the following items. If any are missing or damaged, please contact the place of purchase for your region.) Getting started 5
GL2450 Series User Manual
Page 6
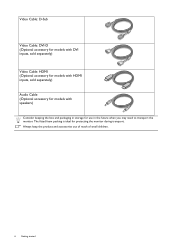
Video Cable: D-Sub Video Cable: DVI-D (Optional accessory for models with DVI inputs, sold separately) Video Cable: HDMI (Optional accessory for models with HDMI inputs, sold separately) Audio Cable (Optional accessory for models with speakers) Consider keeping the box and packaging in storage for protecting the monitor during transport. Always keep the product and accessories out of reach of small children. 6 Getting started The fitted foam packing is ideal for use in the future when you may need to transport the monitor.
Video Cable: D-Sub Video Cable: DVI-D (Optional accessory for models with DVI inputs, sold separately) Video Cable: HDMI (Optional accessory for models with HDMI inputs, sold separately) Audio Cable (Optional accessory for models with speakers) Consider keeping the box and packaging in storage for protecting the monitor during transport. Always keep the product and accessories out of reach of small children. 6 Getting started The fitted foam packing is ideal for use in the future when you may need to transport the monitor.
GL2450 Series User Manual
Page 7
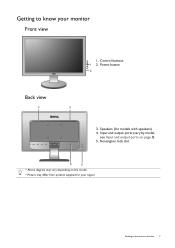
Input and output ports (vary by model, see Input and output ports on the model. • Picture may differ from product supplied for models with speakers) 4. Power button 2 Back view 3 3 3. Getting to know your monitor Front view 1. Kensington lock slot 4 5 • Above diagram may vary depending on page 8) 5. Control buttons 1 2. Getting to know your region. Speakers (for your monitor 7
Input and output ports (vary by model, see Input and output ports on the model. • Picture may differ from product supplied for models with speakers) 4. Power button 2 Back view 3 3 3. Getting to know your monitor Front view 1. Kensington lock slot 4 5 • Above diagram may vary depending on page 8) 5. Control buttons 1 2. Getting to know your region. Speakers (for your monitor 7
GL2450 Series User Manual
Page 8
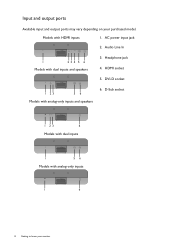
Input and output ports Available input and output ports may vary depending on your monitor Headphone jack 4. D-Sub socket 1 23 6 Models with dual inputs 1 56 Models with dual inputs and speakers 3. Models with analog-only inputs and speakers 6. DVI-D socket 1 23 56 Models with HDMI inputs 1. AC power input jack 2. HDMI socket 5. Audio Line In 1 23 4 5 6 Models with analog-only inputs 1 6 8 Getting to know your purchased model.
Input and output ports Available input and output ports may vary depending on your monitor Headphone jack 4. D-Sub socket 1 23 6 Models with dual inputs 1 56 Models with dual inputs and speakers 3. Models with analog-only inputs and speakers 6. DVI-D socket 1 23 56 Models with HDMI inputs 1. AC power input jack 2. HDMI socket 5. Audio Line In 1 23 4 5 6 Models with analog-only inputs 1 6 8 Getting to know your purchased model.
GL2450 Series User Manual
Page 9
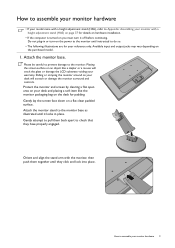
... power to the monitor until instructed to do so. • The following illustrations are for padding. Gently lay the screen face down on the purchased model. 1. Sliding or scraping the monitor around on the desk for your reference only. How to assemble your monitor hardware • If your... model came with a height adjustment stand (HAS), refer to Appendix: Assembling your monitor with the monitor, then push them back apart to check that they click ...
... power to the monitor until instructed to do so. • The following illustrations are for padding. Gently lay the screen face down on the purchased model. 1. Sliding or scraping the monitor around on the desk for your reference only. How to assemble your monitor hardware • If your... model came with a height adjustment stand (HAS), refer to Appendix: Assembling your monitor with the monitor, then push them back apart to check that they click ...
GL2450 Series User Manual
Page 11
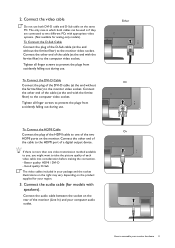
...(at the end without the ferrite filter) to the monitor video socket. Connect the audio cable between the socket on the product supplied for models with the ferrite filter) to the computer video socket. Good quality: D-Sub The video cables included in which both DVI-D cable and D-...consideration before making the connection. - Connect the other end of the cable (at the end with appropriate video systems. (Not available for analog-only models). Better quality: HDMI / DVI-D - If there is if they are connected to prevent the plugs from accidently falling out during use . To ...
...(at the end without the ferrite filter) to the monitor video socket. Connect the audio cable between the socket on the product supplied for models with the ferrite filter) to the computer video socket. Good quality: D-Sub The video cables included in which both DVI-D cable and D-...consideration before making the connection. - Connect the other end of the cable (at the end with appropriate video systems. (Not available for analog-only models). Better quality: HDMI / DVI-D - If there is if they are connected to prevent the plugs from accidently falling out during use . To ...
GL2450 Series User Manual
Page 12
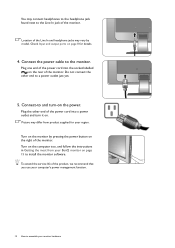
... end of the power cord into a power outlet and turn -on the power. Plug the other end to and turn it on the monitor by model. Check Input and output ports on page 15 to the Line In jack of the monitor. Picture may connect headphones to the headphone jack found... to the monitor. Connect the power cable to assemble your monitor hardware To extend the service life of the monitor. You may differ from your BenQ monitor on page 8 for your region. Do not connect the other end of the power cord into the socket labelled on the right of the...
... end of the power cord into a power outlet and turn -on the power. Plug the other end to and turn it on the monitor by model. Check Input and output ports on page 15 to the Line In jack of the monitor. Picture may connect headphones to the headphone jack found... to the monitor. Connect the power cable to assemble your monitor hardware To extend the service life of the monitor. You may differ from your BenQ monitor on page 8 for your region. Do not connect the other end of the power cord into the socket labelled on the right of the...
GL2450 Series User Manual
Page 15
... you are connecting the monitor and installing the software onto a new computer (without existing monitor driver software), or whether you to select a monitor model. Getting the most from your BenQ monitor To gain the most from installing software on your computer. • To check the name of the purchased... model, refer to the specification label on the BenQ LCD Monitor CD-ROM. At that point, click the Have Disk button, insert the BenQ LCD Monitor CD-...
... you are connecting the monitor and installing the software onto a new computer (without existing monitor driver software), or whether you to select a monitor model. Getting the most from your BenQ monitor To gain the most from installing software on your computer. • To check the name of the purchased... model, refer to the specification label on the BenQ LCD Monitor CD-ROM. At that point, click the Have Disk button, insert the BenQ LCD Monitor CD-...
GL2450 Series User Manual
Page 16
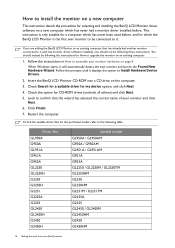
... prompts until it displays the option to it. Check Search for a suitable driver for the purchased model, refer to the following table. Click Finish. 7. Restart the computer. Insert the BenQ LCD Monitor CD-ROM into a CD drive on the computer. 3. Look to confirm that has...G2255A G2255 GL2450 GL2450H G2450 G2450H Suitable models GL950A / GL950AM G950A / G950AM GL951A / GL951AM G951A G955A GL2250 / GL2250M / GL2250TM GL2250HM G2250 G2250HM G2251M / G2251TM G2255A G2255 GL2450 / GL2450M GL2450HM G2450 G2450HM 16 Getting the most from your BenQ monitor This instruction is the first ...
... prompts until it displays the option to it. Check Search for a suitable driver for the purchased model, refer to the following table. Click Finish. 7. Restart the computer. Insert the BenQ LCD Monitor CD-ROM into a CD drive on the computer. 3. Look to confirm that has...G2255A G2255 GL2450 GL2450H G2450 G2450H Suitable models GL950A / GL950AM G950A / G950AM GL951A / GL951AM G951A G955A GL2250 / GL2250M / GL2250TM GL2250HM G2250 G2250HM G2251M / G2251TM G2255A G2255 GL2450 / GL2450M GL2450HM G2450 G2450HM 16 Getting the most from your BenQ monitor This instruction is the first ...

GL2450 Series User Manual
Page 17
Driver files GL2750H G2750 G2750H GL2750HM G2750 G2750HM Suitable models Getting the most from your BenQ monitor 17
Driver files GL2750H G2750 G2750H GL2750HM G2750 G2750HM Suitable models Getting the most from your BenQ monitor 17
GL2450 Series User Manual
Page 18
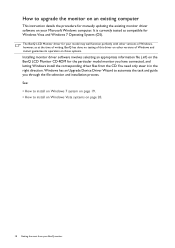
...software involves selecting an appropriate information file (.inf) on the BenQ LCD Monitor CD-ROM for the particular model monitor you through the file selection and installation process. The BenQ LCD Monitor driver for your BenQ monitor Windows has an Upgrade Device Driver Wizard to automate the ...task and guide you have connected, and letting Windows install the corresponding driver files from your model may well function perfectly with ...
...software involves selecting an appropriate information file (.inf) on the BenQ LCD Monitor CD-ROM for the particular model monitor you through the file selection and installation process. The BenQ LCD Monitor driver for your BenQ monitor Windows has an Upgrade Device Driver Wizard to automate the ...task and guide you have connected, and letting Windows install the corresponding driver files from your model may well function perfectly with ...
GL2450 Series User Manual
Page 22
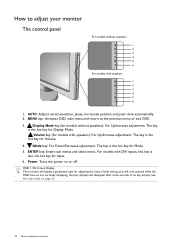
...the power on page 23. 22 How to adjust your monitor The control panel For models without speakers): For Up/Increase adjustment. The key is also the hot key for models without speakers 1 2 3 4 5 6 For models with speakers): For Up/Increase adjustment. MENU key: Activates OSD main menu and ...return to the previous menu or exit OSD. 3. /Display Mode key (for Input. 6. ENTER key: Enters sub menus and select items. For models with DVI inputs,...
...the power on page 23. 22 How to adjust your monitor The control panel For models without speakers): For Up/Increase adjustment. The key is also the hot key for models without speakers 1 2 3 4 5 6 For models with speakers): For Up/Increase adjustment. MENU key: Activates OSD main menu and ...return to the previous menu or exit OSD. 3. /Display Mode key (for Input. 6. ENTER key: Enters sub menus and select items. For models with DVI inputs,...

GL2450 Series User Manual
Page 23
... hot key (not available for 3 more seconds. See also Display Mode on page 33. To release Mute, press the Volume hot key for analog-only models) Press the ENTER key to display the Volume indicators. How to your monitor 23 Display Mode hot key (for... models with speakers) Press the key to toggle between Full and Aspect. Volume hot key (for models without speakers) Press the key continually to switch between different PC video signal inputs that may be connected...
... hot key (not available for 3 more seconds. See also Display Mode on page 33. To release Mute, press the Volume hot key for analog-only models) Press the ENTER key to display the Volume indicators. How to your monitor 23 Display Mode hot key (for... models with speakers) Press the key to toggle between Full and Aspect. Volume hot key (for models without speakers) Press the key continually to switch between different PC video signal inputs that may be connected...
GL2450 Series User Manual
Page 24
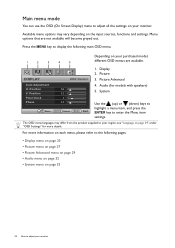
System Use the (up) or (down) keys to highlight a menu item, and press the ENTER key to adjust your purchased model, different OSD menus are not available will become grayed out. Picture 3. Audio (for more details. DISPLAY Auto Adjustment H. Press the MENU key to display the ... page 27 • Picture Advanced menu on page 29 • Audio menu on page 32 • System menu on page 34" under "OSD Settings" for models with speakers) 5. Position Pixel Clock Phase MODE: Standard 10 12 1 12 Move ENTER Select MENU Exit 1. For more information on each menu, please refer to...
System Use the (up) or (down) keys to highlight a menu item, and press the ENTER key to adjust your purchased model, different OSD menus are not available will become grayed out. Picture 3. Audio (for more details. DISPLAY Auto Adjustment H. Press the MENU key to display the ... page 27 • Picture Advanced menu on page 29 • Audio menu on page 32 • System menu on page 34" under "OSD Settings" for models with speakers) 5. Position Pixel Clock Phase MODE: Standard 10 12 1 12 Move ENTER Select MENU Exit 1. For more information on each menu, please refer to...
GL2450 Series User Manual
Page 28
.... keys to 0 to 100 Hue Adjusts the degree of the colors will reduce their respective influence on a yellowish tint. AMA (for Improves the gray level models with natural coloring. Press the or keys to change the settings. • YES • NO Press MENU to change the settings. Decreasing one or more...
.... keys to 0 to 100 Hue Adjusts the degree of the colors will reduce their respective influence on a yellowish tint. AMA (for Improves the gray level models with natural coloring. Press the or keys to change the settings. • YES • NO Press MENU to change the settings. Decreasing one or more...

GL2450 Series User Manual
Page 30
... keys to be displayed without geometric distortion filling as much of the display as possible. Ideal for 16:9 or 16:10 (depending on the purchased model) to change the settings. • ON • OFF The function is displayed without geometric distortion. • Overscan - Press the or keys to ...under the specified mode. Scales the input image to adjust your image. The input image is to automatically detect the distribution of the purchased model, please check the Specification document on the provided CD. 30 How to fill the screen. To find out the monitor aspect ratio of ...
... keys to be displayed without geometric distortion filling as much of the display as possible. Ideal for 16:9 or 16:10 (depending on the purchased model) to change the settings. • ON • OFF The function is displayed without geometric distortion. • Overscan - Press the or keys to ...under the specified mode. Scales the input image to adjust your image. The input image is to automatically detect the distribution of the purchased model, please check the Specification document on the provided CD. 30 How to fill the screen. To find out the monitor aspect ratio of ...
GL2450 Series User Manual
Page 31
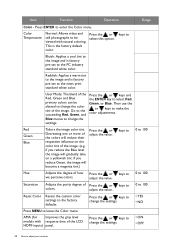
...) from PC: The default Color Format is RGB. • D-Sub (Component) from a video device: The default Color Format is YUV. HDMI RGB PC Range (for models with HDMI inputs): Color Format is automatically set depending on the monitor screen do not display properly. • DVI (for...; RGB (16 ~ 235) How to select this option. In other words, Color Format is not selectable. Press the ENTER key to RGB. • HDMI (for models with DVI inputs): Color Format is automatically set the Color Format if colors shown on the input video source. Item Function Operation Range Color Format...
...) from PC: The default Color Format is RGB. • D-Sub (Component) from a video device: The default Color Format is YUV. HDMI RGB PC Range (for models with HDMI inputs): Color Format is automatically set depending on the monitor screen do not display properly. • DVI (for...; RGB (16 ~ 235) How to select this option. In other words, Color Format is not selectable. Press the ENTER key to RGB. • HDMI (for models with DVI inputs): Color Format is automatically set the Color Format if colors shown on the input video source. Item Function Operation Range Color Format...

GL2450 Series User Manual
Page 32
... selections. 5. Press the or keys to display the main menu. 2. Item Volume Function Adjusts the audio volume Mute Mutes the audio input Audio Select (for models with HDMI inputs) Allow users to select the audio source or let the monitor detect it automatically Operation Range Press the key to increase the...
... selections. 5. Press the or keys to display the main menu. 2. Item Volume Function Adjusts the audio volume Mute Mutes the audio input Audio Select (for models with HDMI inputs) Allow users to select the audio source or let the monitor detect it automatically Operation Range Press the key to increase the...

GL2450 Series User Manual
Page 33
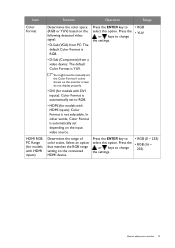
Item Function Operation Range Input Use this to change the settings. • DVI • D-sub (VGA) • HDMI (for models with HDMI inputs) OSD Settings - System menu Available menu options may vary depending on the input sources, functions and settings. Press the MENU key to ...enter the menu. 3. Press the or keys to select SYSTEM and then press the ENTER key to display the main menu. 2. Analog-only models do not have the Input function. Press the or keys to change the input to that appropriate to the previous menu, press the MENU button...
Item Function Operation Range Input Use this to change the settings. • DVI • D-sub (VGA) • HDMI (for models with HDMI inputs) OSD Settings - System menu Available menu options may vary depending on the input sources, functions and settings. Press the MENU key to ...enter the menu. 3. Press the or keys to select SYSTEM and then press the ENTER key to display the main menu. 2. Analog-only models do not have the Input function. Press the or keys to change the input to that appropriate to the previous menu, press the MENU button...
GL2450 Series User Manual
Page 35
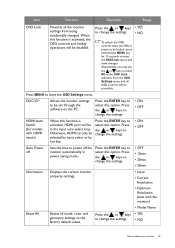
Otherwise, HDMI can only be locked, press and hold the MENU key for models with the monitor) • Model Name Resets all OSD controls will be set through the software on the PC. Press the or keys • YES to change the settings. • ...
Otherwise, HDMI can only be locked, press and hold the MENU key for models with the monitor) • Model Name Resets all OSD controls will be set through the software on the PC. Press the or keys • YES to change the settings. • ...