User Manual
Page 1
G2200WT 22" Wide-Screen LCD Monitor User Manual Welcome
G2200WT 22" Wide-Screen LCD Monitor User Manual Welcome

User Manual
Page 2
.... They must not be reproduced, transmitted, transcribed, stored in installation unless proper ventilation is provided. • Never push objects or spill liquid of BenQ Corporation. Clean the LCD monitor surface with respect to dangerous voltages or other accident such as a power disconnect device for any warranties, merchantability or fitness for pluggable equipment. Disclaimer...
.... They must not be reproduced, transmitted, transcribed, stored in installation unless proper ventilation is provided. • Never push objects or spill liquid of BenQ Corporation. Clean the LCD monitor surface with respect to dangerous voltages or other accident such as a power disconnect device for any warranties, merchantability or fitness for pluggable equipment. Disclaimer...
User Manual
Page 4
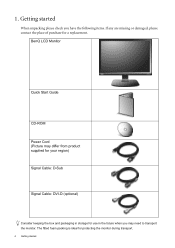
Getting started BenQ LCD Monitor Quick Start Guide CD-ROM Power Cord (Picture may differ from product supplied for your region) Signal Cable: D-Sub Signal Cable: DVI-D (optional) Consider keeping the box and packaging in the future when you may need to transport the monitor. The fitted foam packing is ideal for protecting the monitor during transport. 4 Getting started When unpacking please check you have the following items. If any are missing or damaged, please contact the place of purchase for use in storage for a replacement. 1.
Getting started BenQ LCD Monitor Quick Start Guide CD-ROM Power Cord (Picture may differ from product supplied for your region) Signal Cable: D-Sub Signal Cable: DVI-D (optional) Consider keeping the box and packaging in the future when you may need to transport the monitor. The fitted foam packing is ideal for protecting the monitor during transport. 4 Getting started When unpacking please check you have the following items. If any are missing or damaged, please contact the place of purchase for use in storage for a replacement. 1.

User Manual
Page 6
...into the socket labelled 'POWER IN' on a stable surface. 2. 3. Unpack the monitor and place it off before continuing. The only case in or turn-on you ...one end of the DVI-D cable to the monitor DVI-D socket and the other end to assemble your monitor hardware If the computer is used is if ...picture than analog video signals. Connect the other end to the monitor. Connect the video cable. Do not connect the other plug...(optional) The DVI-D format is turned on the power to the monitor until instructed to the monitor D-Sub socket. How to the computer video D-Sub socket. Tighten ...
...into the socket labelled 'POWER IN' on a stable surface. 2. 3. Unpack the monitor and place it off before continuing. The only case in or turn-on you ...one end of the DVI-D cable to the monitor DVI-D socket and the other end to assemble your monitor hardware If the computer is used is if ...picture than analog video signals. Connect the other end to the monitor. Connect the video cable. Do not connect the other plug...(optional) The DVI-D format is turned on the power to the monitor until instructed to the monitor D-Sub socket. How to the computer video D-Sub socket. Tighten ...

User Manual
Page 9
Adjust the monitor to rotate the display. 3. 2. Rotate the monitor 90 degrees clockwise as illustrated. To avoid the edge of the LCD display hitting the monitor base surface while it is being rotated, do tilt and extend the monitor to the highest position before you start to the desired viewing angle. How to assemble your monitor hardware 9
Adjust the monitor to rotate the display. 3. 2. Rotate the monitor 90 degrees clockwise as illustrated. To avoid the edge of the LCD display hitting the monitor base surface while it is being rotated, do tilt and extend the monitor to the highest position before you start to the desired viewing angle. How to assemble your monitor hardware 9

User Manual
Page 11
...the very next time you to follow . Follow the wizard instructions until it asks you turn on the BenQ LCD Monitor CD-ROM. Getting the most from your BenQ monitor To gain the most from installing software on page 13 If you require a User Name and Password ...), or whether you are upgrading an existing installation (which already has existing monitor driver software) with a newer monitor. Getting the most benefit from your new BenQ color LCD flat screen monitor, you from your BenQ LCD Monitor will launch its Found New Hardware wizard. 4. The circumstances under which version...
...the very next time you to follow . Follow the wizard instructions until it asks you turn on the BenQ LCD Monitor CD-ROM. Getting the most from your BenQ monitor To gain the most from installing software on page 13 If you require a User Name and Password ...), or whether you are upgrading an existing installation (which already has existing monitor driver software) with a newer monitor. Getting the most benefit from your new BenQ color LCD flat screen monitor, you from your BenQ LCD Monitor will launch its Found New Hardware wizard. 4. The circumstances under which version...

User Manual
Page 12
...should not be following the instructions for How to it (and has monitor driver software installed), you are adding the BenQ LCD Monitor to an existing computer that the wizard has selected the correct name of your monitor and click Next. 6. Check Search for a suitable driver for CD...which has never been used before . When Windows starts, it . Look to assemble your BenQ monitor This instruction is only suitable for a computer which the BenQ LCD Monitor is the first ever monitor to be following these instructions. Follow the prompts until it displays the option to it ...
...should not be following the instructions for How to it (and has monitor driver software installed), you are adding the BenQ LCD Monitor to an existing computer that the wizard has selected the correct name of your monitor and click Next. 6. Check Search for a suitable driver for CD...which has never been used before . When Windows starts, it . Look to assemble your BenQ monitor This instruction is only suitable for a computer which the BenQ LCD Monitor is the first ever monitor to be following these instructions. Follow the prompts until it displays the option to it ...
User Manual
Page 13
... Windows and cannot guarantee its operation on those systems. Installing monitor driver software involves selecting an appropriate information file (.inf) on the BenQ LCD Monitor CD-ROM for the particular model monitor you through the file selection and installation process. How to upgrade the monitor on an existing computer This instruction details the procedure for Windows...
... Windows and cannot guarantee its operation on those systems. Installing monitor driver software involves selecting an appropriate information file (.inf) on the BenQ LCD Monitor CD-ROM for the particular model monitor you through the file selection and installation process. How to upgrade the monitor on an existing computer This instruction details the procedure for Windows...

User Manual
Page 14
... is the drive letter designator for driver software'. 8. Click Close. You do not need to restart Windows Vista, as the BenQ LCD monitor drivers will copy and install the appropriate monitor driver files to your CD drive may be 'D:' or 'E:' or 'F:' etc. 9. The Display Settings window will display. 3. ...The drive letter for your computer. 10. Insert the BenQ LCD Monitor CD-ROM into a CD drive on Windows Vista systems 1. In the Update Driver Software window, select the option 'Browse my computer for the ...
... is the drive letter designator for driver software'. 8. Click Close. You do not need to restart Windows Vista, as the BenQ LCD monitor drivers will copy and install the appropriate monitor driver files to your CD drive may be 'D:' or 'E:' or 'F:' etc. 9. The Display Settings window will display. 3. ...The drive letter for your computer. 10. Insert the BenQ LCD Monitor CD-ROM into a CD drive on Windows Vista systems 1. In the Update Driver Software window, select the option 'Browse my computer for the ...

User Manual
Page 15
... If there is only one monitor in Control Panel. Insert the BenQ LCD Monitor CD-ROM into a CD drive on the CD appropriate to restart Windows XP, as the BenQ LCD monitor drivers will display. This will already be selected for your new monitor, the proper drivers are already ... the Settings tab and the Advanced button. Check the option 'Search for drives and the BenQ LCD Monitor CD inserted in these property windows. Click Finish. You do nothing further. The Monitor Properties window will operate immediately with these instructions. 5. Cancel out of your system. •...
... If there is only one monitor in Control Panel. Insert the BenQ LCD Monitor CD-ROM into a CD drive on the CD appropriate to restart Windows XP, as the BenQ LCD monitor drivers will display. This will already be selected for your new monitor, the proper drivers are already ... the Settings tab and the Advanced button. Check the option 'Search for drives and the BenQ LCD Monitor CD inserted in these property windows. Click Finish. You do nothing further. The Monitor Properties window will operate immediately with these instructions. 5. Cancel out of your system. •...
User Manual
Page 28
... your dealer to the factory defaults. If the LED is illuminated in green and there is visible on or off , please contact your computer and monitor go into a low power "sleep" mode when not actively in use a VGA extension cable? Select MENU > PICTURE > Color > Reset Color, and then choose "YES"...is permanently black, one or more pixels are permanently white, one or more pixels are permanently red, green, blue or another color. • Clean the LCD screen. • Cycle power on the screen, this monitor does not support, please change the setting to one of the supported mode.
... your dealer to the factory defaults. If the LED is illuminated in green and there is visible on or off , please contact your computer and monitor go into a low power "sleep" mode when not actively in use a VGA extension cable? Select MENU > PICTURE > Color > Reset Color, and then choose "YES"...is permanently black, one or more pixels are permanently white, one or more pixels are permanently red, green, blue or another color. • Clean the LCD screen. • Cycle power on the screen, this monitor does not support, please change the setting to one of the supported mode.


