User Manual
Page 3
... monitor 6 Front View ...6 Back View ...6 How to install your monitor hardware 7 How to detach the stand base 10 Using the Monitor Wall Mounting Kit 11 Getting the most from your BenQ monitor 13 How to install the monitor on a new computer 14 How to upgrade the monitor on an existing computer 15 How...
... monitor 6 Front View ...6 Back View ...6 How to install your monitor hardware 7 How to detach the stand base 10 Using the Monitor Wall Mounting Kit 11 Getting the most from your BenQ monitor 13 How to install the monitor on a new computer 14 How to upgrade the monitor on an existing computer 15 How...
User Manual
Page 11
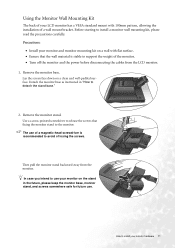
.... Remove the monitor stand. Lay the screen face down on a wall with 100mm pattern, allowing the installation of a wall mount bracket. How to install your monitor on the stand in "How to install a monitor wall mounting kit, please read the precautions carefully. Detach the monitor base as ...cross-pointed screwdriver to release the screws that the wall material is recommended to avoid of losing the screws. In case you intend to use . Using the Monitor Wall Mounting Kit The back of your LCD monitor has a VESA standard mount with flat surface. • Ensure that fixing ...
.... Remove the monitor stand. Lay the screen face down on a wall with 100mm pattern, allowing the installation of a wall mount bracket. How to install your monitor on the stand in "How to install a monitor wall mounting kit, please read the precautions carefully. Detach the monitor base as ...cross-pointed screwdriver to release the screws that the wall material is recommended to avoid of losing the screws. In case you intend to use . Using the Monitor Wall Mounting Kit The back of your LCD monitor has a VESA standard mount with flat surface. • Ensure that fixing ...
User Manual
Page 12
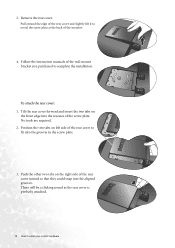
... could snap into the grooves in the screw plate. 3. Tilt the rear cover forward and insert the two tabs on the right side of the wall mount bracket you purchased to install your monitor hardware There will be a clicking sound as the rear cover is perfectly attached. 12 How to complete the...
... could snap into the grooves in the screw plate. 3. Tilt the rear cover forward and insert the two tabs on the right side of the wall mount bracket you purchased to install your monitor hardware There will be a clicking sound as the rear cover is perfectly attached. 12 How to complete the...