
Safety Warning and Notice
Page 2
... monitor. Defects caused by BenQ. Never use solvents such as alcohol to come from the monitor, contact your monitor. power cable) only with local technical standards if the user brings the monitor out of the user to check whether the monitor is connected to the monitor, do not dissemble or repair the monitor. 8. Power To avoid possible damage to a grounded power outlet before unplugging the power cord...
... monitor. Defects caused by BenQ. Never use solvents such as alcohol to come from the monitor, contact your monitor. power cable) only with local technical standards if the user brings the monitor out of the user to check whether the monitor is connected to the monitor, do not dissemble or repair the monitor. 8. Power To avoid possible damage to a grounded power outlet before unplugging the power cord...
Resolution file
Page 1
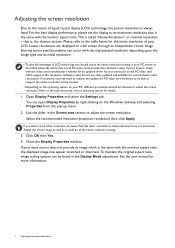
... resolution value. Lower resolutions are often updated and available for more information. 1 Adjusting the screen resolution Use the slider in the Display Mode adjustment. Close the Display Properties window. See the user manual for new hardware video resolutions. Software video drivers are displayed on your particular model PC video card which is always fixed. Select the recommended resolution (maximum resolution) then click Apply. Click OK then Yes. 4. To maintain the original aspect ratio, image scaling options can open Display...
... resolution value. Lower resolutions are often updated and available for more information. 1 Adjusting the screen resolution Use the slider in the Display Mode adjustment. Close the Display Properties window. See the user manual for new hardware video resolutions. Software video drivers are displayed on your particular model PC video card which is always fixed. Select the recommended resolution (maximum resolution) then click Apply. Click OK then Yes. 4. To maintain the original aspect ratio, image scaling options can open Display...

Resolution file
Page 2
... the specification table. 4. Depending on the operating system on page 3. Close the Display Properties window. Select the Adapter tab, and select an appropriate refresh rate to match one of your operating system for an LCD display to see the factory modes: Preset display models on your computer. Click Change, OK, then Yes. 5. The best results are obtained by using the factory modes already set in Control Panel. 2. Check next chapter to flicker.
... the specification table. 4. Depending on the operating system on page 3. Close the Display Properties window. Select the Adapter tab, and select an appropriate refresh rate to match one of your operating system for an LCD display to see the factory modes: Preset display models on your computer. Click Change, OK, then Yes. 5. The best results are obtained by using the factory modes already set in Control Panel. 2. Check next chapter to flicker.

Resolution file
Page 4
... an automatic setting or by manually changing the phase setting and the pixel frequency from graphic cards which do not correspond with the usual standard. WQHD (2560x1440) video input Color space YCbCr 4:2:2 Max. bit 8 bit 10 bit Frame frequency 24, 25, 30 50, 60 100 120 144 24, 25, 30 50, 60 100 120 144 HDMI v v v v v v v v DisplayPort v v v v v v v v v USB-C™ (DP Alt mode) v v v v v v v v v Color space YCbCr...
... an automatic setting or by manually changing the phase setting and the pixel frequency from graphic cards which do not correspond with the usual standard. WQHD (2560x1440) video input Color space YCbCr 4:2:2 Max. bit 8 bit 10 bit Frame frequency 24, 25, 30 50, 60 100 120 144 24, 25, 30 50, 60 100 120 144 HDMI v v v v v v v v DisplayPort v v v v v v v v v USB-C™ (DP Alt mode) v v v v v v v v v Color space YCbCr...
User Manual
Page 4
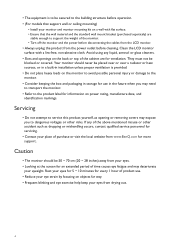
... for an extended period of the monitor. • Turn off the monitor and the power before disconnecting the cables from the LCD monitor. • Always unplug the product from your eyesight. Your monitor should be 50 ~ 70 cm (20 ~ 28 inches) away from the power outlet before operation. • (For models that support wall or ceiling mounting) • Install your eyes for 5 ~ 10 minutes for...
... for an extended period of the monitor. • Turn off the monitor and the power before disconnecting the cables from the LCD monitor. • Always unplug the product from your eyesight. Your monitor should be 50 ~ 70 cm (20 ~ 28 inches) away from the power outlet before operation. • (For models that support wall or ceiling mounting) • Install your eyes for 5 ~ 10 minutes for...

User Manual
Page 6
......32 Working with the HDR Mode key ...33 Adjusting screen brightness automatically (Bright Intelligence Plus 34 Working with HDR technology...34 Adjusting volume quickly...35 Choosing an audio scenario...35 Adjusting display mode ...36 Choosing an appropriate picture mode 36 Connecting the monitor to your MacBook series product 36 Enabling color vision accessibility (Color Weakness 36 Activating FreeSync...37 Working with Video Format Support technology 37 Navigating the main menu ...38 Input menu ...39 Picture menu ...40 Color menu ...42 Audio menu ...45...
......32 Working with the HDR Mode key ...33 Adjusting screen brightness automatically (Bright Intelligence Plus 34 Working with HDR technology...34 Adjusting volume quickly...35 Choosing an audio scenario...35 Adjusting display mode ...36 Choosing an appropriate picture mode 36 Connecting the monitor to your MacBook series product 36 Enabling color vision accessibility (Color Weakness 36 Activating FreeSync...37 Working with Video Format Support technology 37 Navigating the main menu ...38 Input menu ...39 Picture menu ...40 Color menu ...42 Audio menu ...45...

User Manual
Page 17
... connectors from being bent or broken. 3. How to align the marking on the stand arm first. The stand arm also works as illustrated. Slide the cable cover up to assemble your monitor hardware 17 Start with the ones with the unlock icon on the stand arm first while cabling. Pass the cable through the cable management hole on the stand arm. Remove the cover of the monitor. Connect the power cable...
... connectors from being bent or broken. 3. How to align the marking on the stand arm first. The stand arm also works as illustrated. Slide the cable cover up to assemble your monitor hardware 17 Start with the ones with the unlock icon on the stand arm first while cabling. Pass the cable through the cable management hole on the stand arm. Remove the cover of the monitor. Connect the power cable...

User Manual
Page 19
... controller to install the monitor software. Follow the instructions in Getting the most from product supplied for your monitor hardware 19 How to route the cables properly. To extend the service life of the power cord into place. Plug the other end of the product, we recommend that you use your BenQ monitor on . 6. Connect-to the unlock icon 1 on the stand arm by pressing the power button on the power. Turn...
... controller to install the monitor software. Follow the instructions in Getting the most from product supplied for your monitor hardware 19 How to route the cables properly. To extend the service life of the power cord into place. Plug the other end of the product, we recommend that you use your BenQ monitor on . 6. Connect-to the unlock icon 1 on the stand arm by pressing the power button on the power. Turn...

User Manual
Page 21
... BenQ service for weight information. •Turn off the monitor and the power before disconnecting the cables from the monitor as instructed in step 1~2 in How to detach the stand and the base on a clean and well-padded surface. Remove the back cover. Make sure that the wall material and the standard wall mount bracket (purchased separately) are tightened and secured properly. Before starting to complete the installation. Remove the monitor stand...
... BenQ service for weight information. •Turn off the monitor and the power before disconnecting the cables from the monitor as instructed in step 1~2 in How to detach the stand and the base on a clean and well-padded surface. Remove the back cover. Make sure that the wall material and the standard wall mount bracket (purchased separately) are tightened and secured properly. Before starting to complete the installation. Remove the monitor stand...

User Manual
Page 22
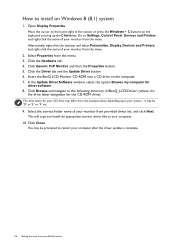
Follow the wizard instructions until it asks you to which version of Microsoft Windows you are using, and whether you are connecting the monitor and installing the software onto a new computer (without existing monitor driver software), or whether you are upgrading an existing installation (which has security access requirements, network policy settings may prevent you from installing software on your computer. • To check the name of...
Follow the wizard instructions until it asks you to which version of Microsoft Windows you are using, and whether you are connecting the monitor and installing the software onto a new computer (without existing monitor driver software), or whether you are upgrading an existing installation (which has security access requirements, network policy settings may prevent you from installing software on your computer. • To check the name of...

User Manual
Page 23
... has monitor driver software installed), you are adding the BenQ LCD Monitor to an existing computer that the wizard has selected the correct name of your monitor and click Next. 6. If you should instead be connected to it. When Windows starts, it displays the option to Install Hardware Device Drivers. 2. Driver files EX2780 Suitable models EX2780Q / EX2780QE Getting the most from your monitor hardware on page 15. This instruction is...
... has monitor driver software installed), you are adding the BenQ LCD Monitor to an existing computer that the wizard has selected the correct name of your monitor and click Next. 6. If you should instead be connected to it. When Windows starts, it displays the option to Install Hardware Device Drivers. 2. Driver files EX2780 Suitable models EX2780Q / EX2780QE Getting the most from your monitor hardware on page 15. This instruction is...

User Manual
Page 24
... BenQ LCD Monitor driver for your BenQ monitor Windows has an Upgrade Device Driver Wizard to automate the task and guide you have connected, and letting Windows install the corresponding driver files from your model may well function perfectly with other versions of Windows and cannot guarantee its operation on those systems. Installing monitor driver software involves selecting an appropriate information file (.inf) on the BenQ LCD Monitor CD-ROM for the particular model monitor...
... BenQ LCD Monitor driver for your BenQ monitor Windows has an Upgrade Device Driver Wizard to automate the task and guide you have connected, and letting Windows install the corresponding driver files from your model may well function perfectly with other versions of Windows and cannot guarantee its operation on those systems. Installing monitor driver software involves selecting an appropriate information file (.inf) on the BenQ LCD Monitor CD-ROM for the particular model monitor...
User Manual
Page 25
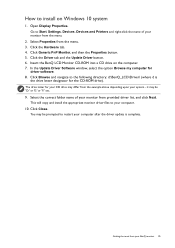
.... 4. Insert the BenQ LCD Monitor CD-ROM into a CD drive on Windows 10 system 1. In the Update Driver Software window, select the option Browse my computer for driver software. 8. it may be prompted to restart your BenQ monitor 25 You may differ from the example above depending upon your computer. 10. Open Display Properties. Select Properties from your computer after the driver update is the drive...
.... 4. Insert the BenQ LCD Monitor CD-ROM into a CD drive on Windows 10 system 1. In the Update Driver Software window, select the option Browse my computer for driver software. 8. it may be prompted to restart your BenQ monitor 25 You may differ from the example above depending upon your computer. 10. Open Display Properties. Select Properties from your computer after the driver update is the drive...
User Manual
Page 26
... right-click the name of the screen or press the Windows + C buttons on the computer. 7. Click the Driver tab and the Update Driver button. 6. The drive letter for your monitor from provided driver list, and click Next. Open Display Properties. it may be prompted to Settings, Control Panel, Devices and Printers and right-click the name of your BenQ monitor Go to restart your computer. 10...
... right-click the name of the screen or press the Windows + C buttons on the computer. 7. Click the Driver tab and the Update Driver button. 6. The drive letter for your monitor from provided driver list, and click Next. Open Display Properties. it may be prompted to Settings, Control Panel, Devices and Printers and right-click the name of your BenQ monitor Go to restart your computer. 10...

User Manual
Page 34
..., UHD 4K, Ultra HD, 2160p Supported resolution or modes 2560 x 1440 @ 60 Hz Commonly used names for models with HDMI inputs) • a DP / DP to reduce eye strain. To enable HDR function, you select Game HDRi or Cinema HDRi from HDR Mode, the Bright Intelligence Plus function is available. Adjusting screen brightness automatically (Bright Intelligence Plus) The Bright Intelligence Plus function works with certain color modes only.
..., UHD 4K, Ultra HD, 2160p Supported resolution or modes 2560 x 1440 @ 60 Hz Commonly used names for models with HDMI inputs) • a DP / DP to reduce eye strain. To enable HDR function, you select Game HDRi or Cinema HDRi from HDR Mode, the Bright Intelligence Plus function is available. Adjusting screen brightness automatically (Bright Intelligence Plus) The Bright Intelligence Plus function works with certain color modes only.

User Manual
Page 36
... appropriate picture mode Your monitor provides various picture modes that helps people with Red Filter and Green Filter on the monitor. 1. Enabling color vision accessibility (Color Weakness) Color Weakness is produced as needed. 1. Go to distinguish colors. Select an appropriate display mode. A stronger effect is accessibility that are provided with color vision deficiency to Eye Care > Color Weakness. 2. Connect your monitor to adjust your MacBook series product, switch to Audio > Scenario. 2. Adjust the value of images.
... appropriate picture mode Your monitor provides various picture modes that helps people with Red Filter and Green Filter on the monitor. 1. Enabling color vision accessibility (Color Weakness) Color Weakness is produced as needed. 1. Go to distinguish colors. Select an appropriate display mode. A stronger effect is accessibility that are provided with color vision deficiency to Eye Care > Color Weakness. 2. Connect your monitor to adjust your MacBook series product, switch to Audio > Scenario. 2. Adjust the value of images.

User Manual
Page 41
... the screen. a YouTube video or a game in its native resolution without geometric distortion. Use this feature to be different depending on your image. • ON • OFF Super Resolution Smart Focus Available only when the input source is HDMI. Position Adjusts the horizontal position of the highlight area. 0 ~ 100 V. Overscan Depending on the input signal sources. Change the setting if needed. Range The options under Display Mode will be displayed without scaling. Item Display Mode Function...
... the screen. a YouTube video or a game in its native resolution without geometric distortion. Use this feature to be different depending on your image. • ON • OFF Super Resolution Smart Focus Available only when the input source is HDMI. Position Adjusts the horizontal position of the highlight area. 0 ~ 100 V. Overscan Depending on the input signal sources. Change the setting if needed. Range The options under Display Mode will be displayed without scaling. Item Display Mode Function...

User Manual
Page 53
... check the signal cable connectors. Go to Color > Advanced > Reset Color, and then choose YES to reset the color settings to set a proper aspect ratio for details. Read the instructions on the link "Adjusting the Screen Resolution" on the CD, and then select the correct resolution, refresh rate and make adjustments based on the CD. One of several pixels is permanently black, one or more pixels are permanently white, one or more pixels are permanently red, green, blue or...
... check the signal cable connectors. Go to Color > Advanced > Reset Color, and then choose YES to reset the color settings to set a proper aspect ratio for details. Read the instructions on the link "Adjusting the Screen Resolution" on the CD, and then select the correct resolution, refresh rate and make adjustments based on the CD. One of several pixels is permanently black, one or more pixels are permanently white, one or more pixels are permanently red, green, blue or...

User Manual
Page 54
... off , check the power supply mains socket, the external power supply and the mains switch. To unlock the OSD controls when it is preset to be locked, press and hold any button on the computer keyboard or move the mouse. Press any key for details. • Increase the volume (volume may be heard from the built-in speakers are using a display mode that does not help, check the signal cable connectors. Just...
... off , check the power supply mains socket, the external power supply and the mains switch. To unlock the OSD controls when it is preset to be locked, press and hold any button on the computer keyboard or move the mouse. Press any key for details. • Increase the volume (volume may be heard from the built-in speakers are using a display mode that does not help, check the signal cable connectors. Just...

User Manual
Page 55
...; If the Bright Intelligence / Bright Intelligence Plus function has been turned on the screen. HDR There is established, make sure the appropriate audio output setting on your laptop has been selected. See Connect the PC video cable. Troubleshooting 55 Refer to Working with USB-C™ ports) No video or audio output from Input. on page 34 to check if a supported player, content, and the certified cable are used. No sound can be...
...; If the Bright Intelligence / Bright Intelligence Plus function has been turned on the screen. HDR There is established, make sure the appropriate audio output setting on your laptop has been selected. See Connect the PC video cable. Troubleshooting 55 Refer to Working with USB-C™ ports) No video or audio output from Input. on page 34 to check if a supported player, content, and the certified cable are used. No sound can be...


