
Safety Warning and Notice
Page 2
... by BenQ. Never use a power cord that the power cord is illegible. The model number or production number on the monitor. Use only the power cord provided by abuse or misuse of the monitor Before using the monitor with local technical standards if the user brings the monitor out of the user if problems (such as data loss and system failure) occurred due to non-factory provided software, parts...
... by BenQ. Never use a power cord that the power cord is illegible. The model number or production number on the monitor. Use only the power cord provided by abuse or misuse of the monitor Before using the monitor with local technical standards if the user brings the monitor out of the user if problems (such as data loss and system failure) occurred due to non-factory provided software, parts...
User Manual
Page 5
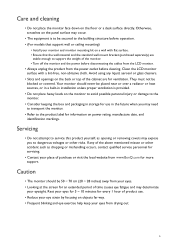
... more support. Avoid using any of the monitor. • Turn off the monitor and the power before operation. • (For models that the wall material and the standard wall mount bracket (purchased separately) are for ventilation. Caution • The monitor should never be placed near or over a radiator or heat sources, or in a built-in storage for information on the panel surface may need...
... more support. Avoid using any of the monitor. • Turn off the monitor and the power before operation. • (For models that the wall material and the standard wall mount bracket (purchased separately) are for ventilation. Caution • The monitor should never be placed near or over a radiator or heat sources, or in a built-in storage for information on the panel surface may need...
User Manual
Page 7
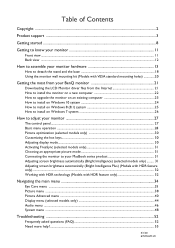
... support ...3 Getting started ...8 Getting to know your monitor 11 Front view ...11 Back view ...12 How to assemble your monitor hardware 13 How to detach the stand and the base 18 Using the monitor wall mounting kit (Models with VESA standard mounting holes 20 Getting the most from your BenQ monitor 21 Downloading the LCD Monitor driver files from the Internet 21 How to install the monitor on a new computer 22 How to upgrade the monitor...
... support ...3 Getting started ...8 Getting to know your monitor 11 Front view ...11 Back view ...12 How to assemble your monitor hardware 13 How to detach the stand and the base 18 Using the monitor wall mounting kit (Models with VESA standard mounting holes 20 Getting the most from your BenQ monitor 21 Downloading the LCD Monitor driver files from the Internet 21 How to install the monitor on a new computer 22 How to upgrade the monitor...
User Manual
Page 21
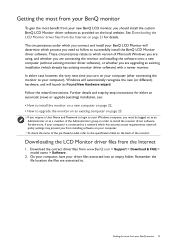
... back of the purchased model, refer to the specification label on as an Administrator or as provided on your computer (after connecting the monitor to . Downloading the LCD Monitor driver files from www.BenQ.com > Support > Download & FAQ > model name > Software. 2. Getting the most from your BenQ monitor To gain the most from your driver files extracted into an empty folder. See Downloading the LCD Monitor driver files from the...
... back of the purchased model, refer to the specification label on as an Administrator or as provided on your computer (after connecting the monitor to . Downloading the LCD Monitor driver files from www.BenQ.com > Support > Download & FAQ > model name > Software. 2. Getting the most from your BenQ monitor To gain the most from your driver files extracted into an empty folder. See Downloading the LCD Monitor driver files from the...
User Manual
Page 22
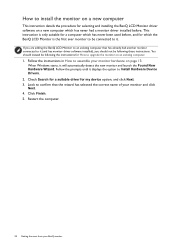
... these instructions. When Windows starts, it displays the option to assemble your BenQ monitor Check Search for a suitable driver for my device option, and click Next. 3. Look to it . You should not be connected to upgrade the monitor on an existing computer. 1. This instruction is the first ever monitor to be following the instructions for How to it (and has monitor driver software installed), you are adding the BenQ LCD Monitor to...
... these instructions. When Windows starts, it displays the option to assemble your BenQ monitor Check Search for a suitable driver for my device option, and click Next. 3. Look to it . You should not be connected to upgrade the monitor on an existing computer. 1. This instruction is the first ever monitor to be following the instructions for How to it (and has monitor driver software installed), you are adding the BenQ LCD Monitor to...

User Manual
Page 23
... This instruction details the procedure for Windows 10, Windows 8 (8.1), and Windows 7 Operating System (OS). Windows has an Upgrade Device Driver Wizard to install on Windows 7 system on your BenQ monitor 23 Getting the most from the downloaded driver files for the particular model monitor you through the file selection and installation process. The BenQ LCD Monitor driver for your model may well function perfectly with other versions of Windows, however, as compatible for manually updating...
... This instruction details the procedure for Windows 10, Windows 8 (8.1), and Windows 7 Operating System (OS). Windows has an Upgrade Device Driver Wizard to install on Windows 7 system on your BenQ monitor 23 Getting the most from the downloaded driver files for the particular model monitor you through the file selection and installation process. The BenQ LCD Monitor driver for your model may well function perfectly with other versions of Windows, however, as compatible for manually updating...

User Manual
Page 24
... instructed in Downloading the LCD Monitor driver files from the menu. 3. How to restart your computer after the driver update is complete. 24 Getting the most from your monitor from the menu. 2. Open Display Properties. Select Properties from the Internet on Windows 10 system 1. Click the Driver tab and the Update Driver button. 6. In the Update Driver Software window, select the option Browse my computer for driver software. 7. You may be prompted to install...
... instructed in Downloading the LCD Monitor driver files from the menu. 3. How to restart your computer after the driver update is complete. 24 Getting the most from your monitor from the menu. 2. Open Display Properties. Select Properties from the Internet on Windows 10 system 1. Click the Driver tab and the Update Driver button. 6. In the Update Driver Software window, select the option Browse my computer for driver software. 7. You may be prompted to install...

User Manual
Page 25
... the Charm bar. Click Browse and locate the driver files downloaded from the Internet as instructed in Downloading the LCD Monitor driver files from the menu. 2. How to restart your monitor from the menu. 3. Click the Hardware tab. 4. Click Generic PnP Monitor, and then the Properties button. 5. You may be prompted to install on Windows 8 (8.1) system 1. Click the Driver tab and the Update Driver button. 6. Click Close. Open Display Properties.
... the Charm bar. Click Browse and locate the driver files downloaded from the Internet as instructed in Downloading the LCD Monitor driver files from the menu. 2. How to restart your monitor from the menu. 3. Click the Hardware tab. 4. Click Generic PnP Monitor, and then the Properties button. 5. You may be prompted to install on Windows 8 (8.1) system 1. Click the Driver tab and the Update Driver button. 6. Click Close. Open Display Properties.

User Manual
Page 30
... always adjust the screen geometric settings manually using a digital (HDMI / DP / mini DP) cable to your monitor, the Auto Adjustment function will automatically display the best image. Select the custom key you can be disabled, because the monitor will be accessed by this key. Go to Display and Auto Adjustment to optimize the currently displayed image to Picture Advanced and Display Mode. 3. When you connect a digital input signal using geometry menu items. To assist you in this endeavour, BenQ has provided a screen test image...
... always adjust the screen geometric settings manually using a digital (HDMI / DP / mini DP) cable to your monitor, the Auto Adjustment function will automatically display the best image. Select the custom key you can be disabled, because the monitor will be accessed by this key. Go to Display and Auto Adjustment to optimize the currently displayed image to Picture Advanced and Display Mode. 3. When you connect a digital input signal using geometry menu items. To assist you in this endeavour, BenQ has provided a screen test image...
User Manual
Page 31
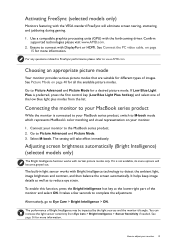
... or HDMI. See Connect the PC video cable. The setting will become grayed out. Alternatively, go to adjust your monitor. 1. How to Eye Care > Bright Intelligence > ON. Use a compatible graphics processing units (GPU) with certain picture modes only. on page 15 for more information. Go to detect the ambient light, image brightness and contrast, and then balance the screen automatically. The built-in light sensor works with the VESA standard...
... or HDMI. See Connect the PC video cable. The setting will become grayed out. Alternatively, go to adjust your monitor. 1. How to Eye Care > Bright Intelligence > ON. Use a compatible graphics processing units (GPU) with certain picture modes only. on page 15 for more information. Go to detect the ambient light, image brightness and contrast, and then balance the screen automatically. The built-in light sensor works with the VESA standard...
User Manual
Page 32
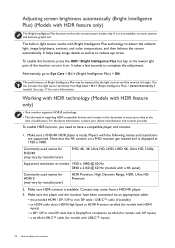
... 4K, Ultra HD, 2160p Supported resolution or modes 1920 x 1080 @ 60 Hz 3840 x 2160 @ 60 Hz (models with a 4K panel) Commonly used names for models with USB-C™ inputs) 32 How to Eye Care > B.I .+ (Bright Intelligence Plus) > Sensor Sensitivity if needed. Adjusting screen brightness automatically (Bright Intelligence Plus) (Models with HDR feature only) The Bright Intelligence Plus function works with the following names and resolutions are supported. It takes a few...
... 4K, Ultra HD, 2160p Supported resolution or modes 1920 x 1080 @ 60 Hz 3840 x 2160 @ 60 Hz (models with a 4K panel) Commonly used names for models with USB-C™ inputs) 32 How to Eye Care > B.I .+ (Bright Intelligence Plus) > Sensor Sensitivity if needed. Adjusting screen brightness automatically (Bright Intelligence Plus) (Models with HDR feature only) The Bright Intelligence Plus function works with the following names and resolutions are supported. It takes a few...
User Manual
Page 42
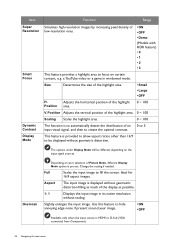
... input signal sources. Change the setting if needed. Slightly enlarges the input image. Item Super Resolution Smart Focus Dynamic Contrast Display Mode Function Range Simulates high-resolution images by increasing pixel density of low-resolution ones. • ON • OFF • Demo (Models with HDR feature) • 0 • 1 • 2 • 3 This feature provides a highlight area to focus on your image. • ON • OFF Available only when the input source is HDMI...
... input signal sources. Change the setting if needed. Slightly enlarges the input image. Item Super Resolution Smart Focus Dynamic Contrast Display Mode Function Range Simulates high-resolution images by increasing pixel density of low-resolution ones. • ON • OFF • Demo (Models with HDR feature) • 0 • 1 • 2 • 3 This feature provides a highlight area to focus on your image. • ON • OFF Available only when the input source is HDMI...
User Manual
Page 44
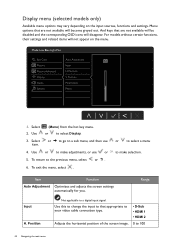
.... Mode: Low Blue Light Plus Eye Care Auto Adjustment 50 Picture Input Picture Advanced H. Item Auto Adjustment Function Optimizes and adjusts the screen settings automatically for you. Position Not applicable to the previous menu, select or . 6. To return to a digital input signal. Use or to make adjustments, or use item. 4. Use this to change the input to your video cable connection type. Position Display V. Select (Menu) from the hot key menu. 2. Range Input H. And keys that appropriate to that are not available will disappear. Position Audio Pixel...
.... Mode: Low Blue Light Plus Eye Care Auto Adjustment 50 Picture Input Picture Advanced H. Item Auto Adjustment Function Optimizes and adjusts the screen settings automatically for you. Position Not applicable to the previous menu, select or . 6. To return to a digital input signal. Use or to make adjustments, or use item. 4. Use this to change the input to your video cable connection type. Position Display V. Select (Menu) from the hot key menu. 2. Range Input H. And keys that appropriate to that are not available will disappear. Position Audio Pixel...

User Manual
Page 50
... accidentally changed. To unlock the OSD controls, press and hold any key for Display Data Channel/Command Interface, which was developed by custom key 2. 2 • Input • Picture Mode • HDR (EW277HDR only) • Super Resolution • Smart Focus • Brightness • Contrast • Color Temperature • Display Mode • Volume • Mute DDC/CI Allows the monitor settings to be disabled. Input Auto Sets to be sent via the software for remote...
... accidentally changed. To unlock the OSD controls, press and hold any key for Display Data Channel/Command Interface, which was developed by custom key 2. 2 • Input • Picture Mode • HDR (EW277HDR only) • Super Resolution • Smart Focus • Brightness • Contrast • Color Temperature • Display Mode • Volume • Mute DDC/CI Allows the monitor settings to be disabled. Input Auto Sets to be sent via the software for remote...
User Manual
Page 51
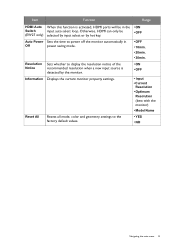
... the recommended resolution when a new input source is activated, HDMI ports will be (EW27 only) selected by input select or by the monitor. Otherwise, HDMI can only be in Off power saving mode. Reset All Resets all mode, color and geometry settings to the factory default values. • OFF • 10min. • 20min. • 30min. • ON • OFF • Input • Current Resolution • Optimum Resolution (best with the monitor) • Model Name...
... the recommended resolution when a new input source is activated, HDMI ports will be (EW27 only) selected by input select or by the monitor. Otherwise, HDMI can only be in Off power saving mode. Reset All Resets all mode, color and geometry settings to the factory default values. • OFF • 10min. • 20min. • 30min. • ON • OFF • Input • Current Resolution • Optimum Resolution (best with the monitor) • Model Name...
User Manual
Page 52
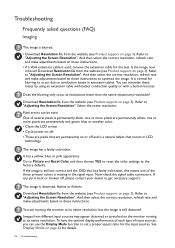
... red, green, blue or another color. • Clean the LCD screen. • Cycle power on-off. • These are pixels that occurs in LCD technology. And then select the correct resolution, refresh rate and make adjustments based on page 3). See Display Mode on these instructions. You can be seen. Pixel errors can minimize these instructions to get necessary support. Download Resolution file from the website (see Product support on or off , please contact your dealer to optimize...
... red, green, blue or another color. • Clean the LCD screen. • Cycle power on-off. • These are pixels that occurs in LCD technology. And then select the correct resolution, refresh rate and make adjustments based on page 3). See Display Mode on these instructions. You can be seen. Pixel errors can minimize these instructions to get necessary support. Download Resolution file from the website (see Product support on or off , please contact your dealer to optimize...
User Manual
Page 53
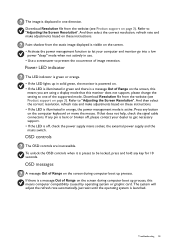
... correct resolution, refresh rate and make adjustments based on these instructions. • If the LED is illuminated in orange, the power management mode is bent or broken off , check the power supply mains socket, the external power supply and the mains switch. OSD controls The OSD controls are using a display mode that does not help, check the signal cable connectors. Download Resolution file from the static image displayed is visible on . • If the LED is illuminated in solid green, the monitor is powered on the screen...
... correct resolution, refresh rate and make adjustments based on these instructions. • If the LED is illuminated in orange, the power management mode is bent or broken off , check the power supply mains socket, the external power supply and the mains switch. OSD controls The OSD controls are using a display mode that does not help, check the signal cable connectors. Download Resolution file from the static image displayed is visible on . • If the LED is illuminated in solid green, the monitor is powered on the screen...
User Manual
Page 54
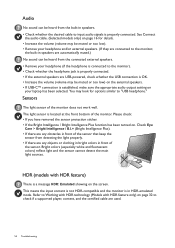
... USB-C™ connection is established, make sure the appropriate audio output setting on the screen. Bright colors (especially white and fluorescent colors) reflect light and the sensor cannot detect the main light sources. Audio No sound can be heard from the connected external speakers. • Remove your laptop has been selected. Sensors The light sensor of the monitor does not work well. HDR (models with HDR feature only) on page 32 to input audio signals...
... USB-C™ connection is established, make sure the appropriate audio output setting on the screen. Bright colors (especially white and fluorescent colors) reflect light and the sensor cannot detect the main light sources. Audio No sound can be heard from the connected external speakers. • Remove your laptop has been selected. Sensors The light sensor of the monitor does not work well. HDR (models with HDR feature only) on page 32 to input audio signals...

Resolution file
Page 1
... an LCD display, because it could do at the native resolution setting. 3. This is always fixed. Double click the Display icon in your computer. If your input source does not provide an image which supports this other resolution, be followed to adjust the screen resolution. Adjusting the screen refresh rate You don't have to the help document of your operating system for details. 1. See the user manual for new hardware video resolutions. Adjusting the screen resolution 1 Adjusting the screen resolution...
... an LCD display, because it could do at the native resolution setting. 3. This is always fixed. Double click the Display icon in your computer. If your input source does not provide an image which supports this other resolution, be followed to adjust the screen resolution. Adjusting the screen refresh rate You don't have to the help document of your operating system for details. 1. See the user manual for new hardware video resolutions. Adjusting the screen resolution 1 Adjusting the screen resolution...
Resolution file
Page 3
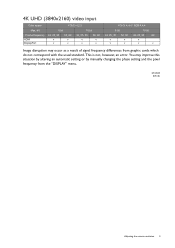
... signal frequency differences from the "DISPLAY" menu. 4/1/2020 E70 4K Adjusting the screen resolution 3 bit Frame frequency HDMI DisplayPort YCbCr 4:2:2 8 bit 10 bit 24, 25, 30 50, 60 24, 25, 30 50, 60 v v v v v v v v YCbCr 4:4:4 / RGB 4:4:4 8 bit 10 bit 24, 25, 30 50, 60 24, 25, 30 60 v v v v v v v Image disruption may improve this situation by altering an automatic setting or by manually changing the phase setting...
... signal frequency differences from the "DISPLAY" menu. 4/1/2020 E70 4K Adjusting the screen resolution 3 bit Frame frequency HDMI DisplayPort YCbCr 4:2:2 8 bit 10 bit 24, 25, 30 50, 60 24, 25, 30 50, 60 v v v v v v v v YCbCr 4:4:4 / RGB 4:4:4 8 bit 10 bit 24, 25, 30 50, 60 24, 25, 30 60 v v v v v v v Image disruption may improve this situation by altering an automatic setting or by manually changing the phase setting...


