User Manual
Page 6
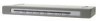
... 1 Includes AC plugs for the U.S., U.K., Europe, and Australia. If one of the tapes has been removed or appears disrupted, please call Belkin Technical Support at (800) 282-2355. 1 Designed especially for purchasing this Belkin OmniView Secure KVM Switch (the Switch). Rack-Mount Brackets with Screws (F1DN108U model only) Important: Tamper-evident tape has been placed on both sides of the...
... 1 Includes AC plugs for the U.S., U.K., Europe, and Australia. If one of the tapes has been removed or appears disrupted, please call Belkin Technical Support at (800) 282-2355. 1 Designed especially for purchasing this Belkin OmniView Secure KVM Switch (the Switch). Rack-Mount Brackets with Screws (F1DN108U model only) Important: Tamper-evident tape has been placed on both sides of the...

User Manual
Page 8
... supports 2 Plug-and-Play connectivity with USB computers, keyboards, and mice. 3 • Video Resolution The Switch supports video resolutions of the Switch, allow for the U.S., U.K., Europe, and Australia. 3 and 4-Port Switches require an optional Rack-Mount Kit for rack installation (Belkin part number F1D005). 3Includes AC plugs for both domestic and international installations.3 2The 2- section Overview Other...
... supports 2 Plug-and-Play connectivity with USB computers, keyboards, and mice. 3 • Video Resolution The Switch supports video resolutions of the Switch, allow for the U.S., U.K., Europe, and Australia. 3 and 4-Port Switches require an optional Rack-Mount Kit for rack installation (Belkin part number F1D005). 3Includes AC plugs for both domestic and international installations.3 2The 2- section Overview Other...

User Manual
Page 13
An optional Rack-Mount Kit (Belkin part number F1D005) is designed for use with the 2- and 4-Port Switches. Consider the following when deciding where to place the Switch: • your proximity to the port selectors on the front of the Switch • the lengths of the ... the location of your computers in relation to your computers to a standard 19-inch server rack using the included rack-mount brackets and screws. The 8-Port Switch (F1DN108U) can be mounted to the Switch Warning: Avoid placing cables near fluorescent lights, air-conditioning equipment, or machines that create electrical...
An optional Rack-Mount Kit (Belkin part number F1D005) is designed for use with the 2- and 4-Port Switches. Consider the following when deciding where to place the Switch: • your proximity to the port selectors on the front of the Switch • the lengths of the ... the location of your computers in relation to your computers to a standard 19-inch server rack using the included rack-mount brackets and screws. The 8-Port Switch (F1DN108U) can be mounted to the Switch Warning: Avoid placing cables near fluorescent lights, air-conditioning equipment, or machines that create electrical...

User Manual
Page 14
... to connect your console. 9 section Installation Step 1 Mounting the Switch (optional) 1 Bracket Installation (F1DN108U) The 8-Port Switch includes adjustable mounting brackets ideal for installation 2 in 19-inch racks. Mount the Switch to the rack rails. (Refer to diagram below.) Your Switch is now mounted securely to the rack and you are ready to diagram below.) 6 7 1.3. The mounting brackets feature three adjustment positions that 3 allow...
... to connect your console. 9 section Installation Step 1 Mounting the Switch (optional) 1 Bracket Installation (F1DN108U) The 8-Port Switch includes adjustable mounting brackets ideal for installation 2 in 19-inch racks. Mount the Switch to the rack rails. (Refer to diagram below.) Your Switch is now mounted securely to the rack and you are ready to diagram below.) 6 7 1.3. The mounting brackets feature three adjustment positions that 3 allow...

User Manual
Page 15
Installation Bracket Installation (F1DN102U and F1DN104U) The 2- and 4-Port Switches can be installed into a 19-inch rack using an optional Rack-Mount Kit, sold separately (Belkin part number F1D005). 1.1 Attach the Rack-Mount Bracket to the Switch using the Phillips screws provided. (Refer to diagram below.) 1.2 Mount the Switch to the rack rails. (Refer to diagram below.) Your Switch is now mounted securely to the rack and you are ready to connect your console. 10
Installation Bracket Installation (F1DN102U and F1DN104U) The 2- and 4-Port Switches can be installed into a 19-inch rack using an optional Rack-Mount Kit, sold separately (Belkin part number F1D005). 1.1 Attach the Rack-Mount Bracket to the Switch using the Phillips screws provided. (Refer to diagram below.) 1.2 Mount the Switch to the rack rails. (Refer to diagram below.) Your Switch is now mounted securely to the rack and you are ready to connect your console. 10