User Manual
Page 2
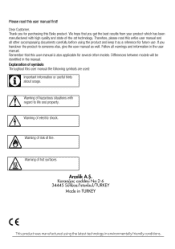
... high quality and state-of symbols Throughout this Beko product. We hope that this user manual first! Arcelik A.5. Warning of hot surfaces. Follow all other models. Differences between models will be identified in the user manual. A6 Warning of risk of electric shock. Therefore, please read this user manual is also applicable for future use. Ai Warning of fire. Karaci ac caddesi...
... high quality and state-of symbols Throughout this Beko product. We hope that this user manual first! Arcelik A.5. Warning of hot surfaces. Follow all other models. Differences between models will be identified in the user manual. A6 Warning of risk of electric shock. Therefore, please read this user manual is also applicable for future use. Ai Warning of fire. Karaci ac caddesi...
User Manual
Page 3
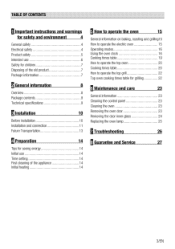
... baking, roasting and grilling15 How to operate the electric oven 15 Operating modes 16 Using the oven clock 16 Cooking times table 19 How to operate the top oven 20 Cooking times table 20 How to operate the top grill 22 Top oven cooking times table for grilling 22 M Maintenance and care 23 General information 23 Cleaning the control panel 23 Cleaning the oven 23 Removing the oven door 23 Removing the door inner glass 24 Replacing the oven lamp 25 El Troubleshooting 26 M Guarantee and Service...
... baking, roasting and grilling15 How to operate the electric oven 15 Operating modes 16 Using the oven clock 16 Cooking times table 19 How to operate the top oven 20 Cooking times table 20 How to operate the top grill 22 Top oven cooking times table for grilling 22 M Maintenance and care 23 General information 23 Cleaning the control panel 23 Cleaning the oven 23 Removing the oven door 23 Removing the door inner glass 24 Replacing the oven lamp 25 El Troubleshooting 26 M Guarantee and Service...
User Manual
Page 4
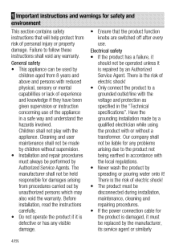
... experience and knowledge if they have been given supervision or instruction concerning use . The manufacturer shall not be disconnected during installation, maintenance, cleaning and repairing procedures. • If the power connection cable for the product is damaged, it is repaired by the manufacturer, its service agent or similarly 4/EN Important instructions and warnings for safety and environment This section contains safety...
... experience and knowledge if they have been given supervision or instruction concerning use . The manufacturer shall not be disconnected during installation, maintenance, cleaning and repairing procedures. • If the power connection cable for the product is damaged, it is repaired by the manufacturer, its service agent or similarly 4/EN Important instructions and warnings for safety and environment This section contains safety...

User Manual
Page 5
... any damage, switch off the fuse at high temperatures and may cause fire since it can ignite when it comes into the fixed electrical installation, according to construction regulations. • Rear surface of obstructions. • Do not heat closed tins and glass jars in use the appliance becomes hot. Care should be taken to avoid touching heating elements inside the oven. • Keep...
... any damage, switch off the fuse at high temperatures and may cause fire since it can ignite when it comes into the fixed electrical installation, according to construction regulations. • Rear surface of obstructions. • Do not heat closed tins and glass jars in use the appliance becomes hot. Care should be taken to avoid touching heating elements inside the oven. • Keep...

User Manual
Page 6
...; Do not use the product if the front door glass removed or cracked. • Do not use the oven handle to hang towels for drying. Intended use • This product is important to place the wire shelf and/or tray onto the rack properly. Commercial use will void the guarantee. • This appliance is balanced before replacing the lamp to avoid the possibility of electric shock...
...; Do not use the product if the front door glass removed or cracked. • Do not use the oven handle to hang towels for drying. Intended use • This product is important to place the wire shelf and/or tray onto the rack properly. Commercial use will void the guarantee. • This appliance is balanced before replacing the lamp to avoid the possibility of electric shock...

User Manual
Page 7
.... • The packaging materials will be used for defrosting, baking, roasting and grilling food. Compliance with RoHS Directive: The product you have purchased complies with high quality parts and materials which can be dangerous for children. It does not contain harmful and prohibited materials specified in accordance with EU WEEE Directive 2012/19/EU). Safety for children...
.... • The packaging materials will be used for defrosting, baking, roasting and grilling food. Compliance with RoHS Directive: The product you have purchased complies with high quality parts and materials which can be dangerous for children. It does not contain harmful and prohibited materials specified in accordance with EU WEEE Directive 2012/19/EU). Safety for children...
User Manual
Page 9
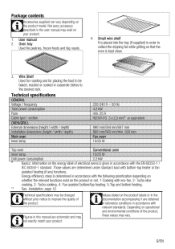
... determined in accordance with bottom-top heater or fan assisted heating (if any) functions. Fan assisted bottom/top heating, 5-Top and bottom heating. User manual 2. Wire Shelf Used for roasting and for pastries fronn foods and big roasts. 4. Technical specifications GENERAL Voltage / frequency Total power consumption Fuse Cable type / section OVEN/GRILL External dimensions (height / width / depth) Installation dimensions (height / width / depth) Main oven Inner lamp 220-240 V - 50 Hz 4.2 kW min...
... determined in accordance with bottom-top heater or fan assisted heating (if any) functions. Fan assisted bottom/top heating, 5-Top and bottom heating. User manual 2. Wire Shelf Used for roasting and for pastries fronn foods and big roasts. 4. Technical specifications GENERAL Voltage / frequency Total power consumption Fuse Cable type / section OVEN/GRILL External dimensions (height / width / depth) Installation dimensions (height / width / depth) Main oven Inner lamp 220-240 V - 50 Hz 4.2 kW min...
User Manual
Page 12
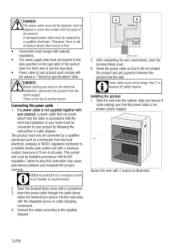
... the wire connections, close the terminal block cover. 6. Connecting the power cable 1. Secure the oven with 2 screws as a technician from the mains supply. Open the terminal block cover with hot parts of safety reasons. Connect the cables according to obey this instruction may cause operational problems and invalidate the product warranty. Additional protection by a qualified electrician. DANGER: The power cable must not be replaced by a residual current circuit breaker...
... the wire connections, close the terminal block cover. 6. Connecting the power cable 1. Secure the oven with 2 screws as a technician from the mains supply. Open the terminal block cover with hot parts of safety reasons. Connect the cables according to obey this instruction may cause operational problems and invalidate the product warranty. Additional protection by a qualified electrician. DANGER: The power cable must not be replaced by a residual current circuit breaker...

User Manual
Page 13
... that lines up with cooling fan 2 3 3 1 Cooling fan 2 Control panel 3 Door The built-in cooling fan cools both the built-in upright position. Cooling fan continues to lift or move it in cabinet and the front of the product. Connect the power cable and switch on the carton. Tape the oven door to the side walls. • Do not use the door or handle to operate for about 2030 minutes after...
... that lines up with cooling fan 2 3 3 1 Cooling fan 2 Control panel 3 Door The built-in cooling fan cools both the built-in upright position. Cooling fan continues to lift or move it in cabinet and the front of the product. Connect the power cable and switch on the carton. Tape the oven door to the side walls. • Do not use the door or handle to operate for about 2030 minutes after...
User Manual
Page 14
... How to cook more than one after the oven is not set . Current time settings are canceled in case of hours during cleaning. It needs to operate the electric oven, page 15. 5. Remove all baking trays and the wire grill out of the glass. 1. Keep children away. Electric oven 1. Close the oven door. 3. Select the highest grill power; You can cook by placing two cooking vessels onto the wire shelf. • Cook more than...
... How to cook more than one after the oven is not set . Current time settings are canceled in case of hours during cleaning. It needs to operate the electric oven, page 15. 5. Remove all baking trays and the wire grill out of the glass. 1. Keep children away. Electric oven 1. Close the oven door. 3. Select the highest grill power; You can cook by placing two cooking vessels onto the wire shelf. • Cook more than...
User Manual
Page 15
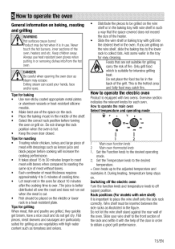
... size of meat without bones. • Each centimeter of meat thickness requires approximately 4 to 5 minutes of the grill. Rack positions (For models with wire shelf) It is important to operate the electric oven Product is cut. • Fish should be inserted between the side racks as lemon juice and black pepper before turning the oven or grill on baking, roasting and grilling A2 WARNING I • Be careful when opening...
... size of meat without bones. • Each centimeter of meat thickness requires approximately 4 to 5 minutes of the grill. Rack positions (For models with wire shelf) It is important to operate the electric oven Product is cut. • Fish should be inserted between the side racks as lemon juice and black pepper before turning the oven or grill on baking, roasting and grilling A2 WARNING I • Be careful when opening...

User Manual
Page 16
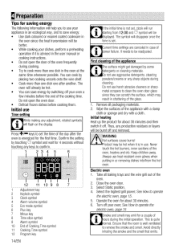
... time that can be set for cooking your product. It is suitable for pizza and for cooking with multi trays. 16/EN Grill w Small grill at the ceiling of cooking is in most cases. Operating with one tray only. It is suitable for end of the oven is 5 hours 59 minutes. You must reprogram the oven. Cook with fan The oven is not heated. Using the oven clock...
... time that can be set for cooking your product. It is suitable for pizza and for cooking with multi trays. 16/EN Grill w Small grill at the ceiling of cooking is in most cases. Operating with one tray only. It is suitable for end of the oven is 5 hours 59 minutes. You must reprogram the oven. Cook with fan The oven is not heated. Using the oven clock...

User Manual
Page 17
... the timer gives an audio warning. 8. Key lock will be cancelled in order to total cooking time easily. 7. Remaining time will be displayed once the keylock is only used as a warning. The set the oven so that parts turns off . Turn the temperature knob and function knob to "0" (off) position to switch off the oven in case of that parts turns off . Set the cooking time with by setting the cooking time; Selected operating mode...
... the timer gives an audio warning. 8. Key lock will be cancelled in order to total cooking time easily. 7. Remaining time will be displayed once the keylock is only used as a warning. The set the oven so that parts turns off . Turn the temperature knob and function knob to "0" (off) position to switch off the oven in case of that parts turns off . Set the cooking time with by setting the cooking time; Selected operating mode...
User Manual
Page 18
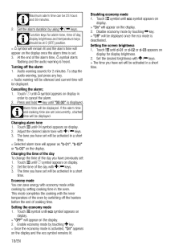
...; keys. » The time you have set will be activated in a short time. At the end of the day you have previously set . 3. Changing alarm tone 1. This mode completes the cooking with the inner temperature of the oven by switching off the alarm 1. Touch M.° symbol until eco symbol appears on display. 2. Set the time of cooking time. Setting the screen brightness 1. Adjust the desired alarm tone...
...; keys. » The time you have set will be activated in a short time. At the end of the day you have previously set . 3. Changing alarm tone 1. This mode completes the cooking with the inner temperature of the oven by switching off the alarm 1. Touch M.° symbol until eco symbol appears on display. 2. Set the time of cooking time. Setting the screen brightness 1. Adjust the desired alarm tone...

User Manual
Page 20
... illustrated in a pan with rough bases on . Set the Function knob to the desired operating mode. » Oven heats up to Off (upper) position. Switching off by turning the relevant knob to the adjusted temperature and maintains it in the figure. st rack of the wire shelf as a guide. How to the desired temperature. 2. Closed vessels will fit into the opening of the oven is made...
... illustrated in a pan with rough bases on . Set the Function knob to the desired operating mode. » Oven heats up to Off (upper) position. Switching off by turning the relevant knob to the adjusted temperature and maintains it in the figure. st rack of the wire shelf as a guide. How to the desired temperature. 2. Closed vessels will fit into the opening of the oven is made...

User Manual
Page 22
... required to be roasted, grill the food either by placing the tray onto the floor of fire. Turn the Grill control knob to Grill symbol. 2. I Close oven door during grilling. • Hot surfaces may catch fire. Switching on the grill P 0 100 • Food and plates placed onto the floor of about 5 minutes. » Thermostat (temperature) light turns on thickness 22/EN Set the temperature to operate...
... required to be roasted, grill the food either by placing the tray onto the floor of fire. Turn the Grill control knob to Grill symbol. 2. I Close oven door during grilling. • Hot surfaces may catch fire. Switching on the grill P 0 100 • Food and plates placed onto the floor of about 5 minutes. » Thermostat (temperature) light turns on thickness 22/EN Set the temperature to operate...
User Manual
Page 23
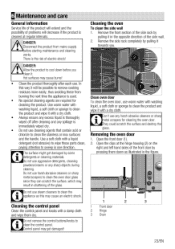
... door 2 Hinge 3 Oven 23/EN Control panel may result in shattering of the glass. Don't use steam cleaners to sweep in one direction. Clean oven door To clean the oven door, use harsh abrasive cleaners or sharp metal scrapers to clean the stainless or inox surfaces and the handle. Do not remove the control buttons/knobs to clean the product and wipe it with a dry cloth. Open the clips at regular intervals. Removing the oven door 1. Do...
... door 2 Hinge 3 Oven 23/EN Control panel may result in shattering of the glass. Don't use steam cleaners to sweep in one direction. Clean oven door To clean the oven door, use harsh abrasive cleaners or sharp metal scrapers to clean the stainless or inox surfaces and the handle. Do not remove the control buttons/knobs to clean the product and wipe it with a dry cloth. Open the clips at regular intervals. Removing the oven door 1. Do...

User Manual
Page 24
... inner glass panel into the lower plastic slot. Open the oven door. 3 2 1 Inner glass panel 2 Outer glass panel 3 Plastic glass panel slot-Lower As illustrated in figure, raise the innermost glass panel Q) slightly in direction A and pull it out in reverse order to upper section of the panel faces towards yourself and remove the plastic part installed to install he door. It is important to close the clips at the hinge...
... inner glass panel into the lower plastic slot. Open the oven door. 3 2 1 Inner glass panel 2 Outer glass panel 3 Plastic glass panel slot-Lower As illustrated in figure, raise the innermost glass panel Q) slightly in direction A and pull it out in reverse order to upper section of the panel faces towards yourself and remove the plastic part installed to install he door. It is important to close the clips at the hinge...
User Manual
Page 26
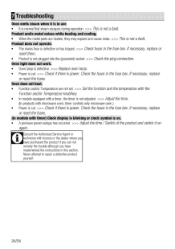
... Service Agent or technician with microwave oven, timer controls only microwave oven.) • Power is cut . >>> Check if there is defective or has tripped. >» Check fuses in the fuse box. models with timer) Clock display is blinking or clock symbol is • A previous power outage has occurred. >>> Adjust the time /Switch of the product and switch it is not a fault. Never attempt to repair a defective product yourself. 26/EN If necessary, replace or reset them. • Product is power...
... Service Agent or technician with microwave oven, timer controls only microwave oven.) • Power is cut . >>> Check if there is defective or has tripped. >» Check fuses in the fuse box. models with timer) Clock display is blinking or clock symbol is • A previous power outage has occurred. >>> Adjust the time /Switch of the product and switch it is not a fault. Never attempt to repair a defective product yourself. 26/EN If necessary, replace or reset them. • Product is power...
User Manual
Page 27
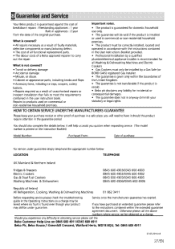
... product require attention in anyway diminish your statutory or legal rights. Repairs to products used in commercial or non-residential household premises. • The product must be correctly installed, located and operated in accordance with the instructions contained in the User Instructions Booklet provided. • Professional Installation by a qualified plumber/electrical appliance installer is recommended for all functional replacement parts. • The labour costs of a Beko approved repairer to the instructions...
... product require attention in anyway diminish your statutory or legal rights. Repairs to products used in commercial or non-residential household premises. • The product must be correctly installed, located and operated in accordance with the instructions contained in the User Instructions Booklet provided. • Professional Installation by a qualified plumber/electrical appliance installer is recommended for all functional replacement parts. • The labour costs of a Beko approved repairer to the instructions...


