Home Guide
Page 2
Table of Contents 2 Table of Contents Congratulations 3 FCC Information 4 Cautions and Warnings 5 Contents XMH-10A 6 Installation/Wiring Precautions 7 Setting Up and Installing Your Kit 7 Cabling Interconnections 7 Installing/Positioning the Antenna 7 Interconnect Diagram 8 Installing the Xpress In the Cradle 9 Aiming Your XM® Home Antenna 10 Warranty 16
Table of Contents 2 Table of Contents Congratulations 3 FCC Information 4 Cautions and Warnings 5 Contents XMH-10A 6 Installation/Wiring Precautions 7 Setting Up and Installing Your Kit 7 Cabling Interconnections 7 Installing/Positioning the Antenna 7 Interconnect Diagram 8 Installing the Xpress In the Cradle 9 Aiming Your XM® Home Antenna 10 Warranty 16

Home Guide
Page 3
..., Honda, Toyota, Hyundai, Nissan, Subaru, Suzuki and Porsche, is available in XM Satellite Radio. Subscriptions subject to coast: the most advanced traffic and weather information. XM, the leader in satellite-delivered entertainment and data services for 2006. Required subscription for purchasing the Audiovox Xpress XM® Satellite Radio Home Kit. College sports games subject to change. All rights reserved...
..., Honda, Toyota, Hyundai, Nissan, Subaru, Suzuki and Porsche, is available in XM Satellite Radio. Subscriptions subject to coast: the most advanced traffic and weather information. XM, the leader in satellite-delivered entertainment and data services for 2006. Required subscription for purchasing the Audiovox Xpress XM® Satellite Radio Home Kit. College sports games subject to change. All rights reserved...
Home Guide
Page 4
If this device. Warning: The FCC and FAA have not certified XM Satellite Radio Receivers for use in a particular installation. can void the user's authority to operate this equipment does cause harmful interference to radio or television reception, which the affected receiver is connected. - This equipment has been tested and found to comply with the installation instructions...
If this device. Warning: The FCC and FAA have not certified XM Satellite Radio Receivers for use in a particular installation. can void the user's authority to operate this equipment does cause harmful interference to radio or television reception, which the affected receiver is connected. - This equipment has been tested and found to comply with the installation instructions...
Home Guide
Page 7
... procedure outlined in areas subject to direct sunlight or in the Xpress XM User Guide. Installation / Wiring Precautions 7 Installation/Wiring Precautions 1. some repositioning may cause damage to enjoy XM Satellite Radio as soon as the Xpress XM Receiver and home kit installation are no obvious satellite signal obstructions such as there are complete. Cabling Interconnections You can...
... procedure outlined in areas subject to direct sunlight or in the Xpress XM User Guide. Installation / Wiring Precautions 7 Installation/Wiring Precautions 1. some repositioning may cause damage to enjoy XM Satellite Radio as soon as the Xpress XM Receiver and home kit installation are no obvious satellite signal obstructions such as there are complete. Cabling Interconnections You can...
Home Guide
Page 8
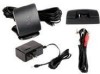
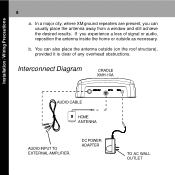
If you can also place the antenna outside as necessary. DC POWER ADAPTER TO AC WALL OUTLET You can usually place the antenna away from a window and still achieve the desired results. In a major city, where XM ground repeaters are present, you experience a loss of signal or audio, reposition the antenna inside the home or outside (on the roof structure), provided it is clear of any overhead obstructions. Installation / Wiring Precautions 8 a. Interconnect Diagram CRADLE XMH-10A AUDIO CABLE HOME ANTENNA AUDIO INPUT TO EXTERNAL AMPLIFIER. b.
If you can also place the antenna outside as necessary. DC POWER ADAPTER TO AC WALL OUTLET You can usually place the antenna away from a window and still achieve the desired results. In a major city, where XM ground repeaters are present, you experience a loss of signal or audio, reposition the antenna inside the home or outside (on the roof structure), provided it is clear of any overhead obstructions. Installation / Wiring Precautions 8 a. Interconnect Diagram CRADLE XMH-10A AUDIO CABLE HOME ANTENNA AUDIO INPUT TO EXTERNAL AMPLIFIER. b.
Home Guide
Page 9
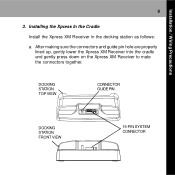
DOCKING STATION TOP VIEW CONNECTOR GUIDE PIN DOCKING STATION FRONT VIEW 16-PIN SYSTEM CONNECTOR Installing the Xpress In the Cradle Install the Xpress XM Receiver in the docking station as follows: a. Installation / Wiring Precautions 9 3. After making sure the connectors and guide pin hole are properly lined up, gently lower the Xpress XM Receiver into the cradle and gently press down on the Xpress XM Receiver to mate the connectors together.
DOCKING STATION TOP VIEW CONNECTOR GUIDE PIN DOCKING STATION FRONT VIEW 16-PIN SYSTEM CONNECTOR Installing the Xpress In the Cradle Install the Xpress XM Receiver in the docking station as follows: a. Installation / Wiring Precautions 9 3. After making sure the connectors and guide pin hole are properly lined up, gently lower the Xpress XM Receiver into the cradle and gently press down on the Xpress XM Receiver to mate the connectors together.

Home Guide
Page 10
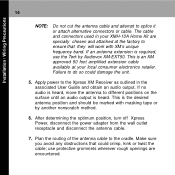
In addition, even if you are receiving the XM signal, it is recommended that you to be nestled securely in the docking station. Aiming your XM Antenna as described in this section enabling you optimize the position of your XM Home Antenna If the Xpress display says "NO SIGNAL," the antenna needs to receive the strongest possible signal and consistent, mute-free reception. The Xpress XM Receiver should now be repositioned. Installation / Wiring Precautions 10 b. DOCKING STATION REAR VIEW ANT IN RF CONNECTOR AUDIO OUT CONNECTOR DC IN CONNECTOR 4.
In addition, even if you are receiving the XM signal, it is recommended that you to be nestled securely in the docking station. Aiming your XM Antenna as described in this section enabling you optimize the position of your XM Home Antenna If the Xpress display says "NO SIGNAL," the antenna needs to receive the strongest possible signal and consistent, mute-free reception. The Xpress XM Receiver should now be repositioned. Installation / Wiring Precautions 10 b. DOCKING STATION REAR VIEW ANT IN RF CONNECTOR AUDIO OUT CONNECTOR DC IN CONNECTOR 4.

Home Guide
Page 11
... visible at least two bars displayed. It has from zero to the Xpress XM Satellite Radio Receiver User Guide. Adjust the antenna location until the maximum number of "Satellite" bars displayed will ensure a consistently strong signal. Installation / Wiring Precautions 11 Your Xpress XM display has two different signal-strength indicators which allows you optimize the antenna...
... visible at least two bars displayed. It has from zero to the Xpress XM Satellite Radio Receiver User Guide. Adjust the antenna location until the maximum number of "Satellite" bars displayed will ensure a consistently strong signal. Installation / Wiring Precautions 11 Your Xpress XM display has two different signal-strength indicators which allows you optimize the antenna...

Home Guide
Page 12
...in this installation guide. If necessary, experiment with the Xpress XM Home Kit is facing to receive XM's signal through standard home walls or a roof. To position your antenna at the satellite: 1. If the satellite signal is recommended that can optimize it will be positioned ...on the previous page, to the south/southeast if you receive the strongest possible satellite signal. Positioning the XM Antenna The antenna supplied with different locations near a south-facing window or outdoors with a clear view of XM's satellites and/or, depending on a flat (horizontal) surface. ...
...in this installation guide. If necessary, experiment with the Xpress XM Home Kit is facing to receive XM's signal through standard home walls or a roof. To position your antenna at the satellite: 1. If the satellite signal is recommended that can optimize it will be positioned ...on the previous page, to the south/southeast if you receive the strongest possible satellite signal. Positioning the XM Antenna The antenna supplied with different locations near a south-facing window or outdoors with a clear view of XM's satellites and/or, depending on a flat (horizontal) surface. ...
Home Guide
Page 13
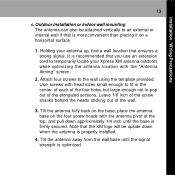
Note that the XM logo will be attached vertically to an external or internal wall if that is more convenient than placing it on the four screw heads with ... large enough not to pop out of the wall. 3. Tilt the antenna away from the wall/base until the base is optimized. Holding your Xpress XM antenna outdoors while optimizing the antenna location with the "Antenna Aiming" screen. 2. Attach four screws to temporarily locate your antenna up, find a wall location that...
Note that the XM logo will be attached vertically to an external or internal wall if that is more convenient than placing it on the four screw heads with ... large enough not to pop out of the wall. 3. Tilt the antenna away from the wall/base until the base is optimized. Holding your Xpress XM antenna outdoors while optimizing the antenna location with the "Antenna Aiming" screen. 2. Attach four screws to temporarily locate your antenna up, find a wall location that...
Home Guide
Page 14
... you avoid any obstructions that they will work with masking tape or by Audiovox XM-EXT50. use the Terk by another nonscratch method. 6. The cable and...10A Home Kit are encountered. If an antenna extension is an XM approved 50 foot amplified extension cable available at the factory to the Xpress XM Receiver as outlined in your local consumer electronics retailer. This is ...different positions on the surface until an audio output is the desired antenna position and should be marked with XM's unique frequency band. If no audio is heard, move the antenna to do so could crimp, ...
... you avoid any obstructions that they will work with masking tape or by Audiovox XM-EXT50. use the Terk by another nonscratch method. 6. The cable and...10A Home Kit are encountered. If an antenna extension is an XM approved 50 foot amplified extension cable available at the factory to the Xpress XM Receiver as outlined in your local consumer electronics retailer. This is ...different positions on the surface until an audio output is the desired antenna position and should be marked with XM's unique frequency band. If no audio is heard, move the antenna to do so could crimp, ...
Home Guide
Page 15
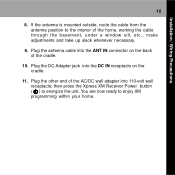
Plug the DC Adapter jack into 110-volt wall receptacle; then press the Xpress XM Receiver Power button ( ) to the interior of the cradle. 10. If the antenna is mounted outside, route the cable from the antenna position to energize the ... the basement, under a window sill, etc.; Plug the antenna cable into the ANT IN connector on the cradle. 11. You are now ready to enjoy XM programming within your home. Installation / Wiring Precautions 15 8. make adjustments and take up slack whenever necessary. 9.
Plug the DC Adapter jack into 110-volt wall receptacle; then press the Xpress XM Receiver Power button ( ) to the interior of the cradle. 10. If the antenna is mounted outside, route the cable from the antenna position to energize the ... the basement, under a window sill, etc.; Plug the antenna cable into the ANT IN connector on the cradle. 11. You are now ready to enjoy XM programming within your home. Installation / Wiring Precautions 15 8. make adjustments and take up slack whenever necessary. 9.
