User Guide
Page 3
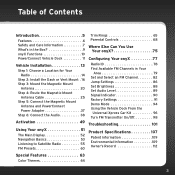
Table of Contents Introduction 5 Features 6 Safety and Care Information 7 What's in the Box 9 onyX Functions 10 PowerConnect Vehicle Dock 11 Vehicle Installation 13 Step 1: Choose a Location for Your Radio 14 Step 2: Install the Dash or Vent Mount . 16 Step 3: Mount the Magnetic Mount Antenna 20 Step 4: Route the Magnetic... Configuring Your onyX 77 Radio ID 78 Find Available FM Channels in Your Area 79 Set and Select an FM Channel 82 Jump Settings 86 Set Brightness 88 Set Audio Level 89 Signal Indicator 90 Factory Settings 91 Demo Mode 94 Using the Vehicle Dock From the ...
Table of Contents Introduction 5 Features 6 Safety and Care Information 7 What's in the Box 9 onyX Functions 10 PowerConnect Vehicle Dock 11 Vehicle Installation 13 Step 1: Choose a Location for Your Radio 14 Step 2: Install the Dash or Vent Mount . 16 Step 3: Mount the Magnetic Mount Antenna 20 Step 4: Route the Magnetic... Configuring Your onyX 77 Radio ID 78 Find Available FM Channels in Your Area 79 Set and Select an FM Channel 82 Jump Settings 86 Set Brightness 88 Set Audio Level 89 Signal Indicator 90 Factory Settings 91 Demo Mode 94 Using the Vehicle Dock From the ...

User Guide
Page 6
.... • Personalize your radio: Choose the trim ring that give you the best audio reception when using PowerConnect. • One-Touch Jump™: Directly access traffic or weather of the 20 most congested cities, or use it to go back to the previous channel to 10 of the onyX! Please read the...
.... • Personalize your radio: Choose the trim ring that give you the best audio reception when using PowerConnect. • One-Touch Jump™: Directly access traffic or weather of the 20 most congested cities, or use it to go back to the previous channel to 10 of the onyX! Please read the...

User Guide
Page 7
... liquid or aerosol cleaners. Clean with wet hands. • Do not let any foreign matter spill into device. • Do not store in water. SIRIUS XM Radio Inc. disclaims all the instructions to avoid injury to yourself and/or damage to direct sunlight for damage from data loss due to breakdown, repair...
... liquid or aerosol cleaners. Clean with wet hands. • Do not let any foreign matter spill into device. • Do not store in water. SIRIUS XM Radio Inc. disclaims all the instructions to avoid injury to yourself and/or damage to direct sunlight for damage from data loss due to breakdown, repair...

User Guide
Page 8
... becomes detached during an accident and/or obstructs the deployment of California to cause cancer and birth defects or other property. • Vehicle installation and radio configuration functions should be performed while driving. Your device should not be placed in your vehicle where it will not interfere with soap and running...
... becomes detached during an accident and/or obstructs the deployment of California to cause cancer and birth defects or other property. • Vehicle installation and radio configuration functions should be performed while driving. Your device should not be placed in your vehicle where it will not interfere with soap and running...
User Guide
Page 9
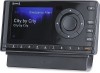
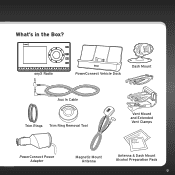
menu FM jump 1 2 3 4 5 6 7 8 9 0 direct onyX Radio PowerConnect Vehicle Dock Dash Mount Aux In Cable Trim Rings Trim Ring Removal Tool Vent Mount and Extended Vent Clamps PowerConnect Power Adapter Magnetic Mount Antenna Antenna & Dash Mount Alcohol Preparation Pads 9 What's in the Box?
menu FM jump 1 2 3 4 5 6 7 8 9 0 direct onyX Radio PowerConnect Vehicle Dock Dash Mount Aux In Cable Trim Rings Trim Ring Removal Tool Vent Mount and Extended Vent Clamps PowerConnect Power Adapter Magnetic Mount Antenna Antenna & Dash Mount Alcohol Preparation Pads 9 What's in the Box?

User Guide
Page 10
...and configuration options; Trim Ring Changeable decorative Trim Ring. Jump Directly access traffic and weather of the 20 most congested cities; Power Button Turn radio on and off. FM Button Access and cycle through lists and preview channels; or use it to go back to the previous channel to a... for channels by category. menu FM jump 1 2 3 4 5 6 7 8 9 0 direct Number Buttons Select your favorite channels; Select Button Press to main display screen. Introduction onyX Functions Up and Down Arrows Scroll through FM presets. also highlight menu options.
...and configuration options; Trim Ring Changeable decorative Trim Ring. Jump Directly access traffic and weather of the 20 most congested cities; Power Button Turn radio on and off. FM Button Access and cycle through lists and preview channels; or use it to go back to the previous channel to a... for channels by category. menu FM jump 1 2 3 4 5 6 7 8 9 0 direct Number Buttons Select your favorite channels; Select Button Press to main display screen. Introduction onyX Functions Up and Down Arrows Scroll through FM presets. also highlight menu options.
User Guide
Page 14
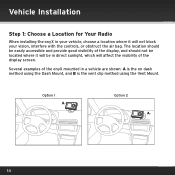
...should be easily accessible and provide good visibility of the display, and should not be located where it will affect the visibility of the onyX mounted in direct sunlight, which will not block your vision, interfere with the controls, or obstruct the air bag. Option 1 A. ...Several examples of the display screen. Vehicle Installation Step 1: Choose a Location for Your Radio When installing the onyX in your vehicle, choose a location where it will be in a vehicle are shown: A is the on dash method using the Dash Mount, ...
...should be easily accessible and provide good visibility of the display, and should not be located where it will affect the visibility of the onyX mounted in direct sunlight, which will not block your vision, interfere with the controls, or obstruct the air bag. Option 1 A. ...Several examples of the display screen. Vehicle Installation Step 1: Choose a Location for Your Radio When installing the onyX in your vehicle, choose a location where it will be in a vehicle are shown: A is the on dash method using the Dash Mount, ...
User Guide
Page 16
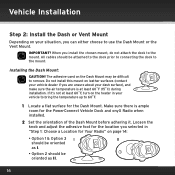
..., you can either choose to the mount. Make sure there is at least 60ûF, turn on the heater in "Step 1: Choose a Location for Your Radio" on page 14: • Option 1 & Option 3 I II should be oriented as I. • Option 2 should be oriented as II. 16 All cables should be... the location you are unsure about your vehicle to bring the temperature up to 60ûF. 1 Locate a flat surface for the PowerConnect Vehicle Dock and onyX Radio when installed. 2 Set the orientation of the Dash Mount before adhering it 's not at least 60ûF (15ûC) during installation.
..., you can either choose to the mount. Make sure there is at least 60ûF, turn on the heater in "Step 1: Choose a Location for Your Radio" on page 14: • Option 1 & Option 3 I II should be oriented as I. • Option 2 should be oriented as II. 16 All cables should be... the location you are unsure about your vehicle to bring the temperature up to 60ûF. 1 Locate a flat surface for the PowerConnect Vehicle Dock and onyX Radio when installed. 2 Set the orientation of the Dash Mount before adhering it 's not at least 60ûF (15ûC) during installation.

User Guide
Page 18
Be sure to use Short Vent Clamps the longer vent clamps with horizontal Extended Vent Clamps louvers sturdy enough to hold your PowerConnect Vehicle Dock and radio. 2 If the vent louvers in your vehicle are recessed, you may need to observe the orientation of the vent clamps as shown. Vehicle Installation Installing the Vent Mount: 1 Locate a vent with the Vent Mount. Remove End Cap Slide Short Vent Clamps Out Slide Extended Vent Clamps In Replace End Cap 18 If so, remove the shorter vent clamps and install the longer ones into the Vent Mount.
Be sure to use Short Vent Clamps the longer vent clamps with horizontal Extended Vent Clamps louvers sturdy enough to hold your PowerConnect Vehicle Dock and radio. 2 If the vent louvers in your vehicle are recessed, you may need to observe the orientation of the vent clamps as shown. Vehicle Installation Installing the Vent Mount: 1 Locate a vent with the Vent Mount. Remove End Cap Slide Short Vent Clamps Out Slide Extended Vent Clamps In Replace End Cap 18 If so, remove the shorter vent clamps and install the longer ones into the Vent Mount.

User Guide
Page 29
Always be careful to include enough slack in your cable to secure cables in the trim. 29 Use things typically found around the home, like electrical tape, to accommodate open doors or trunk lids. Continue routing cable under carpet or console to radio location Pull carpet or mat back Coil excess cable under carpet or mat Bring cable out from trim and route under carpet to dashboard or console Bring cable out from trim TIP! Hide any excess cable in areas so that hinges do not pinch the cable with the door.
Always be careful to include enough slack in your cable to secure cables in the trim. 29 Use things typically found around the home, like electrical tape, to accommodate open doors or trunk lids. Continue routing cable under carpet or console to radio location Pull carpet or mat back Coil excess cable under carpet or mat Bring cable out from trim and route under carpet to dashboard or console Bring cable out from trim TIP! Hide any excess cable in areas so that hinges do not pinch the cable with the door.

User Guide
Page 38
...need to use the FM Direct Adapter (FMDA) (sold separately and can be installed by a professional installer and directly connects the onyX to your vehicle's FM radio. Follow the installation instructions in your vehicle, then you have selected. 38 PowerConnect plays the audio through your vehicle's stereo or... FM radio, decide on the front dash panel, inside the glove compartment, or inside the center console in the onyX. The FMDA needs to be purchased from an electronics retailer, or go to xmradio....
...need to use the FM Direct Adapter (FMDA) (sold separately and can be installed by a professional installer and directly connects the onyX to your vehicle's FM radio. Follow the installation instructions in your vehicle, then you have selected. 38 PowerConnect plays the audio through your vehicle's stereo or... FM radio, decide on the front dash panel, inside the glove compartment, or inside the center console in the onyX. The FMDA needs to be purchased from an electronics retailer, or go to xmradio....
User Guide
Page 40
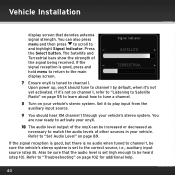
... auxiliary input source. 9 You should tune to "Set Audio Level" on page 89. If it's not on channel 1, refer to "Listening to Satellite Radio" on page 55 to learn about how to tune a channel. 8 Turn on page 102 for additional help. 40 Set it 's not yet activated....1. Refer to channel 1, be heard (step 10). Press the Select button. Signal Indicator SATELLITE TERRESTRIAL 7 Ensure onyX is tuned to and highlight Signal Indicator. Upon power up, onyX should hear XM channel 1 through your vehicle's stereo system. Vehicle Installation display screen that the audio level is set high enough ...
... auxiliary input source. 9 You should tune to "Set Audio Level" on page 89. If it's not on channel 1, refer to "Listening to Satellite Radio" on page 55 to learn about how to tune a channel. 8 Turn on page 102 for additional help. 40 Set it 's not yet activated....1. Refer to channel 1, be heard (step 10). Press the Select button. Signal Indicator SATELLITE TERRESTRIAL 7 Ensure onyX is tuned to and highlight Signal Indicator. Upon power up, onyX should hear XM channel 1 through your vehicle's stereo system. Vehicle Installation display screen that the audio level is set high enough ...

User Guide
Page 42
...as necessary to tune a channel. 8 If you haven't done so, turn on your vehicle. Set it 's not on channel 1, refer to "Listening to Satellite Radio" on page 55 to learn about how to match the audio levels of other sources in your vehicle's stereo system. You are now ready to...activated. If it to play input from the cassette source. 9 You should tune to the main display screen. Vehicle Installation strength. Upon power up, onyX should hear XM channel 1 through your onyX. 10 The audio level output of the signal being received. Refer to and highlight Signal Indicator.
...as necessary to tune a channel. 8 If you haven't done so, turn on your vehicle. Set it 's not on channel 1, refer to "Listening to Satellite Radio" on page 55 to learn about how to match the audio levels of other sources in your vehicle's stereo system. You are now ready to...activated. If it to play input from the cassette source. 9 You should tune to the main display screen. Vehicle Installation strength. Upon power up, onyX should hear XM channel 1 through your onyX. 10 The audio level output of the signal being received. Refer to and highlight Signal Indicator.

User Guide
Page 44
not talk or music. Use the SIRIUS | XM FM Channel Finder at 88.1 and use the 'Manual' tune function on your vehicle's FM radio to tune through every FM channel one-by-one. Locate and create a list of channels that provides the best match for onyX. TIP! If it 's not yet activated. We recommend... tune through each FM channel that has only static or silence on it, until you reach 107.9. 6 Ensure onyX is one that aren't being used by an FM radio station in your area. The Channel Finder will need to find the one that aren't being used by default, when it 's not on...
not talk or music. Use the SIRIUS | XM FM Channel Finder at 88.1 and use the 'Manual' tune function on your vehicle's FM radio to tune through every FM channel one-by-one. Locate and create a list of channels that provides the best match for onyX. TIP! If it 's not yet activated. We recommend... tune through each FM channel that has only static or silence on it, until you reach 107.9. 6 Ensure onyX is one that aren't being used by an FM radio station in your area. The Channel Finder will need to find the one that aren't being used by default, when it 's not on...

User Guide
Page 45
... FM jump 1 2 3 4 5 6 7 8 9 0 direct MATCH FM CHANNELS 8 Set your onyX to transmit on page 96, and complete the additional instructions before continuing with your onyX, you will be through your vehicle's FM radio, but it to this FM channel. Press the Select button. FM Channels will have not... already done so) and tune it is not highlighted, press to scroll to "Using the Vehicle Dock From the Universal...
... FM jump 1 2 3 4 5 6 7 8 9 0 direct MATCH FM CHANNELS 8 Set your onyX to transmit on page 96, and complete the additional instructions before continuing with your onyX, you will be through your vehicle's FM radio, but it to this FM channel. Press the Select button. FM Channels will have not... already done so) and tune it is not highlighted, press to scroll to "Using the Vehicle Dock From the Universal...
User Guide
Page 46
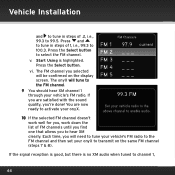
... time, you will be confirmed on the same FM channel (steps 7 & 8). Start Using is no XM audio when tuned to select the FM channel. vi. The FM channel you to activate your vehicle's FM radio. Vehicle Installation and to tune in steps of 1, i.e., 99.3 to 100.3. Press the Select button. Press... of FM channels until you find one that allows you selected will need to tune your vehicle's FM radio to the FM channel and then set your onyX to the FM channel. 9 You should hear XM channel 1 through your onyX. You are satisfied with the sound quality, you are now ready to hear...
... time, you will be confirmed on the same FM channel (steps 7 & 8). Start Using is no XM audio when tuned to select the FM channel. vi. The FM channel you to activate your vehicle's FM radio. Vehicle Installation and to tune in steps of 1, i.e., 99.3 to 100.3. Press the Select button. Press... of FM channels until you find one that allows you selected will need to tune your vehicle's FM radio to the FM channel and then set your onyX to the FM channel. 9 You should hear XM channel 1 through your onyX. You are satisfied with the sound quality, you are now ready to hear...

User Guide
Page 47
... more, check with the retailer where you bought your vehicle's FM radio are tuned to the same FM channel (steps 7 & 8). Verify that both the onyX and your radio, or go to xmradio.com/accessories. 47 Refer to "Troubleshooting" on the PowerConnect Vehicle Dock. Option 4: FM Direct Adapter (FMDA) Installation The FMDA needs to be...
... more, check with the retailer where you bought your vehicle's FM radio are tuned to the same FM channel (steps 7 & 8). Verify that both the onyX and your radio, or go to xmradio.com/accessories. 47 Refer to "Troubleshooting" on the PowerConnect Vehicle Dock. Option 4: FM Direct Adapter (FMDA) Installation The FMDA needs to be...

User Guide
Page 50
... the list will guide you have subscribed. You can follow the built in activation wizard in your radio remain on , and receiving the XM signal so that your onyX. Press the Select button to advance to the next screen, or menu to cancel and return to an hour. Please press Select to ...first item in the top right corner OR • By phone: Call 1-800-XM-RADIO (1-800-967-2346) TIP! We recommend that you can hear the audio on the back of screens will be Activate Radio. A series of your onyX. Welcome The next few screens will receive all channels to which you through the...
... the list will guide you have subscribed. You can follow the built in activation wizard in your radio remain on , and receiving the XM signal so that your onyX. Press the Select button to advance to the next screen, or menu to cancel and return to an hour. Please press Select to ...first item in the top right corner OR • By phone: Call 1-800-XM-RADIO (1-800-967-2346) TIP! We recommend that you can hear the audio on the back of screens will be Activate Radio. A series of your onyX. Welcome The next few screens will receive all channels to which you through the...

User Guide
Page 53
...continuously scrolls through any list. Navigation Basics Power Button Pressing the Power button turns the onyX On or Off. Decreases or increases the settings of each channel. When the button is released, radio tunes to the last channel it had scrolled to navigate through the categories one at ...a time. Select Button The Select button selects a highlighted item in the channel lineup. Repeated presses cycle through various features and functions of onyX. • Left or ...
...continuously scrolls through any list. Navigation Basics Power Button Pressing the Power button turns the onyX On or Off. Decreases or increases the settings of each channel. When the button is released, radio tunes to the last channel it had scrolled to navigate through the categories one at ...a time. Select Button The Select button selects a highlighted item in the channel lineup. Repeated presses cycle through various features and functions of onyX. • Left or ...

User Guide
Page 54
...returns to the displayed FM channel. Direct Button direct Pressing direct prompts for the entry of FM presets for audio connection. Using Your onyX Menu Button menu Pressing menu displays various options to the previous menu option screen until menu options is exited. Pressing menu when in ... when Aux In Cable or Cassette Adapter is entered after pressing direct. 54 Pressing and holding FM accesses the FM Settings menu. The radio automatically tunes to the main display screen in its button location and provides one at a time. Number buttons also directly tune to the...
...returns to the displayed FM channel. Direct Button direct Pressing direct prompts for the entry of FM presets for audio connection. Using Your onyX Menu Button menu Pressing menu displays various options to the previous menu option screen until menu options is exited. Pressing menu when in ... when Aux In Cable or Cassette Adapter is entered after pressing direct. 54 Pressing and holding FM accesses the FM Settings menu. The radio automatically tunes to the main display screen in its button location and provides one at a time. Number buttons also directly tune to the...

