User Guide
Page 3
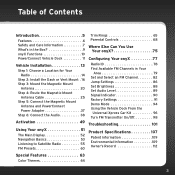
...Features 6 Safety and Care Information 7 What's in the Box 9 onyX Functions 10 PowerConnect Vehicle Dock 11 Vehicle Installation 13 Step 1: Choose a Location for Your Radio 14...and PowerConnect Power Adapter 37 Step 6: Connect the Audio 38 Activation 49 Using Your onyX 51 The Main Display 52 Navigation Basics 53 Listening to Satellite Radio 55 FM ...onyX 77 Radio ID 78 Find Available FM Channels in Your Area 79 Set and Select an FM Channel 82 Jump Settings 86 Set Brightness 88 Set Audio Level 89 Signal Indicator 90 Factory Settings 91 Demo Mode 94 Using the Vehicle Dock...
...Features 6 Safety and Care Information 7 What's in the Box 9 onyX Functions 10 PowerConnect Vehicle Dock 11 Vehicle Installation 13 Step 1: Choose a Location for Your Radio 14...and PowerConnect Power Adapter 37 Step 6: Connect the Audio 38 Activation 49 Using Your onyX 51 The Main Display 52 Navigation Basics 53 Listening to Satellite Radio 55 FM ...onyX 77 Radio ID 78 Find Available FM Channels in Your Area 79 Set and Select an FM Channel 82 Jump Settings 86 Set Brightness 88 Set Audio Level 89 Signal Indicator 90 Factory Settings 91 Demo Mode 94 Using the Vehicle Dock...
User Guide
Page 9
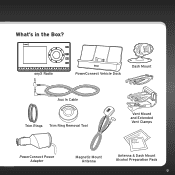
menu FM jump 1 2 3 4 5 6 7 8 9 0 direct onyX Radio PowerConnect Vehicle Dock Dash Mount Aux In Cable Trim Rings Trim Ring Removal Tool Vent Mount and Extended Vent Clamps PowerConnect Power Adapter Magnetic Mount Antenna Antenna & Dash Mount Alcohol Preparation Pads 9 What's in the Box?
menu FM jump 1 2 3 4 5 6 7 8 9 0 direct onyX Radio PowerConnect Vehicle Dock Dash Mount Aux In Cable Trim Rings Trim Ring Removal Tool Vent Mount and Extended Vent Clamps PowerConnect Power Adapter Magnetic Mount Antenna Antenna & Dash Mount Alcohol Preparation Pads 9 What's in the Box?

User Guide
Page 11
ANT (Silver) Connection for PowerConnect Power Adapter. PWR (Red) Connection for the Magnetic Mount Antenna. FM (Blue) Connection for Aux In Cable or optional Cassette Adapter (sold separately). 11 Just match the colors on the cable ends to the colors on the dock to connect. Rear View AUDIO ANT PWR FM AUDIO (Green) Connection for optional FM Direct Adapter (sold separately). PowerConnect Vehicle Dock Color-Coded Connections The color-coded PowerConnect Vehicle Dock makes it simple to see what goes where.
ANT (Silver) Connection for PowerConnect Power Adapter. PWR (Red) Connection for the Magnetic Mount Antenna. FM (Blue) Connection for Aux In Cable or optional Cassette Adapter (sold separately). 11 Just match the colors on the cable ends to the colors on the dock to connect. Rear View AUDIO ANT PWR FM AUDIO (Green) Connection for optional FM Direct Adapter (sold separately). PowerConnect Vehicle Dock Color-Coded Connections The color-coded PowerConnect Vehicle Dock makes it simple to see what goes where.

User Guide
Page 12
Wire Guide 12 If you to organize the cables and wires connected to the other, utilize the wire guide by looping the cable though the wire guide as shown. Introduction Wire Guide The PowerConnect Vehicle Dock has a wire guide at the top rear that can help you need to bring a cable or wire from one side of the dock to the dock.
Wire Guide 12 If you to organize the cables and wires connected to the other, utilize the wire guide by looping the cable though the wire guide as shown. Introduction Wire Guide The PowerConnect Vehicle Dock has a wire guide at the top rear that can help you need to bring a cable or wire from one side of the dock to the dock.
User Guide
Page 16
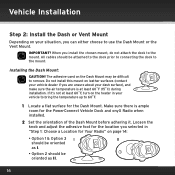
... your vehicle dealer if you are unsure about your vehicle to bring the temperature up to 60ûF. 1 Locate a flat surface for the PowerConnect Vehicle Dock and onyX Radio when installed. 2 Set the orientation of the Dash Mount before adhering it 's not at least 60ûF (15ûC) during installation. All ... room for the Dash Mount. Loosen the knob and adjust the adhesive foot for the location you install the chosen mount, do not attach the dock to remove. Make sure there is at least 60ûF, turn on the heater in "Step 1: Choose a Location for Your Radio" on the Dash ...
... your vehicle dealer if you are unsure about your vehicle to bring the temperature up to 60ûF. 1 Locate a flat surface for the PowerConnect Vehicle Dock and onyX Radio when installed. 2 Set the orientation of the Dash Mount before adhering it 's not at least 60ûF (15ûC) during installation. All ... room for the Dash Mount. Loosen the knob and adjust the adhesive foot for the location you install the chosen mount, do not attach the dock to remove. Make sure there is at least 60ûF, turn on the heater in "Step 1: Choose a Location for Your Radio" on the Dash ...

User Guide
Page 17
... To remove, carefully lift the adhesive pad with the alcohol preparation pad and let it dry thoroughly. 5 Peel off the adhesive liner. Knob Adhesive Foot Dock Mounting Plate 4 Clean the surface with your particular vehicle. The best adhesion occurs after 24 hours. Warming the pad with a hair dryer for a minimum of... necessary for 30 seconds. When the orientation is correct, tighten the knob. IMPORTANT! TIP! Position, press, and hold the Dash Mount in different directions. 3 The dock mounting plate can be tilted in place for your fingers or a spoon.
... To remove, carefully lift the adhesive pad with the alcohol preparation pad and let it dry thoroughly. 5 Peel off the adhesive liner. Knob Adhesive Foot Dock Mounting Plate 4 Clean the surface with your particular vehicle. The best adhesion occurs after 24 hours. Warming the pad with a hair dryer for a minimum of... necessary for 30 seconds. When the orientation is correct, tighten the knob. IMPORTANT! TIP! Position, press, and hold the Dash Mount in different directions. 3 The dock mounting plate can be tilted in place for your fingers or a spoon.

User Guide
Page 18
Vehicle Installation Installing the Vent Mount: 1 Locate a vent with horizontal Extended Vent Clamps louvers sturdy enough to hold your PowerConnect Vehicle Dock and radio. 2 If the vent louvers in your vehicle are recessed, you may need to observe the orientation of the vent clamps as shown. Remove End Cap Slide Short Vent Clamps Out Slide Extended Vent Clamps In Replace End Cap 18 Be sure to use Short Vent Clamps the longer vent clamps with the Vent Mount. If so, remove the shorter vent clamps and install the longer ones into the Vent Mount.
Vehicle Installation Installing the Vent Mount: 1 Locate a vent with horizontal Extended Vent Clamps louvers sturdy enough to hold your PowerConnect Vehicle Dock and radio. 2 If the vent louvers in your vehicle are recessed, you may need to observe the orientation of the vent clamps as shown. Remove End Cap Slide Short Vent Clamps Out Slide Extended Vent Clamps In Replace End Cap 18 Be sure to use Short Vent Clamps the longer vent clamps with the Vent Mount. If so, remove the shorter vent clamps and install the longer ones into the Vent Mount.

User Guide
Page 31
..." on back pillars and above the doors. Be careful not to tuck the cable under the carpet, keeping it to the antenna connector of the dock. 7. Secure the excess cable with "SRS" logos. Avoid side airbag locations on page 37. 31 Airbag locations are marked with wire ties (purchased separately). 6. Bring.... 5. Leave yourself enough cable so you can easily connect it away from the trim near the front of the cable out at the PowerConnect Vehicle Dock location.
..." on back pillars and above the doors. Be careful not to tuck the cable under the carpet, keeping it to the antenna connector of the dock. 7. Secure the excess cable with "SRS" logos. Avoid side airbag locations on page 37. 31 Airbag locations are marked with wire ties (purchased separately). 6. Bring.... 5. Leave yourself enough cable so you can easily connect it away from the trim near the front of the cable out at the PowerConnect Vehicle Dock location.

User Guide
Page 32
... from the opening . Run the cable inside it, then replace the weather stripping. Bring the end of the cable out at the Front of the dock. 32 Vehicle Installation • Sedan/Coupe With Antenna Placed at the PowerConnect Vehicle...
... from the opening . Run the cable inside it, then replace the weather stripping. Bring the end of the cable out at the Front of the dock. 32 Vehicle Installation • Sedan/Coupe With Antenna Placed at the PowerConnect Vehicle...

User Guide
Page 34
Bring the end of the vehicle. Route the cable along the trunk wall and into the trunk at the PowerConnect Vehicle Dock location. Continue with wire ties (purchased separately). 4. Tape or tie the cable along an existing wiring harness. 3. Use a blunt plastic putty knife or... the trunk lid can easily connect it away from any vehicle pedals or controls. Route the cable through a conduit or along the inside of the dock. 5. Secure the excess cable with "Step 5: Connect the Magnetic Mount Antenna and PowerConnect Power Adapter" on page 37. • Convertible: 1. Leave yourself ...
Bring the end of the vehicle. Route the cable along the trunk wall and into the trunk at the PowerConnect Vehicle Dock location. Continue with wire ties (purchased separately). 4. Tape or tie the cable along an existing wiring harness. 3. Use a blunt plastic putty knife or... the trunk lid can easily connect it away from any vehicle pedals or controls. Route the cable through a conduit or along the inside of the dock. 5. Secure the excess cable with "Step 5: Connect the Magnetic Mount Antenna and PowerConnect Power Adapter" on page 37. • Convertible: 1. Leave yourself ...

User Guide
Page 35
Bring the end of the 35 At the lowest corner of the cable out at the PowerConnect Vehicle Dock location. Airbag locations are marked with wire ties (purchased separately). 5. Secure the excess cable with "SRS" logos. Continue with "Step 5: Connect the Magnetic Mount Antenna ... the cable underneath the windshield molding around the windshield and tuck the antenna cable underneath it. 2. Be careful not to the antenna connector of the dock. 6. under the carpet, keeping it away from the trim near the front of the cabin and route it under the carpet toward the dashboard or...
Bring the end of the 35 At the lowest corner of the cable out at the PowerConnect Vehicle Dock location. Airbag locations are marked with wire ties (purchased separately). 5. Secure the excess cable with "SRS" logos. Continue with "Step 5: Connect the Magnetic Mount Antenna ... the cable underneath the windshield molding around the windshield and tuck the antenna cable underneath it. 2. Be careful not to the antenna connector of the dock. 6. under the carpet, keeping it away from the trim near the front of the cabin and route it under the carpet toward the dashboard or...

User Guide
Page 36
...inside it away from the opening . Pull the cable out of the weather stripping at the bottom of the cable out at the PowerConnect Vehicle Dock location. Secure the excess cable with "Step 5: Connect the Magnetic Mount Antenna and PowerConnect Power Adapter" on page 37. 36 Lift the ... and into the rubber weather stripping around the door opening and tuck the cable inside of the weather stripping to the antenna connector of the dock. 6. Coil any vehicle pedals or controls. Continue with wire ties. 5. Leave yourself enough cable so you can easily connect it under the carpet...
...inside it away from the opening . Pull the cable out of the weather stripping at the bottom of the cable out at the PowerConnect Vehicle Dock location. Secure the excess cable with "Step 5: Connect the Magnetic Mount Antenna and PowerConnect Power Adapter" on page 37. 36 Lift the ... and into the rubber weather stripping around the door opening and tuck the cable inside of the weather stripping to the antenna connector of the dock. 6. Coil any vehicle pedals or controls. Continue with wire ties. 5. Leave yourself enough cable so you can easily connect it under the carpet...

User Guide
Page 37
Step 5: Connect the Magnetic Mount Antenna and PowerConnect Power Adapter 1 Plug the Magnetic Mount Antenna into the red PWR connector on the PowerConnect Vehicle Dock. AUDIO ANT PWR FM 37 AUDIO ANT PWR FM 2 Insert the PowerConnect Power Adapter into your vehicle's cigarette lighter or power adapter socket. 3 Plug the PowerConnect Power Adapter into the silver ANT connector on the dock.
Step 5: Connect the Magnetic Mount Antenna and PowerConnect Power Adapter 1 Plug the Magnetic Mount Antenna into the red PWR connector on the PowerConnect Vehicle Dock. AUDIO ANT PWR FM 37 AUDIO ANT PWR FM 2 Insert the PowerConnect Power Adapter into your vehicle's cigarette lighter or power adapter socket. 3 Plug the PowerConnect Power Adapter into the silver ANT connector on the dock.
User Guide
Page 39
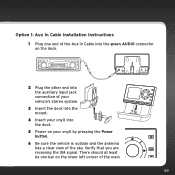
...Aux In Cable Installation Instructions 1 Plug one bar on the lower left corner of the Aux In Cable into the dock. 5 Power on the dock. Verify that you are receiving the XM signal. There should at least be one end of the main menu FM 12 3 4 5 6 78 9 ...jump 0 direct menu FM jump 1 2 3 4 5 6 7 8 9 0 direct 39 AUDIO ANT PWR FM 2 Plug the other end into the auxiliary input jack connection of your vehicle's stereo system. 3 Insert the dock into the mount. 4 Insert your onyX...
...Aux In Cable Installation Instructions 1 Plug one bar on the lower left corner of the Aux In Cable into the dock. 5 Power on the dock. Verify that you are receiving the XM signal. There should at least be one end of the main menu FM 12 3 4 5 6 78 9 ...jump 0 direct menu FM jump 1 2 3 4 5 6 7 8 9 0 direct 39 AUDIO ANT PWR FM 2 Plug the other end into the auxiliary input jack connection of your vehicle's stereo system. 3 Insert the dock into the mount. 4 Insert your onyX...
User Guide
Page 41
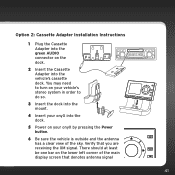
... on the lower left corner of the sky. You may need to do so. 3 Insert the dock into the mount. menu FM 12 3 4 5 6 78 9 jump 0 direct 4 Insert your onyX by pressing the Power button. 6 Be sure the vehicle is outside and the antenna has a clear view of the ...main display screen that you are receiving the XM signal. Verify that denotes antenna signal FM jump 41 1 2 3 4 5 6 7 8 9 0 ...
... on the lower left corner of the sky. You may need to do so. 3 Insert the dock into the mount. menu FM 12 3 4 5 6 78 9 jump 0 direct 4 Insert your onyX by pressing the Power button. 6 Be sure the vehicle is outside and the antenna has a clear view of the ...main display screen that you are receiving the XM signal. Verify that denotes antenna signal FM jump 41 1 2 3 4 5 6 7 8 9 0 ...
User Guide
Page 43
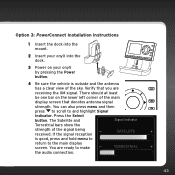
... screen that you are ready to and highlight Signal Indicator. You are receiving the XM signal. Option 3: PowerConnect Installation Instructions 1 Insert the dock into the dock. There should at least be one bar on your onyX into the mount. 2 Insert your onyX by pressing the Power button. 4 Be sure the vehicle is good, press and...
... screen that you are ready to and highlight Signal Indicator. You are receiving the XM signal. Option 3: PowerConnect Installation Instructions 1 Insert the dock into the dock. There should at least be one bar on your onyX into the mount. 2 Insert your onyX by pressing the Power button. 4 Be sure the vehicle is good, press and...

User Guide
Page 45
... you have not already done so) and tune it is not PowerConnect. 90.1 menu FM jump 1 2 3 4 5 6 7 8 9 0 direct MATCH FM CHANNELS 8 Set your onyX to transmit on page 96, and complete the additional instructions before continuing with your vehicle's FM radio, but it is not highlighted, press to scroll... Kit instead of the PowerConnect Vehicle Dock which came with the next step. Refer to this FM channel. ii. NOTE! If you have to and highlight the storage location FM 2 and press the Select button. FM Channels will be through your onyX, you will have selected in step...
... you have not already done so) and tune it is not PowerConnect. 90.1 menu FM jump 1 2 3 4 5 6 7 8 9 0 direct MATCH FM CHANNELS 8 Set your onyX to transmit on page 96, and complete the additional instructions before continuing with your vehicle's FM radio, but it is not highlighted, press to scroll... Kit instead of the PowerConnect Vehicle Dock which came with the next step. Refer to this FM channel. ii. NOTE! If you have to and highlight the storage location FM 2 and press the Select button. FM Channels will be through your onyX, you will have selected in step...

User Guide
Page 47
Refer to "Troubleshooting" on the PowerConnect Vehicle Dock. Option 4: FM Direct Adapter (FMDA) Installation The FMDA needs to the same FM channel (steps 7 & 8). verify that nothing is a suitable one to use in your radio, or go to xmradio.com/accessories. 47 Verify that both the onyX and your radio's reception and significantly reduce...
Refer to "Troubleshooting" on the PowerConnect Vehicle Dock. Option 4: FM Direct Adapter (FMDA) Installation The FMDA needs to the same FM channel (steps 7 & 8). verify that nothing is a suitable one to use in your radio, or go to xmradio.com/accessories. 47 Verify that both the onyX and your radio's reception and significantly reduce...

User Guide
Page 89
... player, other audio sources you may use, such as a volume control. Set Audio Level The audio level of the onyX can be adjusted when an audio connection is used to adjust the onyX's volume level to match the volume of other FM stations, or an MP3 player. Use the volume control on... your vehicle's stereo instead. Audio level is made between the dock and the vehicle's stereo system. Set Audio Level Press arrow...
... player, other audio sources you may use, such as a volume control. Set Audio Level The audio level of the onyX can be adjusted when an audio connection is used to adjust the onyX's volume level to match the volume of other FM stations, or an MP3 player. Use the volume control on... your vehicle's stereo instead. Audio level is made between the dock and the vehicle's stereo system. Set Audio Level Press arrow...
User Guide
Page 91
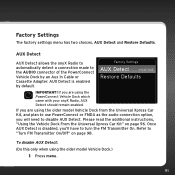
..." on page 96. Once AUX Detect is enabled by an Aux In Cable or Cassette Adapter. If you are using the PowerConnect Vehicle Dock which came with your onyX Radio, AUX Detect should remain enabled. Refer to turn the FM Transmitter On. AUX Detect AUX Detect allows the... onyX Radio to automatically detect a connection made to disable AUX Detect. Please read the additional instructions, "Using the Vehicle Dock From the Universal Xpress Car Kit" on page 98. AUX Detect is disabled, you are...
..." on page 96. Once AUX Detect is enabled by an Aux In Cable or Cassette Adapter. If you are using the PowerConnect Vehicle Dock which came with your onyX Radio, AUX Detect should remain enabled. Refer to turn the FM Transmitter On. AUX Detect AUX Detect allows the... onyX Radio to automatically detect a connection made to disable AUX Detect. Please read the additional instructions, "Using the Vehicle Dock From the Universal Xpress Car Kit" on page 98. AUX Detect is disabled, you are...
