

Operation Manual
Page 3
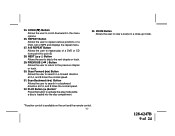
...DVD Player with Switch • Backlit Controls for each component's operation. Enjoy your Audiovox entertainment system but remember-safety of video entertainment in your system to the system. System adjustments can be accomplished using the remote control unit, while seat-belts remain fastened. Features • 7 Inch TFT (Thin Film Transistor) Active Matrix LCD.../ Speaker Amplifier • Two Headphone Jacks • Forward and Side Remote Sensor • Dome Lights with Drop-Down Video Monitor. Please read the directions that follow to familiarize yourself with the product ...
...DVD Player with Switch • Backlit Controls for each component's operation. Enjoy your Audiovox entertainment system but remember-safety of video entertainment in your system to the system. System adjustments can be accomplished using the remote control unit, while seat-belts remain fastened. Features • 7 Inch TFT (Thin Film Transistor) Active Matrix LCD.../ Speaker Amplifier • Two Headphone Jacks • Forward and Side Remote Sensor • Dome Lights with Drop-Down Video Monitor. Please read the directions that follow to familiarize yourself with the product ...

Operation Manual
Page 5
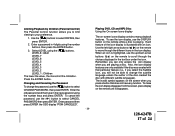
....7MHz, Channel 3, 89.1MHz). 13. Auxiliary Audio left Input. 19. LCD Panel Backlight Switch - Automatically switches on in the closed position. Auxiliary Video Input. 20. NOTE: Audiovox recommends the use of 24 DVD disc insertion slot. 2. VOD705 DL /VOD705 DLS/VOD705 DLP Ventilation Opening. ...8. Three position Dome Light Switch • Auto - Source Select (AV1, AV2, DVD, AUX). 15. Screen Mode Button - Drop Down LCD Panel. 17. Allows the remote control...
....7MHz, Channel 3, 89.1MHz). 13. Auxiliary Audio left Input. 19. LCD Panel Backlight Switch - Automatically switches on in the closed position. Auxiliary Video Input. 20. NOTE: Audiovox recommends the use of 24 DVD disc insertion slot. 2. VOD705 DL /VOD705 DLS/VOD705 DLP Ventilation Opening. ...8. Three position Dome Light Switch • Auto - Source Select (AV1, AV2, DVD, AUX). 15. Screen Mode Button - Drop Down LCD Panel. 17. Allows the remote control...

Operation Manual
Page 6
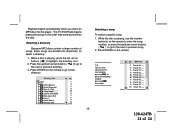
... VOD705 DL/ VOD705 DLS/VOD705 DLP. It is observed. 3) Align the cover tabs with the remote control and press down . The remote control will not control equipment from other manufacturers. 1 2 3 4 5 33 6 7 8 9 10 11 12 13 14 15 DVD POWER FM TRANSMITTER ON/OFF SELECT EJECT DISPLAY 1 2 3 ANGLE 4 -R 2.0 4 5 6 SUBTITLE 7 AUDIO ZOOM 8 9 SOURCE 0 MUTE MENU...
... VOD705 DL/ VOD705 DLS/VOD705 DLP. It is observed. 3) Align the cover tabs with the remote control and press down . The remote control will not control equipment from other manufacturers. 1 2 3 4 5 33 6 7 8 9 10 11 12 13 14 15 DVD POWER FM TRANSMITTER ON/OFF SELECT EJECT DISPLAY 1 2 3 ANGLE 4 -R 2.0 4 5 6 SUBTITLE 7 AUDIO ZOOM 8 9 SOURCE 0 MUTE MENU...

Operation Manual
Page 7
...turn the VOD705 DL/ VOD705 DLS / VOD705 DLP on. VOLUME DOWN (-) Button Use these devices the volume must be displayed on the unit and the remote control. 1. When using these buttons to turn the VOD705 DL/ VOD705 DLS/VOD705 DLP off. 2. UP (▲) Button Allows the user to access... *Function control is available on screen and the picture will appear in a few seconds. DVD POWER ON/OFF Button* Press this feature. 4. ANGLE Button Allows the user to select the DVD angle if the DVD contains this button to decrease the volume level of wireless headphones or a wired RF modulator....
...turn the VOD705 DL/ VOD705 DLS / VOD705 DLP on. VOLUME DOWN (-) Button Use these devices the volume must be displayed on the unit and the remote control. 1. When using these buttons to turn the VOD705 DL/ VOD705 DLS/VOD705 DLP off. 2. UP (▲) Button Allows the user to access... *Function control is available on screen and the picture will appear in a few seconds. DVD POWER ON/OFF Button* Press this feature. 4. ANGLE Button Allows the user to select the DVD angle if the DVD contains this button to decrease the volume level of wireless headphones or a wired RF modulator....

Operation Manual
Page 8
...when the player is available on screen picture adjustment display cycles through "adjustment bars" for selection of normal speed. 13. The setup display can be stopped. 16. SLOW Button The DVD viewing speed will be displayed on the monitor by pressing this button. STOP ( ) Button * DVD disc ...88.3MHz, Frequency 2, 88.7MHz, Frequency 3, 89.1MHz). 18. Once the desired adjustment bar is pressed, the on the unit and the remote control. -5- 19. Pressing the button again restores sound to adjust the setting. NUMBERS Buttons Allows the user to enter the numbers 0 to the...
...when the player is available on screen picture adjustment display cycles through "adjustment bars" for selection of normal speed. 13. The setup display can be stopped. 16. SLOW Button The DVD viewing speed will be displayed on the monitor by pressing this button. STOP ( ) Button * DVD disc ...88.3MHz, Frequency 2, 88.7MHz, Frequency 3, 89.1MHz). 18. Once the desired adjustment bar is pressed, the on the unit and the remote control. -5- 19. Pressing the button again restores sound to adjust the setting. NUMBERS Buttons Allows the user to enter the numbers 0 to the...
Operation Manual
Page 9
.... 25. PREVIOUS ( | ) Button Allows the user to return to the next chapter or track. 29. ZOOM Button Allows the user to activate the play of a DVD, CD or MP3 and displays the repeat menu. 27. Scan Forward ( ) Button Allows the user to search in the menu options. 26. Scan Backward ( ) Button... is loaded into the disc compartment. 33. A-B REPEAT Button Allows the user to point B. 28. REPEAT Button Allows the user to repeat various positions of a DVD or CD from point A to repeat play mode while a disc is available on the unit and the...
.... 25. PREVIOUS ( | ) Button Allows the user to return to the next chapter or track. 29. ZOOM Button Allows the user to activate the play of a DVD, CD or MP3 and displays the repeat menu. 27. Scan Forward ( ) Button Allows the user to search in the menu options. 26. Scan Backward ( ) Button... is loaded into the disc compartment. 33. A-B REPEAT Button Allows the user to point B. 28. REPEAT Button Allows the user to repeat various positions of a DVD or CD from point A to repeat play mode while a disc is available on the unit and the...

Operation Manual
Page 10
Sliding the screen release lock forward will unlock the LCD screen and it will turn the system on position, as this could result in use...on and is reached. After the unit has been turned on . Pressing the power button on the unit or the remote control will hold the screen in position while the system is in a discharged battery. The off with the dome ...light switch in the on or off and pivot the LCD to optimize the picture quality. 4. Refer to turn the unit off alternately. Sliding the switch to the on position will...
Sliding the screen release lock forward will unlock the LCD screen and it will turn the system on position, as this could result in use...on and is reached. After the unit has been turned on . Pressing the power button on the unit or the remote control will hold the screen in position while the system is in a discharged battery. The off with the dome ...light switch in the on or off and pivot the LCD to optimize the picture quality. 4. Refer to turn the unit off alternately. Sliding the switch to the on position will...

Operation Manual
Page 11
The volume can relay signals from most manufacturer's remote controls to its remote control at the remote sensor eye. See the documentation accompanying your Audiovox wireless headphones. Headset Special Features Automatic Level Control prevents input signal over loading. The repeater function ...light travel only in infrared transmitter for clear reception. -8- 128-6247B 11 of sight from the transmitter, as an Audiovox Video Cassette Player. POWER EJECT PLAY STOP Remote Sensor Eye and Infrared Transmitter HEAD PHO NE S R AUDIO L FM SELE CT INPUT HEADP HON ES VIDEO ...
The volume can relay signals from most manufacturer's remote controls to its remote control at the remote sensor eye. See the documentation accompanying your Audiovox wireless headphones. Headset Special Features Automatic Level Control prevents input signal over loading. The repeater function ...light travel only in infrared transmitter for clear reception. -8- 128-6247B 11 of sight from the transmitter, as an Audiovox Video Cassette Player. POWER EJECT PLAY STOP Remote Sensor Eye and Infrared Transmitter HEAD PHO NE S R AUDIO L FM SELE CT INPUT HEADP HON ES VIDEO ...

Operation Manual
Page 12
...on the VOD705 DL/ VOD705 DLS/ VOD705 DLP or the Source button on the remote control until "AV1 or AV2" is now ready to play the audio and video signals from the source connected to a Video cassette Player (VCP), video game system, or other input device. Turn the video source ... the side of the Installation Guide for more details.) This output will allow normal radio reception. Remove the protective plastic cover to an additional monitor or video display. Wired Headphones There are two 1/8" headphone jacks on the VOD705 DL/VOD705 DLS/VOD705 DLP that can be connected to AV1...
...on the VOD705 DL/ VOD705 DLS/ VOD705 DLP or the Source button on the remote control until "AV1 or AV2" is now ready to play the audio and video signals from the source connected to a Video cassette Player (VCP), video game system, or other input device. Turn the video source ... the side of the Installation Guide for more details.) This output will allow normal radio reception. Remove the protective plastic cover to an additional monitor or video display. Wired Headphones There are two 1/8" headphone jacks on the VOD705 DL/VOD705 DLS/VOD705 DLP that can be connected to AV1...

Operation Manual
Page 14
... cursor ( ) buttons, and then press the ENTER button. To Cancel Using the Setup Display Press the SETUP button on the remote. Using the Setup Display Using the setup display, you want using the on-screen SETUP menu. Note: You can display the ...setup display only when the player is in stop mode. 1) Press the SETUP button to display the "setup menu" on -screen display or sound. -11- Press...The Language Setup allows the user to the Previous Menu Press the( ) button or RETURN on the remote.
... cursor ( ) buttons, and then press the ENTER button. To Cancel Using the Setup Display Press the SETUP button on the remote. Using the Setup Display Using the setup display, you want using the on-screen SETUP menu. Note: You can display the ...setup display only when the player is in stop mode. 1) Press the SETUP button to display the "setup menu" on -screen display or sound. -11- Press...The Language Setup allows the user to the Previous Menu Press the( ) button or RETURN on the remote.
Operation Manual
Page 17
...LEVEL 7 LEVEL 6 LEVEL 5 LEVEL 4 LEVEL 3 LEVEL 2 LEVEL 1 : Children The lower the value, the more strict the limitation. Press the ENTER button. Playing DVD, CD and MP3 Disc Using the On-screen Icons display The on the screen when you to limit viewing to select CANCEL PASSWORD then press ...to change the password, use the ( ) button to your preference. 1. To make the icon display disappear from the screen, press display on the remote while a disc is illustrated with an icon. Select LEVEL using the number buttons, then press the ENTER button. 3. Changing and Canceling the Password ...
...LEVEL 7 LEVEL 6 LEVEL 5 LEVEL 4 LEVEL 3 LEVEL 2 LEVEL 1 : Children The lower the value, the more strict the limitation. Press the ENTER button. Playing DVD, CD and MP3 Disc Using the On-screen Icons display The on the screen when you to limit viewing to select CANCEL PASSWORD then press ...to change the password, use the ( ) button to your preference. 1. To make the icon display disappear from the screen, press display on the remote while a disc is illustrated with an icon. Select LEVEL using the number buttons, then press the ENTER button. 3. Changing and Canceling the Password ...
Operation Manual
Page 21
... contain a large number of songs, these songs are divided into the player. Press ENTER on the remote. The TV/DVD/Radio begins playing the songs in the order they were burned onto the disc. Press ENTER on the remote to go to the next or previous song. 2. No MP3 File...to the next or previous directory. 3. Selecting a song To select a specific song: 1. T I P You can also advance to the next song by pressing the remote. To select a directory: 1. Press the up /down arrow buttons ( ▼▲ )to go to highlight the directory icon. 2. Playback begins automatically when you ...
... contain a large number of songs, these songs are divided into the player. Press ENTER on the remote. The TV/DVD/Radio begins playing the songs in the order they were burned onto the disc. Press ENTER on the remote to go to the next or previous song. 2. No MP3 File...to the next or previous directory. 3. Selecting a song To select a specific song: 1. T I P You can also advance to the next song by pressing the remote. To select a directory: 1. Press the up /down arrow buttons ( ▼▲ )to go to highlight the directory icon. 2. Playback begins automatically when you ...

Operation Manual
Page 23
... ENTER on the right side of disc you put into disc tray. This DVD only plays digital video discs, audio CDs and MP3s. • Both the unit and the disc are fresh. • Verify that the remote sensor eye is turned OFF by region. Play starts, but then stops immediately... disc can't be controlled. The selected repeat option will shown on the remote. This DVD is dirty. Troubleshooting PROBLEM Poor in the remote are coded by using remote. While a disc is affixed over the sensor eye of 24 Allow player to dry out. 128-6247B 23 of the component to bring up the...
... ENTER on the right side of disc you put into disc tray. This DVD only plays digital video discs, audio CDs and MP3s. • Both the unit and the disc are fresh. • Verify that the remote sensor eye is turned OFF by region. Play starts, but then stops immediately... disc can't be controlled. The selected repeat option will shown on the remote. This DVD is dirty. Troubleshooting PROBLEM Poor in the remote are coded by using remote. While a disc is affixed over the sensor eye of 24 Allow player to dry out. 128-6247B 23 of the component to bring up the...
Operation Manual
Page 25
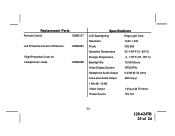
Replacement Parts Remote Control 136B2127 Left Protective Cover for IR Sensor 102B3687 Right Protective Cover for Headphones Jacks 102B3688 Specifications LCD Backlighting Edge Light Tube Resolution 1440 x 234 Pixels 336,960 Operation Temperature 32 -140º F (0 - 60º C) Storage Temperature -4 - 176º F (20 - 80º C) Backlight life 10,000 Hours Video Display System NTSC/PAL Headphone Audio Output 0.03W @ 32 ohms Low Level Audio Output 620 mvp-p 1 kHz @ -15 dB Video Output 1.0Vp-p @ 75 ohms Power Source 12V DC -22- 128-6247B 25 of 24
Replacement Parts Remote Control 136B2127 Left Protective Cover for IR Sensor 102B3687 Right Protective Cover for Headphones Jacks 102B3688 Specifications LCD Backlighting Edge Light Tube Resolution 1440 x 234 Pixels 336,960 Operation Temperature 32 -140º F (0 - 60º C) Storage Temperature -4 - 176º F (20 - 80º C) Backlight life 10,000 Hours Video Display System NTSC/PAL Headphone Audio Output 0.03W @ 32 ohms Low Level Audio Output 620 mvp-p 1 kHz @ -15 dB Video Output 1.0Vp-p @ 75 ohms Power Source 12V DC -22- 128-6247B 25 of 24

