Owners Manual
Page 1
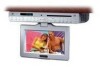
VE926 UNDER THE COUNTER 9" TV, AM/FM RADIO, TELEPHONE & DVD PLAYER OWNER'S and INSTALL MANUAL • Slot-in DVD Player & 9" TFT LCD Monitor • Multi-function Remote Control • Built-in Hands Free Speaker Phone • Cable Ready 125 Channel TV Tuner • AM/FM Radio • 2 A/V Inputs • Intercom Ready • Internal Stereo Speakers • Under Cabinet / Table Top Mounting 0
VE926 UNDER THE COUNTER 9" TV, AM/FM RADIO, TELEPHONE & DVD PLAYER OWNER'S and INSTALL MANUAL • Slot-in DVD Player & 9" TFT LCD Monitor • Multi-function Remote Control • Built-in Hands Free Speaker Phone • Cable Ready 125 Channel TV Tuner • AM/FM Radio • 2 A/V Inputs • Intercom Ready • Internal Stereo Speakers • Under Cabinet / Table Top Mounting 0
Owners Manual
Page 3
... interference in a particular installation. Refer to these instructions may cause or result in the reception of this equipment does cause harmful interference with the manufacture's instructions. SERIAL No. 2 This unit complies with FCC Rules Part 15, which can be... receiving antenna - Increase the separation between the equipment and receiver - MODEL No. Consult with the dealer or an experienced radio/TV technician for help NOTE: Record your AUDIOVOX dealer regarding this product. Failure to follow these numbers if you need to which the receiver is connected...
... interference in a particular installation. Refer to these instructions may cause or result in the reception of this equipment does cause harmful interference with the manufacture's instructions. SERIAL No. 2 This unit complies with FCC Rules Part 15, which can be... receiving antenna - Increase the separation between the equipment and receiver - MODEL No. Consult with the dealer or an experienced radio/TV technician for help NOTE: Record your AUDIOVOX dealer regarding this product. Failure to follow these numbers if you need to which the receiver is connected...

Owners Manual
Page 4
... of the type of power source indicated on an unstable surface. This product should be operated only from the type of power supply in the operating instructions should be adhered to overturn. 10. Use a damp cloth for example, near a bathtub, kitchen sink, washing machine, in damage to replace your electrician to the product. External Accessories - Cleaning - All the safety and operating instructions should be...
... of the type of power source indicated on an unstable surface. This product should be operated only from the type of power supply in the operating instructions should be adhered to overturn. 10. Use a damp cloth for example, near a bathtub, kitchen sink, washing machine, in damage to replace your electrician to the product. External Accessories - Cleaning - All the safety and operating instructions should be...
Owners Manual
Page 5
... mast, supporting structure, grounding of the lead-in a manner that are covered by the operating instructions. F. Power Lines - B. This will expose you to it . Route the power supply cord in wire to an antenna discharge unit, size of grounding conductors, location of overhead power lines or other hazards. When the product exhibits a significant change in the vicinity of antennadischarges unit, and connection to...
... mast, supporting structure, grounding of the lead-in a manner that are covered by the operating instructions. F. Power Lines - B. This will expose you to it . Route the power supply cord in wire to an antenna discharge unit, size of grounding conductors, location of overhead power lines or other hazards. When the product exhibits a significant change in the vicinity of antennadischarges unit, and connection to...

Owners Manual
Page 6
... or cooking product beneath this manual. 24. Replacement Parts - When replacement parts are required, be mounted only as the original part. Mounting - The product should be sure the service technician has used replacement parts specified by the manufacturer or that the product is provided to call the CATV (CABLE-TV) system installer's attention to article 820-40 of cable entry as close to the grounding system...
... or cooking product beneath this manual. 24. Replacement Parts - When replacement parts are required, be mounted only as the original part. Mounting - The product should be sure the service technician has used replacement parts specified by the manufacturer or that the product is provided to call the CATV (CABLE-TV) system installer's attention to article 820-40 of cable entry as close to the grounding system...

Owners Manual
Page 7
... CONTENTS Before You Begin Installation Remote Control Functions Modes of Operation Using the DVD Loader Technical Specifications Troubleshooting Check List Introduction 1 Important Safety Information 3 Table of Contents 6 Contents of package 7 Under Cabinet Installation 8 Countertop/Desktop Installation 9 Front Panel Controls 10 Rear Panel Controls 11 LCD Control Functions 12 Battery Installation 13 Remote Control Functions 14 Operation 17 Initial Set up 17 Channel Tuning Set up 17 Positioning the Screen 17 Setting the Time 17 Setting and Activating The Alarm...
... CONTENTS Before You Begin Installation Remote Control Functions Modes of Operation Using the DVD Loader Technical Specifications Troubleshooting Check List Introduction 1 Important Safety Information 3 Table of Contents 6 Contents of package 7 Under Cabinet Installation 8 Countertop/Desktop Installation 9 Front Panel Controls 10 Rear Panel Controls 11 LCD Control Functions 12 Battery Installation 13 Remote Control Functions 14 Operation 17 Initial Set up 17 Channel Tuning Set up 17 Positioning the Screen 17 Setting the Time 17 Setting and Activating The Alarm...
Owners Manual
Page 9
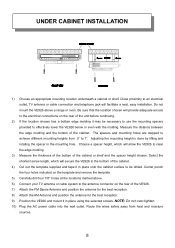
... 1". The spacers and mounting holes are stepped to achieve different mounting heights from heat and moisture sources. 8 NOTE: Do not over-tighten. 10) Plug the AC power cable into the wall outlet. Do not mount the VE926 above . 6) Connect your TV antenna or cable system to the antenna connector on the rear of the cabinet. UNDER CABINET INSTALLATION 1) Choose an appropriate mounting location underneath a cabinet or shelf...
... 1". The spacers and mounting holes are stepped to achieve different mounting heights from heat and moisture sources. 8 NOTE: Do not over-tighten. 10) Plug the AC power cable into the wall outlet. Do not mount the VE926 above . 6) Connect your TV antenna or cable system to the antenna connector on the rear of the cabinet. UNDER CABINET INSTALLATION 1) Choose an appropriate mounting location underneath a cabinet or shelf...

Owners Manual
Page 10
... over and remove the blank cover (#4) 5) Connect the plug of the unit and then turn it sideways. 3) Remove the hinge guide covers (#1) using a flat blade screwdriver inserted into the unit. Install the blank cover on the screen until this unit from the unit (#3), be careful to not damage the wires. COUNTERTOP/DESKTOP INSTALLATION NOTE: Use caution to avoid damaging the LCD screen and the...
... over and remove the blank cover (#4) 5) Connect the plug of the unit and then turn it sideways. 3) Remove the hinge guide covers (#1) using a flat blade screwdriver inserted into the unit. Install the blank cover on the screen until this unit from the unit (#3), be careful to not damage the wires. COUNTERTOP/DESKTOP INSTALLATION NOTE: Use caution to avoid damaging the LCD screen and the...
Owners Manual
Page 11
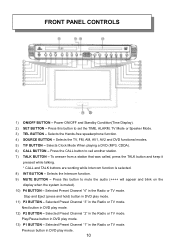
... mode. Selected Preset Channel "1" in DVD play mode. 12) P2 BUTTON - Power ON/OFF and Standby Condition(Time Display). 2) SET BUTTON - FRONT PANEL CONTROLS 1) ON/OFF BUTTON - Stop and Eject (press and hold) button in the Radio or TV mode. Press this button to call another station. 7) TALK BUTTON - To answer from a station that was called, press the TALK button and keep it pressed while talking. * CALL and TALK buttons are working...
... mode. Selected Preset Channel "1" in DVD play mode. 12) P2 BUTTON - Power ON/OFF and Standby Condition(Time Display). 2) SET BUTTON - FRONT PANEL CONTROLS 1) ON/OFF BUTTON - Stop and Eject (press and hold) button in the Radio or TV mode. Press this button to call another station. 7) TALK BUTTON - To answer from a station that was called, press the TALK button and keep it pressed while talking. * CALL and TALK buttons are working...
Owners Manual
Page 12
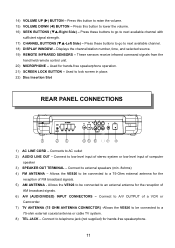
... AM broadcast signals. 6) A/V (AUDIO/VIDEO) INPUT CONNECTORS - 14) VOLUME UP (X) BUTTON - Used to telephone jack (not supplied) for hands-free speakerphone operation. 21) SCREEN LOCK BUTTON - Connect to lock screen in place. 22) Disc Insertion Slot REAR PANEL CONNECTIONS 7 8 1) AC LINE CORD - Connect to next available channel with sufficient signal strength. 17) CHANNEL BUTTONS (TS-Left Side) - Press these buttons to go to A/V OUTPUT of computer speaker 3) SPEAKER OUT TERMINAL - These sensors receive infrared command signals from the hand held remote control unit. 20...
... AM broadcast signals. 6) A/V (AUDIO/VIDEO) INPUT CONNECTORS - 14) VOLUME UP (X) BUTTON - Used to telephone jack (not supplied) for hands-free speakerphone operation. 21) SCREEN LOCK BUTTON - Connect to lock screen in place. 22) Disc Insertion Slot REAR PANEL CONNECTIONS 7 8 1) AC LINE CORD - Connect to next available channel with sufficient signal strength. 17) CHANNEL BUTTONS (TS-Left Side) - Press these buttons to go to A/V OUTPUT of computer speaker 3) SPEAKER OUT TERMINAL - These sensors receive infrared command signals from the hand held remote control unit. 20...
Owners Manual
Page 13
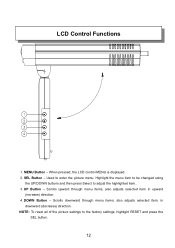
... the menu item to be changed using the UP/DOWN buttons and then press Select to the factory settings, highlight RESET and press the SEL button. 12 DOWN Button - Scrolls upward through menu items; in upward (increase) direction. 4. Scrolls downward through menu items, also adjusts selected item in downward (decrease) direction. also adjusts selected item; Used to enter the picture menu. LCD Control Functions 1. MENU Button - When pressed, the LCD control MENU is displayed. 2.
... the menu item to be changed using the UP/DOWN buttons and then press Select to the factory settings, highlight RESET and press the SEL button. 12 DOWN Button - Scrolls upward through menu items; in upward (increase) direction. 4. Scrolls downward through menu items, also adjusts selected item in downward (decrease) direction. also adjusts selected item; Used to enter the picture menu. LCD Control Functions 1. MENU Button - When pressed, the LCD control MENU is displayed. 2.
Owners Manual
Page 16
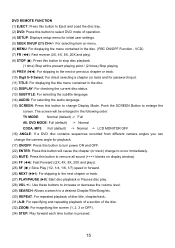
... this button to remove all sound (++++ blanks on menu. (6) MENU: For displaying the menu contained in the disc. (PBC ON/OFF Function - Push the SCREEN Button to enlarge the screen. DVD REMOTE FUNCTION (1) EJECT: Press this button to Eject and Load the disc tray. (2) DVD: Press this button to select DVD mode of the disc. (32) ZOOM: For magnifying the screen (1, 2, 3 or OFF). (34) STEP: Play forward each time button is...
... this button to remove all sound (++++ blanks on menu. (6) MENU: For displaying the menu contained in the disc. (PBC ON/OFF Function - Push the SCREEN Button to enlarge the screen. DVD REMOTE FUNCTION (1) EJECT: Press this button to Eject and Load the disc tray. (2) DVD: Press this button to select DVD mode of the disc. (32) ZOOM: For magnifying the screen (1, 2, 3 or OFF). (34) STEP: Play forward each time button is...
Owners Manual
Page 17
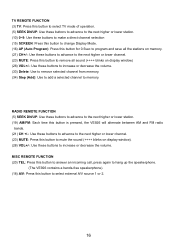
... speakerphone. (The VE926 contains a hands-free speakerphone). (18) A/V: Press this button to select external A/V source 1 or 2. 16 TV REMOTE FUNCTION (3) TV: Press this button to select TV mode of operation. (5) SEEK DN/UP: Use these buttons to advance to the next higher or lower station. (10) 0~9: Use these buttons to make a direct channel selection (15) SCREEN: Press this button to change Display Mode. (16) AP (Auto Program): Press this button for 0.5sec...
... speakerphone. (The VE926 contains a hands-free speakerphone). (18) A/V: Press this button to select external A/V source 1 or 2. 16 TV REMOTE FUNCTION (3) TV: Press this button to select TV mode of operation. (5) SEEK DN/UP: Use these buttons to advance to the next higher or lower station. (10) 0~9: Use these buttons to make a direct channel selection (15) SCREEN: Press this button to change Display Mode. (16) AP (Auto Program): Press this button for 0.5sec...
Owners Manual
Page 18
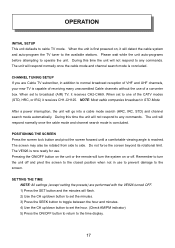
OPERATION INITIAL SETUP This unit defaults to operate the unit. When set to one of a converter box. The VE926 is concluded. Please wait while the unit auto-programs before attempting to cable TV mode. CHANNEL TUNING SETUP If you are performed with the VE926 turned OFF. 1) Press the SET button and the minutes will turn the unit off . Pressing the ON/OFF button on or off and pivot the screen to...
OPERATION INITIAL SETUP This unit defaults to operate the unit. When set to one of a converter box. The VE926 is concluded. Please wait while the unit auto-programs before attempting to cable TV mode. CHANNEL TUNING SETUP If you are performed with the VE926 turned OFF. 1) Press the SET button and the minutes will turn the unit off . Pressing the ON/OFF button on or off and pivot the screen to...
Owners Manual
Page 19
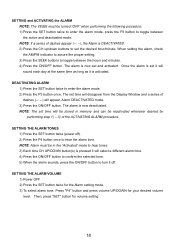
... the alarm sounds, press the ON/OFF button to turn it is activated. SETTING THE ALARM VOLUME 1) Power OFF 2) Press the SET button twice for the Alarm setting mode. 3) To select alarm tone, Press "P4" button and press volume UP/DOWN for volume setting 18 Then, press "SET" button for your desired volume level. DEACTIVATING ALARM 1) Press the SET button twice to set time will disappear from the Display Window and a series of...
... the alarm sounds, press the ON/OFF button to turn it is activated. SETTING THE ALARM VOLUME 1) Power OFF 2) Press the SET button twice for the Alarm setting mode. 3) To select alarm tone, Press "P4" button and press volume UP/DOWN for volume setting 18 Then, press "SET" button for your desired volume level. DEACTIVATING ALARM 1) Press the SET button twice to set time will disappear from the Display Window and a series of...
Owners Manual
Page 20
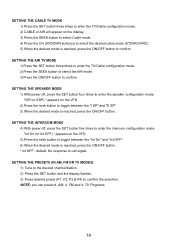
... the selection. FM and 4- SETTING THE AIR TV MODE 1) Press the SET button three times to enter the TV/Cable configuration mode. 2) Press the SEEK button to select the AIR mode. 3) Press the ON/OFF button to call signal. NOTE: you can preset 4- TV Programs 19 AM, 4- SETTING THE SPEAKER MODE 1) With power off , press the SET button five times to enter the intercom configuration mode. ″Int On (or...
... the selection. FM and 4- SETTING THE AIR TV MODE 1) Press the SET button three times to enter the TV/Cable configuration mode. 2) Press the SEEK button to select the AIR mode. 3) Press the ON/OFF button to call signal. NOTE: you can preset 4- TV Programs 19 AM, 4- SETTING THE SPEAKER MODE 1) With power off , press the SET button five times to enter the intercom configuration mode. ″Int On (or...
Owners Manual
Page 22
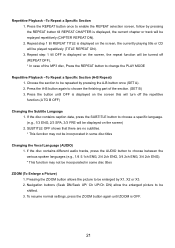
... titles ZOOM (To Enlarge a Picture) 1. Pressing the ZOOM button allows the picture to change the PLAY MODE Repetitive Playback -To Repeat a Specific Section (A-B Repeat) 1. Press the A-B button again to choose the finishing part of the MP3 disc, Press the REPEAT button to be played repetitively (TITLE REPEAT ON). 3. Press the button until ZOOM is displayed on the screen, the currently playing title or CD will...
... titles ZOOM (To Enlarge a Picture) 1. Pressing the ZOOM button allows the picture to change the PLAY MODE Repetitive Playback -To Repeat a Specific Section (A-B Repeat) 1. Press the A-B button again to choose the finishing part of the MP3 disc, Press the REPEAT button to be played repetitively (TITLE REPEAT ON). 3. Press the button until ZOOM is displayed on the screen, the currently playing title or CD will...
Owners Manual
Page 30
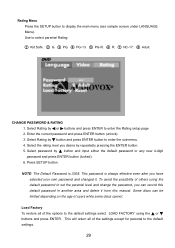
... parental to the default settings. 29 Use to enter the sub-menu. 4. Press SETUP button. Select Rating by h or d buttons and press ENTER to display the main menu (see sample screen under LANGUAGE Menu). Load Factory To restore all of users while some discs cannot. PG-13. Enter the current password and press ENTER button (unlock). 3. NOTE: The Default Password is always effective even after you desire by f button and input...
... parental to the default settings. 29 Use to enter the sub-menu. 4. Press SETUP button. Select Rating by h or d buttons and press ENTER to display the main menu (see sample screen under LANGUAGE Menu). Load Factory To restore all of users while some discs cannot. PG-13. Enter the current password and press ENTER button (unlock). 3. NOTE: The Default Password is always effective even after you desire by f button and input...
Owners Manual
Page 32
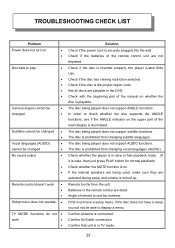
... display a menu. Angle of the manual on whether the disc is playable. The disc being used, make sure they are not depleted. DVD must have a setup you will not be changed • No sound output • • • Remote control doesn't work • • • Setup menu does not operate • TV MODE functions do not • work • • Solution Check if the power cord is securely plugged into player...
... display a menu. Angle of the manual on whether the disc is playable. The disc being used, make sure they are not depleted. DVD must have a setup you will not be changed • No sound output • • • Remote control doesn't work • • • Setup menu does not operate • TV MODE functions do not • work • • Solution Check if the power cord is securely plugged into player...

Owners Manual
Page 33
... suffered or been damaged through alteration, improper installation, mishandling, misuse, neglect, accident, or by removal or defacement of the factory serial number/bar code label(s). This Warranty is similarly waranteed for ninety (90) days. A game controller, if supplied, is in lieu of all other express warranties or liabilities. ANY IMPLIED WARRANTIES, INCLUDING ANY IMPLIED WARRANTY OF MERCHANTABILITY, SHALL BE LIMITED TO THE DURATION...
... suffered or been damaged through alteration, improper installation, mishandling, misuse, neglect, accident, or by removal or defacement of the factory serial number/bar code label(s). This Warranty is similarly waranteed for ninety (90) days. A game controller, if supplied, is in lieu of all other express warranties or liabilities. ANY IMPLIED WARRANTIES, INCLUDING ANY IMPLIED WARRANTY OF MERCHANTABILITY, SHALL BE LIMITED TO THE DURATION...


