Owners Manual
Page 5
... Safety Precautions 1-2 Important Safety Instructions 3 Table of Contents 4 Disc Formats 5 Accessories 6 Remote Control 6 Control Reference Guide 7-9 Mounting Instructions 10-11 Connections 12-13 Connecting the TV Antenna 12 Connecting the Unit to a TV or other Video Equipment 12 Connecting the Unit to a Stereo Receiver or Amplifier 12 Plugging in...Modes for CD or JPEG Disc 21 Customizing the Function Settings 22-23 Language 22 Video 22 Default 23 Using the TV 24 TV Setup 25-27 Listening to the Radio 28 Troubleshooting Guide 29 Maintenance 30 Specifications 30 - 4 -
... Safety Precautions 1-2 Important Safety Instructions 3 Table of Contents 4 Disc Formats 5 Accessories 6 Remote Control 6 Control Reference Guide 7-9 Mounting Instructions 10-11 Connections 12-13 Connecting the TV Antenna 12 Connecting the Unit to a TV or other Video Equipment 12 Connecting the Unit to a Stereo Receiver or Amplifier 12 Plugging in...Modes for CD or JPEG Disc 21 Customizing the Function Settings 22-23 Language 22 Video 22 Default 23 Using the TV 24 TV Setup 25-27 Listening to the Radio 28 Troubleshooting Guide 29 Maintenance 30 Specifications 30 - 4 -
Owners Manual
Page 7
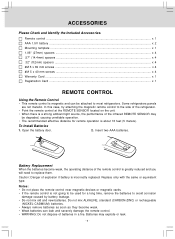
...for a long time, remove the batteries to replace them. Caution: Danger of the infrared REMOTE SENSOR may explode or leak. - 6 - Batteries may be used for remote operation is about 16 feet (5 meters). Remote control ...x 1 AAA 1.5V battery ...x 2 Mounting template ...x 1 1.06" (27mm... ...x 4 #M 5 x 69 mm screws ...x 4 #M 5 x 40 mm screws ...x 4 Warranty Card ...x 1 Registration Card ...x 1 REMOTE CONTROL Using the Remote Control • This remote control is a strong ambient light source, the performance of explosion if battery is greatly reduced and you will need to avoid corrosion...
...for a long time, remove the batteries to replace them. Caution: Danger of the infrared REMOTE SENSOR may explode or leak. - 6 - Batteries may be used for remote operation is about 16 feet (5 meters). Remote control ...x 1 AAA 1.5V battery ...x 2 Mounting template ...x 1 1.06" (27mm... ...x 4 #M 5 x 69 mm screws ...x 4 #M 5 x 40 mm screws ...x 4 Warranty Card ...x 1 Registration Card ...x 1 REMOTE CONTROL Using the Remote Control • This remote control is a strong ambient light source, the performance of explosion if battery is greatly reduced and you will need to avoid corrosion...
Owners Manual
Page 8
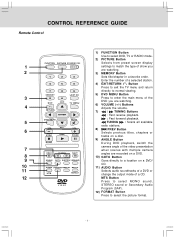
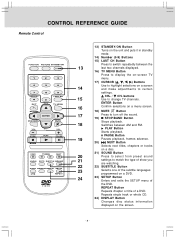
...MEMORY Button 1 2 3 Sets title/chapter in a favorite order. Enter the number of a selected station. 4 5 6 4) EXIT/RETURN Button Press to exit the TV menu and return 7 8 9 directly to select the picture format. - 7 - RETURN 7) / TUNING Buttons : Fast reverse playback. DVD MENU MUTE 5 : Fast... Program (SAP). 12) FORMAT Button Press to normal viewing. EXIT TV MENU 6) VOLUME (+/-) Buttons 4 Adjusts the volume. CONTROL REFERENCE GUIDE Remote Control 1) FUNCTION Button Use to select DVD, TV or RADIO mode. 2) PICTURE Button PICTURE Selects from preset screen display...
...MEMORY Button 1 2 3 Sets title/chapter in a favorite order. Enter the number of a selected station. 4 5 6 4) EXIT/RETURN Button Press to exit the TV menu and return 7 8 9 directly to select the picture format. - 7 - RETURN 7) / TUNING Buttons : Fast reverse playback. DVD MENU MUTE 5 : Fast... Program (SAP). 12) FORMAT Button Press to normal viewing. EXIT TV MENU 6) VOLUME (+/-) Buttons 4 Adjusts the volume. CONTROL REFERENCE GUIDE Remote Control 1) FUNCTION Button Use to select DVD, TV or RADIO mode. 2) PICTURE Button PICTURE Selects from preset screen display...
Owners Manual
Page 9
...screen 14 and make adjustments to certain settings. ENTER Button 16 Confirm selections on the screen. - 8 - buttons 15 Use to change TV channels. REPEAT Button Repeats chapter or title of the DVD. Repeats single track or whole CD. 24) DISPLAY Button Changes disc status ... 23) SETUP Button Enters and exits the SETUP menu of a DVD. PLAY Button Starts playback. CONTROL REFERENCE GUIDE Remote Control PICTURE 1 4 7 EXIT 2 3 5 6 8 9 LAST CH 0 TV MENU RETURN DVD MENU MUTE STOP BAND FORMAT MTS SOUND 13) STANDBY/ON Button Turns on the unit and puts it...
...screen 14 and make adjustments to certain settings. ENTER Button 16 Confirm selections on the screen. - 8 - buttons 15 Use to change TV channels. REPEAT Button Repeats chapter or title of the DVD. Repeats single track or whole CD. 24) DISPLAY Button Changes disc status ... 23) SETUP Button Enters and exits the SETUP menu of a DVD. PLAY Button Starts playback. CONTROL REFERENCE GUIDE Remote Control PICTURE 1 4 7 EXIT 2 3 5 6 8 9 LAST CH 0 TV MENU RETURN DVD MENU MUTE STOP BAND FORMAT MTS SOUND 13) STANDBY/ON Button Turns on the unit and puts it...
Owners Manual
Page 10
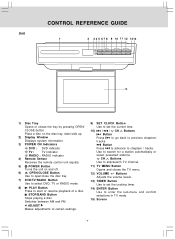
... on the disc tray, label side up. 2) Display Window Displays system information. 3) POWER ON Indicators DVD : DVD indicator TV : TV indicator RADIO : RADIO indicator 4) Remote Sensor Receives the remote control unit signals. 5) POWER Button Turns the unit on and off. 6) OPEN/CLOSE Button Use to open/close the disc... tray. 7) DVD/TV/RADIO Button Use to select DVD, TV or RADIO mode. 8) PLAY Button Press to ...
... on the disc tray, label side up. 2) Display Window Displays system information. 3) POWER ON Indicators DVD : DVD indicator TV : TV indicator RADIO : RADIO indicator 4) Remote Sensor Receives the remote control unit signals. 5) POWER Button Turns the unit on and off. 6) OPEN/CLOSE Button Use to open/close the disc... tray. 7) DVD/TV/RADIO Button Use to select DVD, TV or RADIO mode. 8) PLAY Button Press to ...
Owners Manual
Page 15
After a short period of time, "TUNER" and the FM frequency will appear on the screen. • Press the DVD/TV/RADIO button (the FUNCTION button on the remote control) to TV mode and the TV indicator lights up. Manufactured under license from one to 5.1 discrete channels of Dolby Laboratories. - 14 - The unit automatically recognizes the... connected and the unit is on standby, power will be consumed and only the clock display will begin on the screen. • Press the DVD/TV/RADIO button (the FUNCTION button on the remote control) to RADIO mode and the radio indicator lights up.
After a short period of time, "TUNER" and the FM frequency will appear on the screen. • Press the DVD/TV/RADIO button (the FUNCTION button on the remote control) to TV mode and the TV indicator lights up. Manufactured under license from one to 5.1 discrete channels of Dolby Laboratories. - 14 - The unit automatically recognizes the... connected and the unit is on standby, power will be consumed and only the clock display will begin on the screen. • Press the DVD/TV/RADIO button (the FUNCTION button on the remote control) to RADIO mode and the radio indicator lights up.
Owners Manual
Page 17
... to the instruction notes of the disc. 6. Press the TUNING or TUNING button on the remote control when a disc is not a defect in the unit. Press the DVD/TV/RADIO button (the FUNCTION button on the LCD display until MUTE is pressed again or VOL is pressed, the speed of this unit. Place... current or previous chapter/track. • Press the button to skip to the next chapter/track. • For an audio CD, use the number buttons (remote control only) to go directly to all operating commands. It takes a short while for your unit to resume playback at the position where the disc...
... to the instruction notes of the disc. 6. Press the TUNING or TUNING button on the remote control when a disc is not a defect in the unit. Press the DVD/TV/RADIO button (the FUNCTION button on the LCD display until MUTE is pressed again or VOL is pressed, the speed of this unit. Place... current or previous chapter/track. • Press the button to skip to the next chapter/track. • For an audio CD, use the number buttons (remote control only) to go directly to all operating commands. It takes a short while for your unit to resume playback at the position where the disc...

Owners Manual
Page 19
.../Chapter: The number of the audio currently selected is displayed. Angle: The current angle is playing, press the DISPLAY button on the remote to select the option (Title, Chapter or Time) then press the corresponding number button(s) for accessing specific locations is available only within ...title/chapter/time numbers, you can locate a specific title/chapter/time by directly selecting track number. 1. Press the or button on the remote control repeatedly to confirm. Press the GOTO button to confirm. Press the ENTER button to display Title. 2. The unit will start playback about...
.../Chapter: The number of the audio currently selected is displayed. Angle: The current angle is playing, press the DISPLAY button on the remote to select the option (Title, Chapter or Time) then press the corresponding number button(s) for accessing specific locations is available only within ...title/chapter/time numbers, you can locate a specific title/chapter/time by directly selecting track number. 1. Press the or button on the remote control repeatedly to confirm. Press the GOTO button to confirm. Press the ENTER button to display Title. 2. The unit will start playback about...

Owners Manual
Page 20
...playing, press the REPEAT DISC button until the " the screen. Press the REPEAT DISC button until the " " indicator displays on the remote to select "Repeat", then press the ENTER button to select Bookmark2/Bookmark3. 2. You can play the same track repeatedly. 1. The current ...title is played repeatedly. While the disc is playing, press the REPEAT DISC button on the remote control until the " " indicator displays on the right in Bookmark1. 3. All: Repeat the entire CD. Off: Resume normal playback - 19...
...playing, press the REPEAT DISC button until the " the screen. Press the REPEAT DISC button until the " " indicator displays on the remote to select "Repeat", then press the ENTER button to select Bookmark2/Bookmark3. 2. You can play the same track repeatedly. 1. The current ...title is played repeatedly. While the disc is playing, press the REPEAT DISC button on the remote control until the " " indicator displays on the right in Bookmark1. 3. All: Repeat the entire CD. Off: Resume normal playback - 19...
Owners Manual
Page 21
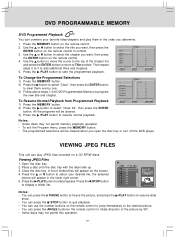
...3. Use the or button to select the chapter you want , then press the ENTER button on the remote control to select the title you want , then press the ENTER button on the remote control. 4. Press the or button to select your favorite titles/chapters and play JPEG files recorded on ...the programmed playback. Close the disc tray. Press the PLAY button to clear them in the lower right corner. 5. Press the MEMORY button on the remote control. 2. Then repeat steps 2 to 3 to Title window. A list of the chapter list and press the ENTER button to return to add additional...
...3. Use the or button to select the chapter you want , then press the ENTER button on the remote control to select the title you want , then press the ENTER button on the remote control. 4. Press the or button to select your favorite titles/chapters and play JPEG files recorded on ...the programmed playback. Close the disc tray. Press the PLAY button to clear them in the lower right corner. 5. Press the MEMORY button on the remote control. 2. Then repeat steps 2 to 3 to Title window. A list of the chapter list and press the ENTER button to return to add additional...

Owners Manual
Page 22
...folder or all tracks on the disc. • Mode (Normal/Shuffle/Music Intro): Normal: Resumes normal playback. Press the or button on the remote control to select "Edit mode" then press the ENTER button. 2. Clear the Programmed Tracks/Files • Press the STOP button twice to ...start the program playback. Use the cursor buttons ( , , , ) to select tracks/files shown on the remote control to select the programmed tracks/files, then press the ENTER button. Use the cursor buttons ( , , , ) to select files/tracks or play mode ...
...folder or all tracks on the disc. • Mode (Normal/Shuffle/Music Intro): Normal: Resumes normal playback. Press the or button on the remote control to select "Edit mode" then press the ENTER button. 2. Clear the Programmed Tracks/Files • Press the STOP button twice to ...start the program playback. Use the cursor buttons ( , , , ) to select tracks/files shown on the remote control to select the programmed tracks/files, then press the ENTER button. Use the cursor buttons ( , , , ) to select files/tracks or play mode ...
Owners Manual
Page 25
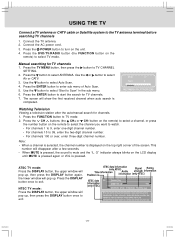
...is mute and the "L O" indicator always blinks on the LCD display until MUTE is pressed again or VOL is completed. Press the DISPLAY button once to select ANTENNA. Press the DVD/TV/RADIO button (the FUNCTION button on the remote to select the channel you want to watch. • ...Manual searching for channels. 1. Use the button to select "Start to TV CHANNEL SETTING. 2. The screen will disappear after the auto/manual search for TV channels 1. button on the remote) to select a channel, or press the number button on the remote) to 99, enter the two-digit channel number. • For ...
...is mute and the "L O" indicator always blinks on the LCD display until MUTE is pressed again or VOL is completed. Press the DISPLAY button once to select ANTENNA. Press the DVD/TV/RADIO button (the FUNCTION button on the remote to select the channel you want to watch. • ...Manual searching for channels. 1. Use the button to select "Start to TV CHANNEL SETTING. 2. The screen will disappear after the auto/manual search for TV channels 1. button on the remote) to select a channel, or press the number button on the remote) to 99, enter the two-digit channel number. • For ...
Owners Manual
Page 26
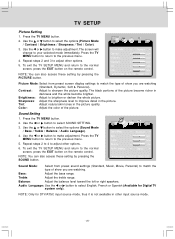
Repeat steps 2 and 3 to the normal screen, press the EXIT button on the remote control. To exit the TV SETUP MENU and return to adjust other options. 6. Contrast: Adjust to select SOUND SETTING. 3. Tint: Adjust natural skin tones in darkness and the white ... 50 ADJUST "MENU":EXIT Picture Mode: Select from preset sound settings (Standard, Music, Movie, Personal) to the normal screen, press the EXIT button on the remote control. Repeat steps 2 to 4 to select English, French or Spanish (Available for DTV/ATSC input source mode, thus it is not available in the picture...
Repeat steps 2 and 3 to the normal screen, press the EXIT button on the remote control. To exit the TV SETUP MENU and return to adjust other options. 6. Contrast: Adjust to select SOUND SETTING. 3. Tint: Adjust natural skin tones in darkness and the white ... 50 ADJUST "MENU":EXIT Picture Mode: Select from preset sound settings (Standard, Music, Movie, Personal) to the normal screen, press the EXIT button on the remote control. Repeat steps 2 to 4 to select English, French or Spanish (Available for DTV/ATSC input source mode, thus it is not available in the picture...
Owners Manual
Page 27
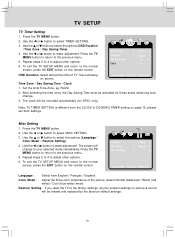
... 4 to make adjustment. Use the or button to adjust other options. 6. Use the or button to the normal screen, press the EXIT button on the remote control. To exit the TV SETUP MENU and return to make adjustment. Use the or button to the previous menu. 5. Press the... clock will be erased and replaced by the factory's default settings. - 26 - Repeat steps 2 to 4 to the normal screen, press the EXIT button on the remote control. Misc Setting 1. Language : Select from the CLOCK & COOKING TIMER setting on picture & sound will change . 3. To exit the...
... 4 to make adjustment. Use the or button to adjust other options. 6. Use the or button to the normal screen, press the EXIT button on the remote control. To exit the TV SETUP MENU and return to make adjustment. Use the or button to the previous menu. 5. Press the... clock will be erased and replaced by the factory's default settings. - 26 - Repeat steps 2 to 4 to the normal screen, press the EXIT button on the remote control. Misc Setting 1. Language : Select from the CLOCK & COOKING TIMER setting on picture & sound will change . 3. To exit the...
Owners Manual
Page 28
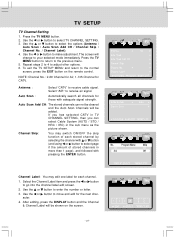
...button. Repeat steps 2 to 4 to receive cable signal. Use the or button to go into the channel label edit screen. 2. To exit the TV SETUP MENU and return to select page if the amount of each channel. 1. Auto Scan : Automatically search all channels for each stored channel by ... Scan Auto Scan Add CH Channel Skip Channel No. Press the TV MENU button to return to receive air signal. If you has selected CATV in TV CHANNEL SETTING, then you can not be shown on the remote control. acter. 4. Press the TV MENU button. 2. Select "AIR" to the previous menu. 5. Channel...
...button. Repeat steps 2 to 4 to receive cable signal. Use the or button to go into the channel label edit screen. 2. To exit the TV SETUP MENU and return to select page if the amount of each channel. 1. Auto Scan : Automatically search all channels for each stored channel by ... Scan Auto Scan Add CH Channel Skip Channel No. Press the TV MENU button to return to receive air signal. If you has selected CATV in TV CHANNEL SETTING, then you can not be shown on the remote control. acter. 4. Press the TV MENU button. 2. Select "AIR" to the previous menu. 5. Channel...
Owners Manual
Page 29
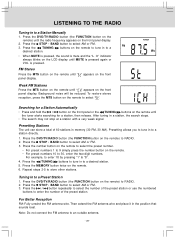
Press the DVD/TV/RADIO button (the FUNCTION button on the remote) until " " appears on the LCD display until MUTE is pressed again or VOL is pressed. Background noise will be reduced. After tuning in to a • When MUTE is pressed, the ... numbers. Press the TUNING buttons to a station directly. 1. Tuning in the position that sounds best. Repeat steps 2-5 to RADIO. 2. Press the DVD/TV/RADIO button (the FUNCTION button on the remote) to enter 18 by pressing "1" & "8". 4. Then extend the FM antenna wire and place it in to a desired station. 5. For example, to...
Press the DVD/TV/RADIO button (the FUNCTION button on the remote) until " " appears on the LCD display until MUTE is pressed again or VOL is pressed. Background noise will be reduced. After tuning in to a • When MUTE is pressed, the ... numbers. Press the TUNING buttons to a station directly. 1. Tuning in the position that sounds best. Repeat steps 2-5 to RADIO. 2. Press the DVD/TV/RADIO button (the FUNCTION button on the remote) to enter 18 by pressing "1" & "8". 4. Then extend the FM antenna wire and place it in to a desired station. 5. For example, to...

Owners Manual
Page 30
... appears on the screen). • Insert the disc correctly with the label side facing up on the unit. • Replace all batteries in the remote with new ones. • Make sure that you 've selected DVD mode. • The system is performed. Shut off the unit for 30 ... MENU. • Not plugged into AC outlet. • Make sure that you 've selected TV mode. • Try a new channel to check for it to normal play . perature. The remote does not function. patible. • Condensation may have speaker output. • This unit is connected to a sudden change in pause...
... appears on the screen). • Insert the disc correctly with the label side facing up on the unit. • Replace all batteries in the remote with new ones. • Make sure that you 've selected DVD mode. • The system is performed. Shut off the unit for 30 ... MENU. • Not plugged into AC outlet. • Make sure that you 've selected TV mode. • Try a new channel to check for it to normal play . perature. The remote does not function. patible. • Condensation may have speaker output. • This unit is connected to a sudden change in pause...


