
Owners Manual
Page 1
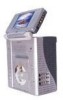
VBP5000 VIDEO IN A BAG SYSTEM WITH 5.6" LCD MONITOR VCP & DVD PLAYER
VBP5000 VIDEO IN A BAG SYSTEM WITH 5.6" LCD MONITOR VCP & DVD PLAYER
Owners Manual
Page 2
INTRODUCTION Thank you for selecting the VBP5000 "Video in motion, and that you anywhere and is designed for quick and easy installation. The... it is plug and play. *NOTE: The AC Adaptor will assist you to obtain the best equipment performance. The VBP5000 utilizes state of the art electronics and is detachable and can be utilized and stored separately from the main unit. The...use . The system's main features include a 5.6" Liquid Crystal Display (LCD) Monitor Video Cassette Payer (VCP) and a DVD Player. The system is compact so that the vehicle is constructed to operation.
INTRODUCTION Thank you for selecting the VBP5000 "Video in motion, and that you anywhere and is designed for quick and easy installation. The... it is plug and play. *NOTE: The AC Adaptor will assist you to obtain the best equipment performance. The VBP5000 utilizes state of the art electronics and is detachable and can be utilized and stored separately from the main unit. The...use . The system's main features include a 5.6" Liquid Crystal Display (LCD) Monitor Video Cassette Payer (VCP) and a DVD Player. The system is compact so that the vehicle is constructed to operation.

Owners Manual
Page 3
IMPORTANT NOTICE It is unlawful in most jurisdictions for a person to drive a motor vehicle which is equipped with a television viewer or screen that is located in the motor vehicle at any point forward of the back of the motor vehicle. In the interest of safety, this system should never be installed where it will be visible, directly or indirectly, by the operator of the driver's seat, or that is visible, directly or indirectly, to the driver while operating the vehicle.
IMPORTANT NOTICE It is unlawful in most jurisdictions for a person to drive a motor vehicle which is equipped with a television viewer or screen that is located in the motor vehicle at any point forward of the back of the motor vehicle. In the interest of safety, this system should never be installed where it will be visible, directly or indirectly, by the operator of the driver's seat, or that is visible, directly or indirectly, to the driver while operating the vehicle.
Owners Manual
Page 4
...Monitor is best kept in the fully closed position when it from falling out of the bag (Refer to the VCP/DVD Player and not in this appliance to a warm location, wait for rear seat viewing only. If the unit is in... the front seat while operating your vehicle. 1 INSTALLATION Ensure that the LCD Monitor, VCP, DVD Player, Bag and Pouch are installed in accordance with the bag open to secure the system in the vehicle in a Bag" System...stand, bracket or table to the lowest position. Operate the "Video in the event of the VBP5000 system (Monitor/VCP/DVD Player).
...Monitor is best kept in the fully closed position when it from falling out of the bag (Refer to the VCP/DVD Player and not in this appliance to a warm location, wait for rear seat viewing only. If the unit is in... the front seat while operating your vehicle. 1 INSTALLATION Ensure that the LCD Monitor, VCP, DVD Player, Bag and Pouch are installed in accordance with the bag open to secure the system in the vehicle in a Bag" System...stand, bracket or table to the lowest position. Operate the "Video in the event of the VBP5000 system (Monitor/VCP/DVD Player).
Owners Manual
Page 5
There is in a fire or electric shock). Use only a lightly dampened lint free cloth to the unit when the ignition key is not in the Run and/or Accessory positions. Do not expose the disc 2 Do not use any kind into the system through openings; Do not stick paper, tape or glue on the unit. not directly from the system. 4. DISASSEMBLE Do not attempt to avoid electric hazards. Contact qualified service personnel if your system is a risk of repair. 6. 3. Power should be powered from the type of any solvents or cleaning materials (liquid, abrasive or aerosol) when ...
There is in a fire or electric shock). Use only a lightly dampened lint free cloth to the unit when the ignition key is not in the Run and/or Accessory positions. Do not expose the disc 2 Do not use any kind into the system through openings; Do not stick paper, tape or glue on the unit. not directly from the system. 4. DISASSEMBLE Do not attempt to avoid electric hazards. Contact qualified service personnel if your system is a risk of repair. 6. 3. Power should be powered from the type of any solvents or cleaning materials (liquid, abrasive or aerosol) when ...

Owners Manual
Page 6
... not touch the surface of the VCP, the picture will be intentionally fixed by software producers. Handle the disc by wiping the disc from the player. CLEANING VIDEO HEAD To prevent video head clogging, use only good quality VHS tapes and discard worn tapes.
... not touch the surface of the VCP, the picture will be intentionally fixed by software producers. Handle the disc by wiping the disc from the player. CLEANING VIDEO HEAD To prevent video head clogging, use only good quality VHS tapes and discard worn tapes.
Owners Manual
Page 7
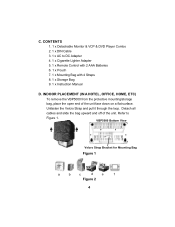
...1 x Pouch 7. 1 x Mounting Bag with 4 Straps 8. 1 x Storage Bag 9. 1 x Instruction Manual D. VBP5000 Bottom View Velcro Strap Bracket for Mounting Bag Figure 1 a b c d e f Figure 2 4 CONTENTS 1. 1 x Detachable Monitor & VCP & DVD Player Combo 2. 1 x DIN Cable 3. 1 x AC to Figure 1. INDOOR PLACEMENT (IN A HOTEL, OFFICE, HOME, ...ETC) To remove the VBP5000 from the protective mounting/storage bag, place the open end of the...
...1 x Pouch 7. 1 x Mounting Bag with 4 Straps 8. 1 x Storage Bag 9. 1 x Instruction Manual D. VBP5000 Bottom View Velcro Strap Bracket for Mounting Bag Figure 1 a b c d e f Figure 2 4 CONTENTS 1. 1 x Detachable Monitor & VCP & DVD Player Combo 2. 1 x DIN Cable 3. 1 x AC to Figure 1. INDOOR PLACEMENT (IN A HOTEL, OFFICE, HOME, ...ETC) To remove the VBP5000 from the protective mounting/storage bag, place the open end of the...

Owners Manual
Page 8
... a 45°. Adjust the screen for the desired viewing angle. BETWEEN TWO SEATS Figure 4 5 IN-CAR INSTALLATION NOTE: When used in a vehicle, always keep the VBP5000 fastened in a straight line. Hinged Base 45° Figure 3 E. The placement can detach* the monitor from the main unit by depressing the button below the...
... a 45°. Adjust the screen for the desired viewing angle. BETWEEN TWO SEATS Figure 4 5 IN-CAR INSTALLATION NOTE: When used in a vehicle, always keep the VBP5000 fastened in a straight line. Hinged Base 45° Figure 3 E. The placement can detach* the monitor from the main unit by depressing the button below the...

Owners Manual
Page 9
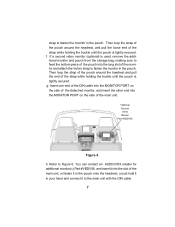
Attach the "S" hook to the same ring after looping the strap around the driver's seat rail. Attach the "S" hook to the same ring after looping the strap around the headrest of the driver's seat. c. Slide the monitor into the monitor pouch, feed the bottom flap of the pouch into the long slot of the mounting bag. a. Repeat this process for the right side (Passenger Seat). Adjust the straps tightly so that the mounting bag is secured. d. In some vehicles, it may be necessary to attach the "S" connector to the rail directly, as it may not be detached from the storage ...
Attach the "S" hook to the same ring after looping the strap around the driver's seat rail. Attach the "S" hook to the same ring after looping the strap around the headrest of the driver's seat. c. Slide the monitor into the monitor pouch, feed the bottom flap of the pouch into the long slot of the mounting bag. a. Repeat this process for the right side (Passenger Seat). Adjust the straps tightly so that the mounting bag is secured. d. In some vehicles, it may be necessary to attach the "S" connector to the rail directly, as it may not be detached from the storage ...
Owners Manual
Page 10
..., and insert the other end into the slot of the strap while holding the buckle until the pouch is tightly secured. You can contact an AUDIOVOX retailer for additional monitor(S) Part #VBDV56, and insert it to the main unit with the DIN cable. 7
..., and insert the other end into the slot of the strap while holding the buckle until the pouch is tightly secured. You can contact an AUDIOVOX retailer for additional monitor(S) Part #VBDV56, and insert it to the main unit with the DIN cable. 7

Owners Manual
Page 11
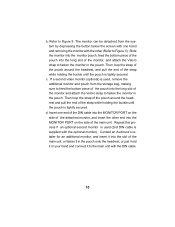
In some vehicles, it may be necessary to attach the "S" connector to the rail directly, as it may not be long enough to reach back to the lower metal ring on the left side of the seat. Adjust the straps tightly so that the mounting bag is secured. c. Take one of the bag around the seat rail. nect the latch to the ring. Attach the "S" hook to Figure 8) Figure 7 a. Swing the monitor upwards and adjust the screen for the right side. b. Repeat this process for the desired viewing angle. 8 d. ON THE SEAT BACK (Refer to the same ring after looping the strap around the ...
In some vehicles, it may be necessary to attach the "S" connector to the rail directly, as it may not be long enough to reach back to the lower metal ring on the left side of the seat. Adjust the straps tightly so that the mounting bag is secured. c. Take one of the bag around the seat rail. nect the latch to the ring. Attach the "S" hook to Figure 8) Figure 7 a. Swing the monitor upwards and adjust the screen for the right side. b. Repeat this process for the desired viewing angle. 8 d. ON THE SEAT BACK (Refer to the same ring after looping the strap around the ...

Owners Manual
Page 12
On the Back Seat a b Figure 8 a. Guide the vehicles safety belt through the short strap sewn on the back seat. Finally uncover the attached monitor and adjust the screen for a de- fully place the system with the screen facing either front (refer to Figure 8a) or rear (refer to move around. sired viewing angle. *Optional Second Video Monitor Part #VBDV56 Figure 9 9 Care- Then secure and adjust the safety belt so that the unit is not free to Figure 8b). The Monitor can be inserted into the slot with the DVD facing up on the bottom of the mounting bag. 3.
On the Back Seat a b Figure 8 a. Guide the vehicles safety belt through the short strap sewn on the back seat. Finally uncover the attached monitor and adjust the screen for a de- fully place the system with the screen facing either front (refer to Figure 8a) or rear (refer to move around. sired viewing angle. *Optional Second Video Monitor Part #VBDV56 Figure 9 9 Care- Then secure and adjust the safety belt so that the unit is not free to Figure 8b). The Monitor can be inserted into the slot with the DVD facing up on the bottom of the mounting bag. 3.
Owners Manual
Page 13
... detached monitor, and insert the other (Refer to feed the bottom piece of the pouch into the long slot of the main unit. b. c. Contact an Audiovox's retailer for an additional monitor, and insert it into the MONITOR PORT on the side of the monitor, and attach the Velcro strap to the...
... detached monitor, and insert the other (Refer to feed the bottom piece of the pouch into the long slot of the main unit. b. c. Contact an Audiovox's retailer for an additional monitor, and insert it into the MONITOR PORT on the side of the monitor, and attach the Velcro strap to the...
Owners Manual
Page 14
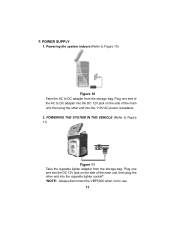
... the DC 12V jack on the side of the main unit, then plug the other end into the cigarette lighter socket*. *NOTE: Always disconnect the VBP5000 when not in use. 11 Plug one end of the AC to DC adapter into the DC 12V jack on the side of the main...
... the DC 12V jack on the side of the main unit, then plug the other end into the cigarette lighter socket*. *NOTE: Always disconnect the VBP5000 when not in use. 11 Plug one end of the AC to DC adapter into the DC 12V jack on the side of the main...

Owners Manual
Page 15
3. The Video Monitor is inserted into the slot on the side of the Video Monitor, rotate the monitor and the monitor's hinged base so that they are aligned in a straight line. POWERING THE DETACHED MONITOR IN THE VEHICLE (Refer to Figure 3 ). Take the AC to Figure 12) Figure 12 The monitor can be detached from the storage, plug one hand and removing the video monitor* with the other hand. *NOTE: During the Removal and Reinstallation of the monitor, then plug the other end into the DC 12V jack on the main unit at a 45° (refer to Figure 13) Figure 13 12 POWERING THE DETACHED ...
3. The Video Monitor is inserted into the slot on the side of the Video Monitor, rotate the monitor and the monitor's hinged base so that they are aligned in a straight line. POWERING THE DETACHED MONITOR IN THE VEHICLE (Refer to Figure 3 ). Take the AC to Figure 12) Figure 12 The monitor can be detached from the storage, plug one hand and removing the video monitor* with the other hand. *NOTE: During the Removal and Reinstallation of the monitor, then plug the other end into the DC 12V jack on the main unit at a 45° (refer to Figure 13) Figure 13 12 POWERING THE DETACHED ...

Owners Manual
Page 16
NOTE: When the monitor is combined with the DIN cable, DC 12V power, Audio/Video and IR signals will be supplied from the main unit to the monitor, so there is connected to the main unit with the main unit DC 12V power will all be connected to either combined with the main unit or connected to the DC 12V jack on the right side of the detached monitor. When the monitor is no need for another power source to be supplied through the DIN cable to the connected monitor. So there is detached from the storage bag, plug one end into the DC 12V jack on the side of the monitor. *...
NOTE: When the monitor is combined with the DIN cable, DC 12V power, Audio/Video and IR signals will be supplied from the main unit to the monitor, so there is connected to the main unit with the main unit DC 12V power will all be connected to either combined with the main unit or connected to the DC 12V jack on the right side of the detached monitor. When the monitor is no need for another power source to be supplied through the DIN cable to the connected monitor. So there is detached from the storage bag, plug one end into the DC 12V jack on the side of the monitor. *...

Owners Manual
Page 17
2) Refer to the main unit with the main unit and connected to Figure 15. In the vehicle, the cigarette lighter adapter can drive up to 3 monitors combined with the DIN cable. *Optional Video Monitors Figure 15 14
2) Refer to the main unit with the main unit and connected to Figure 15. In the vehicle, the cigarette lighter adapter can drive up to 3 monitors combined with the DIN cable. *Optional Video Monitors Figure 15 14
Owners Manual
Page 18
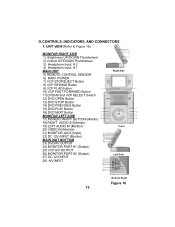
... VCP STOP/EJECT Button 8) VCP REWIND Button 9) VCP PLAY Button 10) VCP FAST FORWARD Button 11) DVD/AV and VCP SELECT Switch 12) DVD OPEN Button 13) DVD STOP Button 14) DVD PREVIOUS Button 15) DVD PLAY Button 16) DVD NEXT Button MONITOR LEFT SIDE 17) POWER ON/OFF BUTTON (Monitor) 18) RIGHT AUDIO IN (Monitor...) 19) LEFT AUDIO IN (Monitor) 20) VIDEO IN (Monitor) 21) MONITOR JACK (Input) 22) DC 12V INPUT (Monitor) MAIN UNIT BOTTOM 23) DVD/AV OUTPUT 24) MONITOR PORT #1 (Output) 25) VCP A/V OUTPUT 26) MONITOR PORT #2 (Output) 27) DC 12V INPUT 28) A/V INPUT Right Side Front Left Side...
... VCP STOP/EJECT Button 8) VCP REWIND Button 9) VCP PLAY Button 10) VCP FAST FORWARD Button 11) DVD/AV and VCP SELECT Switch 12) DVD OPEN Button 13) DVD STOP Button 14) DVD PREVIOUS Button 15) DVD PLAY Button 16) DVD NEXT Button MONITOR LEFT SIDE 17) POWER ON/OFF BUTTON (Monitor) 18) RIGHT AUDIO IN (Monitor...) 19) LEFT AUDIO IN (Monitor) 20) VIDEO IN (Monitor) 21) MONITOR JACK (Input) 22) DC 12V INPUT (Monitor) MAIN UNIT BOTTOM 23) DVD/AV OUTPUT 24) MONITOR PORT #1 (Output) 25) VCP A/V OUTPUT 26) MONITOR PORT #2 (Output) 27) DC 12V INPUT 28) A/V INPUT Right Side Front Left Side...

Owners Manual
Page 19
... 17) 1) POWER Button 2) DISPLAY Button 3) DVD ANGLE Button 4) DVD SUBTITLE Button 5) DVD AUDIO Button 6) DVD ZOOM Button 7) DVD UP/DOWN/LEFT/RIGHT/ ENTER Buttons 8) DVD MENU Button 9) DVD Return Button 10) DVD A-B Button 11) DVD NEXT Button 12) DVD PREVIOUS Button 13) DVD REVERSE Button 14) DVD FORWARD Button 15) VCP EJECT Button * 16)... VCP POWER Button 17) VCP PAUSE Button 18) VCP STOP Button 19) DVD NUMBER Button 20) DVD SETUP Button 21) DVD REPEAT Button 22) DVD PAUSE Button 23) DVD PLAY Button 24) DVD STOP Button 25) DVD SLOW Button 26) VCP PLAY Button 27) VCP FAST FORWARD Button 28) ...
... 17) 1) POWER Button 2) DISPLAY Button 3) DVD ANGLE Button 4) DVD SUBTITLE Button 5) DVD AUDIO Button 6) DVD ZOOM Button 7) DVD UP/DOWN/LEFT/RIGHT/ ENTER Buttons 8) DVD MENU Button 9) DVD Return Button 10) DVD A-B Button 11) DVD NEXT Button 12) DVD PREVIOUS Button 13) DVD REVERSE Button 14) DVD FORWARD Button 15) VCP EJECT Button * 16)... VCP POWER Button 17) VCP PAUSE Button 18) VCP STOP Button 19) DVD NUMBER Button 20) DVD SETUP Button 21) DVD REPEAT Button 22) DVD PAUSE Button 23) DVD PLAY Button 24) DVD STOP Button 25) DVD SLOW Button 26) VCP PLAY Button 27) VCP FAST FORWARD Button 28) ...
Owners Manual
Page 20
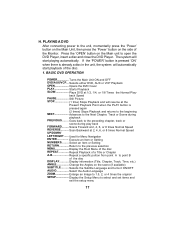
... Next Chapter, Track or Scene during play back FORWARD......... Selects either DVD, AUX or VCP Playback OPEN Opens the DVD Cover PLAY Starts Playback SLOW Plays DVD at the Present Playback Point when the PLAY button is already a ...system will start playback of the Monitor. Used for Menu Navigation ENTER Execute an Item or Setting NUMBERS......... PLAYING A DVD After connecting power to the unit, momentarily press the 'Power' button on the Main Unit, then press the 'Power...to select and set items and exit the setup menu 17 Goes back to open the DVD Player, insert a disc and close the...
... Next Chapter, Track or Scene during play back FORWARD......... Selects either DVD, AUX or VCP Playback OPEN Opens the DVD Cover PLAY Starts Playback SLOW Plays DVD at the Present Playback Point when the PLAY button is already a ...system will start playback of the Monitor. Used for Menu Navigation ENTER Execute an Item or Setting NUMBERS......... PLAYING A DVD After connecting power to the unit, momentarily press the 'Power' button on the Main Unit, then press the 'Power...to select and set items and exit the setup menu 17 Goes back to open the DVD Player, insert a disc and close the...