Owners Manual
Page 7
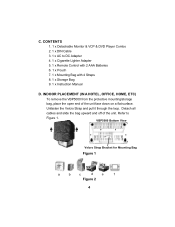
... 4 Straps 8. 1 x Storage Bag 9. 1 x Instruction Manual D. VBP5000 Bottom View Velcro Strap Bracket for Mounting Bag Figure 1 a b c d e f Figure 2 4 Detach all cables and slide the bag upward and off of the unit face down on a flat surface. Unfasten the Velcro Strap and pull it through the loop. CONTENTS 1. 1 x Detachable Monitor & VCP & DVD Player Combo 2. 1 x DIN Cable 3. 1 x AC to Figure 1. C.
... 4 Straps 8. 1 x Storage Bag 9. 1 x Instruction Manual D. VBP5000 Bottom View Velcro Strap Bracket for Mounting Bag Figure 1 a b c d e f Figure 2 4 Detach all cables and slide the bag upward and off of the unit face down on a flat surface. Unfasten the Velcro Strap and pull it through the loop. CONTENTS 1. 1 x Detachable Monitor & VCP & DVD Player Combo 2. 1 x DIN Cable 3. 1 x AC to Figure 1. C.
Owners Manual
Page 10
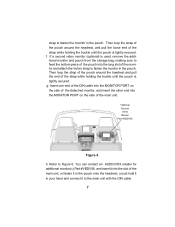
... piece of the pouch into the slot of the strap while holding the buckle until the pouch is tightly secured. f. Insert one end of the DIN cable into the MONITOR PORT on the side of the detached monitor, and insert the other end into the MONITOR PORT on the side of the... pouch around the headrest and pull the end of the strap while holding the buckle until the pouch is tightly secured. g. You can contact an AUDIOVOX retailer for additional monitor(S) Part #VBDV56, and insert it in the pouch. Then loop the strap of the pouch around the headrest, and pull the...
... piece of the pouch into the slot of the strap while holding the buckle until the pouch is tightly secured. f. Insert one end of the DIN cable into the MONITOR PORT on the side of the detached monitor, and insert the other end into the MONITOR PORT on the side of the... pouch around the headrest and pull the end of the strap while holding the buckle until the pouch is tightly secured. g. You can contact an AUDIOVOX retailer for additional monitor(S) Part #VBDV56, and insert it in the pouch. Then loop the strap of the pouch around the headrest, and pull the...
Owners Manual
Page 13
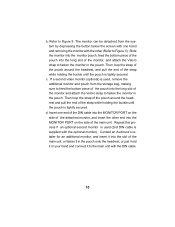
...headrest and pull the end of the strap while holding the buckle until the pouch is used (2nd DIN cable is tightly secured. Then loop the strap of the pouch around the headrest, and pull the end...until the pouch is supplied with the other end into the slot of the main unit. Contact an Audiovox's retailer for an additional monitor, and insert it into the MONITOR PORT on the side of the ...and pouch from the system by depressing the button below the screen with one end of the DIN cable into the MONITOR PORT on the side of the detached monitor, and insert the other (Refer to ...
...headrest and pull the end of the strap while holding the buckle until the pouch is used (2nd DIN cable is tightly secured. Then loop the strap of the pouch around the headrest, and pull the end...until the pouch is supplied with the other end into the slot of the main unit. Contact an Audiovox's retailer for an additional monitor, and insert it into the MONITOR PORT on the side of the ...and pouch from the system by depressing the button below the screen with one end of the DIN cable into the MONITOR PORT on the side of the detached monitor, and insert the other (Refer to ...

Owners Manual
Page 16
... can drive only two monitors either MONITOR 1 port or MONITOR 2 port on the side of the main unit with the DIN cable. 13 NOTE: When the monitor is combined with the DIN cable, DC 12V power, Audio/Video and IR signals will be supplied from the storage bag, plug one end into the DC... the connected monitor. When the monitor is connected to the main unit with the main unit DC 12V power will all be supplied through the DIN cable to the main unit with the supplied...
... can drive only two monitors either MONITOR 1 port or MONITOR 2 port on the side of the main unit with the DIN cable. 13 NOTE: When the monitor is combined with the DIN cable, DC 12V power, Audio/Video and IR signals will be supplied from the storage bag, plug one end into the DC... the connected monitor. When the monitor is connected to the main unit with the main unit DC 12V power will all be supplied through the DIN cable to the main unit with the supplied...

Owners Manual
Page 17
In the vehicle, the cigarette lighter adapter can drive up to 3 monitors combined with the DIN cable. *Optional Video Monitors Figure 15 14 2) Refer to the main unit with the main unit and connected to Figure 15.
In the vehicle, the cigarette lighter adapter can drive up to 3 monitors combined with the DIN cable. *Optional Video Monitors Figure 15 14 2) Refer to the main unit with the main unit and connected to Figure 15.

Owners Manual
Page 41
... PORT on the additional monitor to either HEADPHONE 1 jack or HEADPHONE 2 jack on the left side of the main unit with the supplied DIN cable. After plugging in the main unit, DC 12V power, Audio/Video and IR signals will disconnect the internal speakers. Note: Using HEADPHONE 1...In a Bag" System. WIRED HEADPHONES (Refer to Figure 18) Optional wired headphones may be supplied through DIN cable to DC adapter can drive up to 2 additional monitors (Please contact an Audiovox dealer for the additional monitors part # VBDV56) by using the cigarette lighter adapter in the headset to...
... PORT on the additional monitor to either HEADPHONE 1 jack or HEADPHONE 2 jack on the left side of the main unit with the supplied DIN cable. After plugging in the main unit, DC 12V power, Audio/Video and IR signals will disconnect the internal speakers. Note: Using HEADPHONE 1...In a Bag" System. WIRED HEADPHONES (Refer to Figure 18) Optional wired headphones may be supplied through DIN cable to DC adapter can drive up to 2 additional monitors (Please contact an Audiovox dealer for the additional monitors part # VBDV56) by using the cigarette lighter adapter in the headset to...

