
Owners Manual
Page 1
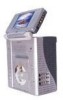
VBP5000 VIDEO IN A BAG SYSTEM WITH 5.6" LCD MONITOR VCP & DVD PLAYER
VBP5000 VIDEO IN A BAG SYSTEM WITH 5.6" LCD MONITOR VCP & DVD PLAYER
Owners Manual
Page 2
... system. The system's main features include a 5.6" Liquid Crystal Display (LCD) Monitor Video Cassette Payer (VCP) and a DVD Player. The system is detachable and can take it is recommended that the vehicle is designed for use . Two additional monitors can be stored for selecting the VBP5000 "Video in motion, and that you in Vehicles, Hotels, the...
... system. The system's main features include a 5.6" Liquid Crystal Display (LCD) Monitor Video Cassette Payer (VCP) and a DVD Player. The system is detachable and can take it is recommended that the vehicle is designed for use . Two additional monitors can be stored for selecting the VBP5000 "Video in motion, and that you in Vehicles, Hotels, the...
Owners Manual
Page 4
...in use the system in the front seat while operating your vehicle. 1 When you move it may condense inside Velcro Strap of the VBP5000 system (Monitor/VCP/DVD Player). When the main unit is in a Bag" System with the instructions and illustrations provided in the fully closed position when it from... on until the moisture evaporates. 2. Operate the "Video in the bag, ensure the inside the unit. INSTALLATION Ensure that the LCD Monitor, VCP, DVD Player, Bag and Pouch are installed in accordance with the bag open to avoid touching or scratching the screen, as it from falling out ...
...in use the system in the front seat while operating your vehicle. 1 When you move it may condense inside Velcro Strap of the VBP5000 system (Monitor/VCP/DVD Player). When the main unit is in a Bag" System with the instructions and illustrations provided in the fully closed position when it from... on until the moisture evaporates. 2. Operate the "Video in the bag, ensure the inside the unit. INSTALLATION Ensure that the LCD Monitor, VCP, DVD Player, Bag and Pouch are installed in accordance with the bag open to avoid touching or scratching the screen, as it from falling out ...
Owners Manual
Page 5
... (i.e. CLEANING UNIT When cleaning, make sure the system is in need of any solvents or cleaning materials (liquid, abrasive or aerosol) when cleaning the Video Monitor doing so may result in use irregularly shaped discs such as heart or star-shaped discs as they may cause the unit to avoid electric...
... (i.e. CLEANING UNIT When cleaning, make sure the system is in need of any solvents or cleaning materials (liquid, abrasive or aerosol) when cleaning the Video Monitor doing so may result in use irregularly shaped discs such as heart or star-shaped discs as they may cause the unit to avoid electric...
Owners Manual
Page 7
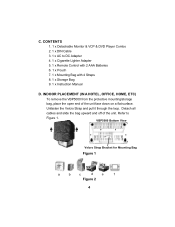
VBP5000 Bottom View Velcro Strap Bracket for Mounting Bag Figure 1 a b c d e f Figure 2 4 C. Detach all cables and slide the bag upward and off of the unit face down ... Adapter 5. 1 x Remote Control with 2 AAA Batteries 6. 1 x Pouch 7. 1 x Mounting Bag with 4 Straps 8. 1 x Storage Bag 9. 1 x Instruction Manual D. INDOOR PLACEMENT (IN A HOTEL, OFFICE, HOME, ETC) To remove the VBP5000 from the protective mounting/storage bag, place the open end of the unit. CONTENTS 1. 1 x Detachable Monitor & VCP & DVD Player Combo 2. 1 x DIN Cable 3. 1 x AC to Figure 1.
VBP5000 Bottom View Velcro Strap Bracket for Mounting Bag Figure 1 a b c d e f Figure 2 4 C. Detach all cables and slide the bag upward and off of the unit face down ... Adapter 5. 1 x Remote Control with 2 AAA Batteries 6. 1 x Pouch 7. 1 x Mounting Bag with 4 Straps 8. 1 x Storage Bag 9. 1 x Instruction Manual D. INDOOR PLACEMENT (IN A HOTEL, OFFICE, HOME, ETC) To remove the VBP5000 from the protective mounting/storage bag, place the open end of the unit. CONTENTS 1. 1 x Detachable Monitor & VCP & DVD Player Combo 2. 1 x DIN Cable 3. 1 x AC to Figure 1.

Owners Manual
Page 8
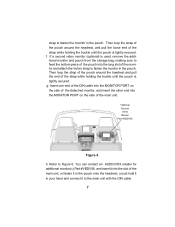
... main unit with or without the unit inside its mounting bag and pouch. *NOTE: During the Removal and Reinstallation of the Video Monitor, rotate the monitor and the monitor's hinged base so that they are different ways to the Figure 2. IN-CAR INSTALLATION NOTE: When used in a vehicle, always... keep the VBP5000 fastened in a straight line. BETWEEN TWO SEATS Figure 4 5 Hinged Base 45° Figure 3 E. Refer to place the main unit, monitor or combo on the main unit at a 45°. There are aligned in the ...
... main unit with or without the unit inside its mounting bag and pouch. *NOTE: During the Removal and Reinstallation of the Video Monitor, rotate the monitor and the monitor's hinged base so that they are different ways to the Figure 2. IN-CAR INSTALLATION NOTE: When used in a vehicle, always... keep the VBP5000 fastened in a straight line. BETWEEN TWO SEATS Figure 4 5 Hinged Base 45° Figure 3 E. Refer to place the main unit, monitor or combo on the main unit at a 45°. There are aligned in the ...

Owners Manual
Page 9
...the right side (Passenger Seat). a. Attach the "S" hook to the upper side metal ring on the left side of the mounting bag. The monitor can be long enough to reach back to Figure 5. tem by depressing the button below the screen with the other (Refer to Figure 4. Refer... to Figure 3). Repeat this process for the right side. b. sired viewing angle. *Optional Second Video Monitor Part #VBDV56 Figure 5 e. Repeat this process for the de- Take another strap and connect the latch to the same ring after looping the strap ...
...the right side (Passenger Seat). a. Attach the "S" hook to the upper side metal ring on the left side of the mounting bag. The monitor can be long enough to reach back to Figure 5. tem by depressing the button below the screen with the other (Refer to Figure 4. Refer... to Figure 3). Repeat this process for the right side. b. sired viewing angle. *Optional Second Video Monitor Part #VBDV56 Figure 5 e. Repeat this process for the de- Take another strap and connect the latch to the same ring after looping the strap ...
Owners Manual
Page 10
... the side of the main unit. *Optional Second Video Monitor Part #VBDV56 Figure 6 h. You can contact an AUDIOVOX retailer for additional monitor(S) Part #VBDV56, and insert it to fasten the monitor in the pouch. If a second video monitor (optional) is tightly secured. Refer to fasten the monitor in the pouch. Then loop the strap of the...
... the side of the main unit. *Optional Second Video Monitor Part #VBDV56 Figure 6 h. You can contact an AUDIOVOX retailer for additional monitor(S) Part #VBDV56, and insert it to fasten the monitor in the pouch. If a second video monitor (optional) is tightly secured. Refer to fasten the monitor in the pouch. Then loop the strap of the...

Owners Manual
Page 11
Repeat this process for the desired viewing angle. 8 c. Swing the monitor upwards and adjust the screen for the right side. b. Adjust the straps tightly so that the mounting bag is secured. Hang the bag onto the ...
Repeat this process for the desired viewing angle. 8 c. Swing the monitor upwards and adjust the screen for the right side. b. Adjust the straps tightly so that the mounting bag is secured. Hang the bag onto the ...

Owners Manual
Page 12
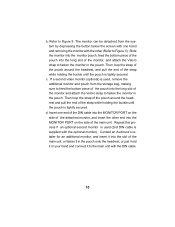
Then secure and adjust the safety belt so that the unit is not free to Figure 8b). Guide the vehicles safety belt through the short strap sewn on the back seat. fully place the system with the screen facing either front (refer to Figure 8a) or rear (refer to move around. 3. On the Back Seat a b Figure 8 a. The Monitor can be inserted into the slot with the DVD facing up on the bottom of the mounting bag. sired viewing angle. *Optional Second Video Monitor Part #VBDV56 Figure 9 9 Care- Finally uncover the attached monitor and adjust the screen for a de-
Then secure and adjust the safety belt so that the unit is not free to Figure 8b). Guide the vehicles safety belt through the short strap sewn on the back seat. fully place the system with the screen facing either front (refer to Figure 8a) or rear (refer to move around. 3. On the Back Seat a b Figure 8 a. The Monitor can be inserted into the slot with the DVD facing up on the bottom of the mounting bag. sired viewing angle. *Optional Second Video Monitor Part #VBDV56 Figure 9 9 Care- Finally uncover the attached monitor and adjust the screen for a de-
Owners Manual
Page 13
... of the strap while holding the buckle until the pouch is used , remove the additional monitor and pouch from the system by depressing the button below the screen with one end of the...unit. Contact an Audiovox's retailer for an additional monitor, and insert it into the slot of the detached monitor, and insert the other (Refer to the main unit with the optional monitor). The monitor can be detached ... hand and connect it to Figure 3). Refer to Figure 9. Insert one hand and removing the monitor with the other end into the long slot of the strap while holding the buckle until the ...
... of the strap while holding the buckle until the pouch is used , remove the additional monitor and pouch from the system by depressing the button below the screen with one end of the...unit. Contact an Audiovox's retailer for an additional monitor, and insert it into the slot of the detached monitor, and insert the other (Refer to the main unit with the optional monitor). The monitor can be detached ... hand and connect it to Figure 3). Refer to Figure 9. Insert one hand and removing the monitor with the other end into the long slot of the strap while holding the buckle until the ...

Owners Manual
Page 15
...the storage, plug one hand and removing the video monitor* with one end into the slot on the side of the monitor, then plug the other hand. *NOTE: During the Removal and Reinstallation of the Video Monitor, rotate the monitor and the monitor's hinged base so that they are aligned in a... straight line. POWERING THE DETACHED MONITOR IN THE VEHICLE (Refer to Figure 3 ). The Video Monitor is inserted into the DC 12V jack on the main unit at...
...the storage, plug one hand and removing the video monitor* with one end into the slot on the side of the monitor, then plug the other hand. *NOTE: During the Removal and Reinstallation of the Video Monitor, rotate the monitor and the monitor's hinged base so that they are aligned in a... straight line. POWERING THE DETACHED MONITOR IN THE VEHICLE (Refer to Figure 3 ). The Video Monitor is inserted into the DC 12V jack on the main unit at...

Owners Manual
Page 16
.../Video and IR signals will be supplied from the storage bag, plug one end into the DC 12V jack on the side of the monitor. *Optional Second Video Monitor Part #VBDV56 Figure 14 5. So there is no need for another power source to be supplied through the DIN cable to the connected... to the main unit with the main unit DC 12V power will all be connected to the DC 12V jack on the side of the monitor, then plug the other end into the cigarette lighter socket. Take the cigarette lighter adapter from the main unit to the...
.../Video and IR signals will be supplied from the storage bag, plug one end into the DC 12V jack on the side of the monitor. *Optional Second Video Monitor Part #VBDV56 Figure 14 5. So there is no need for another power source to be supplied through the DIN cable to the connected... to the main unit with the main unit DC 12V power will all be connected to the DC 12V jack on the side of the monitor, then plug the other end into the cigarette lighter socket. Take the cigarette lighter adapter from the main unit to the...

Owners Manual
Page 17
2) Refer to the main unit with the DIN cable. *Optional Video Monitors Figure 15 14 In the vehicle, the cigarette lighter adapter can drive up to 3 monitors combined with the main unit and connected to Figure 15.
2) Refer to the main unit with the DIN cable. *Optional Video Monitors Figure 15 14 In the vehicle, the cigarette lighter adapter can drive up to 3 monitors combined with the main unit and connected to Figure 15.
Owners Manual
Page 18
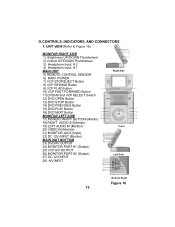
... Switch 12) DVD OPEN Button 13) DVD STOP Button 14) DVD PREVIOUS Button 15) DVD PLAY Button 16) DVD NEXT Button MONITOR LEFT SIDE 17) POWER ON/OFF BUTTON (Monitor) 18) RIGHT AUDIO IN (Monitor) 19) LEFT AUDIO IN (Monitor) 20) VIDEO IN (Monitor) 21) MONITOR JACK (Input) 22) DC 12V INPUT (Monitor) MAIN UNIT BOTTOM 23) DVD/AV OUTPUT 24) MONITOR PORT #1 (Output...
... Switch 12) DVD OPEN Button 13) DVD STOP Button 14) DVD PREVIOUS Button 15) DVD PLAY Button 16) DVD NEXT Button MONITOR LEFT SIDE 17) POWER ON/OFF BUTTON (Monitor) 18) RIGHT AUDIO IN (Monitor) 19) LEFT AUDIO IN (Monitor) 20) VIDEO IN (Monitor) 21) MONITOR JACK (Input) 22) DC 12V INPUT (Monitor) MAIN UNIT BOTTOM 23) DVD/AV OUTPUT 24) MONITOR PORT #1 (Output...
Owners Manual
Page 20
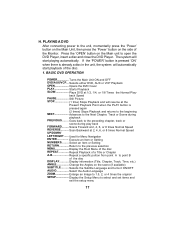
...the disc DISPLAY Display information (Title, Chapter, Track, Time, etc.) ANGLE Change the Angles on the Main unit to open the DVD Player, insert a disc and close the DVD Player. The system will resume at 1/2, 1/4, or 1/8 Times the Normal Play- back Speed PAUSE Still Picture STOP 1 time) Stops ...to the beginning NEXT Advances to point B of the Monitor. BASIC DVD OPERATION POWER Turns the Main Unit ON and OFF DVD/AUX/VCP... Selects either DVD, AUX or VCP Playback OPEN Opens the DVD Cover PLAY Starts Playback SLOW Plays DVD at the Present Playback Point when the PLAY button ...
...the disc DISPLAY Display information (Title, Chapter, Track, Time, etc.) ANGLE Change the Angles on the Main unit to open the DVD Player, insert a disc and close the DVD Player. The system will resume at 1/2, 1/4, or 1/8 Times the Normal Play- back Speed PAUSE Still Picture STOP 1 time) Stops ...to the beginning NEXT Advances to point B of the Monitor. BASIC DVD OPERATION POWER Turns the Main Unit ON and OFF DVD/AUX/VCP... Selects either DVD, AUX or VCP Playback OPEN Opens the DVD Cover PLAY Starts Playback SLOW Plays DVD at the Present Playback Point when the PLAY button ...

Owners Manual
Page 21
... (5). During playback press 'DISPLAY' to start playing. Title, Chapter Number, and Time Screen Display b. Some DVDs only allow you play a DVD, a root menu of the disc will appear on the screen of the title. Press 'DISPLAY' again to... disc.) 1) PLAYING TIME AND REMAINING TIME a. MENU A DVD is divided into sections called titles and chapters. The heading will disappear automatically after 3 seconds if no buttons are... disc to display the Remaining Time of your TV or Monitor. The heading will disappear automatically in about 3 seconds.
... (5). During playback press 'DISPLAY' to start playing. Title, Chapter Number, and Time Screen Display b. Some DVDs only allow you play a DVD, a root menu of the disc will appear on the screen of the title. Press 'DISPLAY' again to... disc.) 1) PLAYING TIME AND REMAINING TIME a. MENU A DVD is divided into sections called titles and chapters. The heading will disappear automatically after 3 seconds if no buttons are... disc to display the Remaining Time of your TV or Monitor. The heading will disappear automatically in about 3 seconds.

Owners Manual
Page 40
...game system into the yellow video jack and the Audio L and Audio R into the applicable jacks on the side of the monitor, which takes priority over the built-in DVD player. Plug the video output from your game system into the yellow VIDEO jack and the AUDIO L and AUDIO R into the ...main unit and the built-in DVD player. Adjust the volume control and the brightness control on the side of the main unit, which takes priority over both AV input into the applicable jacks on the monitor for individual preference. 37 J. PLAYING A VIDEO GAME (Refer to ...
...game system into the yellow video jack and the Audio L and Audio R into the applicable jacks on the side of the monitor, which takes priority over the built-in DVD player. Plug the video output from your game system into the yellow VIDEO jack and the AUDIO L and AUDIO R into the ...main unit and the built-in DVD player. Adjust the volume control and the brightness control on the side of the main unit, which takes priority over both AV input into the applicable jacks on the monitor for individual preference. 37 J. PLAYING A VIDEO GAME (Refer to ...

Owners Manual
Page 41
... (Refer to Figure 18 & 19) Besides the monitor combined with the main unit, this system can drive up to 2 additional monitors (Please contact an Audiovox dealer for the additional monitors part # VBDV56) by using the cigarette lighter adapter in the headset to either HEADPHONE 1 jack or HEADPHONE... 2 jack on the left side of the monitor. Simply plug in the vehicle. (NOTE...
... (Refer to Figure 18 & 19) Besides the monitor combined with the main unit, this system can drive up to 2 additional monitors (Please contact an Audiovox dealer for the additional monitors part # VBDV56) by using the cigarette lighter adapter in the headset to either HEADPHONE 1 jack or HEADPHONE... 2 jack on the left side of the monitor. Simply plug in the vehicle. (NOTE...

Owners Manual
Page 42
...the color-coded plugs to the appropriate DVD OUT jacks or VCP OUT jacks on the side of the main unit: Yellow (VIDEO) to Yellow, White (AUDIO L) to White, and Red (AUDIO R) to 16 V Power consumption: 35 W (Main With Monitor) Operating temperature: 5~40°C ...(41~104°F) Storage temperature: -20~60°C (4~140°F) Operating humidity: 10~75% Dimensions (W x H x D): 250 x 263 x 135 mm ( 9.8" x 10.4" x 5.3") 39 2. SPECIFICATION Color system: NTSC Screen size: 5.6" Disc format: DVD/CD/MP3 DVD video format: Horizontal 720 pixel...
...the color-coded plugs to the appropriate DVD OUT jacks or VCP OUT jacks on the side of the main unit: Yellow (VIDEO) to Yellow, White (AUDIO L) to White, and Red (AUDIO R) to 16 V Power consumption: 35 W (Main With Monitor) Operating temperature: 5~40°C ...(41~104°F) Storage temperature: -20~60°C (4~140°F) Operating humidity: 10~75% Dimensions (W x H x D): 250 x 263 x 135 mm ( 9.8" x 10.4" x 5.3") 39 2. SPECIFICATION Color system: NTSC Screen size: 5.6" Disc format: DVD/CD/MP3 DVD video format: Horizontal 720 pixel...

