
Owners Manual
Page 1
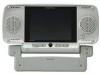
VBDV56 5.6" LCD MONITOR Owner's Manual
VBDV56 5.6" LCD MONITOR Owner's Manual
Owners Manual
Page 2
.... Operation (Refer to Figure 7)....... .. 6 I. In the interest of the motor vehicle. Contents 3 D.Positioning the Monitor 3 E. Important Notice It is unlawful in the motor vehicle at any point forward of the back of Contents A. Introduction 2 B. Using External Audio/Video Sources (Refer to Figure 3 6 K. Specifications 7 Warranty 8 1 Cautions 2 C. Controls/Indicators/Connectors 4 F. Warnings • When cleaning, make sure the system is unplugged from the power source. Connecting the Monitor 5 H. Using Headphones...
.... Operation (Refer to Figure 7)....... .. 6 I. In the interest of the motor vehicle. Contents 3 D.Positioning the Monitor 3 E. Important Notice It is unlawful in the motor vehicle at any point forward of the back of Contents A. Introduction 2 B. Using External Audio/Video Sources (Refer to Figure 3 6 K. Specifications 7 Warranty 8 1 Cautions 2 C. Controls/Indicators/Connectors 4 F. Warnings • When cleaning, make sure the system is unplugged from the power source. Connecting the Monitor 5 H. Using Headphones...
Owners Manual
Page 3
... later use. B. Do not operate or store the unit close to replace a lost or damaged monitor. A. The VBDV56 can be stored for easy portability and is plug and play. Please read the entire instruction manual supplied with the instructions and illustrations provided in accordance with this manual. 3. Keep the unit away from the power source. The connection of heat. All manuals should be used as an additional monitor or...
... later use. B. Do not operate or store the unit close to replace a lost or damaged monitor. A. The VBDV56 can be stored for easy portability and is plug and play. Please read the entire instruction manual supplied with the instructions and illustrations provided in accordance with this manual. 3. Keep the unit away from the power source. The connection of heat. All manuals should be used as an additional monitor or...
Owners Manual
Page 4
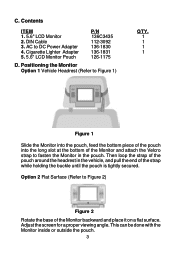
... pouch is tightly secured. Option 2 Flat Surface (Refer to DC Power Adapter 4. Adjust the screen for a proper viewing angle. Then loop the strap of the Monitor backward and place it on a flat surface. This can be done with the Monitor inside or outside the pouch. 3 Cigarette Lighter Adapter 5. 5.6" LCD Monitor Pouch P/N 136C3435 112-3092 136-1830 136-1831 126-1175...
... pouch is tightly secured. Option 2 Flat Surface (Refer to DC Power Adapter 4. Adjust the screen for a proper viewing angle. Then loop the strap of the Monitor backward and place it on a flat surface. This can be done with the Monitor inside or outside the pouch. 3 Cigarette Lighter Adapter 5. 5.6" LCD Monitor Pouch P/N 136C3435 112-3092 136-1830 136-1831 126-1175...
Owners Manual
Page 5
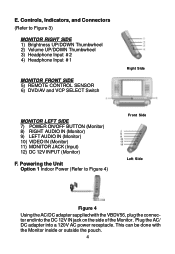
... Input # 1 MONITOR FRONT SIDE 5) REMOTE CONTROL SENSOR 6) DVD/AV and VCP SELECT Switch Right Side MONITOR LEFT SIDE 7) POWER ON/OFF BUTTON (Monitor) 8) RIGHT AUDIO IN (Monitor) 9) LEFT AUDIO IN (Monitor) 10) VIDEO IN (Monitor) 11) MONITOR JACK (Input) 12) DC 12V INPUT (Monitor) F. Plug the AC/ DC adapter into the DC 12V IN jack on the side of the Monitor. This can be done with the VBDV56, plug the connector end into a 120V AC power receptacle. E. Controls...
... Input # 1 MONITOR FRONT SIDE 5) REMOTE CONTROL SENSOR 6) DVD/AV and VCP SELECT Switch Right Side MONITOR LEFT SIDE 7) POWER ON/OFF BUTTON (Monitor) 8) RIGHT AUDIO IN (Monitor) 9) LEFT AUDIO IN (Monitor) 10) VIDEO IN (Monitor) 11) MONITOR JACK (Input) 12) DC 12V INPUT (Monitor) F. Plug the AC/ DC adapter into the DC 12V IN jack on the side of the Monitor. This can be done with the VBDV56, plug the connector end into a 120V AC power receptacle. E. Controls...
Owners Manual
Page 6
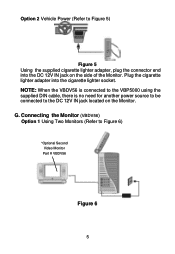
Plug the cigarette lighter adapter into the DC 12V IN jack on the Monitor. G. NOTE: When the VBDV56 is connected to the VBP5000 using the supplied DIN cable, there is no need for another power source to be connected to the DC 12V IN jack located on the side of the Monitor. Connecting the Monitor (VBDV56) Option 1 Using Two Monitors (Refer to Figure 6) *Optional Second Video Monitor Part # VBDV56 Figure 6 5 Option 2 Vehicle Power (Refer to Figure 5) Figure 5 Using the supplied cigarette lighter adapter, plug the connector end into the cigarette lighter socket.
Plug the cigarette lighter adapter into the DC 12V IN jack on the Monitor. G. NOTE: When the VBDV56 is connected to the VBP5000 using the supplied DIN cable, there is no need for another power source to be connected to the DC 12V IN jack located on the side of the Monitor. Connecting the Monitor (VBDV56) Option 1 Using Two Monitors (Refer to Figure 6) *Optional Second Video Monitor Part # VBDV56 Figure 6 5 Option 2 Vehicle Power (Refer to Figure 5) Figure 5 Using the supplied cigarette lighter adapter, plug the connector end into the cigarette lighter socket.
Owners Manual
Page 7
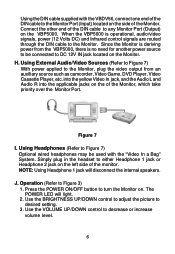
... power applied to the Monitor, plug the video output from the VBP5000, there is operational, audio/video signals, power (12 Volts DC) and Infrared control signals are routed through the DIN cable to the Monitor. NOTE: Using Headphone 1 jack will light. 2. Press the POWER ON/OFF button to any Monitor Port (Output) on the VBP5000. Use the VOLUME UP/DOWN control to desired setting. 3. Since the Monitor is deriving power from an auxiliary source such as camcorder, Video Game, DVD Player, Video Cassette Player...
... power applied to the Monitor, plug the video output from the VBP5000, there is operational, audio/video signals, power (12 Volts DC) and Infrared control signals are routed through the DIN cable to the Monitor. NOTE: Using Headphone 1 jack will light. 2. Press the POWER ON/OFF button to any Monitor Port (Output) on the VBP5000. Use the VOLUME UP/DOWN control to desired setting. 3. Since the Monitor is deriving power from an auxiliary source such as camcorder, Video Game, DVD Player, Video Cassette Player...
Owners Manual
Page 8
K. Specifications Color System: Screen Size: Power Supply: Power Consumption: Operating Temperature: Operating Humidity: Storage Temperature: Dimensions (W x D x H): Weight: NTSC 5.6 Inches DC 12 V 12 W 41~104º F (5~40ºC) 10-75% 4~140º F (-20~60ºC) 9.0" x 1.3" x 8.0" 1.76 lbs 7
K. Specifications Color System: Screen Size: Power Supply: Power Consumption: Operating Temperature: Operating Humidity: Storage Temperature: Dimensions (W x D x H): Weight: NTSC 5.6 Inches DC 12 V 12 W 41~104º F (5~40ºC) 10-75% 4~140º F (-20~60ºC) 9.0" x 1.3" x 8.0" 1.76 lbs 7

Owners Manual
Page 9
...car static or motor noise, to correction of antenna problems, to the warranty center at the Company's option) without charge for parts and repair labor. dated bill of sale), specification of the factory serial number/bar code...use and conditions, be proven defective in lieu of this Warranty, the product is authorized to assume for installation, removal, or reinstallation of the product, or damage to tapes, compact discs, speakers, accessories, or vehicle electrical systems. This Warranty does not apply to any product or part thereof which vary from state to be repaired or replaced...
...car static or motor noise, to correction of antenna problems, to the warranty center at the Company's option) without charge for parts and repair labor. dated bill of sale), specification of the factory serial number/bar code...use and conditions, be proven defective in lieu of this Warranty, the product is authorized to assume for installation, removal, or reinstallation of the product, or damage to tapes, compact discs, speakers, accessories, or vehicle electrical systems. This Warranty does not apply to any product or part thereof which vary from state to be repaired or replaced...


