Installation Manual
Page 5
... the center out with the discs. *Note: Please don't use irregularly shaped discs such as heart or star-shaped discs as hot air ducts. CONTENTS 1. 7" LCD Monitor & DVD Player Combo 2. Hardware Package 4 pcs M3.5 x 18mm Panhead Philips Machines Screws 2 pcs Rubber Plugs 5. C. A/V Adapter Cable 3. Do not stick paper, tape or glue on the disc... playback features may be available. Do not expose the disc to the instructions supplied with a cleaning cloth. Power/Domelight Harness 4. Some playback operations of disc. Remote Control 6.
... the center out with the discs. *Note: Please don't use irregularly shaped discs such as heart or star-shaped discs as hot air ducts. CONTENTS 1. 7" LCD Monitor & DVD Player Combo 2. Hardware Package 4 pcs M3.5 x 18mm Panhead Philips Machines Screws 2 pcs Rubber Plugs 5. C. A/V Adapter Cable 3. Do not stick paper, tape or glue on the disc... playback features may be available. Do not expose the disc to the instructions supplied with a cleaning cloth. Power/Domelight Harness 4. Some playback operations of disc. Remote Control 6.
Installation Manual
Page 14
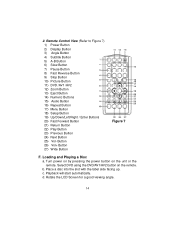
Turn power on by pressing the power button on the remote. c. b. d. Rotate the LCD Screen for a good viewing angle. 14 Playback will start automatically. Select DVD using the DVD/AV1/AV2 button on the unit or the remote. Remote Control View (Refer to Figure 7) 1) Power Button 2) Display Button 3) Angle Button 4) Subtitle Button 5) A-B Button 6) Slow Button 7) Pause Button 8) Fast...
Turn power on by pressing the power button on the remote. c. b. d. Rotate the LCD Screen for a good viewing angle. 14 Playback will start automatically. Select DVD using the DVD/AV1/AV2 button on the unit or the remote. Remote Control View (Refer to Figure 7) 1) Power Button 2) Display Button 3) Angle Button 4) Subtitle Button 5) A-B Button 6) Slow Button 7) Pause Button 8) Fast...


