

Operation Manual
Page 2
... ...2 Setup ...5 Identification of Controls...8 Connections...12 Basic Operations ...18 Memorizing the Channels...20 Channel Selection ...22 Setting Picture ...23 Setting Picture/Adjusting Image ...24 Setting Sound ...25 System Setup...27 Clock and Timer Setup...28 Viewing Closed Captions ...29 Setting Parental Control ...30 PIP/PBP/POP Operations ...34 Electronic Program Guide ...36 Image Adjust for PC/Component Mode 37 Image Adjust for HDMI Mode ...38 Troubleshooting ...39 Care and Maintenance...40 Specifications ...41 Assemble the Speaker ...42 Programming the Universal Remote Control 43
... ...2 Setup ...5 Identification of Controls...8 Connections...12 Basic Operations ...18 Memorizing the Channels...20 Channel Selection ...22 Setting Picture ...23 Setting Picture/Adjusting Image ...24 Setting Sound ...25 System Setup...27 Clock and Timer Setup...28 Viewing Closed Captions ...29 Setting Parental Control ...30 PIP/PBP/POP Operations ...34 Electronic Program Guide ...36 Image Adjust for PC/Component Mode 37 Image Adjust for HDMI Mode ...38 Troubleshooting ...39 Care and Maintenance...40 Specifications ...41 Assemble the Speaker ...42 Programming the Universal Remote Control 43
Operation Manual
Page 3
... to part 15 of important operating and maintenance (servicing) instructions in the operating instructions unless you are designed to persons. FCC CAUTION: Pursuant to correct the interference at his own expense. This equipment generates, uses, and can radiate radio frequency energy and, if not installed and used in accordance with the instruction manual, may cause radio interference in which case the user...
... to part 15 of important operating and maintenance (servicing) instructions in the operating instructions unless you are designed to persons. FCC CAUTION: Pursuant to correct the interference at his own expense. This equipment generates, uses, and can radiate radio frequency energy and, if not installed and used in accordance with the instruction manual, may cause radio interference in which case the user...

Operation Manual
Page 5
... internal parts. When a liquid is in proper operating condition. 21.Wall or ceiling mounting---When mounting the product on the product. 19.Damage requiring service---If any of controls not described in the instructions can cause the product to follow the manufacturer's instructions. When the product has been exposed to perform repairs. Improper adjustment of the following conditions occurs, unplug the power cord...
... internal parts. When a liquid is in proper operating condition. 21.Wall or ceiling mounting---When mounting the product on the product. 19.Damage requiring service---If any of controls not described in the instructions can cause the product to follow the manufacturer's instructions. When the product has been exposed to perform repairs. Improper adjustment of the following conditions occurs, unplug the power cord...

Operation Manual
Page 7
Setup Using the Remote Control
Setup Using the Remote Control
Operation Manual
Page 8
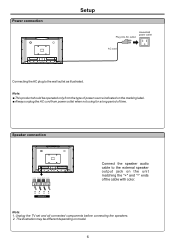
Note: Power connection Setup Household power outlet Plug into AC outlet. AC cord Connecting the AC plug to the wall outlet as illustrated.
Note: Power connection Setup Household power outlet Plug into AC outlet. AC cord Connecting the AC plug to the wall outlet as illustrated.

Operation Manual
Page 9
... antenna UHF antenna TV REAR Mixer 75 Ohm coaxial cable Notes: ! For best reception, an outdoor antenna is used, you in the CHANNEL SETUP menu and then perform auto channel search.(See section) Connect to assist you may require the correct connection cable and plug between the wall antenna socket and your television receiver. ! Select the TV Source (AIR or CABLE) in obtaining the correct antenna system for your responsibility. 7 To obtain optimum quality picture and sound...
... antenna UHF antenna TV REAR Mixer 75 Ohm coaxial cable Notes: ! For best reception, an outdoor antenna is used, you in the CHANNEL SETUP menu and then perform auto channel search.(See section) Connect to assist you may require the correct connection cable and plug between the wall antenna socket and your television receiver. ! Select the TV Source (AIR or CABLE) in obtaining the correct antenna system for your responsibility. 7 To obtain optimum quality picture and sound...

Operation Manual
Page 11
...service only. AV inputs 1/2 Receive video/audio signals from external sources such as well with VGA interface, for software update only RS-232 4 5 6 7 8 9 10 11 12 1. USB port For software update only. Identification of a DVD player or Set-top box. 5. Component inputs 1/2 Connect to a cable TV system. 9 AV output Connect to the VCR input jacks to this interface. 11.AIR antenna input Connect to outdoor antenna. 12.CABLE input Connect to the audio and component output jacks of Controls (continued) Main unit (rear view) HDMI 2 DVI 2 IN HDMI 1 DVI 1 IN 1 2 3 4 AUDIO AUDIO...
...service only. AV inputs 1/2 Receive video/audio signals from external sources such as well with VGA interface, for software update only RS-232 4 5 6 7 8 9 10 11 12 1. USB port For software update only. Identification of a DVD player or Set-top box. 5. Component inputs 1/2 Connect to a cable TV system. 9 AV output Connect to the VCR input jacks to this interface. 11.AIR antenna input Connect to outdoor antenna. 12.CABLE input Connect to the audio and component output jacks of Controls (continued) Main unit (rear view) HDMI 2 DVI 2 IN HDMI 1 DVI 1 IN 1 2 3 4 AUDIO AUDIO...

Operation Manual
Page 12
... channel or input password. 4. CH+/- MUTE Sound mute 10.MENU To access the Menu main page MTS/SAP ZOOM CCD SLEEP LIST FAVORITE AUDIO PICTURE PIP P.POSITION SWAP FREEZE 11.INFO To display channel status or signal information 12.Menu navigation buttons: 5634 56: To move upward or downward in menu operation; 34: To move left or right in menu operation; POWER Turn the unit on -screen Electronic Program Guide(EPG) 10 If your remote control does not work...
... channel or input password. 4. CH+/- MUTE Sound mute 10.MENU To access the Menu main page MTS/SAP ZOOM CCD SLEEP LIST FAVORITE AUDIO PICTURE PIP P.POSITION SWAP FREEZE 11.INFO To display channel status or signal information 12.Menu navigation buttons: 5634 56: To move upward or downward in menu operation; 34: To move left or right in menu operation; POWER Turn the unit on -screen Electronic Program Guide(EPG) 10 If your remote control does not work...
Operation Manual
Page 14
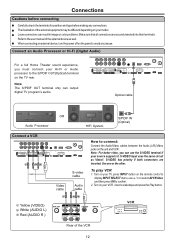
... (Optical) Connect a VCR L S-VIDEO R Y WR or for position and type before connecting Carefully check the terminals for software update only RS-232 Video cable S-video cable Audio cable How to connect: Connect the Audio/Video cables between the Audio (L/R)/Video jacks on the remote control to display INPUT SELECT menu, use5/6to select AV1/SVideo and then press OK to the user manual of the VCR 12 Turn on the panel to the S/PDIF OUT(Optical) terminal on your TV, press INPUT button...
... (Optical) Connect a VCR L S-VIDEO R Y WR or for position and type before connecting Carefully check the terminals for software update only RS-232 Video cable S-video cable Audio cable How to connect: Connect the Audio/Video cables between the Audio (L/R)/Video jacks on the remote control to display INPUT SELECT menu, use5/6to select AV1/SVideo and then press OK to the user manual of the VCR 12 Turn on the panel to the S/PDIF OUT(Optical) terminal on your TV, press INPUT button...

Operation Manual
Page 15
... is dependant on the remote control to display INPUT SELECT menu, use 5/6to select AV2 and then press OK to confirm . 2. Connect a Camcorder Connections (continued) L S-VIDEO R Y WR for software update only RS-232 Video cable Y Y Yellow (VIDEO) W White (AUDIO L) R Red (AUDIO R ) Audio cable OUT IN WR VIDEO L AUDIO R Camcorder How to connect: Connect the Audio/Video cables between the Audio (L/R)/Video jacks on your camcorder and set it to output mode. (For details, refer to your camcorder user manual.) 3. Turn on your TV, press INPUT button on your...
... is dependant on the remote control to display INPUT SELECT menu, use 5/6to select AV2 and then press OK to confirm . 2. Connect a Camcorder Connections (continued) L S-VIDEO R Y WR for software update only RS-232 Video cable Y Y Yellow (VIDEO) W White (AUDIO L) R Red (AUDIO R ) Audio cable OUT IN WR VIDEO L AUDIO R Camcorder How to connect: Connect the Audio/Video cables between the Audio (L/R)/Video jacks on your camcorder and set it to output mode. (For details, refer to your camcorder user manual.) 3. Turn on your TV, press INPUT button on your...

Operation Manual
Page 17
... connect: Connect the Video cable between the AUDIO input jack on the unit and AUDIO output jacks on the DVD (or STB). Turn on your TV, press INPUT button on your DVD or STB and do relative operations. 15 Component color inputs provide luminance and separate color signal. To playback DVD or STB 1. Connections (continued) Connect a DVD player or Set-Top Box HDMI 2 DVI 2 IN HDMI 1 DVI 1 IN G BR R W L S-VIDEO R for software update only RS-232 W white (audio L) R red (audio R, Pr) G Green (Y) B Blue (Pb) Video cable Audio cable G BR R W COMPONENT Pr Pb Y AUDIO...
... connect: Connect the Video cable between the AUDIO input jack on the unit and AUDIO output jacks on the DVD (or STB). Turn on your TV, press INPUT button on your DVD or STB and do relative operations. 15 Component color inputs provide luminance and separate color signal. To playback DVD or STB 1. Connections (continued) Connect a DVD player or Set-Top Box HDMI 2 DVI 2 IN HDMI 1 DVI 1 IN G BR R W L S-VIDEO R for software update only RS-232 W white (audio L) R red (audio R, Pr) G Green (Y) B Blue (Pb) Video cable Audio cable G BR R W COMPONENT Pr Pb Y AUDIO...

Operation Manual
Page 20
...to-use the Power button on the control panel on the screen. Main Menu Overview Main Menu PICTURE IMAGE ADJUST AUDIO SYSTEM SETUP CHANNEL SETUP CONTENT Brightness Contrast Sharpness Color Tint Backlight Image size H position V position Freeze Image Color Temp User Color Temp* Headphone volume Treble Bass Balance Focus window out* AVC Language Screen Saver Transparency OSD Time Out Clock Setup Source Name Edit Closed Caption Setup TV Source Current Channel Channel Label Channel Skip Favorite Channel Auto Search Input Select Signal Strength Content Password Set Password Password...
...to-use the Power button on the control panel on the screen. Main Menu Overview Main Menu PICTURE IMAGE ADJUST AUDIO SYSTEM SETUP CHANNEL SETUP CONTENT Brightness Contrast Sharpness Color Tint Backlight Image size H position V position Freeze Image Color Temp User Color Temp* Headphone volume Treble Bass Balance Focus window out* AVC Language Screen Saver Transparency OSD Time Out Clock Setup Source Name Edit Closed Caption Setup TV Source Current Channel Channel Label Channel Skip Favorite Channel Auto Search Input Select Signal Strength Content Password Set Password Password...

Operation Manual
Page 21
... INFO button to TV viewing. Air or Cable. - Current program broadcast progress. - Component1------Select signal from HDMI1 input interface. Analog RGB-------Select signal from HDMI2 input interface. Current program start and end play times. TV --------Select TV signal. Channel number and name. - Selecting Input Source Signal 1 Press the INPUT button to display INPUT SELECT menu. 2 Press 6or 5 to select your preference (refer to clear the screen. Caption icon (if closed caption is offered), Clock icon (if timer has been setup) and Lock icon...
... INFO button to TV viewing. Air or Cable. - Current program broadcast progress. - Component1------Select signal from HDMI1 input interface. Analog RGB-------Select signal from HDMI2 input interface. Current program start and end play times. TV --------Select TV signal. Channel number and name. - Selecting Input Source Signal 1 Press the INPUT button to display INPUT SELECT menu. 2 Press 6or 5 to select your preference (refer to clear the screen. Caption icon (if closed caption is offered), Clock icon (if timer has been setup) and Lock icon...
Operation Manual
Page 22
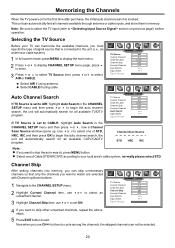
... is set ON. Note: Be sure to select the TV input (refer to CABLE: highlight Auto Search in memory. CHANNEL SETUP TV Source Current Channel Channel Label Channel Skip Favorite Channel Auto Search Input Select Signal Strength AIR 2-1 WGBHOFF OFF > > > > > > Auto Channel Search If TV Source is invoked. CHANNEL SETUP TV Source Current Channel Channel Label Channel Skip Favorite Channel Auto Search Input Select Signal Strength AIR 2-1 WGBHOFF OFF > > > > > > If TV Source is connected to the unit. (i.e., an antenna or cable system) 1 In full screen mode, press MENU to display...
... is set ON. Note: Be sure to select the TV input (refer to CABLE: highlight Auto Search in memory. CHANNEL SETUP TV Source Current Channel Channel Label Channel Skip Favorite Channel Auto Search Input Select Signal Strength AIR 2-1 WGBHOFF OFF > > > > > > Auto Channel Search If TV Source is invoked. CHANNEL SETUP TV Source Current Channel Channel Label Channel Skip Favorite Channel Auto Search Input Select Signal Strength AIR 2-1 WGBHOFF OFF > > > > > > If TV Source is connected to the unit. (i.e., an antenna or cable system) 1 In full screen mode, press MENU to display...

Operation Manual
Page 27
... automatically adjust the volume of the desired channel by lowering the sound output when the modulation singal is high or by pressing OK button and a green border will be different when the unit works in different mode. Focus Window Out menu item is available only in twin window mode (PIP or PBP) and either window's program is default focus window. Speaker/Headphone/Both AVC (auto volume control...
... automatically adjust the volume of the desired channel by lowering the sound output when the modulation singal is high or by pressing OK button and a green border will be different when the unit works in different mode. Focus Window Out menu item is available only in twin window mode (PIP or PBP) and either window's program is default focus window. Speaker/Headphone/Both AVC (auto volume control...

Operation Manual
Page 28
... of these signals. - USER: The sound quality you are having difficulty receiving a stereo signal. 1 When viewing analog channel, press the MTS/SAP button to call up the AUDIO MODE menu. 2 Press 5or6to select your desired audio mode option, then press OK to select the desired sound quality. AUDIO MODE 1. NEWS, USER, MOVIE and MUSIC can receive MTS stereo programs and any SAP (Secondary Audio Program) that accompanies the stereo program; This TV can be...
... of these signals. - USER: The sound quality you are having difficulty receiving a stereo signal. 1 When viewing analog channel, press the MTS/SAP button to call up the AUDIO MODE menu. 2 Press 5or6to select your desired audio mode option, then press OK to select the desired sound quality. AUDIO MODE 1. NEWS, USER, MOVIE and MUSIC can receive MTS stereo programs and any SAP (Secondary Audio Program) that accompanies the stereo program; This TV can be...

Operation Manual
Page 29
... OK button to adjust or enter sub-menu. Making use 3or4 to display SYSTEM SETUP menu page, press 6 to select caption Setup mode. For DTV program, you want to edit, then press OK to setup auto clock, or manual clock, and On/Off timer. OSD Time Out Selects OSD main menu displaying time. You may change systems such as screen Screen Saver saver automatically when no signal is being received for your input source selection easier...
... OK button to adjust or enter sub-menu. Making use 3or4 to display SYSTEM SETUP menu page, press 6 to select caption Setup mode. For DTV program, you want to edit, then press OK to setup auto clock, or manual clock, and On/Off timer. OSD Time Out Selects OSD main menu displaying time. You may change systems such as screen Screen Saver saver automatically when no signal is being received for your input source selection easier...

Operation Manual
Page 30
... Disable and then use the number buttons to select OFF. 28 Note that this setting is cleared when the TV is set . - Set the clock manually, if the current time is wrong, reset the clock manually. - Auto Power On/Off function operates only if current time has been set automatically from a digital channel signal. - Clock Setup sub-menu, highlight Auto Power On or Auto Power Off. 2 Use 3 or 4 to set it to activate it to work. - Press the SLEEP button repeatedly...
... Disable and then use the number buttons to select OFF. 28 Note that this setting is cleared when the TV is set . - Set the clock manually, if the current time is wrong, reset the clock manually. - Auto Power On/Off function operates only if current time has been set automatically from a digital channel signal. - Clock Setup sub-menu, highlight Auto Power On or Auto Power Off. 2 Use 3 or 4 to set it to activate it to work. - Press the SLEEP button repeatedly...

Operation Manual
Page 41
.... =Adjust the contrast and brightness settings. =Select a correct input. =Is a non-compatible signal being input? =Increase the VOLUME. =Check that the AC power cord is too bright. =This may be caused by electrical interference (e.g. If the remote control does not work . Also, do not work correctly when operating the monitor, try pressing the TV button. =Check whether the batteries are working. This is an universal remote control. Replace if necessary. =Clean the remote control sensor...
.... =Adjust the contrast and brightness settings. =Select a correct input. =Is a non-compatible signal being input? =Increase the VOLUME. =Check that the AC power cord is too bright. =This may be caused by electrical interference (e.g. If the remote control does not work . Also, do not work correctly when operating the monitor, try pressing the TV button. =Check whether the batteries are working. This is an universal remote control. Replace if necessary. =Clean the remote control sensor...

Operation Manual
Page 45
... appropriate code listing in "Programming a Device". If the device responds, go to control your brand until you find the codes for the first digit, press 1. then release. 3. Enter the first five-digit code for your VCR or DVD, Cable or Satellite Receivers, Amplifier or Tuner, and Auxiliary devices. Aim the remote at the device and press Power. The LED blinks twice. 4. Press and hold SET until the red LED blinks...
... appropriate code listing in "Programming a Device". If the device responds, go to control your brand until you find the codes for the first digit, press 1. then release. 3. Enter the first five-digit code for your VCR or DVD, Cable or Satellite Receivers, Amplifier or Tuner, and Auxiliary devices. Aim the remote at the device and press Power. The LED blinks twice. 4. Press and hold SET until the red LED blinks...


