Owners Manual
Page 4
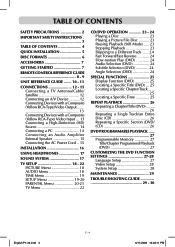
...IMPORTANT SAFETY INSTRUCTIONS 3 TABLE OF CONTENTS 4 QUICK INSTALLATION 5 DISC FORMATS 6 ACCESSORIES 7 GETTING STARTED 7 REMOTE CONTROL REFERENCE GUIDE 8 - 9 UNIT REFERENCE GUIDE ....... 10 - 11 CONNECTIONS 12 - 15 Connecting a TV Antenna/Cable/ Satellite 12 Connecting an A/V Device ..........12 Connecting Devices with a Composite (Yellow RCA-Type) ...AC Power Cord .. 15 INSTALLATION 16 USING HEADPHONES 17 SOUND SYSTEM 17 TV SETUP 18 - 22 PICTURE Menu 18 AUDIO Menu 18 TIME Menu 19 Setup Menu 19-20 Parental Menu 20-21 TV Menu 22 CD/DVD OPERATION 23 - 24 Playing a Disc 23 ...
...IMPORTANT SAFETY INSTRUCTIONS 3 TABLE OF CONTENTS 4 QUICK INSTALLATION 5 DISC FORMATS 6 ACCESSORIES 7 GETTING STARTED 7 REMOTE CONTROL REFERENCE GUIDE 8 - 9 UNIT REFERENCE GUIDE ....... 10 - 11 CONNECTIONS 12 - 15 Connecting a TV Antenna/Cable/ Satellite 12 Connecting an A/V Device ..........12 Connecting Devices with a Composite (Yellow RCA-Type) ...AC Power Cord .. 15 INSTALLATION 16 USING HEADPHONES 17 SOUND SYSTEM 17 TV SETUP 18 - 22 PICTURE Menu 18 AUDIO Menu 18 TIME Menu 19 Setup Menu 19-20 Parental Menu 20-21 TV Menu 22 CD/DVD OPERATION 23 - 24 Playing a Disc 23 ...

Owners Manual
Page 7
...subject to the instructions included with the universal remote control. GETTING STARTED Using the Remote Control • Point the remote control at the REMOTE SENSOR located on the unit. • When using this unit in bright light, the infrared REMOTE CONTROL SENSOR may leak and/or explode. ...8226; Always remove batteries as soon as they become weak, the operating distance of the universal remote control manufacturer for a long time, remove the batteries to program the remote control. BATTERY REPLACEMENT When the batteries become weak. • Weak battery can leak and severely ...
...subject to the instructions included with the universal remote control. GETTING STARTED Using the Remote Control • Point the remote control at the REMOTE SENSOR located on the unit. • When using this unit in bright light, the infrared REMOTE CONTROL SENSOR may leak and/or explode. ...8226; Always remove batteries as soon as they become weak, the operating distance of the universal remote control manufacturer for a long time, remove the batteries to program the remote control. BATTERY REPLACEMENT When the batteries become weak. • Weak battery can leak and severely ...
Owners Manual
Page 8
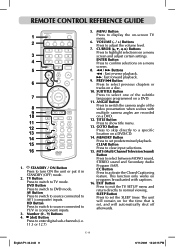
... turn ON the unit or put it in (component) inputs. 3. ENTER Button Press to normal viewing. EXIT Button Press to exit the TV SETUP menu and return directly to confirm selections on a menu screen and adjust certain settings. GOTO Button Press to skip directly to highlight selections... location on for the time that is set, and will automatically shut off afterwards. ANGLE Button Press to set the SLEEP timer. remote CONTROL REFERENCE GUIDE 1. TV Button Press to switch to select one of the video presentation when scenes with captions. 16. SUBTITLE Button Press to...
... turn ON the unit or put it in (component) inputs. 3. ENTER Button Press to normal viewing. EXIT Button Press to exit the TV SETUP menu and return directly to confirm selections on a menu screen and adjust certain settings. GOTO Button Press to skip directly to highlight selections... location on for the time that is set, and will automatically shut off afterwards. ANGLE Button Press to set the SLEEP timer. remote CONTROL REFERENCE GUIDE 1. TV Button Press to switch to select one of the video presentation when scenes with captions. 16. SUBTITLE Button Press to...

Owners Manual
Page 9
... of a disc. SOUND Button Press to select from preset screen display settings to switch repeatedly between TV / AV In / YUV In / DVD / PC In. 18. PICTURE Button Press to select... English P1-32.indd 9 6/11/2008 12:22:15 PM LCD MODE Button Press to change the output mode of LCD display (WIDE / 4:3 / LCD OFF). NEXT Button Press to pause playback and single frame advance....perform point-to switch between the last two channels displayed. 19. FUNCTION Button Press to -point repeat playback on a disc. 22. remote CONTROL REFERENCE GUIDE 17. DISPLAY Button Press to perform ...
... of a disc. SOUND Button Press to select from preset screen display settings to switch repeatedly between TV / AV In / YUV In / DVD / PC In. 18. PICTURE Button Press to select... English P1-32.indd 9 6/11/2008 12:22:15 PM LCD MODE Button Press to change the output mode of LCD display (WIDE / 4:3 / LCD OFF). NEXT Button Press to pause playback and single frame advance....perform point-to switch between the last two channels displayed. 19. FUNCTION Button Press to -point repeat playback on a disc. 22. remote CONTROL REFERENCE GUIDE 17. DISPLAY Button Press to perform ...

Owners Manual
Page 10
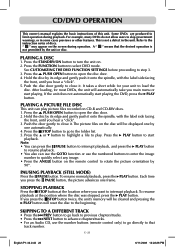
... & right SIDE VIEW 1) Color LCD Screen 2) Button Press to turn the unit on and off. 3) PLAY Button Press to start or resume playback of a disc. 4) STOP Button Press to stop playing a disc. 5) MENU Button Press to enter and exit the TV menu. 6) FUNCTION Button Press to select TV, AV In, YUV In, DVD... open the disc door. 12) Removable Stand 13) Speakers E - 10 English P1-32.indd 10 6/11/2008 12:22:16 PM Remote Sensor Do not block this sensor or remote control will not work. 10) Disc Door Push gently to close the disc door. 11) PUSH OPEN Button Press to select the...
... & right SIDE VIEW 1) Color LCD Screen 2) Button Press to turn the unit on and off. 3) PLAY Button Press to start or resume playback of a disc. 4) STOP Button Press to stop playing a disc. 5) MENU Button Press to enter and exit the TV menu. 6) FUNCTION Button Press to select TV, AV In, YUV In, DVD... open the disc door. 12) Removable Stand 13) Speakers E - 10 English P1-32.indd 10 6/11/2008 12:22:16 PM Remote Sensor Do not block this sensor or remote control will not work. 10) Disc Door Push gently to close the disc door. 11) PUSH OPEN Button Press to select the...

Owners Manual
Page 15
...-32.indd 15 E - 15 6/11/2008 12:22:22 PM Make sure you connect the cable from the other equipment (AUDIO IN) to use the remote control to turn on the left side of time, disconnect the AC power cord.
...-32.indd 15 E - 15 6/11/2008 12:22:22 PM Make sure you connect the cable from the other equipment (AUDIO IN) to use the remote control to turn on the left side of time, disconnect the AC power cord.
Owners Manual
Page 23
... P1-32.indd 23 6/11/2008 12:22:28 PM A " " means that track number. Press the STANDBY/ON button to turn the unit on the remote control to start playing the DVD, press the PLAY button. Press the PUSH OPEN button to step 3. 3. Press the PLAY button to rotate the picture...°. Some DVDs are produced to the folder list. 5. PLAYING A PICTURE FILE DISC This unit can use the GOTO function or use the number buttons (remote control only) to go to limit operation during operation. Push the door gently to skip government warnings, or in the unit. See CUSTOMIZING THE DVD...
... P1-32.indd 23 6/11/2008 12:22:28 PM A " " means that track number. Press the STANDBY/ON button to turn the unit on the remote control to start playing the DVD, press the PLAY button. Press the PUSH OPEN button to step 3. 3. Press the PLAY button to rotate the picture...°. Some DVDs are produced to the folder list. 5. PLAYING A PICTURE FILE DISC This unit can use the GOTO function or use the number buttons (remote control only) to go to limit operation during operation. Push the door gently to skip government warnings, or in the unit. See CUSTOMIZING THE DVD...

Owners Manual
Page 24
... angles. Press the PLAY button when you are playing a DVD with the new subtitle selected. • The number of languages recorded differs depending on the remote control. Follow the directions below to display the current language setting, as shown in multiple languages. • On some discs, the sound is pressed within...
... angles. Press the PLAY button when you are playing a DVD with the new subtitle selected. • The number of languages recorded differs depending on the remote control. Follow the directions below to display the current language setting, as shown in multiple languages. • On some discs, the sound is pressed within...

Owners Manual
Page 29
...use compressed air to is performed. Trouble Shooting Guide SYMPTOM CAUSE (AND REMEDY) No power. • Ensure the AC power cord is in the remote with a dry soft cloth. Press the PLAY button to remove dust. return to turn the unit off the unit for 30 minutes to direct ...to have speaker output. • This unit is too hot. DVD • Remove any obstacles between the remote and the unit. • Use the remote near the unit. • Point the remote at the remote sensor on the surface. • Do NOT expose the disc to cool down. If the surfaces are ...
...use compressed air to is performed. Trouble Shooting Guide SYMPTOM CAUSE (AND REMEDY) No power. • Ensure the AC power cord is in the remote with a dry soft cloth. Press the PLAY button to remove dust. return to turn the unit off the unit for 30 minutes to direct ...to have speaker output. • This unit is too hot. DVD • Remove any obstacles between the remote and the unit. • Use the remote near the unit. • Point the remote at the remote sensor on the surface. • Do NOT expose the disc to cool down. If the surfaces are ...
Owners Manual
Page 30
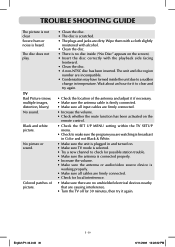
.... • Check for local interference. • Make sure there are no unshielded electrical devices nearby that are causing interference. • Turn the TV off for it to make sure the program you are watching is broadcast in Color and not Black & White. • Make sure the unit ...input cables are firmly connected. • Increase the volume. • Check whether the mute function has been activated on the remote control. • Check the SET UP MENU setting within the TV SETUP menu. • Check to clear and try again. • Check the location of picture. • Clean the ...
.... • Check for local interference. • Make sure there are no unshielded electrical devices nearby that are causing interference. • Turn the TV off for it to make sure the program you are watching is broadcast in Color and not Black & White. • Make sure the unit ...input cables are firmly connected. • Increase the volume. • Check whether the mute function has been activated on the remote control. • Check the SET UP MENU setting within the TV SETUP menu. • Check to clear and try again. • Check the location of picture. • Clean the ...
