
Owners Manual
Page 1
D1708 PORTABLE 7" LCD MONITOR AND DVD PLAYER 128-6895
D1708 PORTABLE 7" LCD MONITOR AND DVD PLAYER 128-6895

Owners Manual
Page 2
...prevent fire or electric shock, do not spill or spray liquid of reliable, trouble-free service, and is compact so that the 7" portable DVD player is constructed to prevent it with a cloth or other material. do not expose this may condense inside the unit. It 2 The main... in the system (this appliance to obtain the best equipment performance. Introduction Thank you anywhere and is designed for choosing the 7" portable DVD player. Cautions and Warnings 1. To ensure proper ventilation and proper operation, never cover or block the slots and openings with you for use ...
...prevent fire or electric shock, do not spill or spray liquid of reliable, trouble-free service, and is compact so that the 7" portable DVD player is constructed to prevent it with a cloth or other material. do not expose this may condense inside the unit. It 2 The main... in the system (this appliance to obtain the best equipment performance. Introduction Thank you anywhere and is designed for choosing the 7" portable DVD player. Cautions and Warnings 1. To ensure proper ventilation and proper operation, never cover or block the slots and openings with you for use ...

Owners Manual
Page 3
Contact qualified service personnel if your system needs repair. 5. Do not expose the disc to disassemble the cabinet. Remove the disc from the unit and store it in order to protect the enviromnent,please dispose the battery properly. Some playback operations of discs may cause the unit to malfunction. Also refer to the instructions supplied with water for cleaning the exterior of the system only. 6. Replace the battery only with a cleaning cloth. Cleaning Unit When cleaning, make sure the system is unplugged from the center out with the same or equivalent type, in its ...
Contact qualified service personnel if your system needs repair. 5. Do not expose the disc to disassemble the cabinet. Remove the disc from the unit and store it in order to protect the enviromnent,please dispose the battery properly. Some playback operations of discs may cause the unit to malfunction. Also refer to the instructions supplied with water for cleaning the exterior of the system only. 6. Replace the battery only with a cleaning cloth. Cleaning Unit When cleaning, make sure the system is unplugged from the center out with the same or equivalent type, in its ...

Owners Manual
Page 4
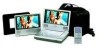
... the AC to DC Adapter 3. 1 x Remote Control with battery (CR2025) 4. 1 x Instruction Manual 5. 1 x Audio/Video Cable 6. 1 x Cigarette Lighter Adapter 7. Controls, Indicators, and Connectors 4 Contents 1. 1 x 7'' LCD Monitor & DVD Player Combo 2. 1 x AC to DC adapter into the DC 9V jack on the unit, then plug the other end into the cigarette lighter socket. C.
... the AC to DC Adapter 3. 1 x Remote Control with battery (CR2025) 4. 1 x Instruction Manual 5. 1 x Audio/Video Cable 6. 1 x Cigarette Lighter Adapter 7. Controls, Indicators, and Connectors 4 Contents 1. 1 x 7'' LCD Monitor & DVD Player Combo 2. 1 x AC to DC adapter into the DC 9V jack on the unit, then plug the other end into the cigarette lighter socket. C.
Owners Manual
Page 5
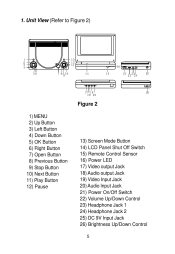
1. Unit View (Refer to Figure 2) Figure 2 1) MENU 2) Up Button 3) Left Button 4) Down Button 5) OK Button 6) Right Button 7) Open Button 8) Previous Button 9) Stop Button 10) Next Button 11) Play Button 12) Pause 13) Screen Mode Button 14) LCD Panel Shut Off Switch 15) Remote Control Sensor 16) Power LED 17) Video output Jack 18) Audio output Jack 19) Video Input Jack 20) Audio Input Jack 21) Power On/Off Switch 22) Volume Up/Down Control 23) Headphone Jack 1 24) Headphone Jack 2 25) DC 9V Input Jack 26) Brightness Up/Down Control 5
1. Unit View (Refer to Figure 2) Figure 2 1) MENU 2) Up Button 3) Left Button 4) Down Button 5) OK Button 6) Right Button 7) Open Button 8) Previous Button 9) Stop Button 10) Next Button 11) Play Button 12) Pause 13) Screen Mode Button 14) LCD Panel Shut Off Switch 15) Remote Control Sensor 16) Power LED 17) Video output Jack 18) Audio output Jack 19) Video Input Jack 20) Audio Input Jack 21) Power On/Off Switch 22) Volume Up/Down Control 23) Headphone Jack 1 24) Headphone Jack 2 25) DC 9V Input Jack 26) Brightness Up/Down Control 5

Owners Manual
Page 6
... tray by pressing OPEN , and place a disc into the tray with the power switch. Remote Control View (Refer to adjust the LCD's brightness and the DVD player's volume. Loading and Playing a Disc a. After connecting power to the unit, power on...
... tray by pressing OPEN , and place a disc into the tray with the power switch. Remote Control View (Refer to adjust the LCD's brightness and the DVD player's volume. Loading and Playing a Disc a. After connecting power to the unit, power on...

Owners Manual
Page 7
Figure 4. General SETUP Menu Screen a).Select TV DISPLAY using UP/DOWN, and press ENTER to return. 7 Press 'SETUP' again to enter the submenu. Select the TV display mode on the screen. Press LEFT to confirm the setting. G. SETUP Press 'SETUP' to display the Main screen of the SETUP Menu on the screen using the UP/DOWN buttons, and then press RIGHT to exit the SETUP Menu and the unit will display on screen. Main SETUP Menu Screen 1) Press "Setup", the 'GENERAL SETUP PAGE' will resume it's last playback mode. Figure 5.
Figure 4. General SETUP Menu Screen a).Select TV DISPLAY using UP/DOWN, and press ENTER to return. 7 Press 'SETUP' again to enter the submenu. Select the TV display mode on the screen. Press LEFT to confirm the setting. G. SETUP Press 'SETUP' to display the Main screen of the SETUP Menu on the screen using the UP/DOWN buttons, and then press RIGHT to exit the SETUP Menu and the unit will display on screen. Main SETUP Menu Screen 1) Press "Setup", the 'GENERAL SETUP PAGE' will resume it's last playback mode. Figure 5.

Owners Manual
Page 8
.../DOWN butttons, and then press the RIGHT button to enter the submenu. * NORMAL/PS: When the player is connected to a normal TV, and a wide picture is shown on the full screen. * NORMAL/LB: When the player is connected to a normal TV, and a wide picture is shown on the screen with a black ...strip at both the top and bottom of the screen. * WIDE: When the player is connected to a wide screen TV, a wide picture is available). Figure 6. Figure 7. TV DISPLAY Screen Display b).Select 'ANGLE MARK' using the UP/DOWN buttons ...
.../DOWN butttons, and then press the RIGHT button to enter the submenu. * NORMAL/PS: When the player is connected to a normal TV, and a wide picture is shown on the full screen. * NORMAL/LB: When the player is connected to a normal TV, and a wide picture is shown on the screen with a black ...strip at both the top and bottom of the screen. * WIDE: When the player is connected to a wide screen TV, a wide picture is available). Figure 6. Figure 7. TV DISPLAY Screen Display b).Select 'ANGLE MARK' using the UP/DOWN buttons ...

Owners Manual
Page 9
... the video quality set up page. LAST MEMORY Screen Display *on: The unit will return to the last position on the disc. *off ) *NOTE: The DVD player will not return to the last position on the screen. d). Select " Last Memory" by using the UP/DOWN buttons, Figure 8. SCREEN SAVER Display *ON: enables... : The unit will enter the Screen Saver mode after approximately five minutes if the same image remains on the disc. 2) With no disc inside the player select "Video quality Setup"by UP/DOWN button Figure 9. Main SETUP Menu VIDEO QUALITY 9 Figure 10.
... the video quality set up page. LAST MEMORY Screen Display *on: The unit will return to the last position on the disc. *off ) *NOTE: The DVD player will not return to the last position on the screen. d). Select " Last Memory" by using the UP/DOWN buttons, Figure 8. SCREEN SAVER Display *ON: enables... : The unit will enter the Screen Saver mode after approximately five minutes if the same image remains on the disc. 2) With no disc inside the player select "Video quality Setup"by UP/DOWN button Figure 9. Main SETUP Menu VIDEO QUALITY 9 Figure 10.

Owners Manual
Page 10
a).Select "Brightness by using the UP or DOWN buttons, then press "Enter" you can adjust the Hue by pressing the LEFT or RIGHT buttons. c).Select "Hue" by using the UP or DOWN buttons ,then press "Enter"you can change the Brightness by pressing the LEFT or RIGHT butttons. HUE Screen Display To exit "Hue"Setting,press "Enter"again to the main Menu. Figure 13. BRIGHTNESS Screen Display b).Select "Contrast" by using the UP or DOWN buttons,then press "Enter" you can adjust the Contrast by pressing the LEFT or RIGHT buttons. Figure 12. CONTAST Screen Display To exit "...
a).Select "Brightness by using the UP or DOWN buttons, then press "Enter" you can adjust the Hue by pressing the LEFT or RIGHT buttons. c).Select "Hue" by using the UP or DOWN buttons ,then press "Enter"you can change the Brightness by pressing the LEFT or RIGHT butttons. HUE Screen Display To exit "Hue"Setting,press "Enter"again to the main Menu. Figure 13. BRIGHTNESS Screen Display b).Select "Contrast" by using the UP or DOWN buttons,then press "Enter" you can adjust the Contrast by pressing the LEFT or RIGHT buttons. Figure 12. CONTAST Screen Display To exit "...
Owners Manual
Page 11
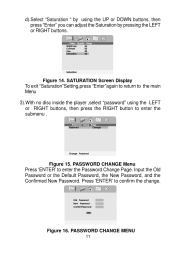
... the change. Figure 16. SATURATION Screen Display To exit "Saturation"Setting,press "Enter"again to return to the main Menu 3).With no disc inside the player ,select "password" using the UP or DOWN buttons, then press "Enter" you can adjust the Saturation by pressing the LEFT or RIGHT buttons. PASSWORD CHANGE...
... the change. Figure 16. SATURATION Screen Display To exit "Saturation"Setting,press "Enter"again to return to the main Menu 3).With no disc inside the player ,select "password" using the UP or DOWN buttons, then press "Enter" you can adjust the Saturation by pressing the LEFT or RIGHT buttons. PASSWORD CHANGE...

Owners Manual
Page 12
.... Press LEFT to return. Figure 19. Preference SUBTITILE LANGUAGE 12 Figure 17. Preference Audio Language a. PASSWORD VERIFY Input Screen Display 4).With no disc inside the player select 'PREFERENCES' using the UP/DOWN buttons, then press 'RIGHT' to enter the submenu. b. Select 'SUBTITLE' the using the UP or DOWN buttons, then press...
.... Press LEFT to return. Figure 19. Preference SUBTITILE LANGUAGE 12 Figure 17. Preference Audio Language a. PASSWORD VERIFY Input Screen Display 4).With no disc inside the player select 'PREFERENCES' using the UP/DOWN buttons, then press 'RIGHT' to enter the submenu. b. Select 'SUBTITLE' the using the UP or DOWN buttons, then press...

Owners Manual
Page 13
... DOWN buttons, then press 'RIGHT' to confirm the setting. Enter a 4 digit password, then press 'ENTER' to return. If the selected, language is not available, the player will play and display on the screen the original recorded language contained in the above listed languages. c. Preference DISC MENU LANGUAGE Note: Language and subtitle...
... DOWN buttons, then press 'RIGHT' to confirm the setting. Enter a 4 digit password, then press 'ENTER' to return. If the selected, language is not available, the player will play and display on the screen the original recorded language contained in the above listed languages. c. Preference DISC MENU LANGUAGE Note: Language and subtitle...

Owners Manual
Page 14
This password is not affected by the default reset function. To avoid the possibility of users while some discs cannot. 14 Select 'DEFAULTS' using the default password to enter the submenu. Figure 22. Some discs can record this default password in another area and delete it . NOTE: The parental setting is always effective even after you can be limited depending on the age of others using the UP or DOWN buttons, then press RIGHT to set mode. e. Press ENTER to make the setting return to the factory-set the parental level and change the password, you have selected your...
This password is not affected by the default reset function. To avoid the possibility of users while some discs cannot. 14 Select 'DEFAULTS' using the default password to enter the submenu. Figure 22. Some discs can record this default password in another area and delete it . NOTE: The parental setting is always effective even after you can be limited depending on the age of others using the UP or DOWN buttons, then press RIGHT to set mode. e. Press ENTER to make the setting return to the factory-set the parental level and change the password, you have selected your...

Owners Manual
Page 15
1. Display the setup menu to point B of the disc Display information (title, chapter, track, time, etc.). Basic Operation POWER OPEN PLAY SLOW PAUSE STOP NEXT PREVIOUS FORWARD REVERSE LEFT/RIGHT/UP/DOWN ENTER NUMBERS RETURN MENU REPEAT A-B DISPLAY ANGLE SUBTITLE AUDIO ZOOM SETUP Turn the unit on / off Remove/load the disc Start Play/Execute item or setting Play at 1/2, 1/4, 1/8 or 1/16 times speed Still Picture (1 time) Stop at the present playing point / (2 times) Stop playing Go to the next chapter, track or scene during play back Go back to the previous chapter, track or scene during ...
1. Display the setup menu to point B of the disc Display information (title, chapter, track, time, etc.). Basic Operation POWER OPEN PLAY SLOW PAUSE STOP NEXT PREVIOUS FORWARD REVERSE LEFT/RIGHT/UP/DOWN ENTER NUMBERS RETURN MENU REPEAT A-B DISPLAY ANGLE SUBTITLE AUDIO ZOOM SETUP Turn the unit on / off Remove/load the disc Start Play/Execute item or setting Play at 1/2, 1/4, 1/8 or 1/16 times speed Still Picture (1 time) Stop at the present playing point / (2 times) Stop playing Go to the next chapter, track or scene during play back Go back to the previous chapter, track or scene during ...

Owners Manual
Page 16
...disc. DISPLAY (Display contents vary from disc to disc.) 1. During playback press the 'DISPLAY' button to select disc playback options using the DVD root menu. 3. Figure 19. Title Remaining Time Screen Display 16 2. Press MENU during playback to display the Remaining Time of Chapters (4), ... (3), the total Number of the title. Press 'DISPLAY' again to display the menu. The contents of your TV or Monitor. MENU A DVD is divided into sections called titles and chapters. The heading will disappear automatically after 3 seconds if no buttons are pressed. Figure 20. The...
...disc. DISPLAY (Display contents vary from disc to disc.) 1. During playback press the 'DISPLAY' button to select disc playback options using the DVD root menu. 3. Figure 19. Title Remaining Time Screen Display 16 2. Press MENU during playback to display the Remaining Time of Chapters (4), ... (3), the total Number of the title. Press 'DISPLAY' again to display the menu. The contents of your TV or Monitor. MENU A DVD is divided into sections called titles and chapters. The heading will disappear automatically after 3 seconds if no buttons are pressed. Figure 20. The...

Owners Manual
Page 17
c. Figure 22. Press 'DISPLAY' a 4th time to display the available angles for discs containing multi-angles*, with the current angle number (1) and the total number of angles (2) displaying. The heading will disappear automatically in 3 seconds. 2. Press 'DISPLAY' a 5th time to exit, 'DISPLAY OFF' will be displayed and will disappear automatically in 3 seconds. The angle display will disappear automatically in 3 seconds. Figure 21. The heading will disappear automatically if the 'ANGLE' button is not pressed again within 3 seconds. *NOTE: Not all discs contain this ...
c. Figure 22. Press 'DISPLAY' a 4th time to display the available angles for discs containing multi-angles*, with the current angle number (1) and the total number of angles (2) displaying. The heading will disappear automatically in 3 seconds. 2. Press 'DISPLAY' a 5th time to exit, 'DISPLAY OFF' will be displayed and will disappear automatically in 3 seconds. The angle display will disappear automatically in 3 seconds. Figure 21. The heading will disappear automatically if the 'ANGLE' button is not pressed again within 3 seconds. *NOTE: Not all discs contain this ...
Owners Manual
Page 18
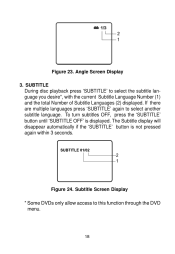
... to select the subtitle language you desire*, with the current Subtitle Language Number (1) and the total Number of Subtitle Languages (2) displayed. Subtitle Screen Display * Some DVDs only allow access to this function through the...
... to select the subtitle language you desire*, with the current Subtitle Language Number (1) and the total Number of Subtitle Languages (2) displayed. Subtitle Screen Display * Some DVDs only allow access to this function through the...

Owners Manual
Page 19
.... 5. Figure 25. ZOOM During playback press 'ZOOM' to normal size. 4. Audio Language Screen Display * Some DVDs only allow access to select another audio language. The audio display will return to enlarge the picture by 2x, 3x or 4X with the current ...
.... 5. Figure 25. ZOOM During playback press 'ZOOM' to normal size. 4. Audio Language Screen Display * Some DVDs only allow access to select another audio language. The audio display will return to enlarge the picture by 2x, 3x or 4X with the current ...

Owners Manual
Page 20
Figure 28. Figure 29. A-B Repeat Starting Point Screen Display b.Press 'A-B'second time to set the Starting Point A. A-B Repeat Cancelled Screen Display 20 Press A-B a third time to set the Ending Point B and the player will repeatedly play the part between Point A and Point B. 6. During playback press first time 'A-B' to cancel A-B repeat and resume playback. A-B Repeat Ending Point Screen Display c. Figure 27. A-B REPEAT a.
Figure 28. Figure 29. A-B Repeat Starting Point Screen Display b.Press 'A-B'second time to set the Starting Point A. A-B Repeat Cancelled Screen Display 20 Press A-B a third time to set the Ending Point B and the player will repeatedly play the part between Point A and Point B. 6. During playback press first time 'A-B' to cancel A-B repeat and resume playback. A-B Repeat Ending Point Screen Display c. Figure 27. A-B REPEAT a.