
User Manual
Page 1
Z8PE-D18 Motherboard
Z8PE-D18 Motherboard

User Manual
Page 3
Contents Contents...iii Notices...vii Safety information viii About this guide ix Z8PE-D18 specifications summary xi Chapter 1: Product introduction 1.1 Welcome 1-3 1.2 Package contents 1-3 1.3 Serial number label 1-4 1.4 Special features 1-4 1.4.1 Product highlights 1-4 1.4.2 Innovative ASUS features 1-6 Chapter 2: Hardware information 2.1 Before you proceed 2-3 2.2 Motherboard overview 2-6 2.2.1 Placement direction 2-6 2.2.2 Screw holes 2-6 2.2.3 Motherboard layouts 2-7 2.2.4 Layout contents 2-8 2.3 Central Processing Unit (CPU 2-10 2.3.1 Installing the...
Contents Contents...iii Notices...vii Safety information viii About this guide ix Z8PE-D18 specifications summary xi Chapter 1: Product introduction 1.1 Welcome 1-3 1.2 Package contents 1-3 1.3 Serial number label 1-4 1.4 Special features 1-4 1.4.1 Product highlights 1-4 1.4.2 Innovative ASUS features 1-6 Chapter 2: Hardware information 2.1 Before you proceed 2-3 2.2 Motherboard overview 2-6 2.2.1 Placement direction 2-6 2.2.2 Screw holes 2-6 2.2.3 Motherboard layouts 2-7 2.2.4 Layout contents 2-8 2.3 Central Processing Unit (CPU 2-10 2.3.1 Installing the...

User Manual
Page 8
...paper clips, screws, and staples away from connectors, slots, sockets and circuitry. • Avoid dust, humidity, and temperature extremes. Operation safety • Before installing the motherboard and adding devices on it may become wet. • Place the product on a stable surface. • If you detect any area where it , carefully read... local power company. • If the power supply is set to fix it by yourself. viii If possible, disconnect all power cables from the motherboard, ensure that came with the product, contact a qualified service technician or your retailer.
...paper clips, screws, and staples away from connectors, slots, sockets and circuitry. • Avoid dust, humidity, and temperature extremes. Operation safety • Before installing the motherboard and adding devices on it may become wet. • Place the product on a stable surface. • If you detect any area where it , carefully read... local power company. • If the power supply is set to fix it by yourself. viii If possible, disconnect all power cables from the motherboard, ensure that came with the product, contact a qualified service technician or your retailer.
User Manual
Page 9
...2: Hardware information This chapter lists the hardware setup procedures that you have been added by your dealer. ASUS websites The ASUS website provides updated information on the motherboard. • Chapter 3: Powering up This chapter describes the power up , creating, and configuring RAID ... documentation Your product package may include optional documentation, such as warranty flyers, that you need when installing and configuring the motherboard. These documents are also provided. • Chapter 5: RAID configuration This chapter provides instructions for setting up sequence and ...
...2: Hardware information This chapter lists the hardware setup procedures that you have been added by your dealer. ASUS websites The ASUS website provides updated information on the motherboard. • Chapter 3: Powering up This chapter describes the power up , creating, and configuring RAID ... documentation Your product package may include optional documentation, such as warranty flyers, that you need when installing and configuring the motherboard. These documents are also provided. • Chapter 5: RAID configuration This chapter provides instructions for setting up sequence and ...

User Manual
Page 13
introPdruoc1dtuiocnt Chapter 1: This chapter describes the motherboard features and the new technologies it supports.
introPdruoc1dtuiocnt Chapter 1: This chapter describes the motherboard features and the new technologies it supports.
User Manual
Page 15
... cable Accessories IO shield Application CD Support CD Documentation User Guide Packing Qty. 1.1 Welcome! Discrete 8 channel audio card provides clearest high quality sounds ASUS Z8PE-D18 1-3 Thank you start installing the motherboard, and hardware devices on it another standout in your package with Hardware RAID 5, 6, 50, 60 Marvell 8 port SAS RAID card Remote Management...
... cable Accessories IO shield Application CD Support CD Documentation User Guide Packing Qty. 1.1 Welcome! Discrete 8 channel audio card provides clearest high quality sounds ASUS Z8PE-D18 1-3 Thank you start installing the motherboard, and hardware devices on it another standout in your package with Hardware RAID 5, 6, 50, 60 Marvell 8 port SAS RAID card Remote Management...

User Manual
Page 16
... DIMM per CPU) DDR3 memory. The Intel® EM64T feature allows your problems. Z8PE-D18 xxS2xxxxxxxx Made in China 合格 1.4 Special features 1.4.1 Product highlights Latest processor technology This motherboard supports the latest Intel® Xeon 5500 series processors in the world. Intel®... 64 Technology). The processor will automatically overclock as long as the figure below. With the correct serial number of the product, ASUS Technical Support team members can then offer a quicker and satisfying solution to your computer to 6.4GT/s. Intel® Xeon 5500 ...
... DIMM per CPU) DDR3 memory. The Intel® EM64T feature allows your problems. Z8PE-D18 xxS2xxxxxxxx Made in China 合格 1.4 Special features 1.4.1 Product highlights Latest processor technology This motherboard supports the latest Intel® Xeon 5500 series processors in the world. Intel®... 64 Technology). The processor will automatically overclock as long as the figure below. With the correct serial number of the product, ASUS Technical Support team members can then offer a quicker and satisfying solution to your computer to 6.4GT/s. Intel® Xeon 5500 ...

User Manual
Page 17
...PCI Express interface and could achieve network throughput close to PCIe 1.0 devices. 82576 LAN Solution The motherboard comes with lower pin count and reduced voltage requirements. ASUS Z8PE-D18 1-5 USB 2.0 technology The motherboard implements the Universal Serial Bus (USB) 2.0 specification, dramatically increasing the connection speed from 1.8 V...one Gigabit LAN controller and dual ports which makes it an ideal memory solution. DDR3 memory support The Z8PE-D18 supports UDIMM and RDIMM DDR3 memory that features data transfer rates of 1333/1066/800 MHZ to a fast 480 Mbps on ...
...PCI Express interface and could achieve network throughput close to PCIe 1.0 devices. 82576 LAN Solution The motherboard comes with lower pin count and reduced voltage requirements. ASUS Z8PE-D18 1-5 USB 2.0 technology The motherboard implements the Universal Serial Bus (USB) 2.0 specification, dramatically increasing the connection speed from 1.8 V...one Gigabit LAN controller and dual ports which makes it an ideal memory solution. DDR3 memory support The Z8PE-D18 supports UDIMM and RDIMM DDR3 memory that features data transfer rates of 1333/1066/800 MHZ to a fast 480 Mbps on ...

User Manual
Page 18
... configurations, PCI-E x8 Link on either Slot 5 or 6. With this flexibility, ASUS Flex-E makes motherboards suitable for durability, improved lifespan, and enhanced thermal capacity. 1.4.2 Innovative ASUS features ASUS EPU With current trends leaning towards power efficiency, the Z8PE-D18 is monitored for timely failure detection. ASUS MIO Audio card Enjoy high-end sound quality! The chip monitors...
... configurations, PCI-E x8 Link on either Slot 5 or 6. With this flexibility, ASUS Flex-E makes motherboards suitable for durability, improved lifespan, and enhanced thermal capacity. 1.4.2 Innovative ASUS features ASUS EPU With current trends leaning towards power efficiency, the Z8PE-D18 is monitored for timely failure detection. ASUS MIO Audio card Enjoy high-end sound quality! The chip monitors...

User Manual
Page 19
Chapter 2: 2 Hardware information It includes description of the jumpers and connectors on the motherboard. This chapter lists the hardware setup procedures that you have to perform when installing system components.
Chapter 2: 2 Hardware information It includes description of the jumpers and connectors on the motherboard. This chapter lists the hardware setup procedures that you have to perform when installing system components.

User Manual
Page 20
Chapter summary 2 2.1 Before you proceed 2-3 2.2 Motherboard overview 2-6 2.3 Central Processing Unit (CPU 2-10 2.4 System memory 2-15 2.5 Expansion slots 2-18 2.6 Jumpers 2-24 2.7 Connectors 2-29 ASUS Z8PE-D18
Chapter summary 2 2.1 Before you proceed 2-3 2.2 Motherboard overview 2-6 2.3 Central Processing Unit (CPU 2-10 2.4 System memory 2-15 2.5 Expansion slots 2-18 2.6 Jumpers 2-24 2.7 Connectors 2-29 ASUS Z8PE-D18

User Manual
Page 21
...pad or in the bag that came with a standby power LED. 2.1 Before you proceed Take note of the onboard LED ASUS Z8PE-D18 2-3 Onboard LED 1. Standby Power LED The motherboard comes with the component. • Before you install or remove any component, ensure that the power supply is switched off ...8226; Hold components by the edges to indicate that you should shut down the system and unplug the power cable before you install motherboard components or change any motherboard settings. • Unplug the power cord from the power supply. This is a reminder that the system is ON, in sleep...
...pad or in the bag that came with a standby power LED. 2.1 Before you proceed Take note of the onboard LED ASUS Z8PE-D18 2-3 Onboard LED 1. Standby Power LED The motherboard comes with the component. • Before you install or remove any component, ensure that the power supply is switched off ...8226; Hold components by the edges to indicate that you should shut down the system and unplug the power cable before you install motherboard components or change any motherboard settings. • Unplug the power cord from the power supply. This is a reminder that the system is ON, in sleep...

User Manual
Page 24
.... 2.2.2 Screw holes Place nine (9) screws into the chassis in an SSI EEB 1.1 compliant chassis. Ensure to unplug the chassis power cord before installing or removing the motherboard. 2.2 Motherboard overview Before you install the motherboard, study the configuration of your chassis to ensure that the motherboard fits into it into the holes indicated by circles to secure...
.... 2.2.2 Screw holes Place nine (9) screws into the chassis in an SSI EEB 1.1 compliant chassis. Ensure to unplug the chassis power cord before installing or removing the motherboard. 2.2 Motherboard overview Before you install the motherboard, study the configuration of your chassis to ensure that the motherboard fits into it into the holes indicated by circles to secure...

User Manual
Page 25
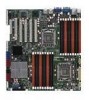
2.2.3 Motherboard layouts ASUS Z8PE-D18 2-7
2.2.3 Motherboard layouts ASUS Z8PE-D18 2-7
User Manual
Page 28
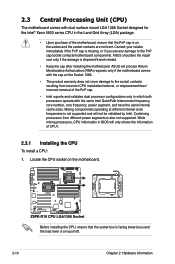
...only in BIOS will process Return Merchandise Authorization (RMA) requests only if the motherboard comes with the cap on the socket and the socket contacts are not bent. ASUS will only shows the information of the motherboard, ensure that the socket box is also not supported. Locate the CPU ...socket on your retailer immediately if the PnP cap is missing, or if you and the load lever is on the motherboard. Mixing componenets operating...
...only in BIOS will process Return Merchandise Authorization (RMA) requests only if the motherboard comes with the cap on the socket and the socket contacts are not bent. ASUS will only shows the information of the motherboard, ensure that the socket box is also not supported. Locate the CPU ...socket on your retailer immediately if the PnP cap is missing, or if you and the load lever is on the motherboard. Mixing componenets operating...

User Manual
Page 33
... modules from the same vendor. • For CPU1 configuraton, when installing only one DIMM, install it to the orange slots labeled DIMM_D1, DIMM_E1, or DIMM_F1. ASUS Z8PE-D18 2-15 2.4 System memory 2.4.1 Overview The motherboard comes with the same CAS latency. DDR3 modules are developed for better performance with less power consumption.
... modules from the same vendor. • For CPU1 configuraton, when installing only one DIMM, install it to the orange slots labeled DIMM_D1, DIMM_E1, or DIMM_F1. ASUS Z8PE-D18 2-15 2.4 System memory 2.4.1 Overview The motherboard comes with the same CAS latency. DDR3 modules are developed for better performance with less power consumption.

User Manual
Page 35
... that the notch on the DIMM 1 1 matches the break on the socket such that it flips out with 1 1 your fingers when pressing the retaining clips. ASUS Z8PE-D18 2-17 2.4.3 Installing a DIMM Unplug the power supply before adding or removing DIMMs or other system components. DO NOT force a DIMM into the socket until the... the DIMM lightly with extra force. 2. Failure to do not support DDR and DDR2 DIMMs. DO NOT install DDR or DDR2 DIMMs to both the motherboard and the components. Align a DIMM on the socket. 3. To install a DIMM: 2 1.
... that the notch on the DIMM 1 1 matches the break on the socket such that it flips out with 1 1 your fingers when pressing the retaining clips. ASUS Z8PE-D18 2-17 2.4.3 Installing a DIMM Unplug the power supply before adding or removing DIMMs or other system components. DO NOT force a DIMM into the socket until the... the DIMM lightly with extra force. 2. Failure to do not support DDR and DDR2 DIMMs. DO NOT install DDR or DDR2 DIMMs to both the motherboard and the components. Align a DIMM on the socket. 3. To install a DIMM: 2 1.
User Manual
Page 36
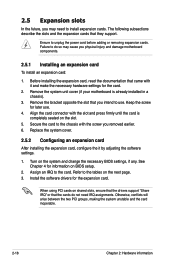
... the expansion cards that came with the screw you removed earlier. 6. Failure to the tables on the slot. 5. Remove the system unit cover (if your motherboard is completely seated on the next page. 3. 2.5 Expansion slots In the future, you may cause you physical injury and damage... motherboard components. 2.5.1 Installing an expansion card To install an expansion card: 1. Assign an IRQ to the chassis with it by adjusting the software settings. 1. Install the ...
... the expansion cards that came with the screw you removed earlier. 6. Failure to the tables on the slot. 5. Remove the system unit cover (if your motherboard is completely seated on the next page. 3. 2.5 Expansion slots In the future, you may cause you physical injury and damage... motherboard components. 2.5.1 Installing an expansion card To install an expansion card: 1. Assign an IRQ to the chassis with it by adjusting the software settings. 1. Install the ...

User Manual
Page 39
Locate the PIKE RAID card slot on the PIKE RAID card slot. ASUS Z8PE-D18 2-21 Ensure that it is completely seated on the motherboard. 2. Align the golden fingers of the RAID card with the PIKE RAID card slot. 3. Insert the RAID card into the PIKE RAID card slot. 2.5.8 Installing an ASUS PIKE RAID card Follow the steps below to install an optional ASUS RAID card on your motherboard. 1.
Locate the PIKE RAID card slot on the PIKE RAID card slot. ASUS Z8PE-D18 2-21 Ensure that it is completely seated on the motherboard. 2. Align the golden fingers of the RAID card with the PIKE RAID card slot. 3. Insert the RAID card into the PIKE RAID card slot. 2.5.8 Installing an ASUS PIKE RAID card Follow the steps below to install an optional ASUS RAID card on your motherboard. 1.

User Manual
Page 40
2.5.9 Installing i Button Follow the steps below to install an optional i Button on your motherboard. 1. Locate the I Button before using PIKE 1078 functions. 2.5.10 Installing ASMB4 management board Follow the steps below to install an optional ASMB4 management board on your motherboard. 1. Snap the I Button in place. 2-22 Chapter 2: Hardware information Locate the BMC_FW header on the motherboard. 2. Orient and press the ASMB4 management card in place. You need to install I Button slot on the motherboard. 2.
2.5.9 Installing i Button Follow the steps below to install an optional i Button on your motherboard. 1. Locate the I Button before using PIKE 1078 functions. 2.5.10 Installing ASMB4 management board Follow the steps below to install an optional ASMB4 management board on your motherboard. 1. Snap the I Button in place. 2-22 Chapter 2: Hardware information Locate the BMC_FW header on the motherboard. 2. Orient and press the ASMB4 management card in place. You need to install I Button slot on the motherboard. 2.


