
User Guide
Page 3
... About this guide iv Package contents vi Z170 PRO GAMING specifications summary vi Chapter 1: Product introduction 1.1 Before you proceed 1-1 1.2 Motherboard overview 1-1 1.3 Central Processing Unit (CPU 1-3 1.4 System memory 1-8 1.5 Expansion slots 1-14 1.6 Jumpers 1-16 1.7 Connectors 1-17 1.8 Onboard LED 1-28 1.9 Software support 1-30 Chapter 2: BIOS information 2.1 Managing and updating your BIOS 2-1 2.2 BIOS setup program 2-6 2.3 My Favorites 2-16 2.4 Main menu...
... About this guide iv Package contents vi Z170 PRO GAMING specifications summary vi Chapter 1: Product introduction 1.1 Before you proceed 1-1 1.2 Motherboard overview 1-1 1.3 Central Processing Unit (CPU 1-3 1.4 System memory 1-8 1.5 Expansion slots 1-14 1.6 Jumpers 1-16 1.7 Connectors 1-17 1.8 Onboard LED 1-28 1.9 Software support 1-30 Chapter 2: BIOS information 2.1 Managing and updating your BIOS 2-1 2.2 BIOS setup program 2-6 2.3 My Favorites 2-16 2.4 Main menu...
User Guide
Page 4
...any area where it may be exposed to moisture. • Place the product on the motherboard. • Chapter 2: BIOS information This chapter discusses changing system settings through the BIOS Setup menus. iv If possible, disconnect all power cables from the existing system before you add a device. • ...Before connecting or removing signal cables from the motherboard, ensure that the power cables for the BIOS parameters are using, contact your local power company. • If the power supply is set to fix it supports. If you need when...
...any area where it may be exposed to moisture. • Place the product on the motherboard. • Chapter 2: BIOS information This chapter discusses changing system settings through the BIOS Setup menus. iv If possible, disconnect all power cables from the existing system before you add a device. • ...Before connecting or removing signal cables from the motherboard, ensure that the power cables for the BIOS parameters are using, contact your local power company. • If the power supply is set to fix it supports. If you need when...

User Guide
Page 8
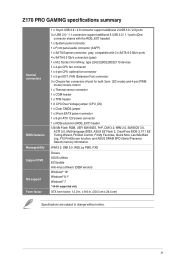
...Streamer app for optimized system cooling control RAMCache Media Streamer - Tuner - CrashFree BIOS 3 - ASUS Q-LED (CPU, DRAM, VGA, Boot Device LED) - AI Suite 3 - ASUS Q-Shield - EPU TPU - Auto Tuning, TurboV, GPU Boost Fan Xpert...DIY Push Notice - EZ Flash 3 Q-Design - USB 3.1 Boost featuring speedy USB 3.1 transmission - O.C. Disk Unlocker - Z170 PRO GAMING specifications summary ASUS gaming features Rear Panel I /O ports (continued on the next page) viii ASUS Q-DIMM - ASUS CPU-Z 1 x PS/2 keyboard/mouse combo port 1 x Optical S/PDIF out 1 x DisplayPort 1 x DVI port 1...
...Streamer app for optimized system cooling control RAMCache Media Streamer - Tuner - CrashFree BIOS 3 - ASUS Q-LED (CPU, DRAM, VGA, Boot Device LED) - AI Suite 3 - ASUS Q-Shield - EPU TPU - Auto Tuning, TurboV, GPU Boost Fan Xpert...DIY Push Notice - EZ Flash 3 Q-Design - USB 3.1 Boost featuring speedy USB 3.1 transmission - O.C. Disk Unlocker - Z170 PRO GAMING specifications summary ASUS gaming features Rear Panel I /O ports (continued on the next page) viii ASUS Q-DIMM - ASUS CPU-Z 1 x PS/2 keyboard/mouse combo port 1 x Optical S/PDIF out 1 x DisplayPort 1 x DVI port 1...
User Guide
Page 9
ix x 9.6 in . Z170 PRO GAMING specifications summary Internal connectors BIOS features Manageability Support DVD OS support Form factor 1 x 19-pin USB 3.0 / 2.0 connector support additional 2 USB 3.0 / 2.0 ports 3 x USB 2.0 / 1.1 connectors support additional 6 USB ... connector 1 x 8-pin ATX 12V power connector 1 x ROG extension (ROG_EXT) header 128 Mb Flash ROM, UEFI AMI BIOS, PnP, DMI 3.0, WfM 2.0, SM BIOS 3.0, ACPI 5.0, Multi-language BIOS, ASUS EZ Flash 3, CrashFree BIOS 3, F11 EZ Tuning Wizard, F6 Qfan Control, F3 My Favorites, Quick Note, Last Modified Log, F12 PrintScreen function,...
ix x 9.6 in . Z170 PRO GAMING specifications summary Internal connectors BIOS features Manageability Support DVD OS support Form factor 1 x 19-pin USB 3.0 / 2.0 connector support additional 2 USB 3.0 / 2.0 ports 3 x USB 2.0 / 1.1 connectors support additional 6 USB ... connector 1 x 8-pin ATX 12V power connector 1 x ROG extension (ROG_EXT) header 128 Mb Flash ROM, UEFI AMI BIOS, PnP, DMI 3.0, WfM 2.0, SM BIOS 3.0, ACPI 5.0, Multi-language BIOS, ASUS EZ Flash 3, CrashFree BIOS 3, F11 EZ Tuning Wizard, F6 Qfan Control, F3 My Favorites, Quick Note, Last Modified Log, F12 PrintScreen function,...
User Guide
Page 12
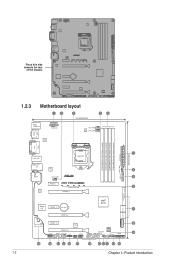
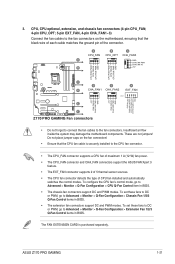
... 2 AUDIO CHA_FAN1 5 USB3_12 CHA_FAN3 PCIEX1_1 Model name LED 6 Intel I219V PCIEX16_1 SATAEXPRESS SATA6G_2 SATA6G_1 Super I/O PCIEX1_2 BATTERY Intel® Z170 7 M.2(SOCKET3) SATA6G_56 SATA6G_34 PCIEX16_2 ALC 1150 PCIEX1_3 8 SupremeFX LED TPU PCIEX16_3 128Mb BIOS AAFP COM CHA_FAN2 TPM USB78 SB_PWR USB910 USB1112 CLRTC T_SENSOR PANEL 9 ROG_EXT EXT_FAN CPU_OV 19 18 17 2 16 15...
... 2 AUDIO CHA_FAN1 5 USB3_12 CHA_FAN3 PCIEX1_1 Model name LED 6 Intel I219V PCIEX16_1 SATAEXPRESS SATA6G_2 SATA6G_1 Super I/O PCIEX1_2 BATTERY Intel® Z170 7 M.2(SOCKET3) SATA6G_56 SATA6G_34 PCIEX16_2 ALC 1150 PCIEX1_3 8 SupremeFX LED TPU PCIEX16_3 128Mb BIOS AAFP COM CHA_FAN2 TPM USB78 SB_PWR USB910 USB1112 CLRTC T_SENSOR PANEL 9 ROG_EXT EXT_FAN CPU_OV 19 18 17 2 16 15...

User Guide
Page 24
...it by adjusting the software settings. 1. Remove the system unit cover (if your motherboard is completely seated on the system and change the necessary BIOS settings, if any. Secure the card to the card. 3. Keep the screw for the card. 2. Replace the system cover. 1.5.2 Configuring an...do not need to use . 4. Align the card connector with the PCI Express specifications. 1-14 Chapter 1: Product introduction When using PCI cards on BIOS setup. 2. Turn on the slot. 5. See Chapter 2 for the expansion card. The following sub‑sections describe the slots and the expansion ...
...it by adjusting the software settings. 1. Remove the system unit cover (if your motherboard is completely seated on the system and change the necessary BIOS settings, if any. Secure the card to the card. 3. Keep the screw for the card. 2. Replace the system cover. 1.5.2 Configuring an...do not need to use . 4. Align the card connector with the PCI Express specifications. 1-14 Chapter 1: Product introduction When using PCI cards on BIOS setup. 2. Turn on the slot. 5. See Chapter 2 for the expansion card. The following sub‑sections describe the slots and the expansion ...
User Guide
Page 26
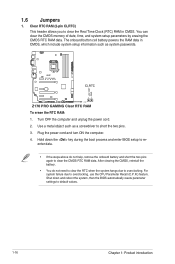
CLRTC PIN 1 Z170 PRO GAMING Clear RTC RAM To erase the RTC RAM: 1. Shut down the key during the boot process and enter BIOS setup to re- Hold down and reboot the system, then the BIOS automatically resets parameter settings to short the two pins. 3. After clearing the CMOS, reinstall the battery. • You do not...
CLRTC PIN 1 Z170 PRO GAMING Clear RTC RAM To erase the RTC RAM: 1. Shut down the key during the boot process and enter BIOS setup to re- Hold down and reboot the system, then the BIOS automatically resets parameter settings to short the two pins. 3. After clearing the CMOS, reinstall the battery. • You do not...
User Guide
Page 29
... displays under Windows® OS environment, two displays under BIOS, and one display under DOS. • Intel display architecture design supports the following maximum supported pixel clocks (Pixel Clock = H total x V Total x Frame Rate (Screen refresh rate)): - 13. USB 2.0 ports 13 and 14. ASUS Z170 PRO GAMING 1-19 VGA port: 180 MHz - This port is for...
... displays under Windows® OS environment, two displays under BIOS, and one display under DOS. • Intel display architecture design supports the following maximum supported pixel clocks (Pixel Clock = H total x V Total x Frame Rate (Screen refresh rate)): - 13. USB 2.0 ports 13 and 14. ASUS Z170 PRO GAMING 1-19 VGA port: 180 MHz - This port is for...
User Guide
Page 31
...The EXT_FAN connector supports 2 of 5 thermal sensor sources. • The CPU fan connector detects the type of the connector. ASUS Z170 PRO GAMING 1-21 Do not place jumper caps on the motherboard, ensuring that the CPU fan cable is purchased separately. To set these ... CHA FAN PWR GND EXTFAN_DET FANCARD_DETECT EXTFAN_SMB_CLK EXTFAN_SMB_DATA GND E F Z170 PRO GAMING Fan connectors • Do not forget to connect the fan cables to Advanced > Monitor > Q-Fan Configuration > Extension Fan 1/2/3 Q-Fan Control items in BIOS. • The chassis fan connectors support DC and PWM modes...
...The EXT_FAN connector supports 2 of 5 thermal sensor sources. • The CPU fan connector detects the type of the connector. ASUS Z170 PRO GAMING 1-21 Do not place jumper caps on the motherboard, ensuring that the CPU fan cable is purchased separately. To set these ... CHA FAN PWR GND EXTFAN_DET FANCARD_DETECT EXTFAN_SMB_CLK EXTFAN_SMB_DATA GND E F Z170 PRO GAMING Fan connectors • Do not forget to connect the fan cables to Advanced > Monitor > Q-Fan Configuration > Extension Fan 1/2/3 Q-Fan Control items in BIOS. • The chassis fan connectors support DC and PWM modes...
User Guide
Page 33
...'97 front panel audio module to this connector. By default, this connector, set the Front Panel Type item in the BIOS setup to [HD]. ROG_EXT Z170 PRO GAMING ROG_EXT connectors • The Front Base is for a chassis-mounted front panel audio I /O module cable to this connector...legacy AC`97 audio standard. ROG Extension - ROG_EXT connector (18-1 pin ROG_EXT) This connector is purchased separately. • Visit www.asus.com for details. 7. See section 2.6.7 Onboard Devices Configuration for more information about the Front Base. If you connect a high-definition ...
...'97 front panel audio module to this connector. By default, this connector, set the Front Panel Type item in the BIOS setup to [HD]. ROG_EXT Z170 PRO GAMING ROG_EXT connectors • The Front Base is for a chassis-mounted front panel audio I /O module cable to this connector...legacy AC`97 audio standard. ROG Extension - ROG_EXT connector (18-1 pin ROG_EXT) This connector is purchased separately. • Visit www.asus.com for details. 7. See section 2.6.7 Onboard Devices Configuration for more information about the Front Base. If you connect a high-definition ...
User Guide
Page 35
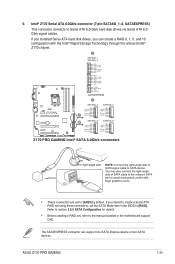
... to section 2.6.5 SATA Configuration for details. • Before creating a RAID set, refer to the manual bundled in the BIOS to [RAID]. A SATA6G_1 SATA6G_2 GND RSATA_TXP1 RSATA_TXN1 GND RSATA_RXN1 RSATA_RXP1 GND GND RSATA_TXP2 RSATA_TXN2 GND RSATA_RXN2 RSATA_RXP2 GND Floating Device_Reset ...RSATA_TXN5 RSATA_TXN6 GND GND RSATA_RXN5 RSATA_RXN6 RSATA_RXP5 RSATA_RXP6 GND GND Z170 PRO GAMING Intel® SATA 6.0Gb/s connectors • These connectors are set the SATA Mode item in the motherboard support DVD. ASUS Z170 PRO GAMING 1-25 If you can support one SATA Express device...
... to section 2.6.5 SATA Configuration for details. • Before creating a RAID set, refer to the manual bundled in the BIOS to [RAID]. A SATA6G_1 SATA6G_2 GND RSATA_TXP1 RSATA_TXN1 GND RSATA_RXN1 RSATA_RXP1 GND GND RSATA_TXP2 RSATA_TXN2 GND RSATA_RXN2 RSATA_RXP2 GND Floating Device_Reset ...RSATA_TXN5 RSATA_TXN6 GND GND RSATA_RXN5 RSATA_RXN6 RSATA_RXP5 RSATA_RXP6 GND GND Z170 PRO GAMING Intel® SATA 6.0Gb/s connectors • These connectors are set the SATA Mode item in the motherboard support DVD. ASUS Z170 PRO GAMING 1-25 If you can support one SATA Express device...
User Guide
Page 38
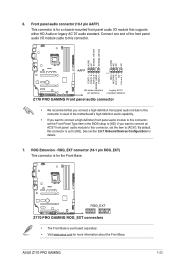
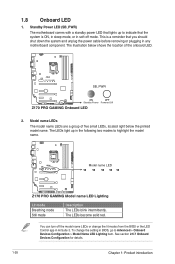
... system and unplug the power cable before removing or plugging in BIOS, go to highlight the model name. You can turn off the model name LEDs or change the setting in any motherboard component. SB_PWR ON OFF Standby Power Powered Off Z170 PRO GAMING Onboard LED 2. See section 2.6.7 Onboard Devices Configuration for details. 1-28...
... system and unplug the power cable before removing or plugging in BIOS, go to highlight the model name. You can turn off the model name LEDs or change the setting in any motherboard component. SB_PWR ON OFF Standby Power Powered Off Z170 PRO GAMING Onboard LED 2. See section 2.6.7 Onboard Devices Configuration for details. 1-28...
User Guide
Page 39
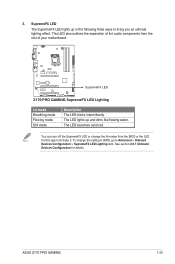
... mode Flowing mode Still mode Description The LED blinks intermittently. The LED becomes solid red. ASUS Z170 PRO GAMING 1-29 This LED also outlines the separation of the audio components from the BIOS or the LED Control app in Ai Suite 3. SupremeFX LED The SupremeFX LED lights up ... change the setting in the following three ways to Advanced > Onboard Devices Configuration > SupremeFX LED Lighting item. The LED lights up in BIOS, go to bring you an ultimate lighting effect. See section 2.6.7 Onboard Devices Configuration for details. 3. To change the lit modes from ...
... mode Flowing mode Still mode Description The LED blinks intermittently. The LED becomes solid red. ASUS Z170 PRO GAMING 1-29 This LED also outlines the separation of the audio components from the BIOS or the LED Control app in Ai Suite 3. SupremeFX LED The SupremeFX LED lights up ... change the setting in the following three ways to Advanced > Onboard Devices Configuration > SupremeFX LED Lighting item. The LED lights up in BIOS, go to bring you an ultimate lighting effect. See section 2.6.7 Onboard Devices Configuration for details. 3. To change the lit modes from ...
User Guide
Page 41
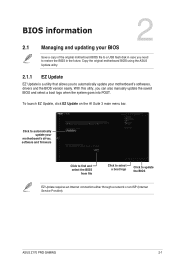
... 3 main menu bar. Click to automatically update your motherboard's softwares, drivers and the BIOS version easily. ASUS Z170 PRO GAMING 2-1 With this utlity, you need to restore the BIOS in the future. BIOS information 2 2.1 Managing and updating your BIOS Save a copy of the original motherboard BIOS file to a USB flash disk in case you can also manually update the...
... 3 main menu bar. Click to automatically update your motherboard's softwares, drivers and the BIOS version easily. ASUS Z170 PRO GAMING 2-1 With this utlity, you need to restore the BIOS in the future. BIOS information 2 2.1 Managing and updating your BIOS Save a copy of the original motherboard BIOS file to a USB flash disk in case you can also manually update the...

User Guide
Page 42
...NOT shut down or reset the system while updating the BIOS to the Drive field. See section 2.10 Exit Menu for details. • Check your Internet connection before updating the BIOS via USB or Internet. Go to the Tool menu to select ASUS EZ Flash 3 Utility and press to complete the update.... 3. Via USB a) Insert the USB flash disk that contains the latest BIOS file to the USB port, then select by Internet....
...NOT shut down or reset the system while updating the BIOS to the Drive field. See section 2.10 Exit Menu for details. • Check your Internet connection before updating the BIOS via USB or Internet. Go to the Tool menu to select ASUS EZ Flash 3 Utility and press to complete the update.... 3. Via USB a) Insert the USB flash disk that contains the latest BIOS file to the USB port, then select by Internet....

User Guide
Page 43
...or reset the system while updating the BIOS! Ensure that your computer has a DVD optical drive. CAP. • The BIOS file in your computer screen. Download the latest BIOS file from http://support.asus.com and save them in the support ...BIOS file and BIOS Updater from the ASUS website at www.asus.com. 2.1.3 ASUS CrashFree BIOS 3 utility The ASUS CrashFree BIOS 3 is an auto recovery tool that you press to load default BIOS values. ASUS Z170 PRO GAMING 2-3 NTFS is not supported under FreeDOS environment. You can cause system boot failure! 2.1.4 ASUS BIOS Updater ASUS BIOS...
...or reset the system while updating the BIOS! Ensure that your computer has a DVD optical drive. CAP. • The BIOS file in your computer screen. Download the latest BIOS file from http://support.asus.com and save them in the support ...BIOS file and BIOS Updater from the ASUS website at www.asus.com. 2.1.3 ASUS CrashFree BIOS 3 utility The ASUS CrashFree BIOS 3 is an auto recovery tool that you press to load default BIOS values. ASUS Z170 PRO GAMING 2-3 NTFS is not supported under FreeDOS environment. You can cause system boot failure! 2.1.4 ASUS BIOS Updater ASUS BIOS...

User Guide
Page 44
...ASUS DRW-2014L1T(4458MB) UEFI: (FAT) aigo miniking (250MB) Enter Setup 4. When the select boot device screen appears, insert the Support DVD into the optical drive then select the optical drive as the boot device. If no key is detected. boot: 5. C:/> d: D:/> Updating the BIOS file To update the BIOS... message appears, press within 5 seconds, the system will boot next priority device automatically. Insert the USB flash drive with the latest BIOS file and BIOS Updater to Drive D (USB flash drive). Booting the system in DOS environment To boot the system in DOS: 1. On the FreeDOS...
...ASUS DRW-2014L1T(4458MB) UEFI: (FAT) aigo miniking (250MB) Enter Setup 4. When the select boot device screen appears, insert the Support DVD into the optical drive then select the optical drive as the boot device. If no key is detected. boot: 5. C:/> d: D:/> Updating the BIOS file To update the BIOS... message appears, press within 5 seconds, the system will boot next priority device automatically. Insert the USB flash drive with the latest BIOS file and BIOS Updater to Drive D (USB flash drive). Booting the system in DOS environment To boot the system in DOS: 1. On the FreeDOS...

User Guide
Page 45
... . 4. Restart your computer. Select the Load Optimized Defaults item under the Exit BIOS menu. Select Yes then press . See section 2.10 Exit Menu for DOS V1.30 [2014/01/01] Current ROM BOARD: Z170 PRO GAMING VER: 0215 (H :00 B :00) DATE: 06/11/2015 PATH: C:\...compatibility and stability. When BIOS update is not supported due to prevent system boot failaure. Are you sure you want to exit BIOS Updater. 6. After the BIOS Updater checks the selected BIOS file, select Yes to confirm the BIOS update. ASUS Z170 PRO GAMING 2-5 Drives panel ASUSTeK BIOS Updater for details.
... . 4. Restart your computer. Select the Load Optimized Defaults item under the Exit BIOS menu. Select Yes then press . See section 2.10 Exit Menu for DOS V1.30 [2014/01/01] Current ROM BOARD: Z170 PRO GAMING VER: 0215 (H :00 B :00) DATE: 06/11/2015 PATH: C:\...compatibility and stability. When BIOS update is not supported due to prevent system boot failaure. Are you sure you want to exit BIOS Updater. 6. After the BIOS Updater checks the selected BIOS file, select Yes to confirm the BIOS update. ASUS Z170 PRO GAMING 2-5 Drives panel ASUSTeK BIOS Updater for details.
User Guide
Page 46
...the Exit menu or press hotkey F5. BIOS menu screen The BIOS setup program can cause damage to your screen. • Visit the ASUS website at startup: Press or during the Power-On Self Test (POST). Entering BIOS Setup at startup To enter BIOS Setup at www.asus.com to erase the RTC RAM. Press... the power button to turn the system off then back on the system chassis. 2.2 BIOS setup program Use the BIOS Setup program to update the BIOS or configure its routines. If ...
...the Exit menu or press hotkey F5. BIOS menu screen The BIOS setup program can cause damage to your screen. • Visit the ASUS website at startup: Press or during the Power-On Self Test (POST). Entering BIOS Setup at startup To enter BIOS Setup at www.asus.com to erase the RTC RAM. Press... the power button to turn the system off then back on the system chassis. 2.2 BIOS setup program Use the BIOS Setup program to update the BIOS or configure its routines. If ...
User Guide
Page 47
... the Advanced Mode, click Advanced Mode(F7) or press . The default screen for details. ASUS Z170 PRO GAMING 2-7 Click the button to the Setup Mode item in section 2.8 Boot menu for entering the BIOS setup program can be changed. Refer to manually tune the fans Loads optimized default settings Shows the...FAQs and resets the system Selects the boot device priority The boot device options vary depending on the devices you enter the BIOS setup program. Displays the CPU/motherboard temperature, CPU voltage output, CPU/chassis fan speed, and SATA information Displays the system properties of...
... the Advanced Mode, click Advanced Mode(F7) or press . The default screen for details. ASUS Z170 PRO GAMING 2-7 Click the button to the Setup Mode item in section 2.8 Boot menu for entering the BIOS setup program can be changed. Refer to manually tune the fans Loads optimized default settings Shows the...FAQs and resets the system Selects the boot device priority The boot device options vary depending on the devices you enter the BIOS setup program. Displays the CPU/motherboard temperature, CPU voltage output, CPU/chassis fan speed, and SATA information Displays the system properties of...


