
User Guide
Page 1
Motherboard X99-DELUXE Series
Motherboard X99-DELUXE Series
User Guide
Page 3
...X99-DELUXE specifications summary viii Package contents...xiv Installation tools and components xv Chapter 1: Product Introduction 1.1 Special features 1-1 1.1.1 Product highlights 1-1 1.1.2 Other special features 1-2 1.2 Motherboard overview 1-3 1.2.1 Before you proceed 1-3 1.2.2 Motherboard...20 1.2.8 Onboard LEDs 1-21 1.2.9 Internal connectors 1-27 Chapter 2: Basic installation 2.1 Building your PC system 2-1 2.1.1 Motherboard installation 2-1 2.1.2 CPU installation 2-3 2.1.3 CPU heatsink and fan assembly installation 2-5 2.1.4 DIMM installation 2-6 2.1.5 ATX ...
...X99-DELUXE specifications summary viii Package contents...xiv Installation tools and components xv Chapter 1: Product Introduction 1.1 Special features 1-1 1.1.1 Product highlights 1-1 1.1.2 Other special features 1-2 1.2 Motherboard overview 1-3 1.2.1 Before you proceed 1-3 1.2.2 Motherboard...20 1.2.8 Onboard LEDs 1-21 1.2.9 Internal connectors 1-27 Chapter 2: Basic installation 2.1 Building your PC system 2-1 2.1.1 Motherboard installation 2-1 2.1.2 CPU installation 2-3 2.1.3 CPU heatsink and fan assembly installation 2-5 2.1.4 DIMM installation 2-6 2.1.5 ATX ...
User Guide
Page 5
...power company. • If the power supply is set to the correct voltage in any damage, contact your retailer. Operation safety • Before installing the motherboard and adding devices on it may become wet. • Place the product on a stable surface. • If you add a device. • ...Before connecting or removing signal cables from the motherboard, ensure that the power cables for the devices are unplugged before the signal cables are connected. If you are not damaged. Do not place the...
...power company. • If the power supply is set to the correct voltage in any damage, contact your retailer. Operation safety • Before installing the motherboard and adding devices on it may become wet. • Place the product on a stable surface. • If you add a device. • ...Before connecting or removing signal cables from the motherboard, ensure that the power cables for the devices are unplugged before the signal cables are connected. If you are not damaged. Do not place the...
User Guide
Page 6
... information you have been added by your dealer. Chapter 1: Product introduction This chapter describes the features of the standard package. ASUS website The ASUS website (www.asus.com) provides updated information on the motherboard. 2. About this guide is organized This guide contains the following sources for additional information and for product and software updates...
... information you have been added by your dealer. Chapter 1: Product introduction This chapter describes the features of the standard package. ASUS website The ASUS website (www.asus.com) provides updated information on the motherboard. 2. About this guide is organized This guide contains the following sources for additional information and for product and software updates...
User Guide
Page 14
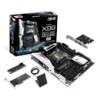
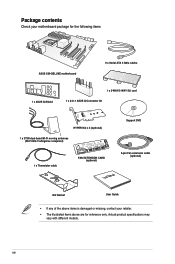
Actual product specifications may vary with different models. xiv Package contents Check your motherboard package for the following items ASUS X99-DELUXE motherboard 8 x Serial ATA 6 Gb/s cables 1 x ASUS Q-Shield 1 x 2-WAY/3-WAY SLI card 1 x 2-in-1 ASUS Q-Connector kit HYPER M.2 x 4 (optional) 1 x 3T3R dual-band Wi-Fi moving antennas (Wi-Fi 802.11a/b/g/n/ac compliant) Support DVD 1 x Thermistor cable FAN EXTENSION...
Actual product specifications may vary with different models. xiv Package contents Check your motherboard package for the following items ASUS X99-DELUXE motherboard 8 x Serial ATA 6 Gb/s cables 1 x ASUS Q-Shield 1 x 2-WAY/3-WAY SLI card 1 x 2-in-1 ASUS Q-Connector kit HYPER M.2 x 4 (optional) 1 x 3T3R dual-band Wi-Fi moving antennas (Wi-Fi 802.11a/b/g/n/ac compliant) Support DVD 1 x Thermistor cable FAN EXTENSION...
User Guide
Page 15
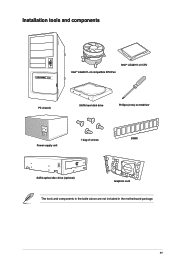
Installation tools and components Intel® LGA2011-v3 compatible CPU Fan Intel® LGA2011-v3 CPU PC chassis SATA hard disk drive Philips (cross) screwdriver Power supply unit 1 bag of screws DIMM SATA optical disc drive (optional) Graphics card The tools and components in the table above are not included in the motherboard package. xv
Installation tools and components Intel® LGA2011-v3 compatible CPU Fan Intel® LGA2011-v3 CPU PC chassis SATA hard disk drive Philips (cross) screwdriver Power supply unit 1 bag of screws DIMM SATA optical disc drive (optional) Graphics card The tools and components in the table above are not included in the motherboard package. xv
User Guide
Page 17
...graphics technologies. It provides an optimal graphics performance, unprecedented data speed and seamless transition with the speed of PCIe 2.0. Chapter 1 ASUS X99-DELUXE Series 1-1 It natively supports up to PCIe 1.0/2.0 devices. 3-WAY/Quad-GPU SLI and 3-WAY CrossFireX™ Support This motherboad ... for Intel® integrated graphics performance. It also enables the iGPU function for Intel® Core™ i7 processors This motherboard supports Intel® Core™ i7 processors in the LGA2011-v3 package. It provides great graphics and system performance with up...
...graphics technologies. It provides an optimal graphics performance, unprecedented data speed and seamless transition with the speed of PCIe 2.0. Chapter 1 ASUS X99-DELUXE Series 1-1 It natively supports up to PCIe 1.0/2.0 devices. 3-WAY/Quad-GPU SLI and 3-WAY CrossFireX™ Support This motherboad ... for Intel® integrated graphics performance. It also enables the iGPU function for Intel® Core™ i7 processors This motherboard supports Intel® Core™ i7 processors in the LGA2011-v3 package. It provides great graphics and system performance with up...
User Guide
Page 18
... radio) into as many as S/PDIF or HDMI) designed to deliver audio to an external decoder. ErP Ready The motherboard is in line with ASUS vision of creating environment-friendly and energyefficient products through augmenting low and high frequencies of musical tones, restores compressed or re...speakers and headphones while monitoring and balancing the loudness level difference between digital audio formats. Quad-Channel DDR4 2800 MHz Support The motherboard supports the quad-channel DDR4 memory that features data transfer rates of DDR4 2800 MHz to boost the system's performance, and...
... radio) into as many as S/PDIF or HDMI) designed to deliver audio to an external decoder. ErP Ready The motherboard is in line with ASUS vision of creating environment-friendly and energyefficient products through augmenting low and high frequencies of musical tones, restores compressed or re...speakers and headphones while monitoring and balancing the loudness level difference between digital audio formats. Quad-Channel DDR4 2800 MHz Support The motherboard supports the quad-channel DDR4 memory that features data transfer rates of DDR4 2800 MHz to boost the system's performance, and...
User Guide
Page 19
...power supply is switched off or the power cord is detached from the wall socket before touching any motherboard settings. • Unplug the power cord from the power supply. Chapter 1 ASUS X99-DELUXE Series 1-3 Failure to do so may cause severe damage to avoid touching the ICs on them. ...• Whenever you uninstall any component, place it on a grounded antistatic pad or in the bag that came with the component. • Before you install motherboard components or ...
...power supply is switched off or the power cord is detached from the wall socket before touching any motherboard settings. • Unplug the power cord from the power supply. Chapter 1 ASUS X99-DELUXE Series 1-3 Failure to do so may cause severe damage to avoid touching the ICs on them. ...• Whenever you uninstall any component, place it on a grounded antistatic pad or in the bag that came with the component. • Before you install motherboard components or ...
User Guide
Page 20
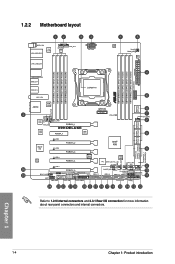
1.2.2 Motherboard layout Chapter 1 Refer to 1.2.9 Internal connectors and 2.3.1 Rear I/O connection for more information about rear panel connectors and internal connectors. 1-4 Chapter 1: Product introduction
1.2.2 Motherboard layout Chapter 1 Refer to 1.2.9 Internal connectors and 2.3.1 Rear I/O connection for more information about rear panel connectors and internal connectors. 1-4 Chapter 1: Product introduction
User Guide
Page 22
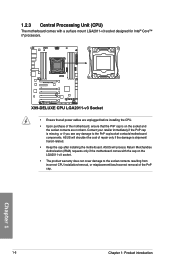
... Return Merchandise Authorization (RMA) requests only if the motherboard comes with a surface mount LGA2011-v3 socket designed for Intel® Core™ i7 processors. • Ensure that all power cables are not bent. ASUS will shoulder the cost of repair only if the damage is missing, or if you see... any damage to the socket contacts resulting from incorrect CPU installation/removal, or misplacement/loss/incorrect removal of the motherboard, ensure that the PnP cap is ...
... Return Merchandise Authorization (RMA) requests only if the motherboard comes with a surface mount LGA2011-v3 socket designed for Intel® Core™ i7 processors. • Ensure that all power cables are not bent. ASUS will shoulder the cost of repair only if the damage is missing, or if you see... any damage to the socket contacts resulting from incorrect CPU installation/removal, or misplacement/loss/incorrect removal of the motherboard, ensure that the PnP cap is ...
User Guide
Page 23
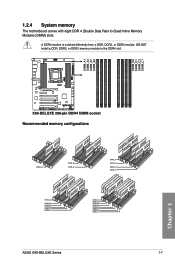
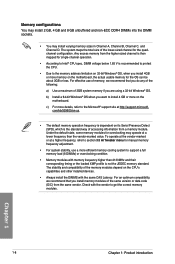
1.2.4 System memory The motherboard comes with eight DDR 4 (Double Data Rate 4) Quad Inline Memory Modules (DIMM) slots. DO NOT install a DDR, DDR2, or DDR3 memory module to the DDR4 slot. A DDR4 module is notched differently from a DDR, DDR2, or DDR3 module. Recommended memory configurations Chapter 1 ASUS X99-DELUXE Series 1-7
1.2.4 System memory The motherboard comes with eight DDR 4 (Double Data Rate 4) Quad Inline Memory Modules (DIMM) slots. DO NOT install a DDR, DDR2, or DDR3 memory module to the DDR4 slot. A DDR4 module is notched differently from a DDR, DDR2, or DDR3 module. Recommended memory configurations Chapter 1 ASUS X99-DELUXE Series 1-7
User Guide
Page 24
...support a full memory load (8 DIMMs) or overclocking condition. • Memory modules with the vendor to install 4 GB or more on the motherboard. com/kb/929605/en-us. • The default memory operation frequency is then mapped for the OS can be about 3GB or less..... Chapter 1 1-8 Chapter 1: Product introduction For an optimum compatibility, we recommend that you install memory modules of the memory modules depend on the motherboard, the actual usable memory for single-channel operation. • According to Intel® CPU spec, DIMM voltage below 1.65 V is recommended to...
...support a full memory load (8 DIMMs) or overclocking condition. • Memory modules with the vendor to install 4 GB or more on the motherboard. com/kb/929605/en-us. • The default memory operation frequency is then mapped for the OS can be about 3GB or less..... Chapter 1 1-8 Chapter 1: Product introduction For an optimum compatibility, we recommend that you install memory modules of the memory modules depend on the motherboard, the actual usable memory for single-channel operation. • According to Intel® CPU spec, DIMM voltage below 1.65 V is recommended to...
User Guide
Page 25
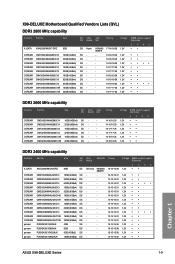
...) 16GB (4GBx4) 32GB (8GBx4) 16GB (4GBx4) 32GB (8GBx4) 64GB (8GBx8) 16GB (4GBx4) 32GB (8GBx4) SS/ Chip Chip DS Brand NO. CORSAIR CMK16GX4M4A2666C15 16GB (4GBx4) SS - - X99-DELUXE Motherboard Qualified Vendors Lists (QVL) DDR3 2800 MHz capability Vendors Part No. Timing 14-16-16-35 14-16-16-35 15-17-17-35 15...; 1.2V • 1.2V • 1.2V • 1.2V • 1.2V • 1.2V • 1.2V • 1.2V • 1.2V • 1.2V • 1.2V • 1.2V • Chapter 1 ASUS X99-DELUXE Series 1-9
...) 16GB (4GBx4) 32GB (8GBx4) 16GB (4GBx4) 32GB (8GBx4) 64GB (8GBx8) 16GB (4GBx4) 32GB (8GBx4) SS/ Chip Chip DS Brand NO. CORSAIR CMK16GX4M4A2666C15 16GB (4GBx4) SS - - X99-DELUXE Motherboard Qualified Vendors Lists (QVL) DDR3 2800 MHz capability Vendors Part No. Timing 14-16-16-35 14-16-16-35 15-17-17-35 15...; 1.2V • 1.2V • 1.2V • 1.2V • 1.2V • 1.2V • 1.2V • 1.2V • 1.2V • 1.2V • 1.2V • 1.2V • Chapter 1 ASUS X99-DELUXE Series 1-9
User Guide
Page 27
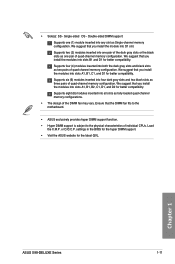
... as fully-loaded quad-channel memory configurations. • The design of the DIMM fan may vary. We suggest that the DIMM fan fits to the motherboard. • ASUS exclusively provides hyper DIMM support function. • Hyper DIMM support is subject to the physical characteristics of quad-channel memory configuration. We suggest that... slots and two black slots as Single-channel memory configuration. Single-sided DS - settings in the BIOS for the hyper DIMM support. • Visit the ASUS website for better compatibility. Chapter 1 ASUS X99-DELUXE Series 1-11
... as fully-loaded quad-channel memory configurations. • The design of the DIMM fan may vary. We suggest that the DIMM fan fits to the motherboard. • ASUS exclusively provides hyper DIMM support function. • Hyper DIMM support is subject to the physical characteristics of quad-channel memory configuration. We suggest that... slots and two black slots as Single-channel memory configuration. Single-sided DS - settings in the BIOS for the hyper DIMM support. • Visit the ASUS website for better compatibility. Chapter 1 ASUS X99-DELUXE Series 1-11
User Guide
Page 28
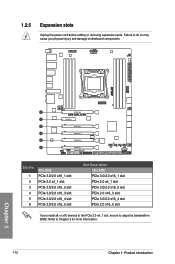
...-LANE PCIe 3.0/2.0 x16_1 slot PCIe 2.0 x4_1 slot PCIe 3.0/2.0 x16_2 slot PCIe 2.0 x16_3 slot PCIe 3.0/2.0 x16_4 slot PCIe 2.0 x16_5 slot If you physical injury and damage motherboard components. Refer to adjust its bandwidth in BIOS. Failure to do so may cause you install x8 or x16 devices to the PCIe 2.0 x4_1 slot...
...-LANE PCIe 3.0/2.0 x16_1 slot PCIe 2.0 x4_1 slot PCIe 3.0/2.0 x16_2 slot PCIe 2.0 x16_3 slot PCIe 3.0/2.0 x16_4 slot PCIe 2.0 x16_5 slot If you physical injury and damage motherboard components. Refer to adjust its bandwidth in BIOS. Failure to do so may cause you install x8 or x16 devices to the PCIe 2.0 x4_1 slot...
User Guide
Page 29
Refer to x8 mode in BIOS. Chapter 1 ASUS X99-DELUXE Series 1-13 40-LANE CPU PCI Express 3.0 operating mode VGA PCIe 3.0/2.0 PCIe 3.0/2.0 PCIe 3.0/2.0 PCIe 3.0/2.0 PCIe 3.0/2.0 configuration x16_1 x16_2 x16_3 x16_4 x16_5 Single VGA/ PCIe card...x8 x8 x8 • We recommend that you provide sufficient power when running CrossFireX™ or SLI™ mode. • Connect a chassis fan to the motherboard connector labeled CHA_FAN1-4 when using multiple graphics cards for better thermal environment. • For a higher performance of the 3-Way configuration using the 40-LANE CPU...
Refer to x8 mode in BIOS. Chapter 1 ASUS X99-DELUXE Series 1-13 40-LANE CPU PCI Express 3.0 operating mode VGA PCIe 3.0/2.0 PCIe 3.0/2.0 PCIe 3.0/2.0 PCIe 3.0/2.0 PCIe 3.0/2.0 configuration x16_1 x16_2 x16_3 x16_4 x16_5 Single VGA/ PCIe card...x8 x8 x8 • We recommend that you provide sufficient power when running CrossFireX™ or SLI™ mode. • Connect a chassis fan to the motherboard connector labeled CHA_FAN1-4 when using multiple graphics cards for better thermal environment. • For a higher performance of the 3-Way configuration using the 40-LANE CPU...
User Guide
Page 30
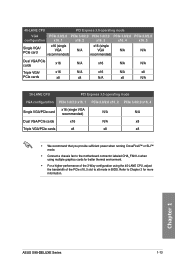
shared - - - - - - - shared - - - - - - Intel® LAN1 (i218) - - - - ASMedia SATA Controller (106SE) shared - - - - - - - shared Intel® EHCI 1 - - - - - shared - - - - - * For 28-LANE CPUs. IRQ assignments for this motherboard A B C D E F G H PCIe x16_1 shared - - - - - - - shared - - Intel® SATA Controller 1 - PCIe x16_2 shared - - - - - - - SMBUS Controller - - Intel® LAN2 (i211AT) shared - - - - - - - shared - - - - - ASMedia Controller (1042AE) - - Chapter 1 1-14...
shared - - - - - - - shared - - - - - - Intel® LAN1 (i218) - - - - ASMedia SATA Controller (106SE) shared - - - - - - - shared Intel® EHCI 1 - - - - - shared - - - - - * For 28-LANE CPUs. IRQ assignments for this motherboard A B C D E F G H PCIe x16_1 shared - - - - - - - shared - - Intel® SATA Controller 1 - PCIe x16_2 shared - - - - - - - SMBUS Controller - - Intel® LAN2 (i211AT) shared - - - - - - - shared - - - - - ASMedia Controller (1042AE) - - Chapter 1 1-14...
User Guide
Page 31
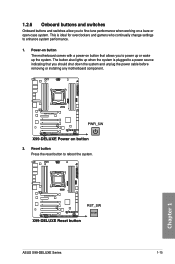
...that allows you should shut down the system and unplug the power cable before removing or installing any motherboard component. 2. Power-on button The motherboard comes with a power-on a bare or open-case system. 1.2.6 Onboard buttons and switches Onboard ...buttons and switches allow you to fine-tune performance when working on button that you to power up or wake up the system. Reset button Press the reset button to enhance system performance. 1. Chapter 1 ASUS X99-DELUXE...
...that allows you should shut down the system and unplug the power cable before removing or installing any motherboard component. 2. Power-on button The motherboard comes with a power-on a bare or open-case system. 1.2.6 Onboard buttons and switches Onboard ...buttons and switches allow you to fine-tune performance when working on button that you to power up or wake up the system. Reset button Press the reset button to enhance system performance. 1. Chapter 1 ASUS X99-DELUXE...
User Guide
Page 32
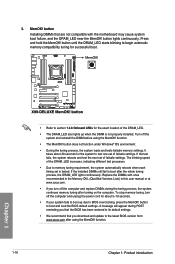
3. It takes about 5-10 seconds. • If your system fails to boot up when the DIMM is tested. Replace the DIMMs with the motherboard may cause system boot failure, and the DRAM_LED near the MemOK! button lights continuously. function. 1-16 Chapter 1: Product introduction Chapter 1 If the test...button Installing DIMMs that are not compatible with ones recommended in the Memory QVL (Qualified Vendors Lists) in this user manual or at www.asus.com. • If you turn off the computer and replace DIMMs during POST reminding you that the BIOS has been restored to its ...
3. It takes about 5-10 seconds. • If your system fails to boot up when the DIMM is tested. Replace the DIMMs with the motherboard may cause system boot failure, and the DRAM_LED near the MemOK! button lights continuously. function. 1-16 Chapter 1: Product introduction Chapter 1 If the test...button Installing DIMMs that are not compatible with ones recommended in the Memory QVL (Qualified Vendors Lists) in this user manual or at www.asus.com. • If you turn off the computer and replace DIMMs during POST reminding you that the BIOS has been restored to its ...


