
X99-DELUXE II user s manual English
Page 3
Contents Safety information...vi About this guide...vii X99-DELUXE II specifications summary ix Package contents...xvi Installation tools and components xviii Chapter 1: Product Introduction 1.1 Motherboard overview 1-1 1.1.1 Before you proceed 1-1 1.1.2 Motherboard layout 1-2 1.1.3 Central Processing Unit (CPU 1-4 1.1.4 System memory 1-5 1.1.5 Expansion slots 1-7 1.1.6 Onboard buttons and ...
Contents Safety information...vi About this guide...vii X99-DELUXE II specifications summary ix Package contents...xvi Installation tools and components xviii Chapter 1: Product Introduction 1.1 Motherboard overview 1-1 1.1.1 Before you proceed 1-1 1.1.2 Motherboard layout 1-2 1.1.3 Central Processing Unit (CPU 1-4 1.1.4 System memory 1-5 1.1.5 Expansion slots 1-7 1.1.6 Onboard buttons and ...
X99-DELUXE II user s manual English
Page 5
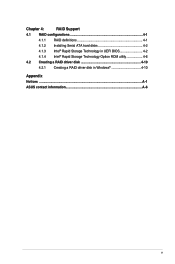
Chapter 4: RAID Support 4.1 RAID configurations 4-1 4.1.1 RAID definitions 4-1 4.1.2 Installing Serial ATA hard disks 4-2 4.1.3 Intel® Rapid Storage Technology in UEFI BIOS 4-2 4.1.4 Intel® Rapid Storage Technology Option ROM utility 4-6 4.2 Creating a RAID driver disk 4-10 4.2.1 Creating a RAID driver disk in Windows 4-10 Appendix Notices ...A-1 ASUS contact information A-6 v
Chapter 4: RAID Support 4.1 RAID configurations 4-1 4.1.1 RAID definitions 4-1 4.1.2 Installing Serial ATA hard disks 4-2 4.1.3 Intel® Rapid Storage Technology in UEFI BIOS 4-2 4.1.4 Intel® Rapid Storage Technology Option ROM utility 4-6 4.2 Creating a RAID driver disk 4-10 4.2.1 Creating a RAID driver disk in Windows 4-10 Appendix Notices ...A-1 ASUS contact information A-6 v

X99-DELUXE II user s manual English
Page 6
... signal cables from the motherboard, ensure that the power cables for the devices are unplugged before the signal cables are connected. Operation safety • Before installing the motherboard and adding devices on a stable surface. • If you are using an adapter or extension cord. Contact a qualified service technician or your area...
... signal cables from the motherboard, ensure that the power cables for the devices are unplugged before the signal cables are connected. Operation safety • Before installing the motherboard and adding devices on a stable surface. • If you are using an adapter or extension cord. Contact a qualified service technician or your area...
X99-DELUXE II user s manual English
Page 7
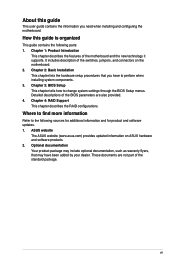
.... Detailed descriptions of the switches, jumpers, and connectors on ASUS hardware and software products. 2. ASUS website The ASUS website (www.asus.com) provides updated information on the motherboard. 2. Optional documentation Your product package may include optional documentation, such as warranty flyers, that you need when installing and configuring the motherboard. Chapter 3: BIOS Setup This chapter...
.... Detailed descriptions of the switches, jumpers, and connectors on ASUS hardware and software products. 2. ASUS website The ASUS website (www.asus.com) provides updated information on the motherboard. 2. Optional documentation Your product package may include optional documentation, such as warranty flyers, that you need when installing and configuring the motherboard. Chapter 3: BIOS Setup This chapter...

X99-DELUXE II user s manual English
Page 10
... interconnect between the integrated Media Access Controller (MAC) and physical layer (PHY) Intel® I211-AT Gigabit LAN controller ASUS LAN Guard ASUS Turbo LAN Utility Wi-Fi 802.11 a/b/g/n/ac supports dual frequency band 2.4/5 GHz Up to ensure consistent performance - DTS ...to audio outputs (continued on the CPU installed. DTS Connect - Gigabit Intel LAN connection- 802.3az Energy Efficient Ethernet (EEE) appliance Intel® I218-V Gigabit LAN- X99-DELUXE II specifications summary Storage LAN Wireless Data Network Bluetooth Audio Intel® X99 Chipset with RAID 0, 1, 5, 10 ...
... interconnect between the integrated Media Access Controller (MAC) and physical layer (PHY) Intel® I211-AT Gigabit LAN controller ASUS LAN Guard ASUS Turbo LAN Utility Wi-Fi 802.11 a/b/g/n/ac supports dual frequency band 2.4/5 GHz Up to ensure consistent performance - DTS ...to audio outputs (continued on the CPU installed. DTS Connect - Gigabit Intel LAN connection- 802.3az Energy Efficient Ethernet (EEE) appliance Intel® I218-V Gigabit LAN- X99-DELUXE II specifications summary Storage LAN Wireless Data Network Bluetooth Audio Intel® X99 Chipset with RAID 0, 1, 5, 10 ...

X99-DELUXE II user s manual English
Page 16
... your motherboard package for the following items: Motherboard ASUS X99-DELUXE II motherboard 1 x 3T3R dual-band Wi-Fi moving antennas (Wi-Fi 802.11a/b/g/n/ac compliant) 1 x RGB LED extension cable 1 x CPU Installation Tool 1 x ASUS 2-WAY/3-WAY SLI bridge 8 x Serial ATA 6.0 Gb/s cables 1 x Onboard M.2 X4 bracket 1 x Q-Connector User Manual 1 x ASUS Q-Shield 1 x User Manual 1 x Support DVD • If any...
... your motherboard package for the following items: Motherboard ASUS X99-DELUXE II motherboard 1 x 3T3R dual-band Wi-Fi moving antennas (Wi-Fi 802.11a/b/g/n/ac compliant) 1 x RGB LED extension cable 1 x CPU Installation Tool 1 x ASUS 2-WAY/3-WAY SLI bridge 8 x Serial ATA 6.0 Gb/s cables 1 x Onboard M.2 X4 bracket 1 x Q-Connector User Manual 1 x ASUS Q-Shield 1 x User Manual 1 x Support DVD • If any...

X99-DELUXE II user s manual English
Page 18
xviii Installation tools and components Intel® LGA2011-v3 compatible CPU Fan Intel® LGA2011-v3 CPU PC chassis SATA hard disk drive Phillips (cross) screwdriver Power supply unit 1 bag of screws DIMM SATA optical disc drive (optional) Graphics card The tools and components in the table above are not included in the motherboard package.
xviii Installation tools and components Intel® LGA2011-v3 compatible CPU Fan Intel® LGA2011-v3 CPU PC chassis SATA hard disk drive Phillips (cross) screwdriver Power supply unit 1 bag of screws DIMM SATA optical disc drive (optional) Graphics card The tools and components in the table above are not included in the motherboard package.

X99-DELUXE II user s manual English
Page 19
ASUS X99-DELUXE II Series 1-1 Chapter 1 Chapter 1: Product Introduction Product Introduction 1 1.1 Motherboard overview 1.1.1 Before you proceed Take note of the following precautions before you install motherboard components or change any motherboard settings. • Unplug the power cord from the wall ... component, ensure that came with the component. • Before you uninstall any component, place it on them. • Whenever you install or remove any component. • Before handling components, use a grounded wrist strap or touch a safely grounded object or a metal object...
ASUS X99-DELUXE II Series 1-1 Chapter 1 Chapter 1: Product Introduction Product Introduction 1 1.1 Motherboard overview 1.1.1 Before you proceed Take note of the following precautions before you install motherboard components or change any motherboard settings. • Unplug the power cord from the wall ... component, ensure that came with the component. • Before you uninstall any component, place it on them. • Whenever you install or remove any component. • Before handling components, use a grounded wrist strap or touch a safely grounded object or a metal object...

X99-DELUXE II user s manual English
Page 22
...is shipment/ transit-related. • Keep the cap after installing the motherboard. Chapter 1 • Ensure that the PnP cap is missing, or if you see any damage to the PnP cap/socket contacts/motherboard components. ASUS will process Return Merchandise Authorization (RMA) requests only if ...cap on the LGA2011-v3 socket. • The product warranty does not cover damage to the socket contacts resulting from incorrect CPU installation/removal, or misplacement/loss/incorrect removal of the motherboard, ensure that all power cables are not bent. Contact your retailer immediately ...
...is shipment/ transit-related. • Keep the cap after installing the motherboard. Chapter 1 • Ensure that the PnP cap is missing, or if you see any damage to the PnP cap/socket contacts/motherboard components. ASUS will process Return Merchandise Authorization (RMA) requests only if ...cap on the LGA2011-v3 socket. • The product warranty does not cover damage to the socket contacts resulting from incorrect CPU installation/removal, or misplacement/loss/incorrect removal of the motherboard, ensure that all power cables are not bent. Contact your retailer immediately ...

X99-DELUXE II user s manual English
Page 23
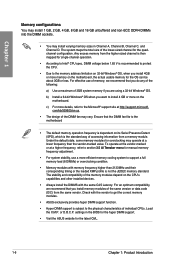
Recommended memory configurations ASUS X99-DELUXE II Series 1-5 DO NOT install a DDR, DDR2, or DDR3 memory module to the DDR4 slot. Chapter 1 1.1.4 System memory The motherboard comes with eight DDR4 (Double Data Rate 4) Quad Inline Memory Modules (DIMM) slots. A DDR4 module is notched differently from a DDR, DDR2, or DDR3 module.
Recommended memory configurations ASUS X99-DELUXE II Series 1-5 DO NOT install a DDR, DDR2, or DDR3 memory module to the DDR4 slot. Chapter 1 1.1.4 System memory The motherboard comes with eight DDR4 (Double Data Rate 4) Quad Inline Memory Modules (DIMM) slots. A DDR4 module is notched differently from a DDR, DDR2, or DDR3 module.
X99-DELUXE II user s manual English
Page 24
...overclocking condition. • Memory modules with memory frequency higher than the vendor-marked value. For an optimum compatibility, we recommend that you install 4GB or more details, refer to the Microsoft® support site at a lower frequency than 2133MHz and their corresponding timing or the... install the DIMMS with the vendor to Intel® CPU spec, DIMM voltage below 1.65 V is the standard way of the memory modules depend on the motherboard, the actual usable memory for single-channel operation. • According to get the correct memory modules. • ASUS ...
...overclocking condition. • Memory modules with memory frequency higher than the vendor-marked value. For an optimum compatibility, we recommend that you install 4GB or more details, refer to the Microsoft® support site at a lower frequency than 2133MHz and their corresponding timing or the... install the DIMMS with the vendor to Intel® CPU spec, DIMM voltage below 1.65 V is the standard way of the memory modules depend on the motherboard, the actual usable memory for single-channel operation. • According to get the correct memory modules. • ASUS ...

X99-DELUXE II user s manual English
Page 29
... system. This is plugged to a power source indicating that allows you should shut down the system and unplug the power cable before removing or installing any motherboard component. 2. ASUS X99-DELUXE II Series 1-11 The button also lights up the system. Chapter 1 1.1.6 Onboard buttons and switches Onboard buttons and switches allow you to fine-tune...
... system. This is plugged to a power source indicating that allows you should shut down the system and unplug the power cable before removing or installing any motherboard component. 2. ASUS X99-DELUXE II Series 1-11 The button also lights up the system. Chapter 1 1.1.6 Onboard buttons and switches Onboard buttons and switches allow you to fine-tune...
X99-DELUXE II user s manual English
Page 30
... increases, indicating different test processes. • Due to memory tuning requirement, the system automatically reboots when each timing set is not properly installed. button does not function under Windows® OS environment. • During the tuning process, the system loads and tests failsafe memory settings...We recommend that are not compatible with ones recommended in the Memory QVL (Qualified Vendors Lists) in this user manual or at www.asus.com. • If you download and update to BIOS overclocking, press the MemOK! System will appear during the tuning process, the ...
... increases, indicating different test processes. • Due to memory tuning requirement, the system automatically reboots when each timing set is not properly installed. button does not function under Windows® OS environment. • During the tuning process, the system loads and tests failsafe memory settings...We recommend that are not compatible with ones recommended in the Memory QVL (Qualified Vendors Lists) in this user manual or at www.asus.com. • If you download and update to BIOS overclocking, press the MemOK! System will appear during the tuning process, the ...

X99-DELUXE II user s manual English
Page 31
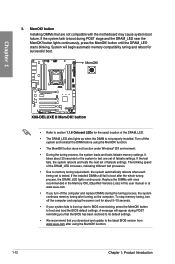
... and PCIE LEDs. • After adjusting PCIE bandwidth in the BIOS, shut down the system for 2-WAY or 3-WAY graphics card installation. SLI/CFX switch This switch allows you to install the graphics cards to the specific slots. • The LEDs below the SLI/CFX switch and near the slots light up... overclocking. 4. Clear CMOS button (CLR_CMOS) Press this button to clear the BIOS setup information only when the systems hangs due to update the lighting effect. ASUS X99-DELUXE II Series 1-13
... and PCIE LEDs. • After adjusting PCIE bandwidth in the BIOS, shut down the system for 2-WAY or 3-WAY graphics card installation. SLI/CFX switch This switch allows you to install the graphics cards to the specific slots. • The LEDs below the SLI/CFX switch and near the slots light up... overclocking. 4. Clear CMOS button (CLR_CMOS) Press this button to clear the BIOS setup information only when the systems hangs due to update the lighting effect. ASUS X99-DELUXE II Series 1-13

X99-DELUXE II user s manual English
Page 32
Chapter 1 6. To gain more CPU voltage setting, insert the jumper to pins 1-2. 1-14 Chapter 1: Product Introduction To go back to its default CPU voltage setting, insert the jumper to pins 2-3. CPU Over Voltage jumper (3-pin CPU_OV) The CPU Over Voltage jumper allows you to set a higher CPU voltage for a flexible overclocking system, depending on the type of the installed CPU. EZ XMP switch Enable this switch to overclock the installed DIMMs, allowing you to enhance the DIMM's speed and performance. 1.1.7 Jumpers 1.
Chapter 1 6. To gain more CPU voltage setting, insert the jumper to pins 1-2. 1-14 Chapter 1: Product Introduction To go back to its default CPU voltage setting, insert the jumper to pins 2-3. CPU Over Voltage jumper (3-pin CPU_OV) The CPU Over Voltage jumper allows you to set a higher CPU voltage for a flexible overclocking system, depending on the type of the installed CPU. EZ XMP switch Enable this switch to overclock the installed DIMMs, allowing you to enhance the DIMM's speed and performance. 1.1.7 Jumpers 1.

X99-DELUXE II user s manual English
Page 36
... initialization after microcode loading PCH initialization after microcode loading Cache initialization Reserved for ASL (see ASL Status Codes section below) Memory Installed CPU post-memory initialization Post-Memory System Agent initialization is started Post-Memory PCH initialization is started DXE IPL is failed (continued... on . Invalid memory type or incompatible memory speed Unspecified memory initialization error Memory not installed Invalid CPU type or Speed CPU mismatch CPU self test failed or possible CPU cache error CPU micro-code is not found...
... initialization after microcode loading PCH initialization after microcode loading Cache initialization Reserved for ASL (see ASL Status Codes section below) Memory Installed CPU post-memory initialization Post-Memory System Agent initialization is started Post-Memory PCH initialization is started DXE IPL is failed (continued... on . Invalid memory type or incompatible memory speed Unspecified memory initialization error Memory not installed Invalid CPU type or Speed CPU mismatch CPU self test failed or possible CPU cache error CPU micro-code is not found...

X99-DELUXE II user s manual English
Page 37
... error codes DXE Core is started NVRAM initialization Installation of the PCH Runtime Services CPU DXE initialization is started PCI host bridge initialization System Agent DXE initialization is started System Agent DXE SMM initialization is started System Agent DXE initialization (System Agent module specific) (continued on the next page) ASUS X99-DELUXE II Series 1-19
... error codes DXE Core is started NVRAM initialization Installation of the PCH Runtime Services CPU DXE initialization is started PCI host bridge initialization System Agent DXE initialization is started System Agent DXE SMM initialization is started System Agent DXE initialization (System Agent module specific) (continued on the next page) ASUS X99-DELUXE II Series 1-19

X99-DELUXE II user s manual English
Page 39
ASUS X99-DELUXE II Series 1-21 If you can support one SATA Express device or two SATA devices. • Due to Serial ATA 6 Gb/s hard disk drives via Serial ATA 6 Gb/s signal cables. If you installed Serial ATA hard disk drives, you intend to create a Serial ATA RAID set using these connectors, set , refer to the... motherboard support DVD. • The SATAEXPRESS_1 connector can create a RAID 0, 1, 5, and 10 configuration with the Intel® Rapid Storage Technology through the onboard Intel® X99 chipset. • These connectors are set to [RAID Mode].
ASUS X99-DELUXE II Series 1-21 If you can support one SATA Express device or two SATA devices. • Due to Serial ATA 6 Gb/s hard disk drives via Serial ATA 6 Gb/s signal cables. If you installed Serial ATA hard disk drives, you intend to create a Serial ATA RAID set using these connectors, set , refer to the... motherboard support DVD. • The SATAEXPRESS_1 connector can create a RAID 0, 1, 5, and 10 configuration with the Intel® Rapid Storage Technology through the onboard Intel® X99 chipset. • These connectors are set to [RAID Mode].

X99-DELUXE II user s manual English
Page 40
Connect the S/PDIF Out module cable to this connector, then install the module to a slot opening at the back of the motherboard's high-definition audio capability. • If you connect a high-definition front panel audio module ...
Connect the S/PDIF Out module cable to this connector, then install the module to a slot opening at the back of the motherboard's high-definition audio capability. • If you connect a high-definition front panel audio module ...

X99-DELUXE II user s manual English
Page 41
4. ASUS X99-DELUXE II Series 1-23 With an installed USB 3.0 module, you to connect a USB 3.0 module for USB-chargeable devices, optimized power efficiency, and backward compatibility with USB 2.0. Chapter 1 The USB 3.0 module is purchased separately. • Ensure to install the related driver to 5 Gb/s, faster charging time for additional USB 3.0 front or rear panel ports. USB 3.0 connectors...
4. ASUS X99-DELUXE II Series 1-23 With an installed USB 3.0 module, you to connect a USB 3.0 module for USB-chargeable devices, optimized power efficiency, and backward compatibility with USB 2.0. Chapter 1 The USB 3.0 module is purchased separately. • Ensure to install the related driver to 5 Gb/s, faster charging time for additional USB 3.0 front or rear panel ports. USB 3.0 connectors...


