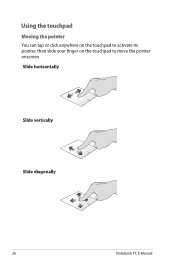
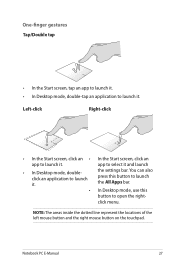
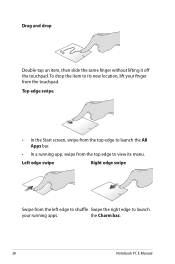
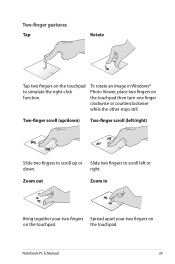
User's Manual for English Edition
Page 3
... Press the power button 23 Gestures for the touch screen (on selected models) and touchpad...24 Using the touch screen (on selected models 24 Using the touchpad 26 Using the keyboard 31 Function keys 31 Function keys for ASUS Apps 32 Windows®8 keys (on selected models 32 Chapter 3: Working with Windows®...
User's Manual for English Edition
Page 7
... and tips that you can help complete tasks. Italic = This indicates sections that can refer to your Notebook PC. = Use the touch screen. = Use the touchpad. = Use the keyboard. Notebook PC E-Manual
User's Manual for English Edition
Page 14
Keyboard The keyboard provides full-sized QWERTY keys with a comfortable travel depth for the touchpad section in this manual. 14 Notebook PC E-Manual NOTE: For more details, refer to navigate onscreen, providing an intuitive user experience. It also simulates the functions of multi-gestures to the Gestures for typing. It also enables you to Windows®, and controls other multimedia functions. Touchpad The touchpad allows the use the function keys, allows quick access to use of a regular mouse. NOTE: The keyboard layout differs by model or territory.
User's Manual for English Edition
Page 24
... from the left edge of the screen to launch the Charm bar. on the touch panel. Gestures for the touch screen (on selected models) and touchpad. Using the touch screen (on selected models) Left edge swipe Right edge swipe Swipe from the right edge of your running apps. Refer to the... following illustrations when using hand gestures on your touch screen (on selected models) and touchpad Gestures allow you to launch programs and access the settings of the screen to shuffle your Notebook PC.
User's Manual for English Edition
Page 26
Using the touchpad Moving the pointer You can tap or click anywhere on the touchpad to activate its pointer, then slide your finger on the touchpad to move the pointer onscreen. Slide horizontally Slide vertically Slide diagonally 26 Notebook PC E-Manual
User's Manual for English Edition
Page 27
... to launch it. NOTE: The areas inside the dotted line represent the locations of the left mouse button and the right mouse button on the touchpad. Notebook PC E-Manual 27 the settings bar.
User's Manual for English Edition
Page 28
To drop the item to launch the All Apps bar. • In a running apps. the Charm bar. 28 Notebook PC E-Manual Top edge swipe • In the Start screen, swipe from the touchpad. Drag and drop Double-tap an item, then slide the same finger without lifting it off the touchpad. Left edge swipe Right edge swipe Swipe from the left edge to shuffle Swipe the right edge to launch your running app, swipe from the top edge to view its new location, lift your finger from the top edge to its menu.
User's Manual for English Edition
Page 29
To rotate an image in Bring together your two fingers Spread apart your two fingers on on the touchpad. Two-finger scroll (up/down) Two-finger scroll (left or down. Notebook PC E-Manual 29 Two-finger gestures Tap Rotate Tap two fingers on the touchpad then turn one finger clockwise or counterclockwise while the other stays still. Zoom out Zoom in Windows® Photo Viewer, place two fingers on the touchpad to scroll left /right) Slide two fingers to scroll up or Slide two fingers to simulate the right-click function. right. the touchpad.
User's Manual for English Edition
Page 30
Using your other finger, slide down the touchpad to drag and drop the item to a new location. 30 Notebook PC E-Manual Drag and drop Select an item then press and hold the left button.
User's Manual for English Edition
Page 31
Using the keyboard Function keys The function keys on your Notebook PC. Enables or disables the touchpad Turns the speaker on or off Turns the speaker volume down Turns the speaker volume up Notebook PC E-Manual 31 Decreases display brightness Increases display brightness Turns the display panel off Activates the second screen NOTE: Ensure that the second display is connected to your Notebook PC's keyboard can trigger the following commands: Puts the Notebook PC into Sleep mode Turns Airplane mode on or off NOTE: When enabled, the Airplane mode disables all wireless connectivity.
User's Manual for English Edition
Page 36
Hotspots on a running app Hotspots on the Start screen 36 Notebook PC E-Manual The functions in these hotspots can be activated using the touchpad. Hotspots Onscreen hotspots allow you to launch programs and access the settings of your Notebook PC.
User's Manual for English Edition
Page 38
... Windows® apps Use your mouse pointer over the app then left-click or tap once to launch it. Position your Notebook PC's touch screen, touchpad, or keyboard to a new location.
User's Manual for English Edition
Page 41
... from the apps already pinned on selected models) 1. Horizontal scroll bar Launching the Apps screen Launch the Apps screen using your Notebook PC's touch screen, touchpad, or keyboard. (on your Notebook PC. From the Start screen, press to launch the All Apps bar.
User's Manual for English Edition
Page 42
Position the mouse pointer over the app you want to pin on the Start 1. In the Apps screen, swipe down the app to select and launch the settings bar. 2. to pin the selected app on the Start screen. 2. Pinning more apps on the Start screen You can pin more apps on the Start screen using your touch screen or touchpad. (on the app to activate its settings. 3. Right-click on selected models) 1. Tap screen. Tap on the icon. 42 Notebook PC E-Manual
User's Manual for English Edition
Page 43
... The Charm bar is a toolbar that allow you to share applications and provide quick access for customizing the settings of your Notebook PC's touch screen, touchpad, or keyboard to launch the Charm bar. (on the upper or lower right corner of the screen. The image above shows how the Charm bar...
User's Manual for English Edition
Page 45
Ensure that your Notebook PC's touch screen, touchpad, or keyboard to activate and use Snap. (on selected models) 1. Snap bar Using Snap Use your Notebook PC's screen resolution is set to 1366 x 768 pixels or higher before using the Snap feature. IMPORTANT! Tap and hold the app's topmost part then drag it to the left or right side of the screen until the snap bar appears. 3. Launch the app you to work or switch between apps. Snap feature The Snap feature displays two apps side-by-side, allowing you wish to snap. 2. Launch another app. Notebook PC E-Manual 45
User's Manual for English Edition
Page 49
... applications via social networking sites using the following steps on your Notebook PC. Select an access point from the list of your touch screen or touchpad. 1. Tap and tap . 3. Launch the Charm bar. 2. Ensure the Airplane mode is turned off to enable the Wi-Fi function of available Wi-Fi connections...
User's Manual for English Edition
Page 51
..., select Devices then tap Add a Device to enable data transfers. For more details, refer to enable the Bluetooth function of your or touch screen or touchpad as follows: 1. Notebook PC E-Manual 51 To do this manual. Launch the Charm bar. 2. Ensure the Airplane mode is turned off to the Airplane mode...