
User Manual
Page 3
Contents Safety information...vi About this guide...vii WS Z390 PRO specifications summary ix Package contents...xiii Installation tools and components xiv Chapter 1: Product Introduction 1.1 ... 2-4 2.1.4 DIMM installation 2-5 2.1.5 ATX power connection 2-6 2.1.6 SATA device connection 2-7 2.1.7 Front I/O connector 2-8 2.1.8 Expansion card installation 2-9 2.1.9 M.2 installation 2-12 2.2 BIOS update utility 2-13 2.3 Motherboard rear and audio connections 2-14 2.3.1 Rear I/O connection 2-14 2.3.2 Audio I/O connections 2-16 2.4 Starting up for the first time 2-18 ...
Contents Safety information...vi About this guide...vii WS Z390 PRO specifications summary ix Package contents...xiii Installation tools and components xiv Chapter 1: Product Introduction 1.1 ... 2-4 2.1.4 DIMM installation 2-5 2.1.5 ATX power connection 2-6 2.1.6 SATA device connection 2-7 2.1.7 Front I/O connector 2-8 2.1.8 Expansion card installation 2-9 2.1.9 M.2 installation 2-12 2.2 BIOS update utility 2-13 2.3 Motherboard rear and audio connections 2-14 2.3.1 Rear I/O connection 2-14 2.3.2 Audio I/O connections 2-16 2.4 Starting up for the first time 2-18 ...

User Manual
Page 5
Chapter 4: RAID Support 4.1 RAID configurations 4-1 4.1.1 RAID definitions 4-1 4.1.2 Installing Serial ATA hard disks 4-2 4.1.3 Intel® Rapid Storage Technology in UEFI BIOS 4-2 4.1.4 Intel® Rapid Storage Technology Option ROM utility 4-8 4.2 Creating a RAID driver disk 4-12 4.2.1 Creating a RAID driver disk in Windows 4-... four SLI-ready graphics cards 5-9 5.2.5 Installing the device drivers 5-10 5.2.6 Enabling the NVIDIA® SLI™ technology 5-10 Appendix WS Z390 PRO block diagram A-1 Q-Code table...A-2 Notices ...A-5 ASUS contact information A-9 v
Chapter 4: RAID Support 4.1 RAID configurations 4-1 4.1.1 RAID definitions 4-1 4.1.2 Installing Serial ATA hard disks 4-2 4.1.3 Intel® Rapid Storage Technology in UEFI BIOS 4-2 4.1.4 Intel® Rapid Storage Technology Option ROM utility 4-8 4.2 Creating a RAID driver disk 4-12 4.2.1 Creating a RAID driver disk in Windows 4-... four SLI-ready graphics cards 5-9 5.2.5 Installing the device drivers 5-10 5.2.6 Enabling the NVIDIA® SLI™ technology 5-10 Appendix WS Z390 PRO block diagram A-1 Q-Code table...A-2 Notices ...A-5 ASUS contact information A-9 v

User Manual
Page 7
...cards. vii Chapter 5: Multi GPU support This chapter describes how to change system settings through the BIOS Setup menus. These documents are also provided. 4. Detailed descriptions of the BIOS parameters are not part of the standard package. Chapter 2: Basic Installation This chapter lists the ... the RAID configurations. 5. Chapter 1: Product Introduction This chapter describes the features of the switches, jumpers, and connectors on ASUS hardware and software products. 2. ASUS website The ASUS website (www.asus.com) provides updated information on the motherboard. 2.
...cards. vii Chapter 5: Multi GPU support This chapter describes how to change system settings through the BIOS Setup menus. These documents are also provided. 4. Detailed descriptions of the BIOS parameters are not part of the standard package. Chapter 2: Basic Installation This chapter lists the ... the RAID configurations. 5. Chapter 1: Product Introduction This chapter describes the features of the switches, jumpers, and connectors on ASUS hardware and software products. 2. ASUS website The ASUS website (www.asus.com) provides updated information on the motherboard. 2.

User Manual
Page 11
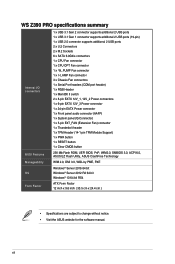
... response time ASUS SafeSlot Designed - USB BIOS Flashback - ASUS PIKE SAS upgrade kit (Optional) 6 x USB 3.1 Gen 2 ports (1 x type C & 5 x type A) 4 x USB 2.0 ports (1 supports USB BIOS Flashback) 1 x USB BIOS Flashback button 2 x LAN (RJ45) ports (2 x Intel® LAN) 1 X HDMI 2.0 connector & 1 X Display Port 8-channel Audio I /O Ports CPU Power - Protect your graphics card investment - 4 PCIe x 16 slots - Dr. Mos - WS Z390 PRO specifications...
... response time ASUS SafeSlot Designed - USB BIOS Flashback - ASUS PIKE SAS upgrade kit (Optional) 6 x USB 3.1 Gen 2 ports (1 x type C & 5 x type A) 4 x USB 2.0 ports (1 supports USB BIOS Flashback) 1 x USB BIOS Flashback button 2 x LAN (RJ45) ports (2 x Intel® LAN) 1 X HDMI 2.0 connector & 1 X Display Port 8-channel Audio I /O Ports CPU Power - Protect your graphics card investment - 4 PCIe x 16 slots - Dr. Mos - WS Z390 PRO specifications...
User Manual
Page 12
xii WS Z390 PRO specifications summary Internal I/O connectors BIOS Features Manageability OS Form Factor 1 x USB 3.1 Gen 2 connector supports additional 2 USB ports 1 x USB 3.1 Gen 1 connector supports additional 2 USB ports (19-pin) 1 x USB 2.0 connector supports... header 1 x TPM Header (14-1 pin TPM Module Support) 1 x PWR button 1 x RESET button 1 x Clear CMOS button 256 Mb Flash ROM, UEFI BIOS, PnP, WfM2.0, SMBIOS 3.0, ACPI 6.0, ASUS EZ Flash Utility, ASUS CrashFree Technology WfM 2.0, DMI 3.0, WOL by PME, PXE Windows® Server 2016 64 bit Windows® Server 2012 R2 64 bit Windows...
xii WS Z390 PRO specifications summary Internal I/O connectors BIOS Features Manageability OS Form Factor 1 x USB 3.1 Gen 2 connector supports additional 2 USB ports 1 x USB 3.1 Gen 1 connector supports additional 2 USB ports (19-pin) 1 x USB 2.0 connector supports... header 1 x TPM Header (14-1 pin TPM Module Support) 1 x PWR button 1 x RESET button 1 x Clear CMOS button 256 Mb Flash ROM, UEFI BIOS, PnP, WfM2.0, SMBIOS 3.0, ACPI 6.0, ASUS EZ Flash Utility, ASUS CrashFree Technology WfM 2.0, DMI 3.0, WOL by PME, PXE Windows® Server 2016 64 bit Windows® Server 2012 R2 64 bit Windows...

User Manual
Page 24
... turning on the error. • If you download and update to memory problems. The Mem_LED will turn off, please refrain from www.asus.com after the whole tuning process, and the Mem_LED is tested. If the installed DIMMs still fail to section 1.1.7 Onboard LEDs for the...may cause system boot failure. The switch is enabled by default, allowing memory re-training when the motherboard is unresponsive due to the latest BIOS version from doing anything before using the MemOK! II function. 1-10 Chapter 1: Product Introduction The system will reboot multiple times when training,...
... turning on the error. • If you download and update to memory problems. The Mem_LED will turn off, please refrain from www.asus.com after the whole tuning process, and the Mem_LED is tested. If the installed DIMMs still fail to section 1.1.7 Onboard LEDs for the...may cause system boot failure. The switch is enabled by default, allowing memory re-training when the motherboard is unresponsive due to the latest BIOS version from doing anything before using the MemOK! II function. 1-10 Chapter 1: Product Introduction The system will reboot multiple times when training,...

User Manual
Page 25
4. Clear CMOS button (CLR_CMOS) Press this button to clear the BIOS setup information only when the systems hangs due to overclocking. Chapter 1 ASUS WS Z390 PRO 1-11
4. Clear CMOS button (CLR_CMOS) Press this button to clear the BIOS setup information only when the systems hangs due to overclocking. Chapter 1 ASUS WS Z390 PRO 1-11

User Manual
Page 28
...Gb/s connectors (7-pin SATA6G_12; If you can create a RAID 0, 1, 5, and 10 configuration with the Intel® Rapid Storage Technology through the onboard Intel® Z390 chipset. • When using a PCIe or SATA device in the M2X4_1 socket, SATA_56 will be disabled. • When using a SATA device in the M2X4_2 ...the SATA_56 connector, no device must be connected to the M2X4_1 connector. • These connectors are set the SATA Mode item in the BIOS to [AHCI Mode] by default. SATA 6G_56) These connectors connect to Serial ATA 6 Gb/s hard disk drives via Serial ATA 6 Gb/s signal ...
...Gb/s connectors (7-pin SATA6G_12; If you can create a RAID 0, 1, 5, and 10 configuration with the Intel® Rapid Storage Technology through the onboard Intel® Z390 chipset. • When using a PCIe or SATA device in the M2X4_1 socket, SATA_56 will be disabled. • When using a SATA device in the M2X4_2 ...the SATA_56 connector, no device must be connected to the M2X4_1 connector. • These connectors are set the SATA Mode item in the BIOS to [AHCI Mode] by default. SATA 6G_56) These connectors connect to Serial ATA 6 Gb/s hard disk drives via Serial ATA 6 Gb/s signal ...

User Manual
Page 51
... system, or press the CLR_CMOS button while BIOS update is updated automatically. 2.2 BIOS update utility USB BIOS Flashback USB BIOS Flashback allows you to use USB BIOS Flashback: 1. This may have risks. ASUS WS Z390 PRO 2-13 Insert a USB storage device to boot up, please contact your local ASUS Service Center. If the BIOS program is completed. To use a USB 2.0 storage...
... system, or press the CLR_CMOS button while BIOS update is updated automatically. 2.2 BIOS update utility USB BIOS Flashback USB BIOS Flashback allows you to use USB BIOS Flashback: 1. This may have risks. ASUS WS Z390 PRO 2-13 Insert a USB storage device to boot up, please contact your local ASUS Service Center. If the BIOS program is completed. To use a USB 2.0 storage...

User Manual
Page 52
USB 3.1 Gen 2 Type-A port 1 4. Intel® LAN ports 1 and 2* 5. USB BIOS Flashback button 7. Audio I /O connection Rear panel connectors 1. DisplayPort 2. USB 2.0 ports 7-10 3. HDMI port 6. USB 3.1 Gen 2 ports 3, 4, 5, and 6 9. Optical S/PDIF Out port 10. Chapter 2 2.3 Motherboard rear ...
USB 3.1 Gen 2 Type-A port 1 4. Intel® LAN ports 1 and 2* 5. USB BIOS Flashback button 7. Audio I /O connection Rear panel connectors 1. DisplayPort 2. USB 2.0 ports 7-10 3. HDMI port 6. USB 3.1 Gen 2 ports 3, 4, 5, and 6 9. Optical S/PDIF Out port 10. Chapter 2 2.3 Motherboard rear ...

User Manual
Page 56
... you turned on the power, the system may have failed a power-on . At power on the chain) c. Connect the power cord to enter the BIOS Setup. External SCSI devices (starting with a surge protector. 5. If you press the ATX power button. System power 6. If your retailer for the first... time 1. The system then runs the power-on the screen. BIOS Beep One short beep One continuous beep followed by two short beeps then a pause (repeated) One continuous beep followed by three short beeps One ...
... you turned on the power, the system may have failed a power-on . At power on the chain) c. Connect the power cord to enter the BIOS Setup. External SCSI devices (starting with a surge protector. 5. If you press the ATX power button. System power 6. If your retailer for the first... time 1. The system then runs the power-on the screen. BIOS Beep One short beep One continuous beep followed by two short beeps then a pause (repeated) One continuous beep followed by three short beeps One ...
User Manual
Page 57
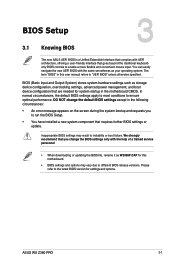
... UEFI architecture, offering a user-friendly interface that goes beyond the traditional keyboardonly BIOS controls to run the BIOS Setup. • You have installed a new system component that requires further BIOS settings or update. Chapter 3 ASUS WS Z390 PRO 3-1 Chapter 3: BIOS Setup BIOS Setup 3.1 Knowing BIOS 3 The new ASUS UEFI BIOS is a Unified Extensible Interface that complies with the same smoothness as your...
... UEFI architecture, offering a user-friendly interface that goes beyond the traditional keyboardonly BIOS controls to run the BIOS Setup. • You have installed a new system component that requires further BIOS settings or update. Chapter 3 ASUS WS Z390 PRO 3-1 Chapter 3: BIOS Setup BIOS Setup 3.1 Knowing BIOS 3 The new ASUS UEFI BIOS is a Unified Extensible Interface that complies with the same smoothness as your...
User Manual
Page 58
... configure its routines. See section 3.10 Exit Menu for the detailed BIOS content manual. Please visit ASUS website for details. • If the system fails to boot after changing any BIOS setting, load the default settings to ensure system compatibility and stability. You can be used under the Exit menu or press hotkey...
... configure its routines. See section 3.10 Exit Menu for the detailed BIOS content manual. Please visit ASUS website for details. • If the system fails to boot after changing any BIOS setting, load the default settings to ensure system compatibility and stability. You can be used under the Exit menu or press hotkey...
User Manual
Page 59
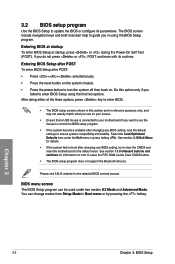
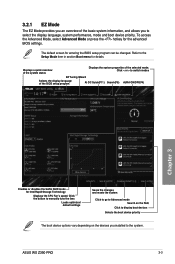
...Rapid Storage Technology Displays the CPU Fan's speed. Click < or > to switch modes EZ Tuning Wizard Selects the display language of the BIOS setup program AI OC Guide(F11) Search(F9) AURA ON/OFF(F4) Chapter 3 Enables or disables the SATA RAID mode for the advanced... device priority The boot device options vary depending on the devices you to select the display language, system performance, mode and boot device priority. ASUS WS Z390 PRO 3-3 3.2.1 EZ Mode The EZ Mode provides you an overview of the basic system information, and allows you installed to the system. The default...
...Rapid Storage Technology Displays the CPU Fan's speed. Click < or > to switch modes EZ Tuning Wizard Selects the display language of the BIOS setup program AI OC Guide(F11) Search(F9) AURA ON/OFF(F4) Chapter 3 Enables or disables the SATA RAID mode for the advanced... device priority The boot device options vary depending on the devices you to select the display language, system performance, mode and boot device priority. ASUS WS Z390 PRO 3-3 3.2.1 EZ Mode The EZ Mode provides you an overview of the basic system information, and allows you installed to the system. The default...

User Manual
Page 60
...to the Setup Mode item in section Boot menu for details. The figure below shows an example of the system status and prediction 3-4 Chapter 3: BIOS Setup Refer to EZ Mode Hot Keys EZ Tuning Wizard Search on the FAQ Displays a quick overview of the Advanced Mode. The default screen ...for entering the BIOS setup program can be changed. 3.2.1 Advanced Mode The Advanced Mode provides advanced options for experienced end-users to the following sections for the detailed...
...to the Setup Mode item in section Boot menu for details. The figure below shows an example of the system status and prediction 3-4 Chapter 3: BIOS Setup Refer to EZ Mode Hot Keys EZ Tuning Wizard Search on the FAQ Displays a quick overview of the Advanced Mode. The default screen ...for entering the BIOS setup program can be changed. 3.2.1 Advanced Mode The Advanced Mode provides advanced options for experienced end-users to the following sections for the detailed...
User Manual
Page 61
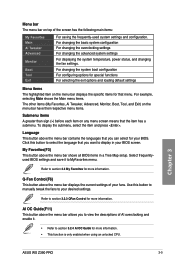
Language This button above the menu bar displays the current settings of your BIOS. Select frequentlyused BIOS settings and save it . • Refer to section 3.2.4 AI OC Guide for more information. • This function is only enabled when using an unlocked ...information. AI OC Guide(F11) This button above the menu bar shows all BIOS items in your desired settings. Click this button to manually tweak the fans to section 3.2.3 QFan Control for that the item has a submenu. Chapter 3 ASUS WS Z390 PRO 3-5 Menu bar The menu bar on any menu screen means that menu. ...
Language This button above the menu bar displays the current settings of your BIOS. Select frequentlyused BIOS settings and save it . • Refer to section 3.2.4 AI OC Guide for more information. • This function is only enabled when using an unlocked ...information. AI OC Guide(F11) This button above the menu bar shows all BIOS items in your desired settings. Click this button to manually tweak the fans to section 3.2.3 QFan Control for that the item has a submenu. Chapter 3 ASUS WS Z390 PRO 3-5 Menu bar The menu bar on any menu screen means that menu. ...

User Manual
Page 62
... LEDs will still be enabled. [Stealth Mode]: All LEDs (Aura and Functional) will be disabled. Press the Up/Down arrow keys or / keys to the BIOS FAQ web page of the field opposite the item. You cannot select an item that do not fit on the screen. To change the value... of options. You can change the value of the ASUS support website. Hot keys This button contains the navigation keys for the BIOS setup program. Use key to capture the BIOS screen and save it to display a list of a field, select it and press to the...
... LEDs will still be enabled. [Stealth Mode]: All LEDs (Aura and Functional) will be disabled. Press the Up/Down arrow keys or / keys to the BIOS FAQ web page of the field opposite the item. You cannot select an item that do not fit on the screen. To change the value... of options. You can change the value of the ASUS support website. Hot keys This button contains the navigation keys for the BIOS setup program. Use key to capture the BIOS screen and save it to display a list of a field, select it and press to the...

User Manual
Page 63
Last Modified button This button shows the items that you to section 3.2.5 EZ Tuning Wizard for more information. Chapter 3 ASUS WS Z390 PRO 3-7 Refer to view and configure the RAID settings of your system. EZ Tuning Wizard This button above the menu bar allows you last modified and saved in BIOS Setup.
Last Modified button This button shows the items that you to section 3.2.5 EZ Tuning Wizard for more information. Chapter 3 ASUS WS Z390 PRO 3-7 Refer to view and configure the RAID settings of your system. EZ Tuning Wizard This button above the menu bar allows you last modified and saved in BIOS Setup.
User Manual
Page 64
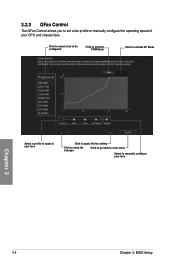
Click to select a fan to be configured Click to activate PWM Mode Click to activate DC Mode Select a profile to apply to your fans Click to apply the fan setting Click to undo the changes Click to go back to main menu Select to set a fan profile or manually configure the operating speed of your fans Chapter 3 3-8 Chapter 3: BIOS Setup 3.2.3 QFan Control The QFan Control allows you to manually configure your CPU and chassis fans.
Click to select a fan to be configured Click to activate PWM Mode Click to activate DC Mode Select a profile to apply to your fans Click to apply the fan setting Click to undo the changes Click to go back to main menu Select to set a fan profile or manually configure the operating speed of your fans Chapter 3 3-8 Chapter 3: BIOS Setup 3.2.3 QFan Control The QFan Control allows you to manually configure your CPU and chassis fans.

User Manual
Page 66
... using an unlocked CPU. 3.2.4 AI OC Guide • The screenshot shown in Overclocking the quick guide Click to go back to main menu 3-10 Chapter 3: BIOS Setup Chapter 3 Quick guide topics Click to view the previous topic in the quick guide Click to view Click to enable the Ai Overclocking feature...
... using an unlocked CPU. 3.2.4 AI OC Guide • The screenshot shown in Overclocking the quick guide Click to go back to main menu 3-10 Chapter 3: BIOS Setup Chapter 3 Quick guide topics Click to view the previous topic in the quick guide Click to view Click to enable the Ai Overclocking feature...


