
Users Manual
Page 3
......14 Bottom...18 Right Side...19 Left Side...21 Chapter 2: Using your Notebook PC Getting started...24 Charge your Notebook PC 24 Lift to open the display panel 26 Press the power button 26 Gestures for the touch screen panel and touchpad 27 Using touch screen panel gestures 27 Using the touchpad...30 Using the keyboard...34 Function keys...34 Windows® 10 keys...35 Multimedia control keys 36 Using the numeric keypad 37 Using the touch screen panel as a tablet 38 Notebook PC E-Manual 3
......14 Bottom...18 Right Side...19 Left Side...21 Chapter 2: Using your Notebook PC Getting started...24 Charge your Notebook PC 24 Lift to open the display panel 26 Press the power button 26 Gestures for the touch screen panel and touchpad 27 Using touch screen panel gestures 27 Using the touchpad...30 Using the keyboard...34 Function keys...34 Windows® 10 keys...35 Multimedia control keys 36 Using the numeric keypad 37 Using the touch screen panel as a tablet 38 Notebook PC E-Manual 3

Users Manual
Page 4
... Connecting to wireless networks 53 Wi-Fi...53 Bluetooth ...54 Airplane mode...55 Connecting to wired networks 56 Configuring a dynamic IP/PPPoE network connection 56 Configuring a static IP network connection 57 Turning your Notebook PC off 58 Putting your Notebook PC to sleep 59 Chapter 4: Power-On Self-Test (POST) The Power-On Self-Test (POST 62 Using POST to access BIOS and Troubleshoot 62 BIOS...62 Accessing BIOS...62 BIOS Settings...63 Recovering your system 73 Performing a recovery option 74 4 Notebook...
... Connecting to wireless networks 53 Wi-Fi...53 Bluetooth ...54 Airplane mode...55 Connecting to wired networks 56 Configuring a dynamic IP/PPPoE network connection 56 Configuring a static IP network connection 57 Turning your Notebook PC off 58 Putting your Notebook PC to sleep 59 Chapter 4: Power-On Self-Test (POST) The Power-On Self-Test (POST 62 Using POST to access BIOS and Troubleshoot 62 BIOS...62 Accessing BIOS...62 BIOS Settings...63 Recovering your system 73 Performing a recovery option 74 4 Notebook...
Users Manual
Page 7
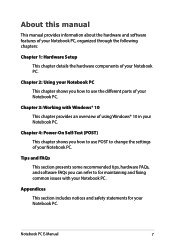
... you how to use POST to change the settings of your Notebook PC. Chapter 3: Working with your Notebook PC. Appendices This section includes notices and safety statements for maintaining and fixing common issues with Windows® 10 This chapter provides an overview of your Notebook PC. Tips and FAQs This section presents some recommended tips, hardware FAQs, and software FAQs you...
... you how to use POST to change the settings of your Notebook PC. Chapter 3: Working with your Notebook PC. Appendices This section includes notices and safety statements for maintaining and fixing common issues with Windows® 10 This chapter provides an overview of your Notebook PC. Tips and FAQs This section presents some recommended tips, hardware FAQs, and software FAQs you...

Users Manual
Page 10
... use or expose your Notebook PC to dusty environments. Do not use your Notebook PC using a dry cloth. Remove any extra moisture from your Notebook PC near liquids, rain, or moisture. Do not expose your Notebook PC near gas leaks. 10 Notebook PC E-Manual Caring for your Notebook PC Disconnect the AC power and remove the battery pack (if applicable) before cleaning your Notebook PC. Use...
... use or expose your Notebook PC to dusty environments. Do not use your Notebook PC using a dry cloth. Remove any extra moisture from your Notebook PC near liquids, rain, or moisture. Do not expose your Notebook PC near gas leaks. 10 Notebook PC E-Manual Caring for your Notebook PC Disconnect the AC power and remove the battery pack (if applicable) before cleaning your Notebook PC. Use...

Users Manual
Page 15
... Using the touch screen panel as a tablet section in this manual. Microphone The built-in use the function keys, allows quick access to Windows®, and controls other multimedia files on how to take pictures or record videos using touch screen gestures. This feature allows you to turn your device from a Notebook PC into a 360° angle. This high-definition touch screen panel provides excellent viewing features for typing. NOTE: The keyboard layout differs by model...
... Using the touch screen panel as a tablet section in this manual. Microphone The built-in use the function keys, allows quick access to Windows®, and controls other multimedia files on how to take pictures or record videos using touch screen gestures. This feature allows you to turn your device from a Notebook PC into a 360° angle. This high-definition touch screen panel provides excellent viewing features for typing. NOTE: The keyboard layout differs by model...

Users Manual
Page 16
... an intuitive user experience. Status Indicators The status indicators help identify the current hardware status of your Notebook PC is enabled. NOTE: When enabled, the Airplane mode disables all wireless connectivity. Touchpad The touchpad allows the use some of a regular mouse. Using capital lock allows you to type capitalized letters (such as A, B, C) using your keyboard for numeric input. 16 Notebook PC E-Manual Capital lock indicator This indicator lights up when the number lock function is activated. Airplane mode indicator This indicator lights up when...
... an intuitive user experience. Status Indicators The status indicators help identify the current hardware status of your Notebook PC is enabled. NOTE: When enabled, the Airplane mode disables all wireless connectivity. Touchpad The touchpad allows the use some of a regular mouse. Using capital lock allows you to type capitalized letters (such as A, B, C) using your keyboard for numeric input. 16 Notebook PC E-Manual Capital lock indicator This indicator lights up when the number lock function is activated. Airplane mode indicator This indicator lights up when...

Users Manual
Page 21
... This USB (Universal Serial Bus) port is accessing the internal storage drives. Two-color battery charge indicator The two-color LED provides a visual indication of your Notebook PC. Drive activity indicator This indicator lights up when your Notebook PC using compatible Notebook PC security products. Status Indicators The status indicators help identify the current hardware status of the battery's charge status. Refer to secure your Notebook PC is compatible with USB 2.0 or USB 1.1 devices such as keyboards, pointing devices, flash disk drives, external HDDs, speakers, cameras...
... This USB (Universal Serial Bus) port is accessing the internal storage drives. Two-color battery charge indicator The two-color LED provides a visual indication of your Notebook PC. Drive activity indicator This indicator lights up when your Notebook PC using compatible Notebook PC security products. Status Indicators The status indicators help identify the current hardware status of the battery's charge status. Refer to secure your Notebook PC is compatible with USB 2.0 or USB 1.1 devices such as keyboards, pointing devices, flash disk drives, external HDDs, speakers, cameras...

Users Manual
Page 25
... your Notebook PC's battery: • Only ASUS-authorized technicians should remove the battery inside the device. • The battery used in fire. • Never attempt to short-circuit your Notebook PC's battery. • Never attempt to the power adapter before turning it on power adapter mode. • The socket outlet must be easily accessible and near your Notebook PC. • To disconnect your Notebook PC from children. IMPORTANT! • Locate...
... your Notebook PC's battery: • Only ASUS-authorized technicians should remove the battery inside the device. • The battery used in fire. • Never attempt to short-circuit your Notebook PC's battery. • Never attempt to the power adapter before turning it on power adapter mode. • The socket outlet must be easily accessible and near your Notebook PC. • To disconnect your Notebook PC from children. IMPORTANT! • Locate...

Users Manual
Page 34
Decreases display brightness Increases display brightness Turns the display panel on or off Toggles the display mode NOTE: Ensure that the second display is connected to your Notebook PC's keyboard can trigger the following commands: Puts the Notebook PC into Sleep mode Turns Airplane mode on or off NOTE: When enabled, the Airplane mode disables all wireless connectivity. Using the keyboard Function keys The function keys on your Notebook PC. 34 Notebook PC E-Manual
Decreases display brightness Increases display brightness Turns the display panel on or off Toggles the display mode NOTE: Ensure that the second display is connected to your Notebook PC's keyboard can trigger the following commands: Puts the Notebook PC into Sleep mode Turns Airplane mode on or off NOTE: When enabled, the Airplane mode disables all wireless connectivity. Using the keyboard Function keys The function keys on your Notebook PC. 34 Notebook PC E-Manual

Users Manual
Page 41
... your Notebook PC to sleep Launch Settings Launch File Explorer You can use the Start menu to do these common activities: • Start programs or Windows® apps • Open commonly used programs or Windows® apps • Adjust Notebook PC settings • Get help with the Windows operating system • Turn off from Windows or switch to your Notebook PC • Log off your Notebook PC's programs, Windows® apps, folders, and settings.
... your Notebook PC to sleep Launch Settings Launch File Explorer You can use the Start menu to do these common activities: • Start programs or Windows® apps • Open commonly used programs or Windows® apps • Adjust Notebook PC settings • Get help with the Windows operating system • Turn off from Windows or switch to your Notebook PC • Log off your Notebook PC's programs, Windows® apps, folders, and settings.
Users Manual
Page 62
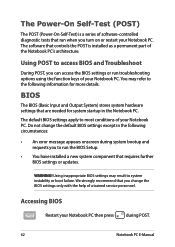
... system hardware settings that requires further BIOS settings or updates. Using POST to run the BIOS Setup. • You have installed a new system component that are needed for more details. WARNING! We strongly recommend that run troubleshooting options using the function keys of your Notebook PC then press during system bootup and requests you to access BIOS and Troubleshoot During POST, you can access the BIOS settings or run when you change the default BIOS settings except...
... system hardware settings that requires further BIOS settings or updates. Using POST to run the BIOS Setup. • You have installed a new system component that are needed for more details. WARNING! We strongly recommend that run troubleshooting options using the function keys of your Notebook PC then press during system bootup and requests you to access BIOS and Troubleshoot During POST, you can access the BIOS settings or run when you change the default BIOS settings except...
Users Manual
Page 63
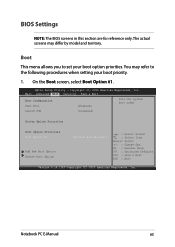
... when setting your boot option priorities. On the Boot screen, select Boot Option #1. BIOS Settings NOTE: The BIOS screens in this section are for reference only. Aptio Setup Utility - You may differ by model and territory. Main Advanced Boot Security Save & Exit Boot Configuration Fast Boot [Enabled] Sets the system boot order Launch CSM [Disabled] Driver Option Priorities Boot Option Priorities Boot Option #1 Add New Boot Option Delete Boot Option [Windows Boot Manager] →← : Select Screen ↑↓ : Select Item Enter: Select +/- : Change Opt. Notebook...
... when setting your boot option priorities. On the Boot screen, select Boot Option #1. BIOS Settings NOTE: The BIOS screens in this section are for reference only. Aptio Setup Utility - You may differ by model and territory. Main Advanced Boot Security Save & Exit Boot Configuration Fast Boot [Enabled] Sets the system boot order Launch CSM [Disabled] Driver Option Priorities Boot Option Priorities Boot Option #1 Add New Boot Option Delete Boot Option [Windows Boot Manager] →← : Select Screen ↑↓ : Select Item Enter: Select +/- : Change Opt. Notebook...
Users Manual
Page 64
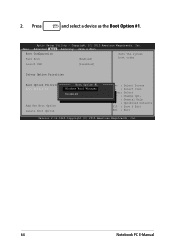
... : Save & Exit ESC : Exit Version 2.16.1243 Copyright (C) 2013 American Megatrends, Inc. 64 Notebook PC E-Manual Press and select a device as the Boot Option #1. Main Advanced Boot Security Save & Exit Boot Configuration Fast Boot [Enabled] Sets the system boot order Launch CSM [Disabled] Driver Option Priorities Boot Option Priorities Boot Option #1 Boot Option #1 [WWiinnddoowwss BBoooott MMaannaaggeerr] Disabled Add New Boot Option Delete Boot Option →← : Select Screen ↑↓ : Select Item Enter: Select +/- : Change Opt. Aptio Setup Utility -
... : Save & Exit ESC : Exit Version 2.16.1243 Copyright (C) 2013 American Megatrends, Inc. 64 Notebook PC E-Manual Press and select a device as the Boot Option #1. Main Advanced Boot Security Save & Exit Boot Configuration Fast Boot [Enabled] Sets the system boot order Launch CSM [Disabled] Driver Option Priorities Boot Option Priorities Boot Option #1 Boot Option #1 [WWiinnddoowwss BBoooott MMaannaaggeerr] Disabled Add New Boot Option Delete Boot Option →← : Select Screen ↑↓ : Select Item Enter: Select +/- : Change Opt. Aptio Setup Utility -
Users Manual
Page 65
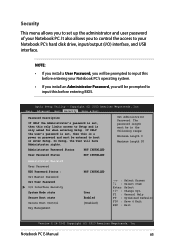
... you to control the access to your Notebook PC's hard disk drive, input/output (I /O Interface Security System Mode state Secure Boot state Secure Boot Control Key Management NOT INSTALLED User Enabled [Enabled] →← : Select Screen ↑↓ : Select Item Enter: Select +/- : Change Opt. Copyright (C) 2013 American Megatrends, Inc. Administrator Password Status NOT INSTALLED User Password Status NOT INSTALLED Set Administrator Password. Notebook PC E-Manual 65 The password length must be prompted to input this before entering your Notebook PC. F1...
... you to control the access to your Notebook PC's hard disk drive, input/output (I /O Interface Security System Mode state Secure Boot state Secure Boot Control Key Management NOT INSTALLED User Enabled [Enabled] →← : Select Screen ↑↓ : Select Item Enter: Select +/- : Change Opt. Copyright (C) 2013 American Megatrends, Inc. Administrator Password Status NOT INSTALLED User Password Status NOT INSTALLED Set Administrator Password. Notebook PC E-Manual 65 The password length must be prompted to input this before entering your Notebook PC. F1...
Users Manual
Page 68
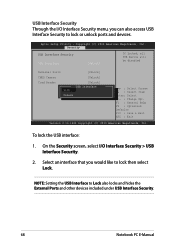
... that you can also access USB Interface Security to lock then select Lock. On the Security screen, select I /O Interface Security menu, you would like to lock or unlock ports and devices. Security USB Interface Security USB Interface [UnLock] If Locked, all USB device will be disabled External Ports [UnLock] CMOS Camera [UnLock] Card Reader Lock [UnLock] USB Interface UnLock →← : Select Screen ↑↓ : Select Item Enter: Select +/- : Change Opt. To lock the USB interface: 1. F1 : General Help F9 : Optimized Defaults F10 : Save & Exit...
... that you can also access USB Interface Security to lock then select Lock. On the Security screen, select I /O Interface Security menu, you would like to lock or unlock ports and devices. Security USB Interface Security USB Interface [UnLock] If Locked, all USB device will be disabled External Ports [UnLock] CMOS Camera [UnLock] Card Reader Lock [UnLock] USB Interface UnLock →← : Select Screen ↑↓ : Select Item Enter: Select +/- : Change Opt. To lock the USB interface: 1. F1 : General Help F9 : Optimized Defaults F10 : Save & Exit...

Users Manual
Page 69
... Utility - In Setup, the User will have Administrator rights. Re-type to Setup and is set,then this is a power on password and must be entered to Power Cycle System after Setting Hard Disk Passwords*** Administrator Password Status NOT INSTALLED User Password Status NOT INSTALLED Administrator Password User Password HDD Password Status : NOT INSTALLED Set Master Password Set User Password I/O Interface Security →← : Select Screen ↑↓ : Select Item Enter: Select +/- : Change Opt. To set the HDD password: 1. Set Master Password In the Security menu...
... Utility - In Setup, the User will have Administrator rights. Re-type to Setup and is set,then this is a power on password and must be entered to Power Cycle System after Setting Hard Disk Passwords*** Administrator Password Status NOT INSTALLED User Password Status NOT INSTALLED Administrator Password User Password HDD Password Status : NOT INSTALLED Set Master Password Set User Password I/O Interface Security →← : Select Screen ↑↓ : Select Item Enter: Select +/- : Change Opt. To set the HDD password: 1. Set Master Password In the Security menu...
Users Manual
Page 71
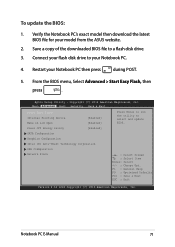
...↑↓ : Select Item Enter: Select +/- : Change Opt. Aptio Setup Utility - Main AdvaAnpcteido SeBtouopt UtiSleictuyri-tyCopySraivgeht& (ECx)it2011 American Megatrends, Inc. Start Easy Flash Internal Pointing Device [Enabled] Wake on Lid Open [Enabled] Power Off Energy Saving [Enabled] SATA Configuration Graphics Configuration Intel (R) Anti-Theft Technology Corporation USB Configuration Network Stack Press Enter to run the utility to a flash disk drive. 3. Notebook PC E-Manual 71 From the BIOS menu, Select Advanced > Start Easy Flash, then press . F1 : General...
...↑↓ : Select Item Enter: Select +/- : Change Opt. Aptio Setup Utility - Main AdvaAnpcteido SeBtouopt UtiSleictuyri-tyCopySraivgeht& (ECx)it2011 American Megatrends, Inc. Start Easy Flash Internal Pointing Device [Enabled] Wake on Lid Open [Enabled] Power Off Energy Saving [Enabled] SATA Configuration Graphics Configuration Intel (R) Anti-Theft Technology Corporation USB Configuration Network Stack Press Enter to run the utility to a flash disk drive. 3. Notebook PC E-Manual 71 From the BIOS menu, Select Advanced > Start Easy Flash, then press . F1 : General...

Users Manual
Page 78
... take out the battery if the battery is removable. • Disconnect all external devices and ensure you have the latest security settings. • Use an anti-virus software to protect your data and keep this updated too. • Unless absolutely necessary, refrain from using force shutdown to turn off your Notebook PC. • Always backup your data and make it a point to resetting your Notebook PC: -
... take out the battery if the battery is removable. • Disconnect all external devices and ensure you have the latest security settings. • Use an anti-virus software to protect your data and keep this updated too. • Unless absolutely necessary, refrain from using force shutdown to turn off your Notebook PC. • Always backup your data and make it a point to resetting your Notebook PC: -
Users Manual
Page 80
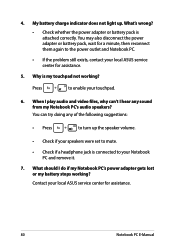
My battery charge indicator does not light up the speaker volume. • Check if your speakers were set to mute. • Check if a headphone jack is connected to your local ASUS service center for assistance. 5. Contact your Notebook PC and remove it. 7. 4. What's wrong? • Check whether the power adapter or battery pack is my touchpad not working ? When I play audio and video files, why can try doing any sound from...
My battery charge indicator does not light up the speaker volume. • Check if your speakers were set to mute. • Check if a headphone jack is connected to your local ASUS service center for assistance. 5. Contact your Notebook PC and remove it. 7. 4. What's wrong? • Check whether the power adapter or battery pack is my touchpad not working ? When I play audio and video files, why can try doing any sound from...
Users Manual
Page 82
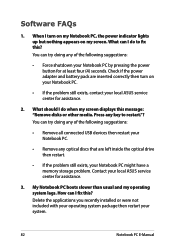
What should I fix this message: "Remove disks or other media. You can I do to restart."? Press any key to fix this? You can I turn on my screen. Delete the applications you recently installed or were not included with your operating system package then restart your Notebook PC might have a memory storage problem. What can try doing any of the following suggestions: • Remove all connected USB devices then...
What should I fix this message: "Remove disks or other media. You can I do to restart."? Press any key to fix this? You can I turn on my screen. Delete the applications you recently installed or were not included with your operating system package then restart your Notebook PC might have a memory storage problem. What can try doing any of the following suggestions: • Remove all connected USB devices then...


