VN289Q User Guide for English Edition
Page 2
... Notices...iii Safety information iv Care & Cleaning v 1.1 Welcome 1-1 1.2 Package contents 1-1 1.3 Assembling the monitor base 1-2 1.4 Connect cables 1-2 1.4.1 Detaching the cable cover 1-2 1.4.2 Rear of the LCD monitor 1-3 1.5 Monitor introduction 1-4 1.5.1 Using the Controls button 1-4 1.5.3 QuickFit Function 1-6 2.1 Detaching the arm/stand (for VESA wall mount 2-1 2.2 Adjusting the monitor 2-2 3.1 OSD (On-Screen Display) menu 3-1 3.1.1 How to infringe. SPECIFICATIONS AND INFORMATION CONTAINED IN THIS MANUAL ARE FURNISHED FOR INFORMATIONAL USE ONLY, AND ARE SUBJECT TO...
... Notices...iii Safety information iv Care & Cleaning v 1.1 Welcome 1-1 1.2 Package contents 1-1 1.3 Assembling the monitor base 1-2 1.4 Connect cables 1-2 1.4.1 Detaching the cable cover 1-2 1.4.2 Rear of the LCD monitor 1-3 1.5 Monitor introduction 1-4 1.5.1 Using the Controls button 1-4 1.5.3 QuickFit Function 1-6 2.1 Detaching the arm/stand (for VESA wall mount 2-1 2.2 Adjusting the monitor 2-2 3.1 OSD (On-Screen Display) menu 3-1 3.1.1 How to infringe. SPECIFICATIONS AND INFORMATION CONTAINED IN THIS MANUAL ARE FURNISHED FOR INFORMATIONAL USE ONLY, AND ARE SUBJECT TO...

VN289Q User Guide for English Edition
Page 3
.... • Connect the equipment to an outlet on , the user is no guarantee that this equipment does cause harmful interference to Part 15 of Communications Statement This digital apparatus does not exceed the Class B limits for a Class B digital device, pursuant to radio or television reception, which can radiate radio frequency energy and, if not installed and used in...
.... • Connect the equipment to an outlet on , the user is no guarantee that this equipment does cause harmful interference to Part 15 of Communications Statement This digital apparatus does not exceed the Class B limits for a Class B digital device, pursuant to radio or television reception, which can radiate radio frequency energy and, if not installed and used in...

VN289Q User Guide for English Edition
Page 4
...; If the power supply is provided. • The monitor should be installed near or over a radiator or heat source unless proper ventilation is broken, do not try to open the monitor cabinet. The dangerous high voltages inside the monitor may become wet. If you encounter technical problems with your dealer or local power company. • Use the appropriate power plug which have appropriate...
...; If the power supply is provided. • The monitor should be installed near or over a radiator or heat source unless proper ventilation is broken, do not try to open the monitor cabinet. The dangerous high voltages inside the monitor may become wet. If you encounter technical problems with your dealer or local power company. • Use the appropriate power plug which have appropriate...

VN289Q User Guide for English Edition
Page 5
... cables and power cord. Conventions used in completing a task. v When lifting or carrying the monitor, grasp the edges of the fluorescent light. Turn off the Power Switch and turn off the Power Switch for hours. • When the screen becomes black or flashes, or cannot work anymore, contact your dealer or service center to fix it. The screen will recover slowly or you lift or reposition your monitor, it is displayed...
... cables and power cord. Conventions used in completing a task. v When lifting or carrying the monitor, grasp the edges of the fluorescent light. Turn off the Power Switch and turn off the Power Switch for hours. • When the screen becomes black or flashes, or cannot work anymore, contact your dealer or service center to fix it. The screen will recover slowly or you lift or reposition your monitor, it is displayed...

VN289Q User Guide for English Edition
Page 7
... you for the following items: LCD Monitor Monitor Base Quick Start Guide Warranty Card 1x Power Cord 1x VGA Cable 1x Audio Cable 1x DVI Cable (option) 1x DisplayPort Cable (option) 1x HDMI Cable (option) 1x HDMI to DVI cable (option) 1x MHL Cable (option) • If any of the above items is damaged or missing, contact your retailer immediately. Thank you ! 1.2 Package contents Check your viewing experience. ASUS LCD Monitor VN289 Series 1-1 With these features, you can enjoy...
... you for the following items: LCD Monitor Monitor Base Quick Start Guide Warranty Card 1x Power Cord 1x VGA Cable 1x Audio Cable 1x DVI Cable (option) 1x DisplayPort Cable (option) 1x HDMI Cable (option) 1x HDMI to DVI cable (option) 1x MHL Cable (option) • If any of the above items is damaged or missing, contact your retailer immediately. Thank you ! 1.2 Package contents Check your viewing experience. ASUS LCD Monitor VN289 Series 1-1 With these features, you can enjoy...

VN289Q User Guide for English Edition
Page 9
VGA port 6. Control buttons • Flip upward the IO port cover to its original position with both thumbs at both sides of the LCD monitor 9 10 8 HDMI / MHL DP 1 2 3 4 5 67 1. ASUS LCD Monitor VN289 Series 1-3 Screw Holes for VESA Wall Mount 10. in Port 7. out Port 8. After connected cables, replace the cover and carefully push it upward to connect cables. AC-IN port 2. Earphone - DisplayPort 5. 1.4.2 Rear of the cover. Audio - DVI port 3. HDMI / MHL port 4. Kensington Lock 9.
VGA port 6. Control buttons • Flip upward the IO port cover to its original position with both thumbs at both sides of the LCD monitor 9 10 8 HDMI / MHL DP 1 2 3 4 5 67 1. ASUS LCD Monitor VN289 Series 1-3 Screw Holes for VESA Wall Mount 10. in Port 7. out Port 8. After connected cables, replace the cover and carefully push it upward to connect cables. AC-IN port 2. Earphone - DisplayPort 5. 1.4.2 Rear of the cover. Audio - DVI port 3. HDMI / MHL port 4. Kensington Lock 9.

VN289Q User Guide for English Edition
Page 10
... image settings. Status Description White ON Amber Standby mode OFF OFF 2. MENU Button: • Press this button to turn the monitor on the back of the monitor to enter the OSD menu. 3. Standard Mode VGA 1920x1080@60Hz Menu QuickFit Input Select Close Brightness Splendid 7 654 321 1 234 56 7 1. See page 1-6 for alignment. • The QuickFit function contains 6 pages of common grid patterns, paper sizes, and photo sizes. 1.5 Monitor introduction 1.5.1 Using the Controls button Use...
... image settings. Status Description White ON Amber Standby mode OFF OFF 2. MENU Button: • Press this button to turn the monitor on the back of the monitor to enter the OSD menu. 3. Standard Mode VGA 1920x1080@60Hz Menu QuickFit Input Select Close Brightness Splendid 7 654 321 1 234 56 7 1. See page 1-6 for alignment. • The QuickFit function contains 6 pages of common grid patterns, paper sizes, and photo sizes. 1.5 Monitor introduction 1.5.1 Using the Controls button Use...
VN289Q User Guide for English Edition
Page 11
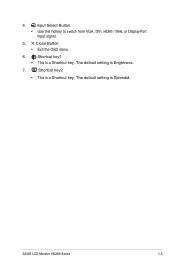
4. Close Button • Exit the OSD menu. 6. The default setting is a Shortcut key. Shortcut key1 • This is Brightness. 7. ASUS LCD Monitor VN289 Series 1-5 Input Select Button: • Use this hotkey to switch from VGA, DVI, HDMI / MHL or DisplayPort input signal. 5. The default setting is a Shortcut key. Shortcut key2 • This is Splendid.
4. Close Button • Exit the OSD menu. 6. The default setting is a Shortcut key. Shortcut key1 • This is Brightness. 7. ASUS LCD Monitor VN289 Series 1-5 Input Select Button: • Use this hotkey to switch from VGA, DVI, HDMI / MHL or DisplayPort input signal. 5. The default setting is a Shortcut key. Shortcut key2 • This is Splendid.

VN289Q User Guide for English Edition
Page 13
... arm/stand (for VESA wall mount. 1. ASUS LCD Monitor VN289 Series 2-1 Disconnect power and signal cables. Use your fingers to the monitor. • Hold the stand while removing the screws. 1 4 3 5 2 • The VESA wall mount kit ( 100 x 100 mm) is specially designed for VESA wall mount) The detachable stand of the base, and remove the base from the monitor. • We recommend that you cover the table surface with soft cloth to prevent damage to loosen the screw located...
... arm/stand (for VESA wall mount. 1. ASUS LCD Monitor VN289 Series 2-1 Disconnect power and signal cables. Use your fingers to the monitor. • Hold the stand while removing the screws. 1 4 3 5 2 • The VESA wall mount kit ( 100 x 100 mm) is specially designed for VESA wall mount) The detachable stand of the base, and remove the base from the monitor. • We recommend that you cover the table surface with soft cloth to prevent damage to loosen the screw located...
VN289Q User Guide for English Edition
Page 15
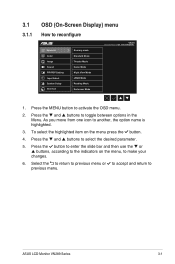
... to accept and return to toggle between options in the Menu. Press the and buttons to previous menu. To select the highlighted item on the menu, to reconfigure Splendid Color Image Sound PIP/PBP Setting Input Select System Setup Shortcut Scenery mode Standard Mode Theater Mode Game Mode Night View Mode sRGB Mode Reading Mode Darkroom Mode VN289 Standard Mode VGA 1920x1080@60Hz 1. ASUS LCD Monitor VN289 Series 3-1 Press the MENU button to activate the OSD menu. 2.
... to accept and return to toggle between options in the Menu. Press the and buttons to previous menu. To select the highlighted item on the menu, to reconfigure Splendid Color Image Sound PIP/PBP Setting Input Select System Setup Shortcut Scenery mode Standard Mode Theater Mode Game Mode Night View Mode sRGB Mode Reading Mode Darkroom Mode VN289 Standard Mode VGA 1920x1080@60Hz 1. ASUS LCD Monitor VN289 Series 3-1 Press the MENU button to activate the OSD menu. 2.

VN289Q User Guide for English Edition
Page 16
... that you to maintain your preference. Splendid Color Image Sound PIP/PBP Setting Input Select System Setup Shortcut Scenery mode Standard Mode Theater Mode Game Mode Night View Mode sRGB Mode Reading Mode Darkroom Mode VN289 Standard Mode VGA 1920x1080@60Hz • Scenery Mode: This is the best choice for scenery photo displaying with SPLENDID™ Video Intelligence Technology. • Standard Mode: This is the best choice for document editing with SPLENDID™...
... that you to maintain your preference. Splendid Color Image Sound PIP/PBP Setting Input Select System Setup Shortcut Scenery mode Standard Mode Theater Mode Game Mode Night View Mode sRGB Mode Reading Mode Darkroom Mode VN289 Standard Mode VGA 1920x1080@60Hz • Scenery Mode: This is the best choice for scenery photo displaying with SPLENDID™ Video Intelligence Technology. • Standard Mode: This is the best choice for document editing with SPLENDID™...
VN289Q User Guide for English Edition
Page 17
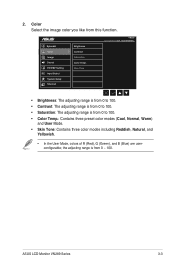
... Mode VGA 1920x1080@60Hz • Brightness: The adjusting range is from 0 to 100. • Contrast: The adjusting range is from 0 to 100. • Color Temp.: Contains three preset color modes (Cool, Normal, Warm) and User Mode. • Skin Tone: Contains three color modes including Reddish, Natural, and Yellowish. • In the User Mode, colors of R (Red), G (Green), and B (Blue) are userconfigurable; Splendid Color Image Sound PIP/PBP Setting Input Select System Setup Shortcut Brightness Contract Saturation Color Temp. ASUS LCD Monitor VN289 Series 3-3 2. Color...
... Mode VGA 1920x1080@60Hz • Brightness: The adjusting range is from 0 to 100. • Contrast: The adjusting range is from 0 to 100. • Color Temp.: Contains three preset color modes (Cool, Normal, Warm) and User Mode. • Skin Tone: Contains three color modes including Reddish, Natural, and Yellowish. • In the User Mode, colors of R (Red), G (Green), and B (Blue) are userconfigurable; Splendid Color Image Sound PIP/PBP Setting Input Select System Setup Shortcut Brightness Contract Saturation Color Temp. ASUS LCD Monitor VN289 Series 3-3 2. Color...
VN289Q User Guide for English Edition
Page 18
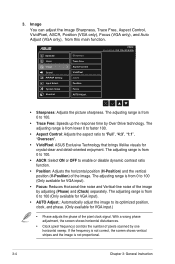
... (pixel frequency) controls the number of the image. If the frequency is not correct, the screen shows vertical stripes and the image is from this main function. VN289 Standard Mode VGA 1920x1080 @ 60Hz • Sharpness: Adjusts the picture sharpness. The adjusting range is from lower 0 to faster 100. • Aspect Control: Adjusts the aspect ratio to enable or disable dynamic contrast ratio function. • Position: Adjusts the horizontal position (H-Position) and the vertical position (V-Position) of pixels scanned...
... (pixel frequency) controls the number of the image. If the frequency is not correct, the screen shows vertical stripes and the image is from this main function. VN289 Standard Mode VGA 1920x1080 @ 60Hz • Sharpness: Adjusts the picture sharpness. The adjusting range is from lower 0 to faster 100. • Aspect Control: Adjusts the aspect ratio to enable or disable dynamic contrast ratio function. • Position: Adjusts the horizontal position (H-Position) and the vertical position (V-Position) of pixels scanned...

VN289Q User Guide for English Edition
Page 19
... the output volume. • Source: Adjusts audio source to open up another sub-window connected from another video source besides the main-window from two different video sources. • PIP/PBP Mode: Selects PIP or PBP function, or turn it off. ASUS LCD Monitor VN289 Series 3-5 4. Splendid Color Image Sound PIP/PBP Setting Input Select System Setup Shortcut PIP/PBP Mode PIP/PBP Source Size Position Aspect Control Swap VN289 Standard Mode VGA 1920x1080 @ 60Hz By activating this function, this monitor displays two pictures from...
... the output volume. • Source: Adjusts audio source to open up another sub-window connected from another video source besides the main-window from two different video sources. • PIP/PBP Mode: Selects PIP or PBP function, or turn it off. ASUS LCD Monitor VN289 Series 3-5 4. Splendid Color Image Sound PIP/PBP Setting Input Select System Setup Shortcut PIP/PBP Mode PIP/PBP Source Size Position Aspect Control Swap VN289 Standard Mode VGA 1920x1080 @ 60Hz By activating this function, this monitor displays two pictures from...

VN289Q User Guide for English Edition
Page 20
Splendid Color Image Sound PIP/PBP Setting Input Select System Setup Shortcut VGA DVI HDMI / MHL DisplayPort VN289 Standard Mode VGA 1920x1080 @ 60Hz 3-6 Chapter 3: General Instruction and sub-windows. Input Select Select the input source from VGA, DVI, HDMI / MHL or DisplayPort input signal. • PIP/PBP Source: Selects the video input source among "VGA", "DVI", "HDMI/MHL", or "DisplayPort". • Size: Adjust the PIP size to "Small", "Middle", or "Large". • Position: Adjusts the position of PIP sub-window to "Right-Top", "LeftTop", "Right-Bottom...
Splendid Color Image Sound PIP/PBP Setting Input Select System Setup Shortcut VGA DVI HDMI / MHL DisplayPort VN289 Standard Mode VGA 1920x1080 @ 60Hz 3-6 Chapter 3: General Instruction and sub-windows. Input Select Select the input source from VGA, DVI, HDMI / MHL or DisplayPort input signal. • PIP/PBP Source: Selects the video input source among "VGA", "DVI", "HDMI/MHL", or "DisplayPort". • Size: Adjust the PIP size to "Small", "Middle", or "Large". • Position: Adjusts the position of PIP sub-window to "Right-Top", "LeftTop", "Right-Bottom...
VN289Q User Guide for English Edition
Page 21
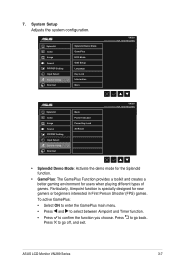
... users when playing different types of games. Press to go off, and exit. ASUS LCD Monitor VN289 Series 3-7 Splendid Color Image Sound PIP/PBP Setting Input Select System Setup Shortcut Splendid Demo Mode GamePlus ECO Mode OSD Setup Language Key Lock Information More VN289 Standard Mode VGA 1920x1080 @ 60Hz Splendid Color Image Sound PIP/PBP Setting Input Select System Setup Shortcut Back Power Indicator Power Key Lock All Reset VN289 Standard Mode VGA 1920x1080 @ 60Hz • Splendid Demo Mode: Activate the demo mode...
... users when playing different types of games. Press to go off, and exit. ASUS LCD Monitor VN289 Series 3-7 Splendid Color Image Sound PIP/PBP Setting Input Select System Setup Shortcut Splendid Demo Mode GamePlus ECO Mode OSD Setup Language Key Lock Information More VN289 Standard Mode VGA 1920x1080 @ 60Hz Splendid Color Image Sound PIP/PBP Setting Input Select System Setup Shortcut Back Power Indicator Power Key Lock All Reset VN289 Standard Mode VGA 1920x1080 @ 60Hz • Splendid Demo Mode: Activate the demo mode...
VN289Q User Guide for English Edition
Page 22
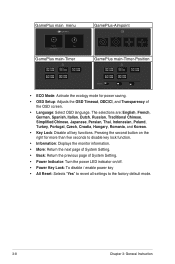
... page of System Setting. • Power Indicator: Turn the power LED indicator on the right for power saving. • OSD Setup: Adjusts the OSD Timeout, DDC/CI, and Transparency of the OSD screen. • Language: Select OSD language. GamePlus main menu GamePlus Aimpoint (Practice Mode) Timer GamePlus main-Timer GamePlus-Aimpoint GamePlus main-Timer-Position Position • ECO Mode: Activate the ecology mode for more than five seconds to the factory default mode. 3-8 Chapter 3: General...
... page of System Setting. • Power Indicator: Turn the power LED indicator on the right for power saving. • OSD Setup: Adjusts the OSD Timeout, DDC/CI, and Transparency of the OSD screen. • Language: Select OSD language. GamePlus main menu GamePlus Aimpoint (Practice Mode) Timer GamePlus main-Timer GamePlus-Aimpoint GamePlus main-Timer-Position Position • ECO Mode: Activate the ecology mode for more than five seconds to the factory default mode. 3-8 Chapter 3: General...
VN289Q User Guide for English Edition
Page 23
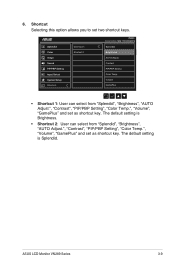
..."Brightness", "AUTO Adjust.", "Contrast", "PIP/PBP Setting", "Color Temp.", "Volume", "GamePlus" and set as shortcut key. Contrast PIP/PBP Setting Color Temp. Shortcut Selecting this option allows you to set as shortcut key. ASUS LCD Monitor VN289 Series 3-9 6. Volume GamePlus • Shortcut 1: User can select from "Splendid", "Brightness", "AUTO Adjust.", "Contrast", "PIP/PBP Setting", "Color Temp.", "Volume", "GamePlus" and set two shortcut keys. Splendid Color Image Sound PIP/PBP Setting Input Select System Setup Shortcut Shortcut 1 Shortcut 2 VN289 Standard Mode HDMI...
..."Brightness", "AUTO Adjust.", "Contrast", "PIP/PBP Setting", "Color Temp.", "Volume", "GamePlus" and set as shortcut key. Contrast PIP/PBP Setting Color Temp. Shortcut Selecting this option allows you to set as shortcut key. ASUS LCD Monitor VN289 Series 3-9 6. Volume GamePlus • Shortcut 1: User can select from "Splendid", "Brightness", "AUTO Adjust.", "Contrast", "PIP/PBP Setting", "Color Temp.", "Volume", "GamePlus" and set two shortcut keys. Splendid Color Image Sound PIP/PBP Setting Input Select System Setup Shortcut Shortcut 1 Shortcut 2 VN289 Standard Mode HDMI...
VN289Q User Guide for English Edition
Page 24
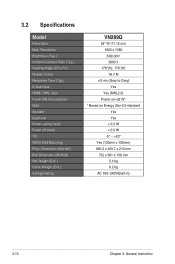
Resolution Brightness (Typ.) Intrisinc Contrast Ratio (Typ.) Viewing Angle (CR≤10) Display Colors Response Time (Typ.) D-Sub input HDMI / MHL input Power ON Consumption Note Speaker Earphone Power saving mode Power off mode Tilt VESA Wall Mounting Phys. Dimension (WxHxD) Box Dimension (WxHxD) Net Weight (Esti.) Gross Weight (Esti.) Voltage Rating VN289Q 28" W (71.12 cm) 1920 x 1080 300cd/m2 3000:1 178°(V); 178°(H) 16.7 M ≤5 ms (Gray to Gray) Yes Yes (MHL2.0) Power on 3.2 Specifications Model Panel Size Max.
Resolution Brightness (Typ.) Intrisinc Contrast Ratio (Typ.) Viewing Angle (CR≤10) Display Colors Response Time (Typ.) D-Sub input HDMI / MHL input Power ON Consumption Note Speaker Earphone Power saving mode Power off mode Tilt VESA Wall Mounting Phys. Dimension (WxHxD) Box Dimension (WxHxD) Net Weight (Esti.) Gross Weight (Esti.) Voltage Rating VN289Q 28" W (71.12 cm) 1920 x 1080 300cd/m2 3000:1 178°(V); 178°(H) 16.7 M ≤5 ms (Gray to Gray) Yes Yes (MHL2.0) Power on 3.2 Specifications Model Panel Size Max.
VN289Q User Guide for English Edition
Page 25
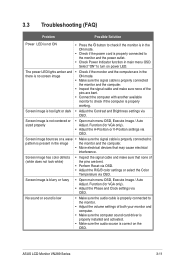
... button to check if the monitor is in the ON mode. • Check if the power cord is properly connected to the monitor. • Adjust the volume settings of both your monitor and computer. • Make sure the computer sound card driver is properly installed and activated. • Make sure the audio source is correct on power LED. Screen image is blurry or fuzzy • Open main menu OSD, Execute Image / Auto Adjust. Screen image has color defects (white does not look white) • Inspect the signal cable...
... button to check if the monitor is in the ON mode. • Check if the power cord is properly connected to the monitor. • Adjust the volume settings of both your monitor and computer. • Make sure the computer sound card driver is properly installed and activated. • Make sure the audio source is correct on power LED. Screen image is blurry or fuzzy • Open main menu OSD, Execute Image / Auto Adjust. Screen image has color defects (white does not look white) • Inspect the signal cable...


