
User Manual
Page 2
.... ASUS ASSUMES NO RESPONSIBILITY OR LIABILITY FOR ANY ERRORS OR INACCURACIES THAT MAY APPEAR IN THIS MANUAL, INCLUDING THE PRODUCTS AND SOFTWARE DESCRIBED IN IT. Adjusting the monitor 1-2 1.4. Specifications summary 3-4 3.3. ii Product.introduction. 1.1. Welcome 1-1 1.2. Supported.operating.modes 3-8 3.5 HDMI Supported Primary Timings 3-9 Copyright © 2009 ASUSTeK COMPUTER INC. General.Instruction.. 3.1. Table of the LCD monitor...
.... ASUS ASSUMES NO RESPONSIBILITY OR LIABILITY FOR ANY ERRORS OR INACCURACIES THAT MAY APPEAR IN THIS MANUAL, INCLUDING THE PRODUCTS AND SOFTWARE DESCRIBED IN IT. Adjusting the monitor 1-2 1.4. Specifications summary 3-4 3.3. ii Product.introduction. 1.1. Welcome 1-1 1.2. Supported.operating.modes 3-8 3.5 HDMI Supported Primary Timings 3-9 Copyright © 2009 ASUSTeK COMPUTER INC. General.Instruction.. 3.1. Table of the LCD monitor...
User Manual
Page 5
... Conventions.used.in completing a task. NOTE: Tips and additional information to complete a task. Follow the correct lifting techniques when positioning the monitor. Never spray cleaner directly on the desktop pattern you use due to make sure that you can turn it on again to the nature of...stand or the cord. • Cleaning. Turn your dealer or service center to complete a task. The.following.symptoms.are.normal.with the LCD. Turn off and unplug the power cord. IMPORTANT: Information that the flicker disappears. • You may find slightly uneven brightness on the screen...
... Conventions.used.in completing a task. NOTE: Tips and additional information to complete a task. Follow the correct lifting techniques when positioning the monitor. Never spray cleaner directly on the desktop pattern you use due to make sure that you can turn it on again to the nature of...stand or the cord. • Cleaning. Turn your dealer or service center to complete a task. The.following.symptoms.are.normal.with the LCD. Turn off and unplug the power cord. IMPORTANT: Information that the flicker disappears. • You may find slightly uneven brightness on the screen...
User Manual
Page 7
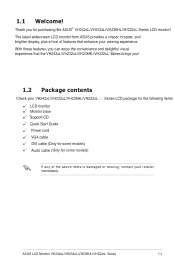
... Support CD Quick Start Guide Power cord VGA cable DVI cable (Only for some models) Audio cable (Only for some models) Series LCD package for purchasing the ASUS® VH242xL/VH232xL/VH236HL/VH222xL Series LCD monitor! With these features, you can enjoy the convenience and delightful visual experience that enhance your retailer immediately. 1.1 Welcome...
... Support CD Quick Start Guide Power cord VGA cable DVI cable (Only for some models) Audio cable (Only for some models) Series LCD package for purchasing the ASUS® VH242xL/VH232xL/VH236HL/VH222xL Series LCD monitor! With these features, you can enjoy the convenience and delightful visual experience that enhance your retailer immediately. 1.1 Welcome...
User Manual
Page 9
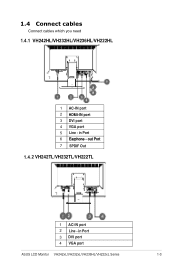
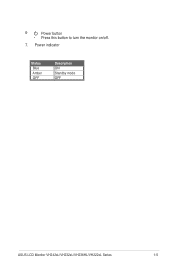
in Port 3 DVI.port 4 VGA.port ASUS LCD Monitor VH242xL/VH232xL/VH236HL/VH222xL Series 1-3 in Port 6 Earphone - 1.4 Connect cables Connect cables which you need 1.4.1 VH242HL/VH232HL/VH236HL/VH222HL 1 AC-IN.port 2 HDMI-IN.port 3 DVI.port 4 VGA.port 5 Line - out Port 7 SPDIF Out 1.4.2 VH242TL/VH232TL/VH222TL 1 AC-IN.port 2 Line -
in Port 3 DVI.port 4 VGA.port ASUS LCD Monitor VH242xL/VH232xL/VH236HL/VH222xL Series 1-3 in Port 6 Earphone - 1.4 Connect cables Connect cables which you need 1.4.1 VH242HL/VH232HL/VH236HL/VH222HL 1 AC-IN.port 2 HDMI-IN.port 3 DVI.port 4 VGA.port 5 Line - out Port 7 SPDIF Out 1.4.2 VH242TL/VH232TL/VH222TL 1 AC-IN.port 2 Line -
User Manual
Page 10
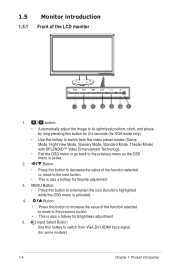
Front.of the function selected or move to enter/select the icon (function) highlighted while the OSD menu is active. 2. 1.5 Monitor introduction 1.5.1. MENU Button: • Press this button to the next fuction. • This is also a hotkey for Brightness adjustment. 5. A button...to switch from VGA,DVI,HDMI input signal. (for Volume adjustment. 3. Button: • Press this hotkey to increase the value of .the.LCD.monitor 1. Input Select Button Use this button to switch from five video preset modes (Game Mode, Night View Mode, Scenery Mode, Standard Mode, ...
Front.of the function selected or move to enter/select the icon (function) highlighted while the OSD menu is active. 2. 1.5 Monitor introduction 1.5.1. MENU Button: • Press this button to the next fuction. • This is also a hotkey for Brightness adjustment. 5. A button...to switch from VGA,DVI,HDMI input signal. (for Volume adjustment. 3. Button: • Press this hotkey to increase the value of .the.LCD.monitor 1. Input Select Button Use this button to switch from five video preset modes (Game Mode, Night View Mode, Scenery Mode, Standard Mode, ...
User Manual
Page 11
Power indicator Status Blue Amber OFF Description ON Standby mode OFF ASUS LCD Monitor VH242xL/VH232xL/VH236HL/VH222xL Series 1-5 Power button • Press this button to turn the monitor on/off. 7. 6.
Power indicator Status Blue Amber OFF Description ON Standby mode OFF ASUS LCD Monitor VH242xL/VH232xL/VH236HL/VH222xL Series 1-5 Power button • Press this button to turn the monitor on/off. 7. 6.
User Manual
Page 12
Rear.of.the.LCD.monitor. 1.5.2.1 VH242HL/VH232HL/VH236HL/VH222HL Rear.connectors 1 AC-IN.port 2 HDMI-IN.port 3 DVI.port 4 VGA.port 5 Line - out Port 7 SPDIF Out 1.5.2.2 VH242TL/VH232TL/VH222TL Rear connectors 1 AC-IN.port 2 Line - 1.5.2. in Port (Only for some models) 3 DVI.port (Only for some models) 4 VGA.port ASUS LCD Monitor VH242xL/VH232xL/VH236HL/VH222xL Series 1-7 in Port 6 Earphone -
Rear.of.the.LCD.monitor. 1.5.2.1 VH242HL/VH232HL/VH236HL/VH222HL Rear.connectors 1 AC-IN.port 2 HDMI-IN.port 3 DVI.port 4 VGA.port 5 Line - out Port 7 SPDIF Out 1.5.2.2 VH242TL/VH232TL/VH222TL Rear connectors 1 AC-IN.port 2 Line - 1.5.2. in Port (Only for some models) 3 DVI.port (Only for some models) 4 VGA.port ASUS LCD Monitor VH242xL/VH232xL/VH236HL/VH222xL Series 1-7 in Port 6 Earphone -
User Manual
Page 13
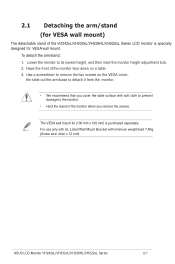
... to prevent damage to its lowest height, and then inset the monitor height adjustment lock. 2. Lower the monitor to the monitor. • Hold the stand of the monitor when you cover the table surface with minimum weight/load 7.4Kg (Screw size: 4mm x 12 mm) ASUS LCD Monitor VH242xL/VH232xL/VH236HL/VH222xL Series 2-1 The VESA wall mount kit...
... to prevent damage to its lowest height, and then inset the monitor height adjustment lock. 2. Lower the monitor to the monitor. • Hold the stand of the monitor when you cover the table surface with minimum weight/load 7.4Kg (Screw size: 4mm x 12 mm) ASUS LCD Monitor VH242xL/VH232xL/VH236HL/VH222xL Series 2-1 The VESA wall mount kit...
User Manual
Page 15
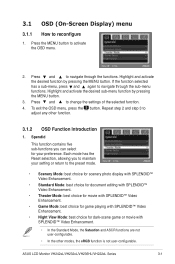
... the selected function. 4. Each mode has the Reset selection, allowing you can select for your setting or return to navigate through the sub-menu functions. ASUS LCD Monitor VH242xL/VH232xL/VH236HL/VH222xL Series 3-1 Press and to the preset mode. • Scenery Mode: best choice for scenery photo display with SPLENDID™ Video Enhancement...
... the selected function. 4. Each mode has the Reset selection, allowing you can select for your setting or return to navigate through the sub-menu functions. ASUS LCD Monitor VH242xL/VH232xL/VH236HL/VH222xL Series 3-1 Press and to the preset mode. • Scenery Mode: best choice for scenery photo display with SPLENDID™ Video Enhancement...
User Manual
Page 17
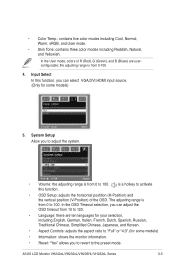
...range is a hotkey to 100. is from 0 to activate this function, you can adjust the OSD timeout from 0 to the preset mode. ASUS LCD Monitor VH242xL/VH232xL/VH236HL/VH222xL Series 3-3 In the OSD Timeout selection, you to adjust the system. • Volume: the adjusting range is from 0-100..., Japanese, and Korean. • Aspect Controls: adjusts the aspect ratio to "Full" or "4:3". (for some models) • Information: shows the monitor information. • Reset: "Yes" allows you to revert to 100. System Setup Allow you can select VGA,DVI,HDMI input source. (Only for ...
...range is a hotkey to 100. is from 0 to activate this function, you can adjust the OSD timeout from 0 to the preset mode. ASUS LCD Monitor VH242xL/VH232xL/VH236HL/VH222xL Series 3-3 In the OSD Timeout selection, you to adjust the system. • Volume: the adjusting range is from 0-100..., Japanese, and Korean. • Aspect Controls: adjusts the aspect ratio to "Full" or "4:3". (for some models) • Information: shows the monitor information. • Reset: "Yes" allows you to revert to 100. System Setup Allow you can select VGA,DVI,HDMI input source. (Only for ...
User Manual
Page 19
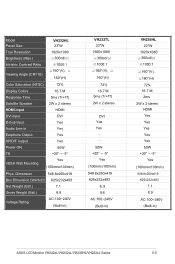
... DVI input 2W x 2 stereo HDMI DVI D-Sub input Yes Audio Line-in ) ASUS LCD Monitor VH242xL/VH232xL/VH236HL/VH222xL Series 3-5 Dimension 548.8x250x419 Box Dimension (WxHxD) 625x232x483 Net Weight (Esti.) 7.1 Gross Weight (Esti.) Voltage Rating 8.9 AC:100~240V (Built-in) VH232TL 23"W 1920x1080 ≧300cd/㎡ ≧1000:1 ≧160°(V), ≧ 160°...
... DVI input 2W x 2 stereo HDMI DVI D-Sub input Yes Audio Line-in ) ASUS LCD Monitor VH242xL/VH232xL/VH236HL/VH222xL Series 3-5 Dimension 548.8x250x419 Box Dimension (WxHxD) 625x232x483 Net Weight (Esti.) 7.1 Gross Weight (Esti.) Voltage Rating 8.9 AC:100~240V (Built-in) VH232TL 23"W 1920x1080 ≧300cd/㎡ ≧1000:1 ≧160°(V), ≧ 160°...
User Manual
Page 20
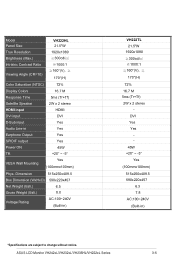
... 6.3 7.8 AC:100~240V (Built-in Yes Earphone Output Yes SPIDIF output Yes Power ON Tilt VESA Wall Mounting 45W +20° ~ -5° Yes (100mmx100mm) Phys. ASUS LCD Monitor VH242xL/VH232xL/VH236HL/VH222xL Series 3-6 Model Panel Size True Resolution Brightness (Max.) Intrisinc Contrast Ratio Viewing Angle (CR=10) VH222HL 21.5"W 1920x1080 ≧300cd/㎡...
... 6.3 7.8 AC:100~240V (Built-in Yes Earphone Output Yes SPIDIF output Yes Power ON Tilt VESA Wall Mounting 45W +20° ~ -5° Yes (100mmx100mm) Phys. ASUS LCD Monitor VH242xL/VH232xL/VH236HL/VH222xL Series 3-6 Model Panel Size True Resolution Brightness (Max.) Intrisinc Contrast Ratio Viewing Angle (CR=10) VH222HL 21.5"W 1920x1080 ≧300cd/㎡...


