
VG249Q1R Series User Guide
Page 2
.... or (2) the serial number of ASUSTeK COMPUTER INC. ("ASUS"). ASUS ASSUMES NO RESPONSIBILITY OR LIABILITY FOR ANY ERRORS OR INACCURACIES THAT MAY APPEAR IN THIS MANUAL, INCLUDING THE PRODUCTS AND SOFTWARE DESCRIBED IN IT. Table of contents Notices...iii Care & Cleaning v 1.1 Welcome 1-1 1.2 Package contents 1-1 1.3 Assembling the monitor 1-2 1.4 Outline dimension 1-2 1.5 Connect cables 1-3 1.5.1 Rear of the LCD monitor 1-3 1.6 Monitor introduction 1-4 1.6.1 Using the Controls button 1-4 2.1 Detaching the arm/stand (for identification or...
.... or (2) the serial number of ASUSTeK COMPUTER INC. ("ASUS"). ASUS ASSUMES NO RESPONSIBILITY OR LIABILITY FOR ANY ERRORS OR INACCURACIES THAT MAY APPEAR IN THIS MANUAL, INCLUDING THE PRODUCTS AND SOFTWARE DESCRIBED IN IT. Table of contents Notices...iii Care & Cleaning v 1.1 Welcome 1-1 1.2 Package contents 1-1 1.3 Assembling the monitor 1-2 1.4 Outline dimension 1-2 1.5 Connect cables 1-3 1.5.1 Rear of the LCD monitor 1-3 1.6 Monitor introduction 1-4 1.6.1 Using the Controls button 1-4 2.1 Detaching the arm/stand (for identification or...

VG249Q1R Series User Guide
Page 3
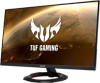
This equipment generates, uses and can be determined by turning the equipment off and on, the user is encouraged to try to correct the interference by one or more of the following two conditions: &#...different from digital apparatus set out in accordance with the instructions, may cause undesired operation. This class B digital apparatus complies with the limits for a Class B digital device, pursuant to provide reasonable protection against harmful interference in a particular installation. Notices Federal Communications Commission Statement This device complies with Part 15 of ...
This equipment generates, uses and can be determined by turning the equipment off and on, the user is encouraged to try to correct the interference by one or more of the following two conditions: &#...different from digital apparatus set out in accordance with the instructions, may cause undesired operation. This class B digital apparatus complies with the limits for a Class B digital device, pursuant to provide reasonable protection against harmful interference in a particular installation. Notices Federal Communications Commission Statement This device complies with Part 15 of ...
VG249Q1R Series User Guide
Page 4
... • Before setting up the monitor, carefully read all cables are correctly connected and the power cables are provided for ventilation. Do not block these slots. Manufacturer: Delta Electronics Inc., Model: ADP-40KD BB This symbol of the crossed out wheeled bin indicates that came with your retailer. • Adjustment of the following power supplies: - iv Please check local regulations for...
... • Before setting up the monitor, carefully read all cables are correctly connected and the power cables are provided for ventilation. Do not block these slots. Manufacturer: Delta Electronics Inc., Model: ADP-40KD BB This symbol of the crossed out wheeled bin indicates that came with your retailer. • Adjustment of the following power supplies: - iv Please check local regulations for...

VG249Q1R Series User Guide
Page 5
... cause an electric shock. Do not repair the screen by the stand or the cord. • Cleaning. IMPORTANT: Information that the flicker disappears. • You may find slightly uneven brightness on the screen depending on the screen, as it is displayed for use with the monitor: • The screen may flicker during the initial use . • When the same image is better to complete a task. Care...
... cause an electric shock. Do not repair the screen by the stand or the cord. • Cleaning. IMPORTANT: Information that the flicker disappears. • You may find slightly uneven brightness on the screen depending on the screen, as it is displayed for use with the monitor: • The screen may flicker during the initial use . • When the same image is better to complete a task. Care...
VG249Q1R Series User Guide
Page 7
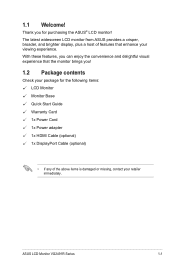
... contents Check your package for the following items: LCD Monitor Monitor Base Quick Start Guide Warranty Card 1x Power Cord 1x Power adapter 1x HDMI Cable (optional) 1x DisplayPort Cable (optional) • If any of features that the monitor brings you for purchasing the ASUS® LCD monitor! ASUS LCD Monitor VG2491R Series 1-1 With these features, you can enjoy the convenience and delightful visual experience that enhance your retailer immediately. The latest widescreen LCD monitor from ASUS...
... contents Check your package for the following items: LCD Monitor Monitor Base Quick Start Guide Warranty Card 1x Power Cord 1x Power adapter 1x HDMI Cable (optional) 1x DisplayPort Cable (optional) • If any of features that the monitor brings you for purchasing the ASUS® LCD monitor! ASUS LCD Monitor VG2491R Series 1-1 With these features, you can enjoy the convenience and delightful visual experience that enhance your retailer immediately. The latest widescreen LCD monitor from ASUS...

VG249Q1R Series User Guide
Page 8
Adjust the monitor to join them tightly. You can easily tighten the screw by fingers. 2. Place the display flat on a cloth on the table, Then attach the base to the arm and fix with the screw to the angle that is most comfortable for you. -5 ~ 22 1.4 Outline dimension Unit: mm [inch] 1-2 Chapter 1: Product Introduction 1.3 Assembling the monitor To assemble the monitor: 1.
Adjust the monitor to join them tightly. You can easily tighten the screw by fingers. 2. Place the display flat on a cloth on the table, Then attach the base to the arm and fix with the screw to the angle that is most comfortable for you. -5 ~ 22 1.4 Outline dimension Unit: mm [inch] 1-2 Chapter 1: Product Introduction 1.3 Assembling the monitor To assemble the monitor: 1.

VG249Q1R Series User Guide
Page 9
out Port 3. HDMI 2 Port 4. DC-IN Port 2. 1.5 Connect cables 1.5.1 Rear of the LCD monitor 1 2 1. Audio - HDMI 1 Port 5. DisplayPort Port ASUS LCD Monitor VG2491R Series 1-3
out Port 3. HDMI 2 Port 4. DC-IN Port 2. 1.5 Connect cables 1.5.1 Rear of the LCD monitor 1 2 1. Audio - HDMI 1 Port 5. DisplayPort Port ASUS LCD Monitor VG2491R Series 1-3
VG249Q1R Series User Guide
Page 10
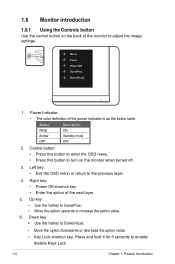
... to adjust the image settings. Left key: • Exit the OSD menu or return to enable/ disable Keys Lock. 1-4 Chapter 1: Product Introduction Down key: • Use this button to GamePlus. • Move the option upwards or increase the option value. 6. 1.6 Monitor introduction 1.6.1 Using the Controls button Use the control button on the monitor when turned off. 3. Menu Close Power Off GamePlus GameVisual 1. Status Description White ON Amber Standby mode OFF OFF 2. Power Indicator...
... to adjust the image settings. Left key: • Exit the OSD menu or return to enable/ disable Keys Lock. 1-4 Chapter 1: Product Introduction Down key: • Use this button to GamePlus. • Move the option upwards or increase the option value. 6. 1.6 Monitor introduction 1.6.1 Using the Controls button Use the control button on the monitor when turned off. 3. Menu Close Power Off GamePlus GameVisual 1. Status Description White ON Amber Standby mode OFF OFF 2. Power Indicator...

VG249Q1R Series User Guide
Page 12
... the best choice for viewing photos and graphics from PCs. • MOBA Mode: This is the best choice for multiplayer online battle arena game playing with GameVisualTM Video intelligence Technology. • In the Racing mode, the following function(s) are not user-configurable: Saturation, Skin Tone, ASCR. • In the sRGB mode, the following function(s) are not user-configurable: Brightness, Contrast, Saturation, Color Temp...
... the best choice for viewing photos and graphics from PCs. • MOBA Mode: This is the best choice for multiplayer online battle arena game playing with GameVisualTM Video intelligence Technology. • In the Racing mode, the following function(s) are not user-configurable: Saturation, Skin Tone, ASCR. • In the sRGB mode, the following function(s) are not user-configurable: Brightness, Contrast, Saturation, Color Temp...
VG249Q1R Series User Guide
Page 13
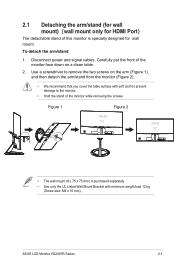
...). ASUS LCD Monitor VG2491R Series 2-1 Use a screwdriver to the monitor. • Hold the stand of this monitor is purchased separately. • Use only the UL Listed Wall Mount Bracket with soft cloth to prevent damage to remove the two screws on a clean table. 2. Figure 1 Figure 2 • The wall mount kit ( 75 x 75 mm) is specially designed for HDMI Port) The detachable stand of the monitor while removing the screws. Disconnect power and signal cables...
...). ASUS LCD Monitor VG2491R Series 2-1 Use a screwdriver to the monitor. • Hold the stand of this monitor is purchased separately. • Use only the UL Listed Wall Mount Bracket with soft cloth to prevent damage to remove the two screws on a clean table. 2. Figure 1 Figure 2 • The wall mount kit ( 75 x 75 mm) is specially designed for HDMI Port) The detachable stand of the monitor while removing the screws. Disconnect power and signal cables...

VG249Q1R Series User Guide
Page 15
... then use the or buttons, according to the indicators on the menu press the button. 4. As you move from one icon to make your changes. • 6. 3.1 OSD (On-Screen Display) menu 3.1.1 How to toggle between options in the Menu. Press the and buttons to reconfigur Gaming Overclocking OD(Tracefree) GameVisual GamePlus Adaptive-Sync/FreeSync Premium ELMB Shadow Boost ASUS TUF Gaming VG2491R Racing Mode DisplayPort...
... then use the or buttons, according to the indicators on the menu press the button. 4. As you move from one icon to make your changes. • 6. 3.1 OSD (On-Screen Display) menu 3.1.1 How to toggle between options in the Menu. Press the and buttons to reconfigur Gaming Overclocking OD(Tracefree) GameVisual GamePlus Adaptive-Sync/FreeSync Premium ELMB Shadow Boost ASUS TUF Gaming VG2491R Racing Mode DisplayPort...

VG249Q1R Series User Guide
Page 16
... to dynamically adjust display refresh rate based on typical content frame rates for power efficient, virtually stutter free and low-latency display update. • Adaptive-Sync/FreeSync Premium can only be activated within 48Hz~165Hz for DisplayPort. • FreeSync Premium can only be activated within 48Hz~144Hz for DisplayPort input). 3.1.2 OSD Function Introduction 1. To reduce such effects, disconnect the DisplayPort cable and use the monitor OSD menu to activate...
... to dynamically adjust display refresh rate based on typical content frame rates for power efficient, virtually stutter free and low-latency display update. • Adaptive-Sync/FreeSync Premium can only be activated within 48Hz~165Hz for DisplayPort. • FreeSync Premium can only be activated within 48Hz~144Hz for DisplayPort input). 3.1.2 OSD Function Introduction 1. To reduce such effects, disconnect the DisplayPort cable and use the monitor OSD menu to activate...

VG249Q1R Series User Guide
Page 17
... setting. When Blue Light Filter is scattered. ASUS LCD Monitor VG2491R Series 3-3 Image Image Brightness Contrast VividPixel ASCR Aspect Control Blue Light Filter ASUS TUF Gaming VG2491R Racing Mode DisplayPort 1920x1080@ 165Hz • Brightness: The adjusting range is from 0 to 100. • Contrast: The adjusting range is from 0 to Full, or 4:3 • Blue Light Filter * Level 0: No change. * Level 1~4: The higher the level, the less blue light is activated,the default settings of the displayed picture and generates high-quality images on screen. • ASCR: Turns...
... setting. When Blue Light Filter is scattered. ASUS LCD Monitor VG2491R Series 3-3 Image Image Brightness Contrast VividPixel ASCR Aspect Control Blue Light Filter ASUS TUF Gaming VG2491R Racing Mode DisplayPort 1920x1080@ 165Hz • Brightness: The adjusting range is from 0 to 100. • Contrast: The adjusting range is from 0 to Full, or 4:3 • Blue Light Filter * Level 0: No change. * Level 1~4: The higher the level, the less blue light is activated,the default settings of the displayed picture and generates high-quality images on screen. • ASCR: Turns...
VG249Q1R Series User Guide
Page 18
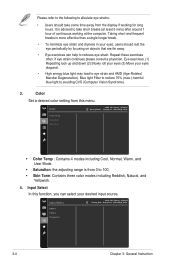
.... • Skin Tone: Contains three color modes including Reddish, Natural, and Yellowish. 4. Blue light Filter to reduce 70% (max.) harmful blue light to eye strain and AMD (Age-Related Macular Degeneration). Input Select ASUS TUF Gaming VG2491R Racing Mode DisplayPort 1920x1080@ 165Hz HDMI-1 HDMI-2 DisplayPort 3-4 Chapter 3: General Instruction Color ASUS TUF Gaming VG2491R Racing Mode DisplayPort 1920x1080@ 165Hz Color Temp. Color Set a desired color setting from the display if working at least 5 mins) after around 1 hour...
.... • Skin Tone: Contains three color modes including Reddish, Natural, and Yellowish. 4. Blue light Filter to reduce 70% (max.) harmful blue light to eye strain and AMD (Age-Related Macular Degeneration). Input Select ASUS TUF Gaming VG2491R Racing Mode DisplayPort 1920x1080@ 165Hz HDMI-1 HDMI-2 DisplayPort 3-4 Chapter 3: General Instruction Color ASUS TUF Gaming VG2491R Racing Mode DisplayPort 1920x1080@ 165Hz Color Temp. Color Set a desired color setting from the display if working at least 5 mins) after around 1 hour...
VG249Q1R Series User Guide
Page 19
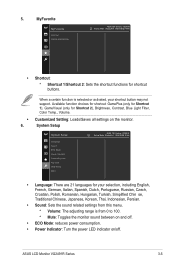
... Sound: Sets the sound related settings from 0 to 100. *. Customized.Setting: Loads/Saves all settings on and off . System Setup Language Sound ECO Mode Power Indicator Power Key Lock Key Lock OSD Setup More ASUS TUF Gaming VG2491R Racing Mode DisplayPort 1920x1080@ 165Hz •. Mute: Toggles the monitor sound between on the monitor. ASUS LCD Monitor VG2491R Series 3-5 ECO.Mode: reduces power consumption. •. 5.. Available function choices for shortcut: GamePlus (only for Shortcut. 1), GameVisual (only for your shortcut button may not support. Volume...
... Sound: Sets the sound related settings from 0 to 100. *. Customized.Setting: Loads/Saves all settings on and off . System Setup Language Sound ECO Mode Power Indicator Power Key Lock Key Lock OSD Setup More ASUS TUF Gaming VG2491R Racing Mode DisplayPort 1920x1080@ 165Hz •. Mute: Toggles the monitor sound between on the monitor. ASUS LCD Monitor VG2491R Series 3-5 ECO.Mode: reduces power consumption. •. 5.. Available function choices for shortcut: GamePlus (only for Shortcut. 1), GameVisual (only for your shortcut button may not support. Volume...

VG249Q1R Series User Guide
Page 20
Key.Lock: To disable all function keys. Press over 5 seconds to transparent. •. Power.Key.Lock: Enables or disables the power key. •. OSD.Setup: * Adjusts the OSD timeout from 10 to 120 seconds. * Enables or disables the DDC/CI function. * Adjusts the OSD background from opaque to cancel the key lock function. •. •. Information: Shows the monitor information. •. All.Reset: "Yes" allows you to restore the default settings. 3-6 Chapter 3: General Instruction
Key.Lock: To disable all function keys. Press over 5 seconds to transparent. •. Power.Key.Lock: Enables or disables the power key. •. OSD.Setup: * Adjusts the OSD timeout from 10 to 120 seconds. * Enables or disables the DDC/CI function. * Adjusts the OSD background from opaque to cancel the key lock function. •. •. Information: Shows the monitor information. •. All.Reset: "Yes" allows you to restore the default settings. 3-6 Chapter 3: General Instruction
VG249Q1R Series User Guide
Page 21
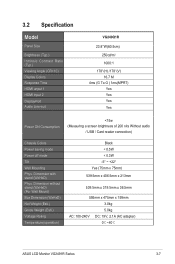
3.2 Specification Model Panel Size Brightness (Typ.) Intrinsic Contrast Ratio (Typ.) Viewing Angle (CR>10) Display Colors Response Time HDMI unput 1 HDMI input 2 DisplayPort Audio Line-out VG249Q1R 23.8''W(60.5cm) 250cd/m2 1000:1 178°(H) /178°(V) 16.7 M 4ms (G To G ) 1ms(MPRT) Yes Yes Yes Yes Power ON Consumption
3.2 Specification Model Panel Size Brightness (Typ.) Intrinsic Contrast Ratio (Typ.) Viewing Angle (CR>10) Display Colors Response Time HDMI unput 1 HDMI input 2 DisplayPort Audio Line-out VG249Q1R 23.8''W(60.5cm) 250cd/m2 1000:1 178°(H) /178°(V) 16.7 M 4ms (G To G ) 1ms(MPRT) Yes Yes Yes Yes Power ON Consumption
VG249Q1R Series User Guide
Page 22
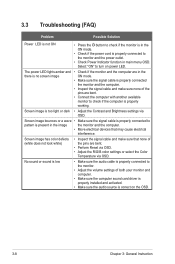
... sound card driver is properly installed and activated. • Make sure the audio source is properly connected to the monitor. • Adjust the volume settings of the pins are bent. • Connect the computer with another available monitor to turn on the OSD. 3-8 Chapter 3: General Instruction Screen image has color defects (white does not look white) • Inspect the signal cable and make sure none of the pins are bent. • Perform Reset via OSD. • Adjust the R/G/B color settings...
... sound card driver is properly installed and activated. • Make sure the audio source is properly connected to the monitor. • Adjust the volume settings of the pins are bent. • Connect the computer with another available monitor to turn on the OSD. 3-8 Chapter 3: General Instruction Screen image has color defects (white does not look white) • Inspect the signal cable and make sure none of the pins are bent. • Perform Reset via OSD. • Adjust the R/G/B color settings...
VG249Q1R Series User Guide
Page 23
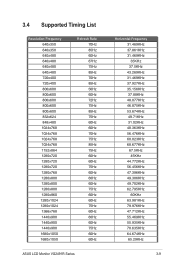
... 1280x1024 1366x768 1440x900 1440x900 1440x900 1680x1050 1680x1050 Refresh.Rate. 70Hz 85Hz 60Hz 67Hz 75Hz 85Hz 70Hz 85Hz 56Hz 60Hz 72Hz 75Hz 85Hz 75Hz 60Hz 60Hz 70Hz 75Hz 85Hz 75Hz 60Hz 60Hz 75Hz 60Hz 60Hz 60Hz 75Hz 60Hz 60Hz 75Hz 60Hz 60Hz 60Hz 75Hz 60Hz 60Hz ASUS LCD Monitor VG2491R Series Horizontal.Frequency 31.469KHz 37.861KHz 31.469KHz...
... 1280x1024 1366x768 1440x900 1440x900 1440x900 1680x1050 1680x1050 Refresh.Rate. 70Hz 85Hz 60Hz 67Hz 75Hz 85Hz 70Hz 85Hz 56Hz 60Hz 72Hz 75Hz 85Hz 75Hz 60Hz 60Hz 70Hz 75Hz 85Hz 75Hz 60Hz 60Hz 75Hz 60Hz 60Hz 60Hz 75Hz 60Hz 60Hz 75Hz 60Hz 60Hz 60Hz 75Hz 60Hz 60Hz ASUS LCD Monitor VG2491R Series Horizontal.Frequency 31.469KHz 37.861KHz 31.469KHz...

VG249Q1R Series User Guide
Page 24
Resolution.Frequency 1920x1080 1920x1080 1920x1080 1920x1080* 1920x1080* 1920x1080* 1920x1080 (DP)* 640x480P 720x480P 720x576P 1280x720P 1280x720P 1440x480P 1440x576P 1920x1080P 1920x1080P Refresh.Rate. 60Hz 60Hz 85Hz 100Hz 120Hz 144Hz 165Hz 59.94/60Hz 59.94/60Hz 50Hz 50Hz 59.94/60Hz 59.94/60Hz 50Hz 50Hz 59.94/60Hz Horizontal.Frequency 66.587KHz 67.5KHz 95.43KHz 113.3KHz.../31.5KHz 31.25KHz 56.25KHz 67.433KHz/67.5KHz . Note:.You.must.select.one.of.the."*".timings.for.enabling.ELMB.or.100Hz.feature.with.a.compatible GPU.graphic.card. 3-10 Chapter 3: General Instruction
Resolution.Frequency 1920x1080 1920x1080 1920x1080 1920x1080* 1920x1080* 1920x1080* 1920x1080 (DP)* 640x480P 720x480P 720x576P 1280x720P 1280x720P 1440x480P 1440x576P 1920x1080P 1920x1080P Refresh.Rate. 60Hz 60Hz 85Hz 100Hz 120Hz 144Hz 165Hz 59.94/60Hz 59.94/60Hz 50Hz 50Hz 59.94/60Hz 59.94/60Hz 50Hz 50Hz 59.94/60Hz Horizontal.Frequency 66.587KHz 67.5KHz 95.43KHz 113.3KHz.../31.5KHz 31.25KHz 56.25KHz 67.433KHz/67.5KHz . Note:.You.must.select.one.of.the."*".timings.for.enabling.ELMB.or.100Hz.feature.with.a.compatible GPU.graphic.card. 3-10 Chapter 3: General Instruction


