VG259QM Series User Guide
Page 3
... Package contents 1-1 1.3.1 Front view 1-2 1.3.2 Back view 1-3 1.3.3 GamePlus Function 1-4 1.3.4 GameVisual Function 1-5 Chapter 2: Setup 2.1 Assembling the monitor arm/base 2-1 2.2 Adjusting the monitor 2-2 2.3 Detaching the arm (for VESA wall mount 2-3 2.4 Connecting the cables 2-4 2.5 Turning on the monitor 2-4 Chapter 3: General instructions 3.1 OSD (On-Screen Display) menu 3-1 3.1.1 How to reconfigure 3-1 3.1.2 OSD function introduction 3-1 3.2 Specifications summary 3-7 3.3 Outline dimensions 3-9 3.4 Troubleshooting (FAQ 3-10 3.5 Supported operating mode 3-11 iii
... Package contents 1-1 1.3.1 Front view 1-2 1.3.2 Back view 1-3 1.3.3 GamePlus Function 1-4 1.3.4 GameVisual Function 1-5 Chapter 2: Setup 2.1 Assembling the monitor arm/base 2-1 2.2 Adjusting the monitor 2-2 2.3 Detaching the arm (for VESA wall mount 2-3 2.4 Connecting the cables 2-4 2.5 Turning on the monitor 2-4 Chapter 3: General instructions 3.1 OSD (On-Screen Display) menu 3-1 3.1.1 How to reconfigure 3-1 3.1.2 OSD function introduction 3-1 3.2 Specifications summary 3-7 3.3 Outline dimensions 3-9 3.4 Troubleshooting (FAQ 3-10 3.5 Supported operating mode 3-11 iii

VG259QM Series User Guide
Page 4
... regulations. This class B digital apparatus complies with Part 15 of the monitor to the graphics card is required to provide reasonable protection against harmful interference in accordance with the limits for help. The use of shielded cables for connection of the FCC Rules. iv This equipment has been tested and found to comply with the instructions, may cause undesired...
... regulations. This class B digital apparatus complies with Part 15 of the monitor to the graphics card is required to provide reasonable protection against harmful interference in accordance with the limits for help. The use of shielded cables for connection of the FCC Rules. iv This equipment has been tested and found to comply with the instructions, may cause undesired...
VG259QM Series User Guide
Page 5
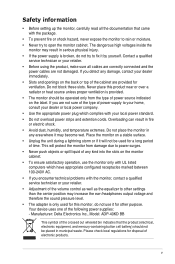
... encounter technical problems with the monitor, contact a qualified service technician or your dealer immediately. • Slots and openings on a stable surface. • Unplug the unit during a lightning storm or if it by yourself. Place the monitor on the back or top of power source indicated on the label. Please check local regulations for a long period of the following power supplies: -
... encounter technical problems with the monitor, contact a qualified service technician or your dealer immediately. • Slots and openings on a stable surface. • Unplug the unit during a lightning storm or if it by yourself. Place the monitor on the back or top of power source indicated on the label. Please check local regulations for a long period of the following power supplies: -

VG259QM Series User Guide
Page 6
... unplug the power cord. Turn your monitor off the Power Switch and turn off the Power Switch for hours. • When the screen becomes black or flashes, or cannot work anymore, contact your dealer or service center to fix it. Do not lift the display by yourself! Do not repair the screen by the stand or the cord. • Cleaning. The following symptoms are normal with mild cleaner. • Avoid using a cleaner...
... unplug the power cord. Turn your monitor off the Power Switch and turn off the Power Switch for hours. • When the screen becomes black or flashes, or cannot work anymore, contact your dealer or service center to fix it. Do not lift the display by yourself! Do not repair the screen by the stand or the cord. • Cleaning. The following symptoms are normal with mild cleaner. • Avoid using a cleaner...
VG259QM Series User Guide
Page 9
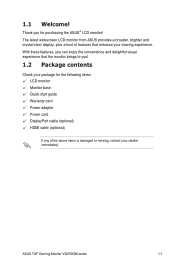
ASUS TUF Gaming Monitor VG259QM series 1-1 Thank you for the following items: LCD monitor Monitor base Quick start guide Warranty card Power adapter Power cord DisplayPort cable (optional) HDMI cable (optional) If any of the above items is damaged or missing, contact your viewing experience. With these features, you ! 1.2 Package contents Check your package for purchasing the ASUS® LCD monitor! The latest widescreen LCD monitor from ASUS provides a broader, brighter and crystal-clear display, plus a host of features that the...
ASUS TUF Gaming Monitor VG259QM series 1-1 Thank you for the following items: LCD monitor Monitor base Quick start guide Warranty card Power adapter Power cord DisplayPort cable (optional) HDMI cable (optional) If any of the above items is damaged or missing, contact your viewing experience. With these features, you ! 1.2 Package contents Check your package for purchasing the ASUS® LCD monitor! The latest widescreen LCD monitor from ASUS provides a broader, brighter and crystal-clear display, plus a host of features that the...

VG259QM Series User Guide
Page 11
...menu. • Displays the input selection bar when the monitor enters standby mode or displays the "NO SIGNAL" message. 5. This port connects the power cord. 2. This port is for connection with an HDMI compatible device. 3. ASUS TUF Gaming Monitor VG259QM series 1-3 Kensington lock slot. 8. HDMI port. Earphone jack. Power button/power indicator • Turns the monitor on/off. • The color definition of the power indicator is connected. 6. This port is for a DisplayPort compatible device. 5. This port is for connection for service only. (USB Type-A) 7. Control...
...menu. • Displays the input selection bar when the monitor enters standby mode or displays the "NO SIGNAL" message. 5. This port connects the power cord. 2. This port is for connection with an HDMI compatible device. 3. ASUS TUF Gaming Monitor VG259QM series 1-3 Kensington lock slot. 8. HDMI port. Earphone jack. Power button/power indicator • Turns the monitor on/off. • The color definition of the power indicator is connected. 6. This port is for a DisplayPort compatible device. 5. This port is for connection for service only. (USB Type-A) 7. Control...

VG259QM Series User Guide
Page 13
ASUS TUF Gaming Monitor VG259QM series 1-5 1.3.4 GameVisual Function The GameVisual function helps you select among different picture modes in a convenient way. To active GameVisual: Press the GameVisual hotkey repeatedly to select. • Scenery Mode: This is the best choice for scenery photo displaying with GameVisualTM Video intelligence Technology. • Racing Mode: This is the best choice for racing game playing with GameVisualTM Video intelligence Technology. • Cinema Mode: This...
ASUS TUF Gaming Monitor VG259QM series 1-5 1.3.4 GameVisual Function The GameVisual function helps you select among different picture modes in a convenient way. To active GameVisual: Press the GameVisual hotkey repeatedly to select. • Scenery Mode: This is the best choice for scenery photo displaying with GameVisualTM Video intelligence Technology. • Racing Mode: This is the best choice for racing game playing with GameVisualTM Video intelligence Technology. • Cinema Mode: This...
VG259QM Series User Guide
Page 15
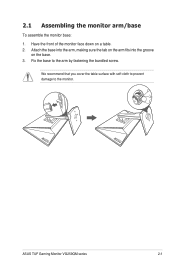
Attach the base into the arm, making sure the tab on the arm fits into the groove on a table. 2. ASUS TUF Gaming Monitor VG259QM series 2-1 We recommend that you cover the table surface with soft cloth to prevent damage to the arm by fastening the bundled screw. Fix the base to the monitor. Have the front of the monitor face down on the base. 3. 2.1 Assembling the monitor arm/base To assemble the monitor base: 1.
Attach the base into the arm, making sure the tab on the arm fits into the groove on a table. 2. ASUS TUF Gaming Monitor VG259QM series 2-1 We recommend that you cover the table surface with soft cloth to prevent damage to the arm by fastening the bundled screw. Fix the base to the monitor. Have the front of the monitor face down on the base. 3. 2.1 Assembling the monitor arm/base To assemble the monitor base: 1.

VG259QM Series User Guide
Page 17
Remove the base (Figure 2). 4. To detach the arm/base: 1. Remove the rubbers in the four screw holes. (Figure 1) 3. Use a screwdriver to the monitor. Have the front of this monitor is specially designed for VESA wall mount. ASUS TUF Gaming Monitor VG259QM series 2-3 2.3 Detaching the arm (for VESA wall mount) The detachable arm/base of the monitor face down on the hinge (Figure 3), then remove the hinge. 1 1 2 2 (Figure 1) (Figure 2) (Figure 3) We recommend that you cover the table surface with soft cloth to prevent damage to remove the screw on a table. 2.
Remove the base (Figure 2). 4. To detach the arm/base: 1. Remove the rubbers in the four screw holes. (Figure 1) 3. Use a screwdriver to the monitor. Have the front of this monitor is specially designed for VESA wall mount. ASUS TUF Gaming Monitor VG259QM series 2-3 2.3 Detaching the arm (for VESA wall mount) The detachable arm/base of the monitor face down on the hinge (Figure 3), then remove the hinge. 1 1 2 2 (Figure 1) (Figure 2) (Figure 3) We recommend that you cover the table surface with soft cloth to prevent damage to remove the screw on a table. 2.

VG259QM Series User Guide
Page 18
.../HDMI port. • To use the earphone: connect the end with plug type to show that the monitor is fed. 2.5 Turning on the monitor Press the power button . Connect one end of the DisplayPort/HDMI cable to the monitor's DC input. The power indicator lights up in white to the monitor's earphone jack when an HDMI or DisplayPort signal is ON. 2-4 Chapter 2: Setup 2.4 Connecting the cables Connect the cables as the following instructions: For service only • To connect...
.../HDMI port. • To use the earphone: connect the end with plug type to show that the monitor is fed. 2.5 Turning on the monitor Press the power button . Connect one end of the DisplayPort/HDMI cable to the monitor's DC input. The power indicator lights up in white to the monitor's earphone jack when an HDMI or DisplayPort signal is ON. 2-4 Chapter 2: Setup 2.4 Connecting the cables Connect the cables as the following instructions: For service only • To connect...
VG259QM Series User Guide
Page 19
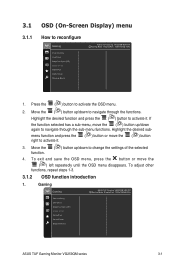
...-menu functions. To adjust other functions, repeat steps 1-3. 3.1.2 OSD function introduction 1. menu function and press the right to activate it . Move the ( ) button up /down to change the settings of the selected 4. Gaming Gaming ASUS TUF Gaming VG259QM HDR Off Racing Mode DisplayPort 1920x1080@ 60Hz Overclocking OverDrive Adaptive-Sync (DP) ELMB SYNC GamePlus GameVisual Shadow Boost ASUS TUF Gaming Monitor VG259QM series 3-1 Highlight the desired function and press the ( ) button to reconfigure Gaming Overclocking OverDrive Adaptive-Sync...
...-menu functions. To adjust other functions, repeat steps 1-3. 3.1.2 OSD function introduction 1. menu function and press the right to activate it . Move the ( ) button up /down to change the settings of the selected 4. Gaming Gaming ASUS TUF Gaming VG259QM HDR Off Racing Mode DisplayPort 1920x1080@ 60Hz Overclocking OverDrive Adaptive-Sync (DP) ELMB SYNC GamePlus GameVisual Shadow Boost ASUS TUF Gaming Monitor VG259QM series 3-1 Highlight the desired function and press the ( ) button to reconfigure Gaming Overclocking OverDrive Adaptive-Sync...
VG259QM Series User Guide
Page 20
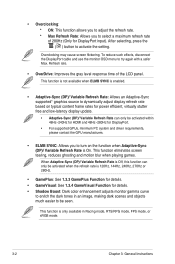
Overclocking may cause screen flickering. This function is not available when ELMB SYNC is enabled. • Adaptive-Sync (DP)/ Variable Refresh Rate: Allows an Adaptive-Sync supported* graphics source to dynamically adjust display refresh rate based on the function when Adaptive-Sync (DP)/ Variable Refresh Rate is On. After selecting, press the ( ) button to try again with a safer Max. To reduce such effects, disconnect the DisplayPort cable and use the monitor OSD menu to activate the setting. Refresh rate. •...
Overclocking may cause screen flickering. This function is not available when ELMB SYNC is enabled. • Adaptive-Sync (DP)/ Variable Refresh Rate: Allows an Adaptive-Sync supported* graphics source to dynamically adjust display refresh rate based on the function when Adaptive-Sync (DP)/ Variable Refresh Rate is On. After selecting, press the ( ) button to try again with a safer Max. To reduce such effects, disconnect the DisplayPort cable and use the monitor OSD menu to activate the setting. Refresh rate. •...
VG259QM Series User Guide
Page 21
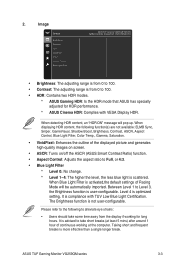
When Blue Light Filter is activated,the default settings of Racing Mode will pop up. It is from the display if working for HDR performance. * ASUS Cinema HDR: Complies with TUV Low Blue Light Certification. ASUS TUF Gaming Monitor VG259QM series 3-3 Image Image Brightness Contrast HDR VividPixel ASCR Aspect Control Blue Light Filter ASUS TUF Gaming VG259QM HDR Off Racing Mode DisplayPort 1920x1080@ 60Hz • Brightness: The adjusting range is from 0 to 100. • Contrast: The adjusting range is compliance with VESA Display HDR. When detecting HDR...
When Blue Light Filter is activated,the default settings of Racing Mode will pop up. It is from the display if working for HDR performance. * ASUS Cinema HDR: Complies with TUV Low Blue Light Certification. ASUS TUF Gaming Monitor VG259QM series 3-3 Image Image Brightness Contrast HDR VividPixel ASCR Aspect Control Blue Light Filter ASUS TUF Gaming VG259QM HDR Off Racing Mode DisplayPort 1920x1080@ 60Hz • Brightness: The adjusting range is from 0 to 100. • Contrast: The adjusting range is compliance with VESA Display HDR. When detecting HDR...
VG259QM Series User Guide
Page 22
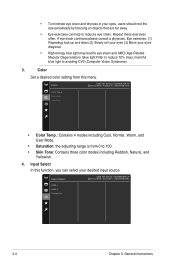
..., and User Mode. • Saturation: the adjusting range is from this function, you can help to reduces eye strain. Color Set a desired color setting from 0 to 100. • Skin Tone: Contains three color modes including Reddish, Natural, and Yellowish. 4. Input Select In this menu. Blue light Filter to reduce 70% (max.) harmful blue light to avoiding CVS (Computer Vision Syndrome). 3. Input Select ASUS TUF Gaming VG259QM HDR Off Racing Mode DisplayPort 1920x1080@ 60Hz HDMI-1 HDMI...
..., and User Mode. • Saturation: the adjusting range is from this function, you can help to reduces eye strain. Color Set a desired color setting from 0 to 100. • Skin Tone: Contains three color modes including Reddish, Natural, and Yellowish. 4. Input Select In this menu. Blue light Filter to reduce 70% (max.) harmful blue light to avoiding CVS (Computer Vision Syndrome). 3. Input Select ASUS TUF Gaming VG259QM HDR Off Racing Mode DisplayPort 1920x1080@ 60Hz HDMI-1 HDMI...
VG259QM Series User Guide
Page 23
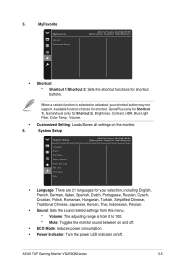
... (only for shortcut buttons. • 6. Customized Setting: Loads/Saves all settings on /off. ASUS TUF Gaming Monitor VG259QM series 3-5 MyFavorite MyFavorite Shortcut Customized Setting ASUS TUF Gaming VG259QM HDR Off Racing Mode DisplayPort 1920x1080@ 60Hz • Shortcut: * Shortcut 1/Shortcut 2: Sets the shortcut functions for Shortcut 2), Brightness, Contrast, HDR, Blue Light Filter, Color Temp., Volume. System Setup System Setup Language Sound ECO Mode Power Indicator Power Key Lock Key Lock OSD Setup More ASUS TUF Gaming VG259QM HDR Off Racing Mode DisplayPort 1920x1080...
... (only for shortcut buttons. • 6. Customized Setting: Loads/Saves all settings on /off. ASUS TUF Gaming Monitor VG259QM series 3-5 MyFavorite MyFavorite Shortcut Customized Setting ASUS TUF Gaming VG259QM HDR Off Racing Mode DisplayPort 1920x1080@ 60Hz • Shortcut: * Shortcut 1/Shortcut 2: Sets the shortcut functions for Shortcut 2), Brightness, Contrast, HDR, Blue Light Filter, Color Temp., Volume. System Setup System Setup Language Sound ECO Mode Power Indicator Power Key Lock Key Lock OSD Setup More ASUS TUF Gaming VG259QM HDR Off Racing Mode DisplayPort 1920x1080...

VG259QM Series User Guide
Page 24
....: Compatibility with graphic card. Select DisplayPort 1.1 or DisplayPort 1.2+HDR by graphic card DP version. Press over 5 seconds to cancel the key lock function. • OSD Setup: * Adjusts the OSD timeout from 10 to 120 seconds. * Enables or disables the DDC/CI function. * Adjusts the OSD background from opaque to restore the default settings. 3-6 Chapter 3: General Instructions • Power Key Lock: Enables or disables the power key. • Key Lock...
....: Compatibility with graphic card. Select DisplayPort 1.1 or DisplayPort 1.2+HDR by graphic card DP version. Press over 5 seconds to cancel the key lock function. • OSD Setup: * Adjusts the OSD timeout from 10 to 120 seconds. * Enables or disables the DDC/CI function. * Adjusts the OSD background from opaque to restore the default settings. 3-6 Chapter 3: General Instructions • Power Key Lock: Enables or disables the power key. • Key Lock...

VG259QM Series User Guide
Page 25
... Specifications summary Panel Type Panel size Max. Resolution Pixel pitch Brightness (Typ.) Contrast Ratio (Typ.) Contrast Ratio (Max.) Viewing angle(H/V) CR>10 Display colors Response time Color temperature selection Analog input Digital input Earphone jack Audio input Speaker (Built-in) USB 3.0 port Colors Power LED Tilt Pivot Swivel Height adjustment VESA wall mount Kensington lock Voltage rating Power consumption Temperature (Operating) Temperature (Non-operating) Dimensions (W x H x D) without stand Dimensions (W x H x D) with stand Weight (Esti.) TFT LCD 24.5"W (16:9, 62.2 cm) wide...
... Specifications summary Panel Type Panel size Max. Resolution Pixel pitch Brightness (Typ.) Contrast Ratio (Typ.) Contrast Ratio (Max.) Viewing angle(H/V) CR>10 Display colors Response time Color temperature selection Analog input Digital input Earphone jack Audio input Speaker (Built-in) USB 3.0 port Colors Power LED Tilt Pivot Swivel Height adjustment VESA wall mount Kensington lock Voltage rating Power consumption Temperature (Operating) Temperature (Non-operating) Dimensions (W x H x D) without stand Dimensions (W x H x D) with stand Weight (Esti.) TFT LCD 24.5"W (16:9, 62.2 cm) wide...

VG259QM Series User Guide
Page 26
..., Japanese, Korean, Thai, Indonesian, Persian) Quick start guide, warranty card, power adapter, power cord, DisplayPort cable (optional), HDMI cable (optional) UL/cUL, CB, CE, ErP, FCC, CCC, CU, RCM, BSMI, VCCI, RoHS, J-MOSS, WEEE, Windows 7 & 8.1 & 10 WHQL, CEL, MEPS, PSE, UkrSEPRO, KCC, E-Standby, TUV-Flicker Free, TUV-Low Blue Light, ICES-3, PC Recycle *Specifications are subject to change without notice. **Measuring a screen brightness of 200 nits without audio/ USB/ Card reader connection. 3-8 Chapter 3: General Instructions
..., Japanese, Korean, Thai, Indonesian, Persian) Quick start guide, warranty card, power adapter, power cord, DisplayPort cable (optional), HDMI cable (optional) UL/cUL, CB, CE, ErP, FCC, CCC, CU, RCM, BSMI, VCCI, RoHS, J-MOSS, WEEE, Windows 7 & 8.1 & 10 WHQL, CEL, MEPS, PSE, UkrSEPRO, KCC, E-Standby, TUV-Flicker Free, TUV-Low Blue Light, ICES-3, PC Recycle *Specifications are subject to change without notice. **Measuring a screen brightness of 200 nits without audio/ USB/ Card reader connection. 3-8 Chapter 3: General Instructions

VG259QM Series User Guide
Page 27
3.3 Outline dimensions 90° 90° ASUS VG259QM Outline Dimension *Unit: mm(inch) Pivot: +/-90 Degree 90° Swivel: +/-90 Degree 302.6 [11.9]-Active Area 328.9 [13.0] 485.6 [19.1] 90° 5° 33° 142.6 [5.6] 151.1 [5.9] 204.8 [8.1] 213.2 [8.4]...10.6 [0.4] 9.4 [0.4] 15.8 [0.6] 51.4 [2.0] 16.1 [0.6] 60.1 [2.4] 44.3 [1.7] 211.4 [8.3] 211.4 [8.3] 275.9 [10.9] 195.8 [7.7] 130.0 [5.1] 325.8 [12.8] 363.5 [14.3] 156.6 [6.2] 100.0 [3.9] 117.0 [4.6] M4*4-Depth 10 mm 100.0 [3.9] 117.0 [4.6] Wall mount Keep out area 76.9 [3.0] ASUS TUF Gaming Monitor VG259QM series 3-9
3.3 Outline dimensions 90° 90° ASUS VG259QM Outline Dimension *Unit: mm(inch) Pivot: +/-90 Degree 90° Swivel: +/-90 Degree 302.6 [11.9]-Active Area 328.9 [13.0] 485.6 [19.1] 90° 5° 33° 142.6 [5.6] 151.1 [5.9] 204.8 [8.1] 213.2 [8.4]...10.6 [0.4] 9.4 [0.4] 15.8 [0.6] 51.4 [2.0] 16.1 [0.6] 60.1 [2.4] 44.3 [1.7] 211.4 [8.3] 211.4 [8.3] 275.9 [10.9] 195.8 [7.7] 130.0 [5.1] 325.8 [12.8] 363.5 [14.3] 156.6 [6.2] 100.0 [3.9] 117.0 [4.6] M4*4-Depth 10 mm 100.0 [3.9] 117.0 [4.6] Wall mount Keep out area 76.9 [3.0] ASUS TUF Gaming Monitor VG259QM series 3-9

VG259QM Series User Guide
Page 28
... working. 3.4 Troubleshooting (FAQ) Problem Possible Solution Power LED is not ON • Press the button to check if the monitor is in the image connected to the monitor and the computer. • Move electrical devices that none of the pins are bent. • Perform All Reset via OSD. • Adjust the R/G/B color settings or select the Color Temperature via OSD. Screen image bounces or a wave pattern is • Make sure the signal cable...
... working. 3.4 Troubleshooting (FAQ) Problem Possible Solution Power LED is not ON • Press the button to check if the monitor is in the image connected to the monitor and the computer. • Move electrical devices that none of the pins are bent. • Perform All Reset via OSD. • Adjust the R/G/B color settings or select the Color Temperature via OSD. Screen image bounces or a wave pattern is • Make sure the signal cable...


