VG249Q Series User Guide
Page 2
... such repair, modification of alteration is defaced or missing. Product warranty or service will not be registered trademarks or copyrights of their respective companies, and are used only for VESA wall mount 2-1 2.2 Adjusting the monitor 2-2 3.1 OSD (On-Screen Display) menu 3-1 3.1.1 How to reconfigure 3-1 3.1.2 OSD Function Introduction 3-2 3.2 Specifications 3-11 3.3 Troubleshooting (FAQ 3-12 3.4 Supported Timing List 3-13 Copyright © 2019 ASUSTeK COMPUTER INC. IN NO EVENT SHALL ASUS, ITS...
... such repair, modification of alteration is defaced or missing. Product warranty or service will not be registered trademarks or copyrights of their respective companies, and are used only for VESA wall mount 2-1 2.2 Adjusting the monitor 2-2 3.1 OSD (On-Screen Display) menu 3-1 3.1.1 How to reconfigure 3-1 3.1.2 OSD Function Introduction 3-2 3.2 Specifications 3-11 3.3 Troubleshooting (FAQ 3-12 3.4 Supported Timing List 3-13 Copyright © 2019 ASUSTeK COMPUTER INC. IN NO EVENT SHALL ASUS, ITS...

VG249Q Series User Guide
Page 3
...by turning the equipment off and on, the user is subject to the following measures: • Reorient or relocate the receiving antenna. • Increase the separation between the equipment and receiver. • Connect the equipment to radio communications. This equipment generates, uses and... This class B digital apparatus complies with Part 15 of Communications. Operation is encouraged to try to comply with the instructions, may cause undesired operation. These limits are designed to which can radiate radio frequency energy and, if not installed and used in accordance with the...
...by turning the equipment off and on, the user is subject to the following measures: • Reorient or relocate the receiving antenna. • Increase the separation between the equipment and receiver. • Connect the equipment to radio communications. This equipment generates, uses and... This class B digital apparatus complies with Part 15 of Communications. Operation is encouraged to try to comply with the instructions, may cause undesired operation. These limits are designed to which can radiate radio frequency energy and, if not installed and used in accordance with the...

VG249Q Series User Guide
Page 4
... monitor, contact a qualified servic er. • Provide an earthing connection before the mains plug is connected to disconnect after pulling out the mains plug from damage due to open the monitor cabinet. Overloading can result in serious physical injury. • If the power supply is provided. • The monitor should be easily accessible • If you encounter technical problems with your local power...
... monitor, contact a qualified servic er. • Provide an earthing connection before the mains plug is connected to disconnect after pulling out the mains plug from damage due to open the monitor cabinet. Overloading can result in serious physical injury. • If the power supply is provided. • The monitor should be easily accessible • If you encounter technical problems with your local power...

VG249Q Series User Guide
Page 5
... again to make sure that you use. • When the same image is better to complete a task. Turn off the Power Switch and turn off and unplug the power cord. NOTE: Tips and additional information to complete a task. Use a cleaner intended for hours. • When the screen becomes black or flashes, or cannot work anymore, contact your dealer or service center to excessive sound pressures. WARNING...
... again to make sure that you use. • When the same image is better to complete a task. Turn off the Power Switch and turn off and unplug the power cord. NOTE: Tips and additional information to complete a task. Use a cleaner intended for hours. • When the screen becomes black or flashes, or cannot work anymore, contact your dealer or service center to excessive sound pressures. WARNING...

VG249Q Series User Guide
Page 7
..., contact your retailer immediately. Thank you ! 1.2 Package contents Check your viewing experience. ASUS LCD Monitor VG249 Series 1-1 With these features, you can enjoy the convenience and delightful visual experience that the monitor brings you for the following items: LCD Monitor Monitor Base Quick Start Guide Warranty Card 1x Power Cord* 1x Audio Cable (optional) 1x HDMI Cable (optional) 1x VGA Cable (optional) 1x DisplayPort Cable (optional) • If any of features that enhance your...
..., contact your retailer immediately. Thank you ! 1.2 Package contents Check your viewing experience. ASUS LCD Monitor VG249 Series 1-1 With these features, you can enjoy the convenience and delightful visual experience that the monitor brings you for the following items: LCD Monitor Monitor Base Quick Start Guide Warranty Card 1x Power Cord* 1x Audio Cable (optional) 1x HDMI Cable (optional) 1x VGA Cable (optional) 1x DisplayPort Cable (optional) • If any of features that enhance your...
VG249Q Series User Guide
Page 9
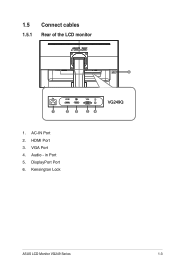
1.5 Connect cables 1.5.1 Rear of the LCD monitor 6 HDMI VGA VG249Q 1 2 5 34 1. HDMI Port 3. Audio - DisplayPort Port 6. AC-IN Port 2. in Port 5. VGA Port 4. Kensington Lock ASUS LCD Monitor VG249 Series 1-3
1.5 Connect cables 1.5.1 Rear of the LCD monitor 6 HDMI VGA VG249Q 1 2 5 34 1. HDMI Port 3. Audio - DisplayPort Port 6. AC-IN Port 2. in Port 5. VGA Port 4. Kensington Lock ASUS LCD Monitor VG249 Series 1-3

VG249Q Series User Guide
Page 10
... turn the monitor on/off. 3. Input Select Button. • Use this hotkey to enter the OSD menu. 4. Status Description White ON Amber Standby mode OFF OFF 2. GamePlus Button: • GamePlus: The GamePlus Function provides a toolkit and creates a better gaming environment for new gamers or beginners interested in First Person Shooter (FPS) games. 1-4 Chapter 1: Product Introduction MENU Button: • Press this button to adjust the image settings. 87 65432 1 1. 1.6 Monitor...
... turn the monitor on/off. 3. Input Select Button. • Use this hotkey to enter the OSD menu. 4. Status Description White ON Amber Standby mode OFF OFF 2. GamePlus Button: • GamePlus: The GamePlus Function provides a toolkit and creates a better gaming environment for new gamers or beginners interested in First Person Shooter (FPS) games. 1-4 Chapter 1: Product Introduction MENU Button: • Press this button to adjust the image settings. 87 65432 1 1. 1.6 Monitor...

VG249Q Series User Guide
Page 13
...) is specially designed for VESA wall mount) The detachable stand of the monitor while removing the screws. ASUS LCD Monitor VG249 Series 2-1 Carefully put the front of the monitor face down on the arm (Figure 1), and then detach the arm/stand from the monitor (Figure 2). • We recommend that you cover the table surface with minimum weight/load 12 kg (Screw size: M4 x 10 mm). Disconnect power and signal cables.
...) is specially designed for VESA wall mount) The detachable stand of the monitor while removing the screws. ASUS LCD Monitor VG249 Series 2-1 Carefully put the front of the monitor face down on the arm (Figure 1), and then detach the arm/stand from the monitor (Figure 2). • We recommend that you cover the table surface with minimum weight/load 12 kg (Screw size: M4 x 10 mm). Disconnect power and signal cables.
VG249Q Series User Guide
Page 16
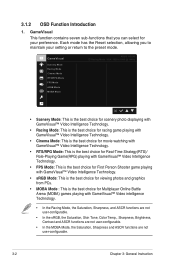
... your setting or return to the preset mode. Each mode has the Reset selection, allowing you can select for Multiplayer Online Battle Arena (MOBA) games playing with GameVisual™ Video intelligence Technology. • In the Racing Mode, the Saturation, Sharpness, and ASCR functions are not user-configurable. • In the sRGB, the Saturation, Skin Tone, Color Temp., Sharpness, Brightness, Contrast and...
... your setting or return to the preset mode. Each mode has the Reset selection, allowing you can select for Multiplayer Online Battle Arena (MOBA) games playing with GameVisual™ Video intelligence Technology. • In the Racing Mode, the Saturation, Sharpness, and ASCR functions are not user-configurable. • In the sRGB, the Saturation, Skin Tone, Color Temp., Sharpness, Brightness, Contrast and...

VG249Q Series User Guide
Page 17
... Blue Light Filter is activated,the default settings of Standard Mode will be automatically imported. • Between Level 1 to Level 3, the Brightness function is user-configurable. • Level 4 is advised to reduces eye strain. Blue light filter to reduce 70% (max.) harmful blue light to eye strain and AMD (Age-Related Macular Degeneration). It is compliance with TUV Low Blue Light Certification. ASUS LCD Monitor VG249 Series...
... Blue Light Filter is activated,the default settings of Standard Mode will be automatically imported. • Between Level 1 to Level 3, the Brightness function is user-configurable. • Level 4 is advised to reduces eye strain. Blue light filter to reduce 70% (max.) harmful blue light to eye strain and AMD (Age-Related Macular Degeneration). It is compliance with TUV Low Blue Light Certification. ASUS LCD Monitor VG249 Series...

VG249Q Series User Guide
Page 18
... 0 ~ 100. 3-4 Chapter 3: General Instruction Color Brightness Contrast Saturation Color Temp. 3. Skin Tone ASUS VG249 Racing Mode VGA 1920 x 1080 @ 144Hz • Brightness: The adjusting range is from 0 to 100. • Contrast: The adjusting range is from 0 to 100. • Color Temp.: Contains three preset color modes (Cool, Normal, Warm) and User Mode. • Skin Tone: Contains three color modes including Reddish, Natural, and Yellowish. • In the User Mode, colors of R (Red), G (Green), and B (Blue) are userconfigurable;
... 0 ~ 100. 3-4 Chapter 3: General Instruction Color Brightness Contrast Saturation Color Temp. 3. Skin Tone ASUS VG249 Racing Mode VGA 1920 x 1080 @ 144Hz • Brightness: The adjusting range is from 0 to 100. • Contrast: The adjusting range is from 0 to 100. • Color Temp.: Contains three preset color modes (Cool, Normal, Warm) and User Mode. • Skin Tone: Contains three color modes including Reddish, Natural, and Yellowish. • In the User Mode, colors of R (Red), G (Green), and B (Blue) are userconfigurable;
VG249Q Series User Guide
Page 19
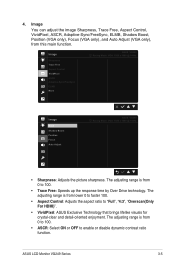
... Over Drive technology. Image Sharpness Trace Free Aspect Control VividPixel ASCR Adaptive-Sync/FreeSync ELMB More ASUS VG249 Racing Mode VGA 1920 x 1080 @ 144Hz Image Back Shadow Boost Position Focus Auto Adjust ASUS VG249 Racing Mode VGA 1920 x 1080 @ 144Hz • Sharpness: Adjusts the picture sharpness. The adjusting range is from 0 to 100. • ASCR: Select ON or OFF to "Full", "4:3", "Overscan(Only For HDMI)". • VividPixel: ASUS Exclusive Technology that...
... Over Drive technology. Image Sharpness Trace Free Aspect Control VividPixel ASCR Adaptive-Sync/FreeSync ELMB More ASUS VG249 Racing Mode VGA 1920 x 1080 @ 144Hz Image Back Shadow Boost Position Focus Auto Adjust ASUS VG249 Racing Mode VGA 1920 x 1080 @ 144Hz • Sharpness: Adjusts the picture sharpness. The adjusting range is from 0 to 100. • ASCR: Select ON or OFF to "Full", "4:3", "Overscan(Only For HDMI)". • VividPixel: ASUS Exclusive Technology that...

VG249Q Series User Guide
Page 20
... HDMI input source • Phase adjusts the phase of the pixel clock signal. • Adaptive-Sync/FreeSync: It can only be found. • Position: Adjusts the horizontal position (H-Position) and the vertical position (V-Position) of the image. The adjusting range is from 0 to decrease motion blur and minimize ghosting part when on typical content frame rates for power efficient, virtually stutter free and low-latency display update. • ELMB: Check to 100 (Only available for VGA input). • Auto Adjust...
... HDMI input source • Phase adjusts the phase of the pixel clock signal. • Adaptive-Sync/FreeSync: It can only be found. • Position: Adjusts the horizontal position (H-Position) and the vertical position (V-Position) of the image. The adjusting range is from 0 to decrease motion blur and minimize ghosting part when on typical content frame rates for power efficient, virtually stutter free and low-latency display update. • ELMB: Check to 100 (Only available for VGA input). • Auto Adjust...
VG249Q Series User Guide
Page 21
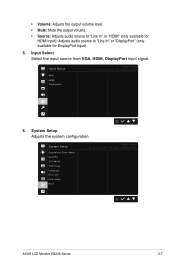
... GameVisual Demo Mode QuickFit ECO Mode OSD Setup Language Key Lock Information More ASUS VG249 Racing Mode VGA 1920 x 1080 @ 144Hz ASUS LCD Monitor VG249 Series 3-7 System Setup Adjusts the system configuration. Input Select VGA HDMI DisplayPort ASUS VG249 Racing Mode VGA 1920 x 1080 @ 144Hz 6. • Volume: Adjusts the output volume level. • Mute: Mute the output volume. • Source: Adjusts audio source to "Line In" or "DisplayPort" (only available for HDMI input); Input Select Select the input source from VGA, HDMI, DisplayPort input signal. Adjusts audio source to...
... GameVisual Demo Mode QuickFit ECO Mode OSD Setup Language Key Lock Information More ASUS VG249 Racing Mode VGA 1920 x 1080 @ 144Hz ASUS LCD Monitor VG249 Series 3-7 System Setup Adjusts the system configuration. Input Select VGA HDMI DisplayPort ASUS VG249 Racing Mode VGA 1920 x 1080 @ 144Hz 6. • Volume: Adjusts the output volume level. • Mute: Mute the output volume. • Source: Adjusts audio source to "Line In" or "DisplayPort" (only available for HDMI input); Input Select Select the input source from VGA, HDMI, DisplayPort input signal. Adjusts audio source to...

VG249Q Series User Guide
Page 23
ASUS LCD Monitor VG249 Series 3-9 3. Photo size: Provides photographers and other users to accurately view and edit their photos in real size on /off. • Power Key Lock: To disable / enable power key • All Reset: Selects "Yes" to the factory default mode. The selections are: English, French, German, Spanish, Italian, Dutch, , Russian, Poland, Czech, Croacia, Hungary, Romania, Portugal, Turkey, Simplified Chinese, Traditional Chinese, Japanese, Korean, Persian, Thai...
ASUS LCD Monitor VG249 Series 3-9 3. Photo size: Provides photographers and other users to accurately view and edit their photos in real size on /off. • Power Key Lock: To disable / enable power key • All Reset: Selects "Yes" to the factory default mode. The selections are: English, French, German, Spanish, Italian, Dutch, , Russian, Poland, Czech, Croacia, Hungary, Romania, Portugal, Turkey, Simplified Chinese, Traditional Chinese, Japanese, Korean, Persian, Thai...

VG249Q Series User Guide
Page 24
... Adjust", "Contrast", "Color Temp.", "Volume", "QuickFit", and set as shortcut key. The default setting is Blue Light Filter. 3-10 Chapter 3: General Instruction Shortcut Selecting this option allows you to set as shortcut key. The default setting is .GameVisual. • Shortcut 2: User can select from "Blue Light Filter" "GameVisual", "Brightness", "Auto Adjust", "Contrast", "Color Temp.", "Volume", "QuickFit", and set two shortcut keys. Shortcut Shortcut 1 Shortcut 2 ASUS VG249 Racing Mode VGA 1920 x 1080 @ 144Hz Blue Light Filter GameVisual Brightness Auto Adjust Contrast...
... Adjust", "Contrast", "Color Temp.", "Volume", "QuickFit", and set as shortcut key. The default setting is Blue Light Filter. 3-10 Chapter 3: General Instruction Shortcut Selecting this option allows you to set as shortcut key. The default setting is .GameVisual. • Shortcut 2: User can select from "Blue Light Filter" "GameVisual", "Brightness", "Auto Adjust", "Contrast", "Color Temp.", "Volume", "QuickFit", and set two shortcut keys. Shortcut Shortcut 1 Shortcut 2 ASUS VG249 Racing Mode VGA 1920 x 1080 @ 144Hz Blue Light Filter GameVisual Brightness Auto Adjust Contrast...

VG249Q Series User Guide
Page 25
Resolution Brightness (Typ.) Intrinsic Contrast Ratio (Typ.) Viewing Angle (CR>10) Display Colors Response Time Sound from HDMI HDMI input D-Sub input DisplayPort Audio Line-in Power ON Consumption Note Chassis Colors Power saving mode Power off mode Tilt VESA Wall Mounting Phys. Dimension without stand (WxHxD) (For VESA Wall Mount) Box Dimension (WxHxD) Net Weight (Esti.) Gross Weight (Esti.) Voltage Rating Temperature(operation) VG249Q 23.8''W(60.45cm) 1920x1080@144Hz 250cd/m2 1000:1 178°(H) /178°(V) 16.7 M 4ms (G To...
Resolution Brightness (Typ.) Intrinsic Contrast Ratio (Typ.) Viewing Angle (CR>10) Display Colors Response Time Sound from HDMI HDMI input D-Sub input DisplayPort Audio Line-in Power ON Consumption Note Chassis Colors Power saving mode Power off mode Tilt VESA Wall Mounting Phys. Dimension without stand (WxHxD) (For VESA Wall Mount) Box Dimension (WxHxD) Net Weight (Esti.) Gross Weight (Esti.) Voltage Rating Temperature(operation) VG249Q 23.8''W(60.45cm) 1920x1080@144Hz 250cd/m2 1000:1 178°(H) /178°(V) 16.7 M 4ms (G To...
VG249Q Series User Guide
Page 26
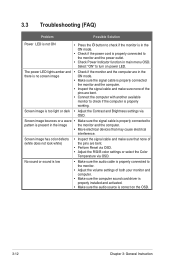
... mode. • Check if the power cord is properly connected to the monitor. • Adjust the volume settings of both your monitor and computer. • Make sure the computer sound card driver is properly installed and activated. • Make sure the audio source is correct on power LED. The power LED lights amber and • Check if the monitor and the computer are in the there is no screen image ON mode. • Make sure the signal cable is properly connected the monitor...
... mode. • Check if the power cord is properly connected to the monitor. • Adjust the volume settings of both your monitor and computer. • Make sure the computer sound card driver is properly installed and activated. • Make sure the audio source is correct on power LED. The power LED lights amber and • Check if the monitor and the computer are in the there is no screen image ON mode. • Make sure the signal cable is properly connected the monitor...
VG249Q Series User Guide
Page 27
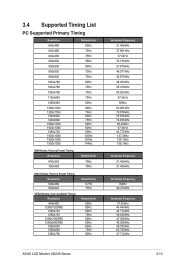
...Modes, Factory Preset Timing Resolution 640x350 720x400 Refresh Rate 70Hz 70Hz MAC Modes, Factory Preset Timing Resolution 640x480 832x624 VESA Modes, User Available Timing Resolution 848x480 1280x720(RB) 1280x720 1280x720 1280x768(RB) 1280x800(RB) 1280x800 1280x800 1366x768 Refresh Rate 67Hz 75Hz Refresh Rate 60Hz 60Hz 60Hz 75Hz 60Hz 60Hz 60Hz 75Hz 60Hz Horizontal Frequency...Horizontal Frequency 31.469kHz 31.469kHz Horizontal Frequency 35kHz 49.725kHz Horizontal Frequency 31.02kHz 44.444kHz 44.772kHz 56.456kHz 47.396kHz 49.306kHz 49.702kHz 62.795kHz 47.712kHz ASUS LCD Monitor VG249 Series...
...Modes, Factory Preset Timing Resolution 640x350 720x400 Refresh Rate 70Hz 70Hz MAC Modes, Factory Preset Timing Resolution 640x480 832x624 VESA Modes, User Available Timing Resolution 848x480 1280x720(RB) 1280x720 1280x720 1280x768(RB) 1280x800(RB) 1280x800 1280x800 1366x768 Refresh Rate 67Hz 75Hz Refresh Rate 60Hz 60Hz 60Hz 75Hz 60Hz 60Hz 60Hz 75Hz 60Hz Horizontal Frequency...Horizontal Frequency 31.469kHz 31.469kHz Horizontal Frequency 35kHz 49.725kHz Horizontal Frequency 31.02kHz 44.444kHz 44.772kHz 56.456kHz 47.396kHz 49.306kHz 49.702kHz 62.795kHz 47.712kHz ASUS LCD Monitor VG249 Series...

VG249Q Series User Guide
Page 28
For optimal resolution, we recommend that you choose a mode listed in the above tables. 3-14 Chapter 3: General Instruction 1440x900(RB) 1440x900 1680x1050(RB) 1920x1080 60Hz 75Hz 60Hz 60Hz 55.469kHz 70.635kHz 64.674kHz 66.587kHz SD/HD Timings HDMI/DP,CEA-861B Formats, SD/HD Supported Primary Timings of Resolution 640 x ... 31.5kHz 31.469/ 31.5kHz 31.25kHz 31.25kHz 56.25kHz 67.433/67.5kHz HDMI/DP,CEA-861B Formats, SD/HD Supported Optional Timings of Resolution Refresh Rate Horizontal Frequency 1440x480P 1440x576P 1920x1080P 1920x1080P 59.94 / 60Hz 50Hz 50Hz 59.94 / 60Hz 31.469 ...
For optimal resolution, we recommend that you choose a mode listed in the above tables. 3-14 Chapter 3: General Instruction 1440x900(RB) 1440x900 1680x1050(RB) 1920x1080 60Hz 75Hz 60Hz 60Hz 55.469kHz 70.635kHz 64.674kHz 66.587kHz SD/HD Timings HDMI/DP,CEA-861B Formats, SD/HD Supported Primary Timings of Resolution 640 x ... 31.5kHz 31.469/ 31.5kHz 31.25kHz 31.25kHz 56.25kHz 67.433/67.5kHz HDMI/DP,CEA-861B Formats, SD/HD Supported Optional Timings of Resolution Refresh Rate Horizontal Frequency 1440x480P 1440x576P 1920x1080P 1920x1080P 59.94 / 60Hz 50Hz 50Hz 59.94 / 60Hz 31.469 ...


