
User Guide
Page 4
...the dual function power switch 2-44 Chapter 3: BIOS setup 3.1 Managing and updating your BIOS 3-1 3.1.1 ASUS Update utility 3-1 3.1.2 ASUS EZ Flash 2 utility 3-4 3.1.3 ASUS CrashFree BIOS 3 utility 3-5 3.2 BIOS setup program 3-6 3.2.1 BIOS menu screen 3-7 3.2.2 Menu bar... 3-7 3.2.3 Navigation keys 3-7 3.2.4 Menu items 3-8 3.2.5 Submenu items 3-8 3.2.6 Configuration fields 3-8 3.2.7 Pop-up window 3-8 3.2.8 Scroll bar 3-8 ...
...the dual function power switch 2-44 Chapter 3: BIOS setup 3.1 Managing and updating your BIOS 3-1 3.1.1 ASUS Update utility 3-1 3.1.2 ASUS EZ Flash 2 utility 3-4 3.1.3 ASUS CrashFree BIOS 3 utility 3-5 3.2 BIOS setup program 3-6 3.2.1 BIOS menu screen 3-7 3.2.2 Menu bar... 3-7 3.2.3 Navigation keys 3-7 3.2.4 Menu items 3-8 3.2.5 Submenu items 3-8 3.2.6 Configuration fields 3-8 3.2.7 Pop-up window 3-8 3.2.8 Scroll bar 3-8 ...
User Guide
Page 7
Contents 4.3.4 ASUS AI Suite 4-21 4.3.5 ASUS AI Nap 4-23 4.3.6 ASUS Fan Xpert 4-24 4.3.7 CPU Level Up 4-26 4.3.8 ASUS EPU-6 Engine 4-27 4.3.9 ASUS TurboV 4-31 4.4 RAID configurations 4-33 4.4.1 RAID ...definitions 4-33 4.4.2 Installing Serial ATA hard disks 4-34 4.4.3 Setting the RAID item in BIOS 4-34 4.4.4 Intel® Matrix Storage Manager option ROM utility......... 4-35 4.5 Creating a RAID driver disk 4-40 4.5.1 Creating a RAID driver disk without entering the OS.... 4-40 4.5.2 Creating a RAID driver disk in Windows...
Contents 4.3.4 ASUS AI Suite 4-21 4.3.5 ASUS AI Nap 4-23 4.3.6 ASUS Fan Xpert 4-24 4.3.7 CPU Level Up 4-26 4.3.8 ASUS EPU-6 Engine 4-27 4.3.9 ASUS TurboV 4-31 4.4 RAID configurations 4-33 4.4.1 RAID ...definitions 4-33 4.4.2 Installing Serial ATA hard disks 4-34 4.4.3 Setting the RAID item in BIOS 4-34 4.4.4 Intel® Matrix Storage Manager option ROM utility......... 4-35 4.5 Creating a RAID driver disk 4-40 4.5.1 Creating a RAID driver disk without entering the OS.... 4-40 4.5.2 Creating a RAID driver disk in Windows...

User Guide
Page 40
...64-bit Windows OS when having 4GB or more memory on its SPD. DIMMs and DDR3-1600 are supported for the OS can be about 3GB or less. For optimum compatibility, we recommend that you obtain memory modules from the higher-sized channel is dependent on the motherboard, the ...memory frequency adjustment. • For system stability, use of memory, we recommend that you install 4GB or more memory installed on the motherboard. • This motherboard does not support DIMMs made up of the lower-sized channel for single-channel operation. • Due to Intel CPU spec, DIMMs ...
...64-bit Windows OS when having 4GB or more memory on its SPD. DIMMs and DDR3-1600 are supported for the OS can be about 3GB or less. For optimum compatibility, we recommend that you obtain memory modules from the higher-sized channel is dependent on the motherboard, the ...memory frequency adjustment. • For system stability, use of memory, we recommend that you install 4GB or more memory installed on the motherboard. • This motherboard does not support DIMMs made up of the lower-sized channel for single-channel operation. • Due to Intel CPU spec, DIMMs ...
User Guide
Page 55
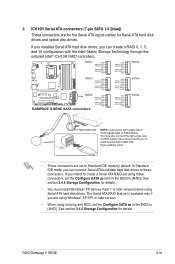
...1, 5, and 10 configuration with the Intel® Matrix Storage Technology through the onboard Intel® ICH10R RAID controllers. • These connectors are using Windows® XP SP1 or later version. • When using Serial ATA hard disk drives. 2. See section 3.4.5 Storage Configuration for Serial ATA hard disk...; You must install Windows® XP Service Pack 1 or later version before using hot-plug and NCQ, set to [RAID]. The Serial ATA RAID feature is available only if you can connect Serial ATA boot/data hard disk drives to [AHCI]. ROG Rampage II GENE 2-31 If you ...
...1, 5, and 10 configuration with the Intel® Matrix Storage Technology through the onboard Intel® ICH10R RAID controllers. • These connectors are using Windows® XP SP1 or later version. • When using Serial ATA hard disk drives. 2. See section 3.4.5 Storage Configuration for Serial ATA hard disk...; You must install Windows® XP Service Pack 1 or later version before using hot-plug and NCQ, set to [RAID]. The Serial ATA RAID feature is available only if you can connect Serial ATA boot/data hard disk drives to [AHCI]. ROG Rampage II GENE 2-31 If you ...

User Guide
Page 68
...-off mode, depending on the BIOS setting. The power supply should turn off after Windows® shuts down. Refer to shut down the computer. 3. The power supply should turn off after Windows® shuts down. 2.9.2 Using the dual function power switch While the system is ON..., pressing the power switch for details. 2-44 Chapter 2: Hardware information If you are using Windows® Vista™: 1. 2.9 Turning off the computer ...
...-off mode, depending on the BIOS setting. The power supply should turn off after Windows® shuts down. Refer to shut down the computer. 3. The power supply should turn off after Windows® shuts down. 2.9.2 Using the dual function power switch While the system is ON..., pressing the power switch for details. 2-44 Chapter 2: Hardware information If you are using Windows® Vista™: 1. 2.9 Turning off the computer ...
User Guide
Page 71
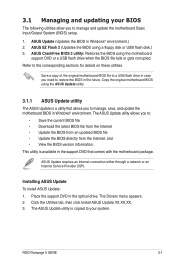
... following utilities allow you to manage and update the motherboard Basic Input/Output System (BIOS) setup. 1. Place the support DVD in Windows® environment.) 2. ASUS CrashFree BIOS 3 utility: Restores the BIOS using a floppy disk or USB flash disk.) 3. ROG Rampage II GENE 3-1 3.1 Managing and updating your system. The ASUS Update utility allows you to : • Save the...
... following utilities allow you to manage and update the motherboard Basic Input/Output System (BIOS) setup. 1. Place the support DVD in Windows® environment.) 2. ASUS CrashFree BIOS 3 utility: Restores the BIOS using a floppy disk or USB flash disk.) 3. ROG Rampage II GENE 3-1 3.1 Managing and updating your system. The ASUS Update utility allows you to : • Save the...
User Guide
Page 72
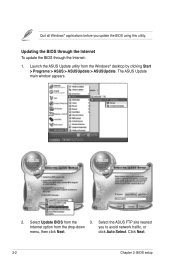
Quit all Windows® applications before you to avoid network traffic, or menu, then click Next. The ASUS Update main window appears. 2. Select Update BIOS from the drop‑down you update the BIOS using this utility. Click Next. 3-2 Chapter 3: BIOS setup Updating the BIOS through the Internet To update the BIOS through the Internet: 1. Select the ASUS FTP site nearest Internet option from the 3. click Auto Select. Launch the ASUS Update utility from the Windows® desktop by clicking Start > Programs > ASUS > ASUSUpdate > ASUSUpdate.
Quit all Windows® applications before you to avoid network traffic, or menu, then click Next. The ASUS Update main window appears. 2. Select Update BIOS from the drop‑down you update the BIOS using this utility. Click Next. 3-2 Chapter 3: BIOS setup Updating the BIOS through the Internet To update the BIOS through the Internet: 1. Select the ASUS FTP site nearest Internet option from the 3. click Auto Select. Launch the ASUS Update utility from the Windows® desktop by clicking Start > Programs > ASUS > ASUSUpdate > ASUSUpdate.

User Guide
Page 73
... BIOS version that you wish to complete the update process. Click Next. 5. The ASUS Update main window appears. 2. Select Update BIOS from a file option from the Windows® desktop by clicking Start > Programs > ASUS > ASUSUpdate > ASUSUpdate. RAMIIGEN.ROM RAMIIGEN ROG Rampage II GENE 3-3 Launch the ASUS Update utility from the drop‑down menu, then click Next. 3. Follow...
... BIOS version that you wish to complete the update process. Click Next. 5. The ASUS Update main window appears. 2. Select Update BIOS from a file option from the Windows® desktop by clicking Start > Programs > ASUS > ASUSUpdate > ASUSUpdate. RAMIIGEN.ROM RAMIIGEN ROG Rampage II GENE 3-3 Launch the ASUS Update utility from the drop‑down menu, then click Next. 3. Follow...

User Guide
Page 78
... do not fit on the screen. You cannot select an item that menu. Refer to 3.2.7 Pop-up window. 3.2.7 Pop-up window Select a menu item then press to display a pop-up window 3.2.9 General help At the top right corner of the menu screen is user-configurable, you can change the... Help Save and Exit Exit v02.61 (C)Copyright 1985-2008, American Megatrends, Inc. To change the value of options. Scroll bar Pop-up window with the configuration options for that is highlighted when selected. A configurable field is enclosed in brackets, and is not user-configurable. Press the ...
... do not fit on the screen. You cannot select an item that menu. Refer to 3.2.7 Pop-up window. 3.2.7 Pop-up window Select a menu item then press to display a pop-up window 3.2.9 General help At the top right corner of the menu screen is user-configurable, you can change the... Help Save and Exit Exit v02.61 (C)Copyright 1985-2008, American Megatrends, Inc. To change the value of options. Scroll bar Pop-up window with the configuration options for that is highlighted when selected. A configurable field is enclosed in brackets, and is not user-configurable. Press the ...

User Guide
Page 113
...Exit & Save Changes Exit & Discard Changes Discard Changes F10 key can be used for this option or if you press , a confirmation window appears. Exit & Save Changes Once you are finished making your selections, choose this menu or from the Exit menu to ensure the values... option, a confirmation appears. Press to save changes and exit. After selecting this option, a confirmation window appears. If you made and restore the previously saved values. ROG Rampage II GENE 3-43 Select YES to the BIOS items. Main Extreme Tweaker BIOS SETUP UTILITY Advanced Power Boot Tools ...
...Exit & Save Changes Exit & Discard Changes Discard Changes F10 key can be used for this option or if you press , a confirmation window appears. Exit & Save Changes Once you are finished making your selections, choose this menu or from the Exit menu to ensure the values... option, a confirmation appears. Press to save changes and exit. After selecting this option, a confirmation window appears. If you made and restore the previously saved values. ROG Rampage II GENE 3-43 Select YES to the BIOS items. Main Extreme Tweaker BIOS SETUP UTILITY Advanced Power Boot Tools ...

User Guide
Page 117
...Running the support DVD Place the support DVD to change at any time without notice. ROG Rampage II GENE 4-1 4.1 Installing an operating system This motherboard supports Windows® X��P�/�6�4��-b��it�X��P�/&#...65533;�(�O��S�)�. Visit the ASUS website (www.asus.com) for better compatibility and system stability. 4.2 Support DVD information The support DVD that came with the motherboard package contains the drivers, software applications, and utilities...
...Running the support DVD Place the support DVD to change at any time without notice. ROG Rampage II GENE 4-1 4.1 Installing an operating system This motherboard supports Windows® X��P�/�6�4��-b��it�X��P�/&#...65533;�(�O��S�)�. Visit the ASUS website (www.asus.com) for better compatibility and system stability. 4.2 Support DVD information The support DVD that came with the motherboard package contains the drivers, software applications, and utilities...
User Guide
Page 119
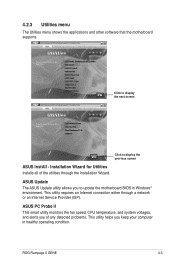
...Windows® environment. This utility requires an Internet connection either through the Installation Wizard. ASUS PC Probe II This smart utility monitors the fan speed, CPU temperature, and system voltages, and alerts you of the utilities through a network or an Internet Service Provider (ISP). ROG Rampage II GENE... 4-3 Installation Wizard for Utilities Installs all of any detected problems. This utility helps you to display the previous screen ASUS InstAll - 4.2.3 Utilities menu The Utilities menu shows the applications and other software that the motherboard ...
...Windows® environment. This utility requires an Internet connection either through the Installation Wizard. ASUS PC Probe II This smart utility monitors the fan speed, CPU temperature, and system voltages, and alerts you of the utilities through a network or an Internet Service Provider (ISP). ROG Rampage II GENE... 4-3 Installation Wizard for Utilities Installs all of any detected problems. This utility helps you to display the previous screen ASUS InstAll - 4.2.3 Utilities menu The Utilities menu shows the applications and other software that the motherboard ...
User Guide
Page 125
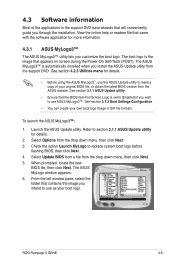
... the new BIOS file, then click Next. From the left window pane, select the folder that the BIOS item Full Screen Logo is automatically installed when you intend to use as your boot logo. ROG Rampage II GENE 4-9 Launch the ASUS Update utility. To launch the ASUS MyLogo3 1. Refer to replace system boot logo before flashing...
... the new BIOS file, then click Next. From the left window pane, select the folder that the BIOS item Full Screen Logo is automatically installed when you intend to use as your boot logo. ROG Rampage II GENE 4-9 Launch the ASUS Update utility. To launch the ASUS MyLogo3 1. Refer to replace system boot logo before flashing...
User Guide
Page 126
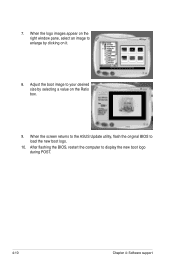
When the logo images appear on the right window pane, select an image to your desired size by clicking on the Ratio box. 9. Adjust the boot image to enlarge by selecting a value on it. 8. After flashing the BIOS, restart the computer to load the new boot logo. 10. When the screen returns to the ASUS Update utility, flash the original BIOS to display the new boot logo during POST. 4-10 Chapter 4: Software support 7.
When the logo images appear on the right window pane, select an image to your desired size by clicking on the Ratio box. 9. Adjust the boot image to enlarge by selecting a value on it. 8. After flashing the BIOS, restart the computer to load the new boot logo. 10. When the screen returns to the ASUS Update utility, flash the original BIOS to display the new boot logo during POST. 4-10 Chapter 4: Software support 7.
User Guide
Page 131
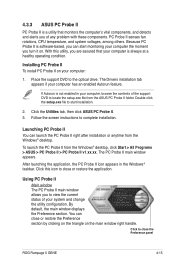
...ASUS PC Probe II PC Probe II is a utility that your computer is always at a healthy operating condition. With this icon to close the Preference panel ROG Rampage II GENE 4-15 To launch the PC Probe II from the Windows® desktop. Installing PC Probe II To install PC Probe II on . The PC Probe II main window... section. Double-click the setup.exe file to locate the setup.exe file from the ASUS PC Probe II folder. Using PC Probe II Main window The PC Probe II main window allows you to view the current status of any problem with these components. If Autorun ...
...ASUS PC Probe II PC Probe II is a utility that your computer is always at a healthy operating condition. With this icon to close the Preference panel ROG Rampage II GENE 4-15 To launch the PC Probe II from the Windows® desktop. Installing PC Probe II To install PC Probe II on . The PC Probe II main window... section. Double-click the setup.exe file to locate the setup.exe file from the ASUS PC Probe II folder. Using PC Probe II Main window The PC Probe II main window allows you to view the current status of any problem with these components. If Autorun ...

User Guide
Page 132
... customize the application using the Preference section in the main window. Button Function Opens the Configuration window Opens the Report window Opens the Desktop Management Interface window Opens the Peripheral Component Interconnect window Opens the Windows Management Instrumentation window Opens the hard disk drive, memory, CPU usage window Shows/Hides the Preference section Minimizes the application Closes the...
... customize the application using the Preference section in the main window. Button Function Opens the Configuration window Opens the Report window Opens the Desktop Management Interface window Opens the Peripheral Component Interconnect window Opens the Windows Management Instrumentation window Opens the hard disk drive, memory, CPU usage window Shows/Hides the Preference section Minimizes the application Closes the...

User Guide
Page 133
... two display modes: hexagonal (large) and rectangular (small). The hardware monitor panels come in a small monitoring panel. You can now move together using the Config window. You can adjust the sensor threshold value in the desktop, click the arrow down button of a system sensor such as fan rotation, CPU temperature, and... appear on your computer's desktop. Click to increase value Click to detach a monitor panel from the list box. When you want to decrease value ROG Rampage II GENE 4-17
... two display modes: hexagonal (large) and rectangular (small). The hardware monitor panels come in a small monitoring panel. You can now move together using the Config window. You can adjust the sensor threshold value in the desktop, click the arrow down button of a system sensor such as fan rotation, CPU temperature, and... appear on your computer's desktop. Click to increase value Click to detach a monitor panel from the list box. When you want to decrease value ROG Rampage II GENE 4-17

User Guide
Page 134
This browser displays various Windows® management information. You can enlarge or reduce the browser size by dragging the bottom right corner of the browser. Refer to display on the ... sensor alert The monitor panel turns red when a component value exceeds or is lower than the threshold value. DMI browser Click to display the WMI (Windows Management Instrumentation) browser. This browser displays various desktop and system information. Small display Large display WMI browser Click to display the DMI (Desktop Management Interface...
This browser displays various Windows® management information. You can enlarge or reduce the browser size by dragging the bottom right corner of the browser. Refer to display on the ... sensor alert The monitor panel turns red when a component value exceeds or is lower than the threshold value. DMI browser Click to display the WMI (Windows Management Instrumentation) browser. This browser displays various desktop and system information. Small display Large display WMI browser Click to display the DMI (Desktop Management Interface...

User Guide
Page 135
...) browser. ROG Rampage II GENE 4-19 This browser provides information on the PCI devices installed on the CPU, hard disk drive space, and memory usage. Hard disk drive space usage The Hard Disk tab displays the used (blue) and the available HDD space. The pie chart at the bottom of the window represents the...
...) browser. ROG Rampage II GENE 4-19 This browser provides information on the PCI devices installed on the CPU, hard disk drive space, and memory usage. Hard disk drive space usage The Hard Disk tab displays the used (blue) and the available HDD space. The pie chart at the bottom of the window represents the...

User Guide
Page 136
Memory usage The Memory tab shows both used (blue) and the available physical memory. The Config window has two tabs: Sensor/Threshold and Preference. Loads the default threshold values for each sensor Applies your changes Cancels or ignores your changes Loads your ... sensor threshold values. The Preference tab allows you to activate the sensors or to customize sensor alerts, or change the temperature scale. Configuring PC Probe II Click to view and adjust the sensor threshold values. The pie chart at the bottom of the...
Memory usage The Memory tab shows both used (blue) and the available physical memory. The Config window has two tabs: Sensor/Threshold and Preference. Loads the default threshold values for each sensor Applies your changes Cancels or ignores your changes Loads your ... sensor threshold values. The Preference tab allows you to activate the sensors or to customize sensor alerts, or change the temperature scale. Configuring PC Probe II Click to view and adjust the sensor threshold values. The pie chart at the bottom of the...


