User Manual
Page 3
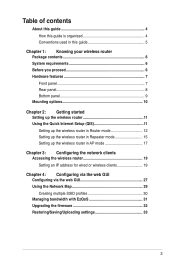
... 8 Bottom panel 9 Mounting options 10 Chapter 2: Getting started Setting up the wireless router 11 Using the Quick Internet Setup (QIS 11 Setting up the wireless router in Router mode 12 Setting up the wireless router in Repeater mode 15 Setting up the wireless router in AP mode 17 Chapter 3: Configuring the network clients Accessing the wireless...
... 8 Bottom panel 9 Mounting options 10 Chapter 2: Getting started Setting up the wireless router 11 Using the Quick Internet Setup (QIS 11 Setting up the wireless router in Router mode 12 Setting up the wireless router in Repeater mode 15 Setting up the wireless router in AP mode 17 Chapter 3: Configuring the network clients Accessing the wireless...

User Manual
Page 11
.... Chapter 2: Setting up the wireless router The ASUS Wireless Router includes a web graphics user interface (web GUI) that allows you to configure the wireless router using your web browser on configuring your web browser. Using the Quick Internet Setup (QIS) The Quick Internet Setup (QIS) function, which is integrated...access the web GUI. To do this, click Go in setting up the wireless router in the web GUI. 2 Getting started Setting up the hardware RT-N12 11 You can set up the wireless router in the support CD to Chapter 4: Configuring via the web GUI. Note: To...
.... Chapter 2: Setting up the wireless router The ASUS Wireless Router includes a web graphics user interface (web GUI) that allows you to configure the wireless router using your web browser on configuring your web browser. Using the Quick Internet Setup (QIS) The Quick Internet Setup (QIS) function, which is integrated...access the web GUI. To do this, click Go in setting up the wireless router in the web GUI. 2 Getting started Setting up the hardware RT-N12 11 You can set up the wireless router in the support CD to Chapter 4: Configuring via the web GUI. Note: To...
User Manual
Page 12
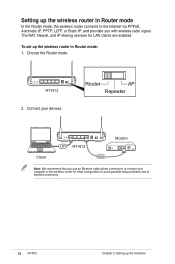
...: 1. The NAT, firewall, and IP sharing services for initial configuration to avoid possible setup problems due to wireless uncertainty. 12 RT-N12 Chapter 2: Setting up the wireless router in Router mode In the Router mode, the wireless router connects to the Internet via PPPoE, Automatic IP, PPTP, L2TP, or Static IP, and provides you use an Ethernet...
...: 1. The NAT, firewall, and IP sharing services for initial configuration to avoid possible setup problems due to wireless uncertainty. 12 RT-N12 Chapter 2: Setting up the wireless router in Router mode In the Router mode, the wireless router connects to the Internet via PPPoE, Automatic IP, PPTP, L2TP, or Static IP, and provides you use an Ethernet...
User Manual
Page 14
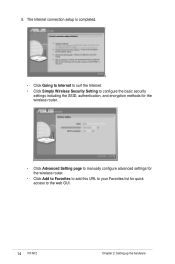
5. The Internet connection setup is completed. • Click Going to Internet to surf the Internet. • Click Simply Wireless Security Setting to configure the basic security settings including the SSID, authentication, and encryption methods for the wireless router. • Click Advanced Setting page to manually configure advanced settings for the wireless router. • Click Add to Favorites to add this URL to your Favorites list for quick access to the web GUI. 14 RT-N12 Chapter 2: Setting up the hardware
5. The Internet connection setup is completed. • Click Going to Internet to surf the Internet. • Click Simply Wireless Security Setting to configure the basic security settings including the SSID, authentication, and encryption methods for the wireless router. • Click Advanced Setting page to manually configure advanced settings for the wireless router. • Click Add to Favorites to add this URL to your Favorites list for quick access to the web GUI. 14 RT-N12 Chapter 2: Setting up the hardware
User Manual
Page 15
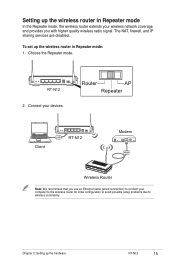
... computer to the wireless router for initial configuration to avoid possible setup problems due to wireless uncertainty. The NAT, firewall, and IP sharing services are disabled. To set up the hardware RT-N12 15 Choose the Repeater mode. Router AP Repeater Client RT-N12 Modem Wireless Router Note: We recommend that you with higher quality wireless radio signal...
... computer to the wireless router for initial configuration to avoid possible setup problems due to wireless uncertainty. The NAT, firewall, and IP sharing services are disabled. To set up the hardware RT-N12 15 Choose the Repeater mode. Router AP Repeater Client RT-N12 Modem Wireless Router Note: We recommend that you with higher quality wireless radio signal...
User Manual
Page 17
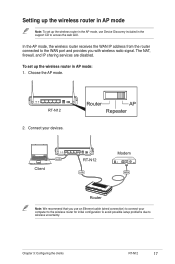
... the WAN IP address from the router connected to wireless uncertainty. RT-N12 2. Chapter 3: Configuring the clients RT-N12 17 Connect your computer to the wireless router for initial configuration to avoid possible setup problems due to the WAN port and provides you with wireless radio signal. Router AP Repeater Client RT-N12 Modem Router Note: We recommend that you use...
... the WAN IP address from the router connected to wireless uncertainty. RT-N12 2. Chapter 3: Configuring the clients RT-N12 17 Connect your computer to the wireless router for initial configuration to avoid possible setup problems due to the WAN port and provides you with wireless radio signal. Router AP Repeater Client RT-N12 Modem Router Note: We recommend that you use...

User Manual
Page 22
From the IP Address tab of the Microsoft TCP/IP Properties window, you can: • Select the type of network adapter installed in your system. • Set the router to display the Network setup window then select the Protocols tab. 2. Go to Control Panel > Network to assign IP address automatically. • Manually set up the IP address, subnet mask, and default gateway. 22 RT-N12 Chapter 3: Configuring the clients Windows® NT4.0 1. Select TCP/IP Protocol from the Network Protocols list then click Properties. 3.
From the IP Address tab of the Microsoft TCP/IP Properties window, you can: • Select the type of network adapter installed in your system. • Set the router to display the Network setup window then select the Protocols tab. 2. Go to Control Panel > Network to assign IP address automatically. • Manually set up the IP address, subnet mask, and default gateway. 22 RT-N12 Chapter 3: Configuring the clients Windows® NT4.0 1. Select TCP/IP Protocol from the Network Protocols list then click Properties. 3.

User Manual
Page 34
To install the utilities: 1. Click Next. 34 RT-N12 Chapter 5: Installing the utilities Click Install...Utilities. 2. If Autorun is disabled, run setup.exe from the root directory of the support CD. To install the ASUS WLAN Utilities in Microsoft® Windows, insert the support CD in the CD drive. 5 Installing the utilities Installing the utilities The support CD contains the utilities for configuring the ASUS Wireless Router.
To install the utilities: 1. Click Next. 34 RT-N12 Chapter 5: Installing the utilities Click Install...Utilities. 2. If Autorun is disabled, run setup.exe from the root directory of the support CD. To install the ASUS WLAN Utilities in Microsoft® Windows, insert the support CD in the CD drive. 5 Installing the utilities Installing the utilities The support CD contains the utilities for configuring the ASUS Wireless Router.
User Manual
Page 38
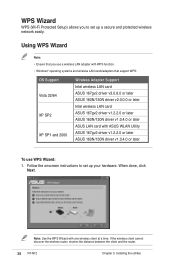
...Setup) allows you use WPS Wizard: 1. When done, click Next. If the wireless client cannot discover the wireless router, shorten the distance between the client and the router. 38 RT-N12 Chapter 5: Installing the utilities Note: Use the WPS Wizard with ASUS WLAN Utility ASUS 167gv2 driver v1.2.2.0 or later ASUS... Wireless Adapter Support Intel wireless LAN card ASUS 167gv2 driver v3.0.6.0 or later ASUS 160N/130N driver v2.0.0.0 or later Intel wireless LAN card ASUS 167gv2 driver v1.2.2.0 or later ASUS 160N/130N driver v1.0.4.0 or later ASUS LAN card with one wireless client at ...
...Setup) allows you use WPS Wizard: 1. When done, click Next. If the wireless client cannot discover the wireless router, shorten the distance between the client and the router. 38 RT-N12 Chapter 5: Installing the utilities Note: Use the WPS Wizard with ASUS WLAN Utility ASUS 167gv2 driver v1.2.2.0 or later ASUS... Wireless Adapter Support Intel wireless LAN card ASUS 167gv2 driver v3.0.6.0 or later ASUS 160N/130N driver v2.0.0.0 or later Intel wireless LAN card ASUS 167gv2 driver v1.2.2.0 or later ASUS 160N/130N driver v1.0.4.0 or later ASUS LAN card with one wireless client at ...

User Manual
Page 41
You have connected to configure the Internet settings, click Setup. If you want to the wireless router. Click Save or print settings for future reference or Save settings to a USB flash drive to add other devices to close the WPS Wizard. Installation is completed. Click Finish to the network. Note: For more details on adding devices to the network using a USB flash drive, refer to the Internet. 6. Chapter 5: Installing the utilities RT-N12 41 Click Next to connect to the section Adding network devices using a USB flash drive on the next page. 7.
You have connected to configure the Internet settings, click Setup. If you want to the wireless router. Click Save or print settings for future reference or Save settings to a USB flash drive to add other devices to close the WPS Wizard. Installation is completed. Click Finish to the network. Note: For more details on adding devices to the network using a USB flash drive, refer to the Internet. 6. Chapter 5: Installing the utilities RT-N12 41 Click Next to connect to the section Adding network devices using a USB flash drive on the next page. 7.


