

GR6 Users manualEnglish
Page 2
... are entitled to claim damages from omission or failure of performing legal duties under this Warranty Statement, up to infringe. SPECIFICATIONS AND INFORMATION CONTAINED IN THIS MANUAL ARE FURNISHED FOR INFORMATIONAL USE ONLY, AND ARE SUBJECT TO CHANGE AT ANY TIME WITHOUT NOTICE, AND SHOULD NOT...ERRORS OR INACCURACIES THAT MAY APPEAR IN THIS MANUAL, INCLUDING THE PRODUCTS AND SOFTWARE DESCRIBED IN IT. UNDER NO CIRCUMSTANCES IS ASUS LIABLE FOR ANY OF THE FOLLOWING: (1) THIRDPARTY CLAIMS AGAINST YOU FOR DAMAGES; (2) LOSS OF, OR DAMAGE TO, YOUR RECORDS OR DATA; SERVICE AND SUPPORT...
... are entitled to claim damages from omission or failure of performing legal duties under this Warranty Statement, up to infringe. SPECIFICATIONS AND INFORMATION CONTAINED IN THIS MANUAL ARE FURNISHED FOR INFORMATIONAL USE ONLY, AND ARE SUBJECT TO CHANGE AT ANY TIME WITHOUT NOTICE, AND SHOULD NOT...ERRORS OR INACCURACIES THAT MAY APPEAR IN THIS MANUAL, INCLUDING THE PRODUCTS AND SOFTWARE DESCRIBED IN IT. UNDER NO CIRCUMSTANCES IS ASUS LIABLE FOR ANY OF THE FOLLOWING: (1) THIRDPARTY CLAIMS AGAINST YOU FOR DAMAGES; (2) LOSS OF, OR DAMAGE TO, YOUR RECORDS OR DATA; SERVICE AND SUPPORT...
GR6 Users manualEnglish
Page 3
... ROG GR6 Features...8 Front panel...8 Bottom view...10 Top view...10 Rear panel...11 Using your ROG GR6 Getting started 16 Positioning your ROG GR6 16 Connecting the AC power adapter 17 Connecting a display panel 19 Connecting the keyboard or mouse 20 Turning on your ROG GR6 21 Using the Steam Big Picture Launcher 22 Recovering your system 23 Resetting your PC 23 Removing everything and reinstalling Windows 25 Turning off your ROG GR6 26 Putting your ROG GR6 to sleep 26 Entering the BIOS Setup...
... ROG GR6 Features...8 Front panel...8 Bottom view...10 Top view...10 Rear panel...11 Using your ROG GR6 Getting started 16 Positioning your ROG GR6 16 Connecting the AC power adapter 17 Connecting a display panel 19 Connecting the keyboard or mouse 20 Turning on your ROG GR6 21 Using the Steam Big Picture Launcher 22 Recovering your system 23 Resetting your PC 23 Removing everything and reinstalling Windows 25 Turning off your ROG GR6 26 Putting your ROG GR6 to sleep 26 Entering the BIOS Setup...
GR6 Users manualEnglish
Page 4
Contents Upgrading your ROG GR6 Upgrading memory modules 30 Installing a 2.5-inch storage drive 35 Appendix Safety information 42 Setting up your system 42 Care during use 43 Regulatory notices 44 ASUS contact information 50 4 GR6
Contents Upgrading your ROG GR6 Upgrading memory modules 30 Installing a 2.5-inch storage drive 35 Appendix Safety information 42 Setting up your system 42 Care during use 43 Regulatory notices 44 ASUS contact information 50 4 GR6
GR6 Users manualEnglish
Page 6
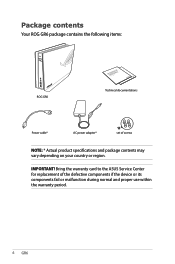
IMPORTANT! Bring the warranty card to the ASUS Service Center for replacement of screws NOTE: * Actual product specifications and package contents may vary depending on your country or region. Package contents Your ROG GR6 package contains the following items: ROG GR6 Technical documentations Power cable* AC power adapter* set of the defective components if the device or its components fail or malfunction during normal and proper use within the warranty period. 6 GR6
IMPORTANT! Bring the warranty card to the ASUS Service Center for replacement of screws NOTE: * Actual product specifications and package contents may vary depending on your country or region. Package contents Your ROG GR6 package contains the following items: ROG GR6 Technical documentations Power cable* AC power adapter* set of the defective components if the device or its components fail or malfunction during normal and proper use within the warranty period. 6 GR6
GR6 Users manualEnglish
Page 9
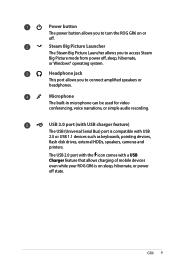
... access Steam Big Picture mode from power off, sleep, hibernate, or Windows® operating system. The USB 2.0 port with the icon comes with USB 2.0 or USB 1.1 devices such as keyboards, pointing devices, flash disk drives, external HDDs, speakers, cameras and printers. USB 2.0 port (with USB charger feature) The USB (Universal Serial Bus) port is compatible with a USB Charger feature that allows charging of mobile devices even while your ROG GR6 is on or off. Power button The power button allows you to turn the ROG GR6...
... access Steam Big Picture mode from power off, sleep, hibernate, or Windows® operating system. The USB 2.0 port with the icon comes with USB 2.0 or USB 1.1 devices such as keyboards, pointing devices, flash disk drives, external HDDs, speakers, cameras and printers. USB 2.0 port (with USB charger feature) The USB (Universal Serial Bus) port is compatible with a USB Charger feature that allows charging of mobile devices even while your ROG GR6 is on or off. Power button The power button allows you to turn the ROG GR6...
GR6 Users manualEnglish
Page 11
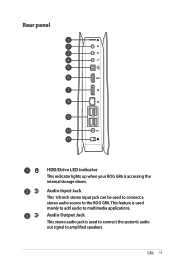
GR6 11 This feature is accessing the internal storage drives. Audio Input Jack This 1/8-inch stereo input jack can be used to connect a stereo audio source to amplified speakers. Rear panel HDD/Drive LED indicator This indicator lights up when your ROG GR6 is used mainly to add audio to multimedia applications. Audio Output Jack This stereo audio jack is used to connect the system's audio out signal to the ROG GR6.
GR6 11 This feature is accessing the internal storage drives. Audio Input Jack This 1/8-inch stereo input jack can be used to connect a stereo audio source to amplified speakers. Rear panel HDD/Drive LED indicator This indicator lights up when your ROG GR6 is used mainly to add audio to multimedia applications. Audio Output Jack This stereo audio jack is used to connect the system's audio out signal to the ROG GR6.
GR6 Users manualEnglish
Page 12
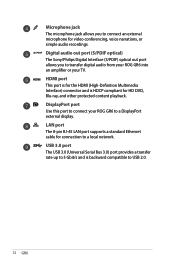
... LAN port supports a standard Ethernet cable for video conferencing, voice narrations, or simple audio recordings. DisplayPort port Use this port to connect your TV. Digital audio out port (S/PDIF optical) The Sony/Philips Digital Interface (S/PDIF) optical out port allows you to connect an external microphone for connection to a DisplayPort external display. USB 3.0 port The USB 3.0 (Universal Serial Bus 3.0) port provides a transfer rate up to 5 Gbit/s and is HDCP compliant for the HDMI (High-Definition Multimedia Interface) connector...
... LAN port supports a standard Ethernet cable for video conferencing, voice narrations, or simple audio recordings. DisplayPort port Use this port to connect your TV. Digital audio out port (S/PDIF optical) The Sony/Philips Digital Interface (S/PDIF) optical out port allows you to connect an external microphone for connection to a DisplayPort external display. USB 3.0 port The USB 3.0 (Universal Serial Bus 3.0) port provides a transfer rate up to 5 Gbit/s and is HDCP compliant for the HDMI (High-Definition Multimedia Interface) connector...

GR6 Users manualEnglish
Page 20
Connecting a USB keyboard or mouse 20 GR6 You can connect generally any of the USB 2.0/3.0 ports of your ROG GR6. Connecting the keyboard or mouse You can also connect a USB dongle for a wireless keyboard and mouse set. To connect a keyboard and mouse to your ROG GR6: Connect the USB cable from your keyboard and mouse to any USB keyboard and mouse to your ROG GR6.
Connecting a USB keyboard or mouse 20 GR6 You can connect generally any of the USB 2.0/3.0 ports of your ROG GR6. Connecting the keyboard or mouse You can also connect a USB dongle for a wireless keyboard and mouse set. To connect a keyboard and mouse to your ROG GR6: Connect the USB cable from your keyboard and mouse to any USB keyboard and mouse to your ROG GR6.
GR6 Users manualEnglish
Page 23
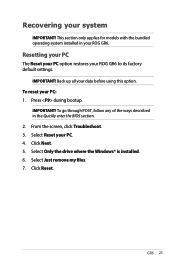
... Quickly enter the BIOS section. 2. To reset your ROG GR6 to its factory default settings. From the screen, click Troubleshoot. 3. Click Next. 5. Select Only the drive where the Windows® is installed. 6. To go through POST, follow any of the ways described in your data before using this option. Click Reset. Resetting your PC The Reset your PC option restores your PC: 1. Back up all your ROG GR6. GR6 23 Select Just remove my...
... Quickly enter the BIOS section. 2. To reset your ROG GR6 to its factory default settings. From the screen, click Troubleshoot. 3. Click Next. 5. Select Only the drive where the Windows® is installed. 6. To go through POST, follow any of the ways described in your data before using this option. Click Reset. Resetting your PC The Reset your PC option restores your PC: 1. Back up all your ROG GR6. GR6 23 Select Just remove my...
GR6 Users manualEnglish
Page 25
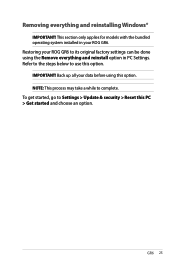
Removing everything and reinstall option in your ROG GR6. IMPORTANT! GR6 25 Refer to the steps below to its original factory settings can be done using this option. Back up all your ROG GR6 to use this option. To get started, go to complete. NOTE: This process may take a while to Settings > Update & security > Reset this PC > Get started and choose an option. This section only applies for models with the bundled operating system installed in PC Settings. Restoring your data before using the Remove everything and reinstalling Windows® IMPORTANT!
Removing everything and reinstall option in your ROG GR6. IMPORTANT! GR6 25 Refer to the steps below to its original factory settings can be done using this option. Back up all your ROG GR6 to use this option. To get started, go to complete. NOTE: This process may take a while to Settings > Update & security > Reset this PC > Get started and choose an option. This section only applies for models with the bundled operating system installed in PC Settings. Restoring your data before using the Remove everything and reinstalling Windows® IMPORTANT!
GR6 Users manualEnglish
Page 26
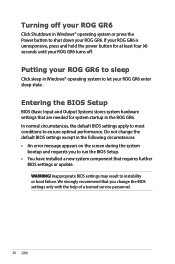
... ROG GR6 turns off your ROG GR6 Click Shutdown in Windows® operating system or press the Power button to run the BIOS Setup. • You have installed a new system component that are needed for at least four (4) seconds until your ROG GR6 enter sleep state. In normal circumstances, the default BIOS settings apply to most conditions to instability or boot failure. If your ROG GR6 is unresponsive, press and hold the power button for system startup in the ROG GR6...
... ROG GR6 turns off your ROG GR6 Click Shutdown in Windows® operating system or press the Power button to run the BIOS Setup. • You have installed a new system component that are needed for at least four (4) seconds until your ROG GR6 enter sleep state. In normal circumstances, the default BIOS settings apply to most conditions to instability or boot failure. If your ROG GR6 is unresponsive, press and hold the power button for system startup in the ROG GR6...
GR6 Users manualEnglish
Page 30
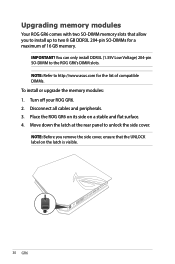
... the rear panel to the ROG GR6's DIMM slots. NOTE: Before you remove the side cover, ensure that allow you to install up to http://www.asus.com for a maximum of compatible DIMMs. To install or upgrade the memory modules: 1. NOTE: Refer to two 8 GB DDR3L 204-pin SO-DIMMs for the list of 16 GB memory. Upgrading memory modules Your ROG GR6 comes with two SO-DIMM memory slots that...
... the rear panel to the ROG GR6's DIMM slots. NOTE: Before you remove the side cover, ensure that allow you to install up to http://www.asus.com for a maximum of compatible DIMMs. To install or upgrade the memory modules: 1. NOTE: Refer to two 8 GB DDR3L 204-pin SO-DIMMs for the list of 16 GB memory. Upgrading memory modules Your ROG GR6 comes with two SO-DIMM memory slots that...

GR6 Users manualEnglish
Page 32
B. Repeat steps A and B to release the memory module. 7. C. Carefully remove the memory module. To remove a memory module: A. Press the retaining clips on each side to remove the other memory module. NOTE: • Use the same model and speed when replacing memory modules. • Remove the upper memory module first if you wish to replace the lower memory module. 32 GR6 Remove the memory modules.
B. Repeat steps A and B to release the memory module. 7. C. Carefully remove the memory module. To remove a memory module: A. Press the retaining clips on each side to remove the other memory module. NOTE: • Use the same model and speed when replacing memory modules. • Remove the upper memory module first if you wish to replace the lower memory module. 32 GR6 Remove the memory modules.

User Guide English
Page 2
...This limit also applies to recover damages from ASUS. SPECIFICATIONS AND INFORMATION CONTAINED IN THIS MANUAL ARE FURNISHED FOR INFORMATIONAL USE ONLY, AND ARE SUBJECT TO CHANGE AT ANY TIME WITHOUT NOTICE, AND SHOULD...ERROR IN THIS MANUAL OR PRODUCT. E10138 First Edition January 2015 COPYRIGHT INFORMATION No part of this Warranty Statement, up to the listed contract price of each such instance, regardless of the basis on ASUS' part or other actual and direct damages resulted from omission or failure of performing legal duties under this manual, including the products and software...
...This limit also applies to recover damages from ASUS. SPECIFICATIONS AND INFORMATION CONTAINED IN THIS MANUAL ARE FURNISHED FOR INFORMATIONAL USE ONLY, AND ARE SUBJECT TO CHANGE AT ANY TIME WITHOUT NOTICE, AND SHOULD...ERROR IN THIS MANUAL OR PRODUCT. E10138 First Edition January 2015 COPYRIGHT INFORMATION No part of this Warranty Statement, up to the listed contract price of each such instance, regardless of the basis on ASUS' part or other actual and direct damages resulted from omission or failure of performing legal duties under this manual, including the products and software...

User Guide English
Page 12
LAN port The 8-pin RJ-45 LAN port supports a standard Ethernet cable for video conferencing, voice narrations, or simple audio recordings. HDMI port The HDMI (High Definition Multimedia Interface) port supports a Full-HD device such as an LCD TV or monitor to transfer digital audio from your GR6 into an amplifier or your GR6 to 5 Gbit/s and are backward compatible with USB 2.0. 12 GR6 Digital audio out port (S/PDIF optical) The Sony/Philips Digital Interface (S/PDIF...
LAN port The 8-pin RJ-45 LAN port supports a standard Ethernet cable for video conferencing, voice narrations, or simple audio recordings. HDMI port The HDMI (High Definition Multimedia Interface) port supports a Full-HD device such as an LCD TV or monitor to transfer digital audio from your GR6 into an amplifier or your GR6 to 5 Gbit/s and are backward compatible with USB 2.0. 12 GR6 Digital audio out port (S/PDIF optical) The Sony/Philips Digital Interface (S/PDIF...

User Guide English
Page 20
Connecting the keyboard or mouse You can also connect a USB dongle for a wireless keyboard and mouse set. To connect a keyboard and mouse to your GR6: Connect the USB cable from your keyboard and mouse to any USB keyboard and mouse to your GR6. Connecting a USB keyboard or mouse 20 GR6 You can connect generally any of the USB 2.0/3.0 ports of your GR6.
Connecting the keyboard or mouse You can also connect a USB dongle for a wireless keyboard and mouse set. To connect a keyboard and mouse to your GR6: Connect the USB cable from your keyboard and mouse to any USB keyboard and mouse to your GR6. Connecting a USB keyboard or mouse 20 GR6 You can connect generally any of the USB 2.0/3.0 ports of your GR6.

User Guide English
Page 23
... Reset your PC option restores your PC: 1. GR6 23 IMPORTANT! From the screen, click Troubleshoot. 3. Click Reset. Click Next. 5. To reset your GR6 to its factory default settings. To go through POST, follow any of the ways described in your system IMPORTANT! Select Only the drive where the Windows® is installed. 6. This section only applies for models with the bundled operating system installed in the Quickly enter the BIOS...
... Reset your PC option restores your PC: 1. GR6 23 IMPORTANT! From the screen, click Troubleshoot. 3. Click Reset. Click Next. 5. To reset your GR6 to its factory default settings. To go through POST, follow any of the ways described in your system IMPORTANT! Select Only the drive where the Windows® is installed. 6. This section only applies for models with the bundled operating system installed in the Quickly enter the BIOS...

User Guide English
Page 25
... GR6. IMPORTANT! Refer to the steps below to complete the re-installation and reset process. Click Settings > Change PC Settings > Update and recovery > Recovery. 3. This section only applies for models with the bundled operating system installed in your data before using the Remove everything and reinstall option in PC Settings. Launch the Charms bar. 2. Removing everything and reinstall Windows®, click Get Started. 4. GR6 25 Follow the onscreen instructions to use this option...
... GR6. IMPORTANT! Refer to the steps below to complete the re-installation and reset process. Click Settings > Change PC Settings > Update and recovery > Recovery. 3. This section only applies for models with the bundled operating system installed in your data before using the Remove everything and reinstall option in PC Settings. Launch the Charms bar. 2. Removing everything and reinstall Windows®, click Get Started. 4. GR6 25 Follow the onscreen instructions to use this option...

User Guide English
Page 26
... you change the default BIOS settings except in Windows® operating system or press the Power button to let your GR6. Inappropriate BIOS settings may result to ensure optimal performance. In normal circumstances, the default BIOS settings apply to most conditions to instability or boot failure. We strongly recommend that are needed for at least four seconds until your GR6 turns off your GR6 to run the BIOS Setup. • You have installed a new system...
... you change the default BIOS settings except in Windows® operating system or press the Power button to let your GR6. Inappropriate BIOS settings may result to ensure optimal performance. In normal circumstances, the default BIOS settings apply to most conditions to instability or boot failure. We strongly recommend that are needed for at least four seconds until your GR6 turns off your GR6 to run the BIOS Setup. • You have installed a new system...

User Guide English
Page 32
Press the retaining clips on each side to replace the lower memory module. 32 GR6 NOTES: • Use the same model and speed when replacing memory modules. • Remove the upper memory module first if you wish to release the memory module. 7. Remove the memory modules. To remove a memory module: A. Carefully remove the memory module. B. C. Repeat steps A and B to remove the other memory module.
Press the retaining clips on each side to replace the lower memory module. 32 GR6 NOTES: • Use the same model and speed when replacing memory modules. • Remove the upper memory module first if you wish to release the memory module. 7. Remove the memory modules. To remove a memory module: A. Carefully remove the memory module. B. C. Repeat steps A and B to remove the other memory module.


