CROSSHAIR VI HERO Wi-Fi AC Users manualEnglish
Page 11
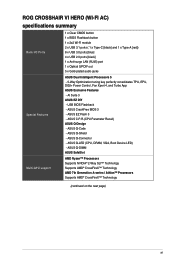
...; CrossFireX™ Technology AMD 7th Generation A-series / Athlon™ Processors Supports AMD® CrossFireX™ Technology (continued on the next page) xi ASUS CrashFree BIOS 3 - USB BIOS Flashback - AI Suite 3 ASUS EZ DIY - ASUS Q-Connector - ASUS EZ Flash 3 - ROG CROSSHAIR VI HERO (WI-FI AC) specifications summary Back I/O Ports Special Features Multi-GPU support 1 x Clear CMOS button 1 x BIOS Flashback button 1 x 2x2...
...; CrossFireX™ Technology AMD 7th Generation A-series / Athlon™ Processors Supports AMD® CrossFireX™ Technology (continued on the next page) xi ASUS CrashFree BIOS 3 - USB BIOS Flashback - AI Suite 3 ASUS EZ DIY - ASUS Q-Connector - ASUS EZ Flash 3 - ROG CROSSHAIR VI HERO (WI-FI AC) specifications summary Back I/O Ports Special Features Multi-GPU support 1 x Clear CMOS button 1 x BIOS Flashback button 1 x 2x2...
CROSSHAIR VI HERO Wi-Fi AC Users manualEnglish
Page 13
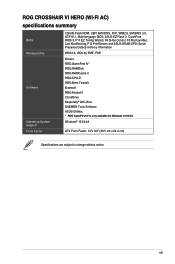
..., 12"x 9.6" (30.5 cm x 24.4 cm) Specifications are subject to change without notice. ROG CROSSHAIR VI HERO (WI-FI AC) specifications summary BIOS Manageability Software Operating System Support Form Factor 128 Mb Flash ROM, UEFI AMI BIOS, PnP, WfM2.0, SM BIOS 3.0, ACPI 6.1, Multi-language BIOS, ASUS EZ Flash 3, CrashFree BIOS 3, F11 EZ Tuning Wizard, F6 Q-fan Control, F3 My...
..., 12"x 9.6" (30.5 cm x 24.4 cm) Specifications are subject to change without notice. ROG CROSSHAIR VI HERO (WI-FI AC) specifications summary BIOS Manageability Software Operating System Support Form Factor 128 Mb Flash ROM, UEFI AMI BIOS, PnP, WfM2.0, SM BIOS 3.0, ACPI 6.1, Multi-language BIOS, ASUS EZ Flash 3, CrashFree BIOS 3, F11 EZ Tuning Wizard, F6 Q-fan Control, F3 My...

CROSSHAIR VI HERO Wi-Fi AC Users manualEnglish
Page 43
Chapter 1 9. ROG CROSSHAIR VI HERO (WI-FI AC) 1-27 ROG extension connector (18-1 pin ROG_EXT) This connector is for the OC Panel I/II. • The OC Panel I /II varies over different platforms. • Visit www.asus.com for the thermistor cable that allows you to monitor the temperature of your motherboard's critical components and connected devices. Thermal sensor connector (2-pin T_SENSOR1) This connector is purchased separately. • Support for OC Panel I /II is for more information about the devices and the latest compatibility list. 10.
Chapter 1 9. ROG CROSSHAIR VI HERO (WI-FI AC) 1-27 ROG extension connector (18-1 pin ROG_EXT) This connector is for the OC Panel I/II. • The OC Panel I /II varies over different platforms. • Visit www.asus.com for the thermistor cable that allows you to monitor the temperature of your motherboard's critical components and connected devices. Thermal sensor connector (2-pin T_SENSOR1) This connector is purchased separately. • Support for OC Panel I /II is for more information about the devices and the latest compatibility list. 10.

CROSSHAIR VI HERO Wi-Fi AC Users manualEnglish
Page 49
Motherboard installation 1. Install the ASUS Q-Shield to the chassis' rear I/O panel. Chapter 2 ROG CROSSHAIR VI HERO (WI-FI AC) 2-1 Place the motherboard into the chassis, ensuring that its rear I /O panel. 2. The motherboard layout may vary with models, but the installation steps are aligned to the chassis rear I /O ports are the same for reference only. Chapter 2: Basic Installation Basic Installation 2.1 Building your PC system 2 2.1.1 The diagrams in this section are for all models.
Motherboard installation 1. Install the ASUS Q-Shield to the chassis' rear I/O panel. Chapter 2 ROG CROSSHAIR VI HERO (WI-FI AC) 2-1 Place the motherboard into the chassis, ensuring that its rear I /O panel. 2. The motherboard layout may vary with models, but the installation steps are aligned to the chassis rear I /O ports are the same for reference only. Chapter 2: Basic Installation Basic Installation 2.1 Building your PC system 2 2.1.1 The diagrams in this section are for all models.

CROSSHAIR VI HERO Wi-Fi AC Users manualEnglish
Page 57
Chapter 2 2.1.7 Front I/O connector To install ASUS Q-Connector To install USB 3.1 connector To install USB 3.0 connector USB 3.1 This connector will only fit in one orientation. To install USB 2.0 connector USB 3.0 USB 2.0 To install front panel audio connector To install system speaker connector AAFP ROG CROSSHAIR VI HERO (WI-FI AC) 2-9 Push the connector until it clicks into place.
Chapter 2 2.1.7 Front I/O connector To install ASUS Q-Connector To install USB 3.1 connector To install USB 3.0 connector USB 3.1 This connector will only fit in one orientation. To install USB 2.0 connector USB 3.0 USB 2.0 To install front panel audio connector To install system speaker connector AAFP ROG CROSSHAIR VI HERO (WI-FI AC) 2-9 Push the connector until it clicks into place.
CROSSHAIR VI HERO Wi-Fi AC Users manualEnglish
Page 59
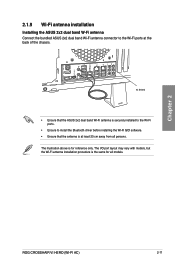
... is the same for reference only. Chapter 2 ROG CROSSHAIR VI HERO (WI-FI AC) 2-11 IO Shield • Ensure that the antenna is securely installed to the Wi-Fi ports. • Ensure to the Wi-Fi ports at least 20 cm away from all models. software. • Ensure that the ASUS 2x2 dual band Wi-Fi antenna is at the back of the chassis.
... is the same for reference only. Chapter 2 ROG CROSSHAIR VI HERO (WI-FI AC) 2-11 IO Shield • Ensure that the antenna is securely installed to the Wi-Fi ports. • Ensure to the Wi-Fi ports at least 20 cm away from all models. software. • Ensure that the ASUS 2x2 dual band Wi-Fi antenna is at the back of the chassis.

CROSSHAIR VI HERO Wi-Fi AC Users manualEnglish
Page 61
Chapter 2 ROG CROSSHAIR VI HERO (WI-FI AC) 2-13 You may be installed onto your motherboard into the 3D Mount shown in the illustration below. 2.1.11 3D printing part installation Installing the 3D printing part onto the 3D Mount A 3D printing part may use the screw package included to secure the 3D printing part to the product page of your motherboard on the ASUS website at www.asus.com. For more details regarding the installation of the 3D printing part on your motherboard, please refer to the 3D Mount.
Chapter 2 ROG CROSSHAIR VI HERO (WI-FI AC) 2-13 You may be installed onto your motherboard into the 3D Mount shown in the illustration below. 2.1.11 3D printing part installation Installing the 3D printing part onto the 3D Mount A 3D printing part may use the screw package included to secure the 3D printing part to the product page of your motherboard on the ASUS website at www.asus.com. For more details regarding the installation of the 3D printing part on your motherboard, please refer to the 3D Mount.
CROSSHAIR VI HERO Wi-Fi AC Users manualEnglish
Page 69
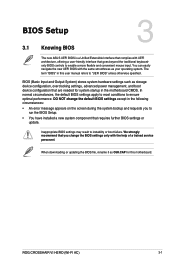
.... Chapter 3 ROG CROSSHAIR VI HERO (WI-FI AC) 3-1 The term "BIOS" in the motherboard CMOS. Inappropriate BIOS settings may result to "UEFI BIOS" unless otherwise specified. BIOS (Basic Input and Output System) stores system hardware settings such as C6H.CAP for system startup in this motherboard. Chapter 3: BIOS Setup BIOS Setup 3.1 Knowing BIOS 3 The new ASUS UEFI BIOS...
.... Chapter 3 ROG CROSSHAIR VI HERO (WI-FI AC) 3-1 The term "BIOS" in the motherboard CMOS. Inappropriate BIOS settings may result to "UEFI BIOS" unless otherwise specified. BIOS (Basic Input and Output System) stores system hardware settings such as C6H.CAP for system startup in this motherboard. Chapter 3: BIOS Setup BIOS Setup 3.1 Knowing BIOS 3 The new ASUS UEFI BIOS...
CROSSHAIR VI HERO Wi-Fi AC Users manualEnglish
Page 87
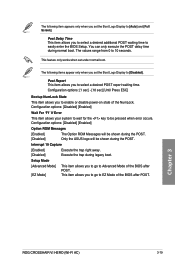
...under normal boot. Configuration options: [Disabled] [Enabled] Option ROM Messages [Enabled] [Disabled] The Option ROM Messages will be shown during the POST. Only the ASUS logo will be shown during the POST. Configuration options: [1 sec] - [10 sec] [Until Press ESC] Bootup NumLock State This item allows you to enable... to 10 seconds. Post Report This item allows you to select a desired POST report waiting time. Execute the trap during normal boot. Chapter 3 ROG CROSSHAIR VI HERO (WI-FI AC) 3-19 You can only execute the POST delay time during legacy boot.
...under normal boot. Configuration options: [Disabled] [Enabled] Option ROM Messages [Enabled] [Disabled] The Option ROM Messages will be shown during the POST. Only the ASUS logo will be shown during the POST. Configuration options: [1 sec] - [10 sec] [Until Press ESC] Bootup NumLock State This item allows you to enable... to 10 seconds. Post Report This item allows you to select a desired POST report waiting time. Execute the trap during normal boot. Chapter 3 ROG CROSSHAIR VI HERO (WI-FI AC) 3-19 You can only execute the POST delay time during legacy boot.

CROSSHAIR VI HERO Wi-Fi AC Users manualEnglish
Page 89
... enable or disable the Setup animator. Click an item to start booting from the available devices. Configuration options: [Disabled] [Enabled] 3.9.1 ASUS EZ Flash 3 Utility This item allows you press , a confirmation message appears. The number of device items that appears on the screen ...; 8 not supported). • To select the boot device during system startup, press when the ASUS Logo appears. When you to configure options for special functions. Chapter 3 ROG CROSSHAIR VI HERO (WI-FI AC) 3-21 Select an item then press to confirm your choice. Use the left/right arrow key to...
... enable or disable the Setup animator. Click an item to start booting from the available devices. Configuration options: [Disabled] [Enabled] 3.9.1 ASUS EZ Flash 3 Utility This item allows you press , a confirmation message appears. The number of device items that appears on the screen ...; 8 not supported). • To select the boot device during system startup, press when the ASUS Logo appears. When you to configure options for special functions. Chapter 3 ROG CROSSHAIR VI HERO (WI-FI AC) 3-21 Select an item then press to confirm your choice. Use the left/right arrow key to...
CROSSHAIR VI HERO Wi-Fi AC Users manualEnglish
Page 91
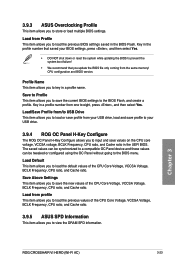
... SPD information. Load/Save Profile from/to USB Drive This item allows you to load or save profile from one to the BIOS menu. Chapter 3 ROG CROSSHAIR VI HERO (WI-FI AC) 3-23 Key in a profile number from your BIOS settings, press , and then select Yes. • DO NOT shut down or reset the...CPU Core Voltage, VCCSA Voltage, BCLK Frequency, CPU ratio, and Cache ratio. Load from the same memory/ CPU configuration and BIOS version. 3.9.3 ASUS Overclocking Profile This item allows you to key in a profile name. Profile Name This item allows you to save values on the CPU core voltage...
... SPD information. Load/Save Profile from/to USB Drive This item allows you to load or save profile from one to the BIOS menu. Chapter 3 ROG CROSSHAIR VI HERO (WI-FI AC) 3-23 Key in a profile number from your BIOS settings, press , and then select Yes. • DO NOT shut down or reset the...CPU Core Voltage, VCCSA Voltage, BCLK Frequency, CPU ratio, and Cache ratio. Load from the same memory/ CPU configuration and BIOS version. 3.9.3 ASUS Overclocking Profile This item allows you to key in a profile name. Profile Name This item allows you to save values on the CPU core voltage...
CROSSHAIR VI HERO Wi-Fi AC Users manualEnglish
Page 93
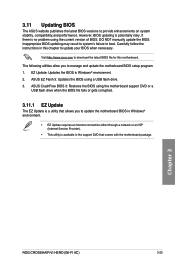
...Carefully follow the instructions in this motherboard. The following utilities allow you to update your BIOS when necessary. Chapter 3 ROG CROSSHAIR VI HERO (WI-FI AC) 3-25 Visit http://www.asus.com to download the latest BIOS file for this chapter to update the motherboard BIOS in Windows® environment. ...either through a network or an ISP (Internet Service Provider). • This utility is a utility that comes with the motherboard package. ASUS EZ Flash 3: Updates the BIOS using the motherboard support DVD or a USB flash drive when the BIOS file fails or gets corrupted....
...Carefully follow the instructions in this motherboard. The following utilities allow you to update your BIOS when necessary. Chapter 3 ROG CROSSHAIR VI HERO (WI-FI AC) 3-25 Visit http://www.asus.com to download the latest BIOS file for this chapter to update the motherboard BIOS in Windows® environment. ...either through a network or an ISP (Internet Service Provider). • This utility is a utility that comes with the motherboard package. ASUS EZ Flash 3: Updates the BIOS using the motherboard support DVD or a USB flash drive when the BIOS file fails or gets corrupted....
CROSSHAIR VI HERO Wi-Fi AC Users manualEnglish
Page 95
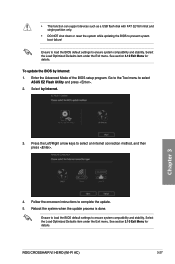
... the update process is done. See section 3.10 Exit Menu for details. ROG CROSSHAIR VI HERO (WI-FI AC) 3-27 See section 3.10 Exit Menu for details. Go to the Tool menu to complete the update. 5. Select by Internet: 1. Follow the onscreen instructions to select ASUS EZ Flash Utility and press . 2. Chapter 3 4. Select the Load Optimized Defaults item...
... the update process is done. See section 3.10 Exit Menu for details. ROG CROSSHAIR VI HERO (WI-FI AC) 3-27 See section 3.10 Exit Menu for details. Go to the Tool menu to complete the update. 5. Select by Internet: 1. Follow the onscreen instructions to select ASUS EZ Flash Utility and press . 2. Chapter 3 4. Select the Load Optimized Defaults item...

CROSSHAIR VI HERO Wi-Fi AC Users manualEnglish
Page 101
...throw the mercury-containing button cell battery in conjunction with any other components as well as the packaging materials. ASUS Recycling/Takeback Services ASUS recycling and takeback programs come from all persons and must not be able to be co-located or operating ...electronic equipment) should not be installed to the highest standards for disposal of electronic products. ROG CROSSHAIR VI HERO (WI-FI AC) A-3 End-users and installers must be placed in our products at ASUS REACH website at least 20 cm from our commitment to provide a separation distance of at...
...throw the mercury-containing button cell battery in conjunction with any other components as well as the packaging materials. ASUS Recycling/Takeback Services ASUS recycling and takeback programs come from all persons and must not be able to be co-located or operating ...electronic equipment) should not be installed to the highest standards for disposal of electronic products. ROG CROSSHAIR VI HERO (WI-FI AC) A-3 End-users and installers must be placed in our products at ASUS REACH website at least 20 cm from our commitment to provide a separation distance of at...
CROSSHAIR VI HERO Wi-Fi AC Users manualEnglish
Page 105
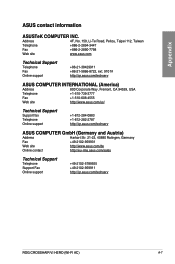
... +886-2-2894-3447 Fax +886-2-2890-7798 Web site www.asus.com Technical Support Telephone Fax Online support +86-21-38429911 +86-21-5866-8722, ext. 9101# http://qr.asus.com/techserv ASUS COMPUTER INTERNATIONAL (America) Address 800 Corporate Way, Fremont, CA ... +49-2102-959931 Web site http://www.asus.com/de Online contact http://eu-rma.asus.com/sales Technical Support Telephone +49-2102-5789555 Support Fax +49-2102-959911 Online support http://qr.asus.com/techserv ROG CROSSHAIR VI HERO (WI-FI AC) A-7 Appendix ASUS contact information ASUSTeK COMPUTER INC.
... +886-2-2894-3447 Fax +886-2-2890-7798 Web site www.asus.com Technical Support Telephone Fax Online support +86-21-38429911 +86-21-5866-8722, ext. 9101# http://qr.asus.com/techserv ASUS COMPUTER INTERNATIONAL (America) Address 800 Corporate Way, Fremont, CA ... +49-2102-959931 Web site http://www.asus.com/de Online contact http://eu-rma.asus.com/sales Technical Support Telephone +49-2102-5789555 Support Fax +49-2102-959911 Online support http://qr.asus.com/techserv ROG CROSSHAIR VI HERO (WI-FI AC) A-7 Appendix ASUS contact information ASUSTeK COMPUTER INC.

CROSSHAIR VI HERO Wi-Fi AC Users manualEnglish
Page 106
... 2. 1077(a) Responsible Party Name: Asus Computer International Address: 800 Corporate Way, Fremont, CA 94539. Operation is subject to the following two conditions: (1) This device may not cause harmful interference, and (2) this device must accept any interference received, including interference that the product Product Name : Motherboard Model Number : CROSSHAIR VI HERO, ROG CROSSHAIR VI HERO (WI-FI AC) Conforms to the following...
... 2. 1077(a) Responsible Party Name: Asus Computer International Address: 800 Corporate Way, Fremont, CA 94539. Operation is subject to the following two conditions: (1) This device may not cause harmful interference, and (2) this device must accept any interference received, including interference that the product Product Name : Motherboard Model Number : CROSSHAIR VI HERO, ROG CROSSHAIR VI HERO (WI-FI AC) Conforms to the following...


