User Guide
Page 18
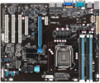
...motherboard supports Intel® processors with peak bandwidth up to 25Gb/s, and dramatically reduces the memory voltage to just 1.5V compared to DDR2's memory voltage of server... EM64T feature allows your problems. P9D-X xxS2xxxxxxxx Made in China 合格 1.4 Special features 1.4.1 Product highlights Latest processor technology This motherboard supports the latest Intel® ...level parallelism on today's multithreaded software. This technology increases performance of the product, ASUS Technical Support team members can then offer a quicker and satisfying solution to your ...
...motherboard supports Intel® processors with peak bandwidth up to 25Gb/s, and dramatically reduces the memory voltage to just 1.5V compared to DDR2's memory voltage of server... EM64T feature allows your problems. P9D-X xxS2xxxxxxxx Made in China 合格 1.4 Special features 1.4.1 Product highlights Latest processor technology This motherboard supports the latest Intel® ...level parallelism on today's multithreaded software. This technology increases performance of the product, ASUS Technical Support team members can then offer a quicker and satisfying solution to your ...

User Guide
Page 119
...Makedisk menu appears. 6. C22x INTEL RAID Driver Windows 32 bit(AHCI / AHCI RAID) Windows Server 2012 64 bit (AHCI / AHCI RAID) Back Exit ASUS P9D-X 6-3 To create a RAID driver disk in the support DVD). Select the C22x INTEL RAID .... You can create a RAID driver disk in DOS (using the Makedisk application in DOS environment: 1. Restart your server system, you are now ready to install an operating system to install the RAID controller drivers during OS installation. ... driver disk. Exit the BIOS Setup and restart your changes. 5. Place the motherboard support DVD in a RAID set.
...Makedisk menu appears. 6. C22x INTEL RAID Driver Windows 32 bit(AHCI / AHCI RAID) Windows Server 2012 64 bit (AHCI / AHCI RAID) Back Exit ASUS P9D-X 6-3 To create a RAID driver disk in the support DVD). Select the C22x INTEL RAID .... You can create a RAID driver disk in DOS (using the Makedisk application in DOS environment: 1. Restart your server system, you are now ready to install an operating system to install the RAID controller drivers during OS installation. ... driver disk. Exit the BIOS Setup and restart your changes. 5. Place the motherboard support DVD in a RAID set.
User Guide
Page 122
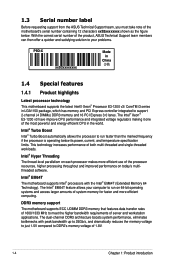
When the system finishes loading the RAID driver, replace the motherboard Support DVD with the motherboard Support DVD into the optical drive. Locate the driver in your system, eject the Windows OS installation disc and replace with the Windows Server installation disc. Select the drive to continue. 5. Click Browse to install Windows and click...
When the system finishes loading the RAID driver, replace the motherboard Support DVD with the motherboard Support DVD into the optical drive. Locate the driver in your system, eject the Windows OS installation disc and replace with the Windows Server installation disc. Select the drive to continue. 5. Click Browse to install Windows and click...

User Guide
Page 123
... The main screen of the Support DVD looks exactly the same on the Windows® Server 2008 R2 and on software and utilities. 2. Utilities 3. ASUS P9D-X 6-7 If Autorun is NOT enabled in your computer, browse the contents of your motherboard. 1. MakeDisk 4. The contents of the Support DVD contains the following tabs: 1. The support DVD...
... The main screen of the Support DVD looks exactly the same on the Windows® Server 2008 R2 and on software and utilities. 2. Utilities 3. ASUS P9D-X 6-7 If Autorun is NOT enabled in your computer, browse the contents of your motherboard. 1. MakeDisk 4. The contents of the Support DVD contains the following tabs: 1. The support DVD...
User Guide
Page 126
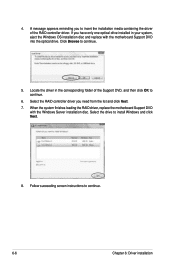
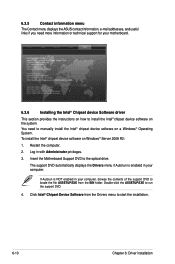
... on Windows® Server 2008 R2: 1. Click Intel® Chipset Device Software from the BIN folder. Restart the computer. 2. If Autorun is enabled in your computer. To install the Intel® chipset device software on the system. Insert the Motherboard Support DVD to run... the support DVD. 4. The support DVD automatically displays the Drivers menu if Autorun is NOT enabled in with Administrator privileges. 3. 6.3.5 Contact information menu The Contact menu displays the ASUS contact information, e-mail addresses, ...
... on Windows® Server 2008 R2: 1. Click Intel® Chipset Device Software from the BIN folder. Restart the computer. 2. If Autorun is enabled in your computer. To install the Intel® chipset device software on the system. Insert the Motherboard Support DVD to run... the support DVD. 4. The support DVD automatically displays the Drivers menu if Autorun is NOT enabled in with Administrator privileges. 3. 6.3.5 Contact information menu The Contact menu displays the ASUS contact information, e-mail addresses, ...
User Guide
Page 129
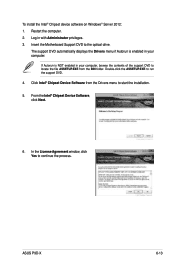
... to continue the process. From the Intel® Chipset Device Software, click Next. 6. To install the Intel® Chipset device software on Windows® Server 2012: 1. If Autorun is enabled in your computer, browse the contents of the support DVD to run the support DVD. 4. In the License Agreement window... the Drivers menu if Autorun is NOT enabled in with Administrator privileges. 3. Click Intel® Chipset Device Software from the BIN folder. Insert the Motherboard Support DVD to the optical drive. ASUS P9D-X 6-13 Log in your computer. Restart the computer. 2.
... to continue the process. From the Intel® Chipset Device Software, click Next. 6. To install the Intel® Chipset device software on Windows® Server 2012: 1. If Autorun is enabled in your computer, browse the contents of the support DVD to run the support DVD. 4. In the License Agreement window... the Drivers menu if Autorun is NOT enabled in with Administrator privileges. 3. Click Intel® Chipset Device Software from the BIN folder. Insert the Motherboard Support DVD to the optical drive. ASUS P9D-X 6-13 Log in your computer. Restart the computer. 2.
User Guide
Page 131
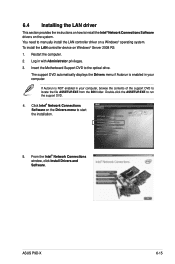
Insert the Motherboard Support DVD to run the support DVD. 4. Double-click the ASSETUP.EXE to the optical drive. Click Intel® Network Connections Software on the Drivers ... need to start the installation. 5. To install the LAN controller device on Windows® Server 2008 R2: 1. The support DVD automatically displays the Drivers menu if Autorun is NOT enabled in with Administrator privileges. 3. Restart the computer. 2. ASUS P9D-X 6-15 6.4 Installing the LAN driver This section provides the instructions on how to locate...
Insert the Motherboard Support DVD to run the support DVD. 4. Double-click the ASSETUP.EXE to the optical drive. Click Intel® Network Connections Software on the Drivers ... need to start the installation. 5. To install the LAN controller device on Windows® Server 2008 R2: 1. The support DVD automatically displays the Drivers menu if Autorun is NOT enabled in with Administrator privileges. 3. Restart the computer. 2. ASUS P9D-X 6-15 6.4 Installing the LAN driver This section provides the instructions on how to locate...

User Guide
Page 133
...Click Yes when the Microsoft Management Console dialog box appears. You have to locate the file ASSETUP.EXE from the BIN folder. ASUS P9D-X 6-17 When done, click Finish to run the support DVD. 4. Restart the computer. 2. Log in your computer, browse ... the installation. 11. Double-click the ASSETUP.EXE to complete the installation. Click Intel® Network Connections Software on Windows® Server 2012: 1. The Microsoft Management Console dialog box appears when the system detects open or running applications that needs to proceed with Administrator privileges...
...Click Yes when the Microsoft Management Console dialog box appears. You have to locate the file ASSETUP.EXE from the BIN folder. ASUS P9D-X 6-17 When done, click Finish to run the support DVD. 4. Restart the computer. 2. Log in your computer, browse ... the installation. 11. Double-click the ASSETUP.EXE to complete the installation. Click Intel® Network Connections Software on Windows® Server 2012: 1. The Microsoft Management Console dialog box appears when the system detects open or running applications that needs to proceed with Administrator privileges...
User Guide
Page 136
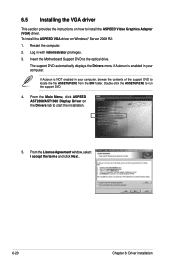
... enabled in with Administrator privileges. 3. From the Main Menu, click ASPEED AST2300/AST1300 Display Driver on the Drivers tab to the optical drive. Insert the Motherboard Support DVD to start the installation. 5. 6.5 Installing the VGA driver This section provides the instructions on Windows®...
... enabled in with Administrator privileges. 3. From the Main Menu, click ASPEED AST2300/AST1300 Display Driver on the Drivers tab to the optical drive. Insert the Motherboard Support DVD to start the installation. 5. 6.5 Installing the VGA driver This section provides the instructions on Windows®...
User Guide
Page 138
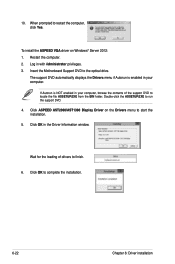
If Autorun is enabled in with Administrator privileges. 3. Click OK to the optical drive. Insert the Motherboard Support DVD to complete the installation. 6-22 Chapter 6: Driver installation The support DVD automatically displays the Drivers menu if Autorun is NOT enabled in the ... VGA driver on the Drivers menu to locate the file ASSETUP.EXE from the BIN folder. Click ASPEED AST2300/AST1300 Display Driver on Windows® Server 2012: 1.
If Autorun is enabled in with Administrator privileges. 3. Click OK to the optical drive. Insert the Motherboard Support DVD to complete the installation. 6-22 Chapter 6: Driver installation The support DVD automatically displays the Drivers menu if Autorun is NOT enabled in the ... VGA driver on the Drivers menu to locate the file ASSETUP.EXE from the BIN folder. Click ASPEED AST2300/AST1300 Display Driver on Windows® Server 2012: 1.
User Guide
Page 141
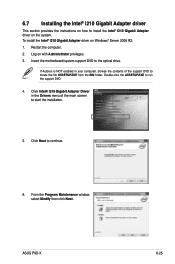
...Click Intel® I210 Gigabit Adapter Driver in your computer, browse the contents of the main screen to the optical drive. Insert the motherboard/system support DVD to start the installation. 5. Click Next to locate the file ASSETUP.EXE from the BIN folder. From the Program...install the Intel® I210 Gigabit Adapter driver on the system. ASUS P9D-X 6-25 6.7 Installing the Intel® I210 Gigabit Adapter driver This section provides the instructions on how to run the support DVD. 4. Log on Windows® Server 2008 R2: 1. To install the Intel® I210 Gigabit Adapter...
...Click Intel® I210 Gigabit Adapter Driver in your computer, browse the contents of the main screen to the optical drive. Insert the motherboard/system support DVD to start the installation. 5. Click Next to locate the file ASSETUP.EXE from the BIN folder. From the Program...install the Intel® I210 Gigabit Adapter driver on the system. ASUS P9D-X 6-25 6.7 Installing the Intel® I210 Gigabit Adapter driver This section provides the instructions on how to run the support DVD. 4. Log on Windows® Server 2008 R2: 1. To install the Intel® I210 Gigabit Adapter...
User Guide
Page 143
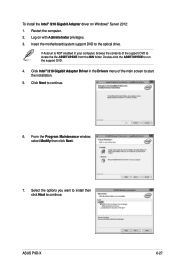
Insert the motherboard/system support DVD to continue. 6. Click Next to the optical drive. From the Program Maintenance window, select Modify then click Next. 7. ASUS P9D-X 6-27 Restart the computer. 2. Log on Windows® Server 2012: 1. Double-click the ASSETUP.EXE to continue. Click Intel® I210 Gigabit Adapter Driver in your computer, browse the...
Insert the motherboard/system support DVD to continue. 6. Click Next to the optical drive. From the Program Maintenance window, select Modify then click Next. 7. ASUS P9D-X 6-27 Restart the computer. 2. Log on Windows® Server 2012: 1. Double-click the ASSETUP.EXE to continue. Click Intel® I210 Gigabit Adapter Driver in your computer, browse the...


