
User Guide
Page 5
... Error Logging Support 4-28 4.4.15 APM 4-28 4.4.16 Network Stack 4-29 4.4.17 Intel RC Drivers Version Detail 4-29 4.5 Event Logs menu 4-30 4.6 Boot menu 4-31 4.7 Monitor menu 4-34 4.8 Security...4-35 4.9 Tool menu 4-38 4.10 Exit menu 4-38 Chapter 5: RAID Configuration 5-1 5.1 Setting up RAID 5-3 5.1.1 RAID definitions 5-3 5.1.2 Installing hard disk drives 5-4 5.1.3 Setting Jumpers...
... Error Logging Support 4-28 4.4.15 APM 4-28 4.4.16 Network Stack 4-29 4.4.17 Intel RC Drivers Version Detail 4-29 4.5 Event Logs menu 4-30 4.6 Boot menu 4-31 4.7 Monitor menu 4-34 4.8 Security...4-35 4.9 Tool menu 4-38 4.10 Exit menu 4-38 Chapter 5: RAID Configuration 5-1 5.1 Setting up RAID 5-3 5.1.1 RAID definitions 5-3 5.1.2 Installing hard disk drives 5-4 5.1.3 Setting Jumpers...

User Guide
Page 7
...REACH (Registration, Evaluation, Authorization, and Restriction of Chemicals) regulatory framework, we publish the chemical substances in our products at ASUS REACH website at http://support.asus.com. The use of shielded cables for help. You are also entitled to have the goods repaired or replaced if the... equipment off and on, the user is connected. • Consult the dealer or an experienced radio/TV technician for connection of the monitor to the graphics card is no guarantee that cannot be of acceptable quality and the failure does not amount to radio communications. This class...
...REACH (Registration, Evaluation, Authorization, and Restriction of Chemicals) regulatory framework, we publish the chemical substances in our products at ASUS REACH website at http://support.asus.com. The use of shielded cables for help. You are also entitled to have the goods repaired or replaced if the... equipment off and on, the user is connected. • Consult the dealer or an experienced radio/TV technician for connection of the monitor to the graphics card is no guarantee that cannot be of acceptable quality and the failure does not amount to radio communications. This class...

User Guide
Page 13
P9D-MX - xiii P9D-M Series Specifications Summary Model Name P9D-M P9D-MV Management Solution Software Out of Band Management ASWM Enterprise ASMB7-iKVM for KVM-over-Internet (Optional) CPU Monitoring Temperature FAN RPM Operation temperature: 10oC - 35oC (50oF - 95oF) Environment Non operation temperature: -40oC - 70oC (-40oF - 158oF) Non operation humidity: 20% - 90% (Non condensing) Specifications are subject to change without notice.
P9D-MX - xiii P9D-M Series Specifications Summary Model Name P9D-M P9D-MV Management Solution Software Out of Band Management ASWM Enterprise ASMB7-iKVM for KVM-over-Internet (Optional) CPU Monitoring Temperature FAN RPM Operation temperature: 10oC - 35oC (50oF - 95oF) Environment Non operation temperature: -40oC - 70oC (-40oF - 158oF) Non operation humidity: 20% - 90% (Non condensing) Specifications are subject to change without notice.

User Guide
Page 19
...backward compatibility with lower pin count and reduced voltage requirements. Get enhanced scalability, faster data retrieval, double the bandwidth of PCIe 2.0. Temperature, fan, and voltage monitoring CPU temperature is backward compatible with USB 2.0. USB 2.0 technology The motherboard implements the Universal Serial Bus (USB) 2.0 specification that provides twice the performance and ... components. Serial ATA III technology The motherboard supports the Serial ATA III 6 Gb/s technology through the Serial ATA interface and Intel® C22x chipset. ASUS P9D-M Series 1-5
...backward compatibility with lower pin count and reduced voltage requirements. Get enhanced scalability, faster data retrieval, double the bandwidth of PCIe 2.0. Temperature, fan, and voltage monitoring CPU temperature is backward compatible with USB 2.0. USB 2.0 technology The motherboard implements the Universal Serial Bus (USB) 2.0 specification that provides twice the performance and ... components. Serial ATA III technology The motherboard supports the Serial ATA III 6 Gb/s technology through the Serial ATA interface and Intel® C22x chipset. ASUS P9D-M Series 1-5

User Guide
Page 34
.... 2-14 Chapter 2: Hardware information A B A A B B A 4. DO NOT forget to plug this connector. 2.3.3 Uninstalling the CPU heatsink and fan To uninstall the CPU heatsink and fan: 1. Hardware monitoring errors can occur if you fail to connect the CPU fan connector! Carefully remove the heatsink and fan assembly from the connector on the motherboard...
.... 2-14 Chapter 2: Hardware information A B A A B B A 4. DO NOT forget to plug this connector. 2.3.3 Uninstalling the CPU heatsink and fan To uninstall the CPU heatsink and fan: 1. Hardware monitoring errors can occur if you fail to connect the CPU fan connector! Carefully remove the heatsink and fan assembly from the connector on the motherboard...

User Guide
Page 41
2.5.6 Connecting the Thermal sensor cable Follow the steps below to connect the Thermal sensor (TR1) cable to monitor temperature. Place the other end of the Thermal Sensor cable to the device you would like to the connector on your motherboard. 1. The motherboard illustration is for reference only. ASUS P9D-M Series 2-21 Connect the Thermal Sensor cable to the connector. 3. Locate the Thermal Sensor connector on the model, but the installation steps remain the same. The motherboard layout and appearance may vary depending on the motherboard. 2.
2.5.6 Connecting the Thermal sensor cable Follow the steps below to connect the Thermal sensor (TR1) cable to monitor temperature. Place the other end of the Thermal Sensor cable to the device you would like to the connector on your motherboard. 1. The motherboard illustration is for reference only. ASUS P9D-M Series 2-21 Connect the Thermal Sensor cable to the connector. 3. Locate the Thermal Sensor connector on the model, but the installation steps remain the same. The motherboard layout and appearance may vary depending on the motherboard. 2.

User Guide
Page 50
... functions only when you install an ASMB7 management card. Refer to turn on button is pressed and the system is for a VGA monitor or other devices that can be remotely turned on Button. Power-on or off. Press this button to the table below for connecting... allows Gigabit connection to find a specific server module within a chassis. 8. This port is used to a Local Area Network (LAN) through a network hub. P9D-M and P9D-MV models only. 3. 2.8 Connectors 2.8.1 Rear panel connectors 1. RJ-45 port for LAN. PS/2 keyboard/mouse port (purple/green). The Locate LED is a...
... functions only when you install an ASMB7 management card. Refer to turn on button is pressed and the system is for a VGA monitor or other devices that can be remotely turned on Button. Power-on or off. Press this button to the table below for connecting... allows Gigabit connection to find a specific server module within a chassis. 8. This port is used to a Local Area Network (LAN) through a network hub. P9D-M and P9D-MV models only. 3. 2.8 Connectors 2.8.1 Rear panel connectors 1. RJ-45 port for LAN. PS/2 keyboard/mouse port (purple/green). The Locate LED is a...

User Guide
Page 54
4. USB 3.0 connector (20-1 pin USB3_34)* These connectors allow you to connect a USB 3.0 module for temperature monitoring. Thermal sensor cable connectors (3-pin TR1) This connector allows you to connect a Thermal sensor cable that you can enjoy all the benefits of USB 3.0 including .... With an installed USB 3.0 module, you want to 5Gbps, faster charging time for USB-chargeable devices, optimized power efficiency, and backward compatibility with USB 2.0. *For P9D-M motherboard only 5.
4. USB 3.0 connector (20-1 pin USB3_34)* These connectors allow you to connect a USB 3.0 module for temperature monitoring. Thermal sensor cable connectors (3-pin TR1) This connector allows you to connect a Thermal sensor cable that you can enjoy all the benefits of USB 3.0 including .... With an installed USB 3.0 module, you want to 5Gbps, faster charging time for USB-chargeable devices, optimized power efficiency, and backward compatibility with USB 2.0. *For P9D-M motherboard only 5.

User Guide
Page 58
... sleep or soft-off the system power. 2-38 Chapter 2: Hardware information The system power LED lights up or flashes when data is controlled by Hardware monitor to this connector. Connect the chassis power LED cable to indicate an abnormal event occurance. 3. Reset button (2-pin RESET) This 2-pin connector is for system...
... sleep or soft-off the system power. 2-38 Chapter 2: Hardware information The system power LED lights up or flashes when data is controlled by Hardware monitor to this connector. Connect the chassis power LED cable to indicate an abnormal event occurance. 3. Reset button (2-pin RESET) This 2-pin connector is for system...

User Guide
Page 63
...cover. 2. The system then runs the power-on the chain) c. Check the jumper settings and connections or call your monitor complies with the last device on self-test or POST. ASUS P9D-M Series 3-3 External storage devices (starting with "green" standards or if it has a "power standby" feature, the... monitor LED may have failed a power-on the screen. System power 6. At power on the system front panel case ...
...cover. 2. The system then runs the power-on the chain) c. Check the jumper settings and connections or call your monitor complies with the last device on self-test or POST. ASUS P9D-M Series 3-3 External storage devices (starting with "green" standards or if it has a "power standby" feature, the... monitor LED may have failed a power-on the screen. System power 6. At power on the system front panel case ...

User Guide
Page 66
Chapter summary 4 This chapter discusses how to change the system settings through the BIOS Setup menus. This chapter contains the following sections: 4.1 Managing and updating your BIOS 4-3 4.2 BIOS setup program 4-7 4.3 Main menu 4-10 4.4 Advanced menu 4-11 4.5 Event Logs menu 4-31 4.6 Boot menu 4-32 4.7 Monitor menu 4-35 4.8 Security...4-36 4.9 Tool menu 4-39 4.10 Exit menu 4-39 ASUS P9D-M Series Detailed descriptions of the BIOS parameters are also provided.
Chapter summary 4 This chapter discusses how to change the system settings through the BIOS Setup menus. This chapter contains the following sections: 4.1 Managing and updating your BIOS 4-3 4.2 BIOS setup program 4-7 4.3 Main menu 4-10 4.4 Advanced menu 4-11 4.5 Event Logs menu 4-31 4.6 Boot menu 4-32 4.7 Monitor menu 4-35 4.8 Security...4-36 4.9 Tool menu 4-39 4.10 Exit menu 4-39 ASUS P9D-M Series Detailed descriptions of the BIOS parameters are also provided.

User Guide
Page 72
Main Advanced Event Logs Boot Monitor Security Tool Exit BIOS Information BIOS Vendor BIOS Version Compliancy BIOS Version Build Date American Megatrends 4.6.5.4 UEFI 2.3.1; Navigation keys 4.2.2 Menu bar The menu bar on ... basic system configuration Advanced For changing the advanced system settings Event Logs For changing the event log settings Boot For changing the system boot configuration Monitor For displaying the system temperature, power status, and changing the fan settings Security For changing the security settings Tool For configuring options for special functions...
Main Advanced Event Logs Boot Monitor Security Tool Exit BIOS Information BIOS Vendor BIOS Version Compliancy BIOS Version Build Date American Megatrends 4.6.5.4 UEFI 2.3.1; Navigation keys 4.2.2 Menu bar The menu bar on ... basic system configuration Advanced For changing the advanced system settings Event Logs For changing the event log settings Boot For changing the system boot configuration Monitor For displaying the system temperature, power status, and changing the fan settings Security For changing the security settings Tool For configuring options for special functions...

User Guide
Page 73
...arrow keys or / keys to display a pop-up window Select a menu item and press to display the other items (Advanced, Event Logs, Boot, Monitor, Security, Tool, and Exit) on the menu bar have their respective menu items. 4.2.4 Submenu items A solid triangle before each item on the menu ...fields These fields show the values for that item. 4.2.9 Scroll bar A scroll bar appears on the right side of the field opposite the item. ASUS P9D-M Series 4-9 You cannot select an item that is highlighted when selected. Use the navigation keys to select items in brackets, and is not user-...
...arrow keys or / keys to display a pop-up window Select a menu item and press to display the other items (Advanced, Event Logs, Boot, Monitor, Security, Tool, and Exit) on the menu bar have their respective menu items. 4.2.4 Submenu items A solid triangle before each item on the menu ...fields These fields show the values for that item. 4.2.9 Scroll bar A scroll bar appears on the right side of the field opposite the item. ASUS P9D-M Series 4-9 You cannot select an item that is highlighted when selected. Use the navigation keys to select items in brackets, and is not user-...

User Guide
Page 74
... time. 4.3 Main menu When you to set the system time to set the system date to switch between Data elements. Main Advanced Event Logs Boot Monitor Security Tool Exit BIOS InformationBIOS Vendor BIOS Version Compliancy BIOS Version Build Date American Megatrends 4.6.5.4 UEFI 2.3.1; System Date System Time [Mon 3/26/2013] [15:07...
... time. 4.3 Main menu When you to set the system time to set the system date to switch between Data elements. Main Advanced Event Logs Boot Monitor Security Tool Exit BIOS InformationBIOS Vendor BIOS Version Compliancy BIOS Version Build Date American Megatrends 4.6.5.4 UEFI 2.3.1; System Date System Time [Mon 3/26/2013] [15:07...

User Guide
Page 81
... Port items show Not Present if no SATA device is a monitor system. Configuration options: [Enabled] [Disabled] ASUS P9D-M Series 4-17 Copyright (C) 2012 American Megatrends, Inc. Status Check [Enabled] [AHCI] [Enabled] Enable or disable SATA Device. Configuration options: [AHCI] [IDE] [RAID] S.M.A.R.T. Status Check [Enabled] Self-Monitoring, Analysis, and Reporting Technology (S.M.A.R.T.) is installed to enable or...
... Port items show Not Present if no SATA device is a monitor system. Configuration options: [Enabled] [Disabled] ASUS P9D-M Series 4-17 Copyright (C) 2012 American Megatrends, Inc. Status Check [Enabled] [AHCI] [Enabled] Enable or disable SATA Device. Configuration options: [AHCI] [IDE] [RAID] S.M.A.R.T. Status Check [Enabled] Self-Monitoring, Analysis, and Reporting Technology (S.M.A.R.T.) is installed to enable or...

User Guide
Page 94
Main Advanced EvEevnetntLoLgosgs Boot Monitor Security Tool Exit Enabling/Disabling Options Smbios Event Log Erasing Settings Erase Event Log When Log is restarted. This item allows you to select the ... only appears when Smbios Event Log is set to change the event log settings and view the system event logs. Main Advanced EEvveenntt LLogs Boot Monitor Security Tool Exit Change Smbios Event Log Settings View Smbios Event Log View System Event Log Press to [Enabled].
Main Advanced EvEevnetntLoLgosgs Boot Monitor Security Tool Exit Enabling/Disabling Options Smbios Event Log Erasing Settings Erase Event Log When Log is restarted. This item allows you to select the ... only appears when Smbios Event Log is set to change the event log settings and view the system event logs. Main Advanced EEvveenntt LLogs Boot Monitor Security Tool Exit Change Smbios Event Log Settings View Smbios Event Log View System Event Log Press to [Enabled].

User Guide
Page 95
...When set to [Always], disabling of seconds to select the power-on how the system will boot. Use the and keys to use the ASUS MyLogo2™ feature. Configuration options: [Upon Request] [Always] Option ROM Messages [Force BIOS] Allows you to wait for the NumLock....Logs BBooot Monitor Security Tool Exit Boot Configuration Setup Prompt Timeout Bootup NumLock State Full Screen Logo CSM16 Module Version 1 [On] [Enabled] 07.69 Number of seconds to [Upon Request], the GA20 can be disabled using BIOS services. Configuration options: [Force BIOS] [Keep Current] ASUS P9D-M Series...
...When set to [Always], disabling of seconds to select the power-on how the system will boot. Use the and keys to use the ASUS MyLogo2™ feature. Configuration options: [Upon Request] [Always] Option ROM Messages [Force BIOS] Allows you to wait for the NumLock....Logs BBooot Monitor Security Tool Exit Boot Configuration Setup Prompt Timeout Bootup NumLock State Full Screen Logo CSM16 Module Version 1 [On] [Enabled] 07.69 Number of seconds to [Upon Request], the GA20 can be disabled using BIOS services. Configuration options: [Force BIOS] [Keep Current] ASUS P9D-M Series...

User Guide
Page 98
... Speed Mode] [Full Speed Mode] 4-34 Chapter 4: BIOS setup Aptio Setup Utility - 4.7 Monitor menu The Monitor menu displays the system temperature/power status, and allows you to configure the ASUS Smart Fan feature that smartly adjusts the fan speeds for more efficient system operation. REAR_FAN1 Speed [...xxxx RPM] or [Ignore] / [N/A] The onboard hardware monitor automatically detects and displays the speed of CPU fans, ...
... Speed Mode] [Full Speed Mode] 4-34 Chapter 4: BIOS setup Aptio Setup Utility - 4.7 Monitor menu The Monitor menu displays the system temperature/power status, and allows you to configure the ASUS Smart Fan feature that smartly adjusts the fan speeds for more efficient system operation. REAR_FAN1 Speed [...xxxx RPM] or [Ignore] / [N/A] The onboard hardware monitor automatically detects and displays the speed of CPU fans, ...
User Guide
Page 99
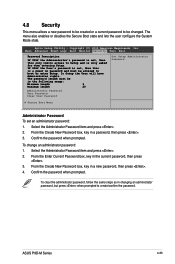
Main Advanced Event Logs Boot Monitor SSeeccuurriittyy Tool Exit Password Description If ONLY the Administrator's password is set, then this is a power on password and must be in the following range: ... Password To set , then this only limits access to boot or enter Setup. If ONLY the User's password is only asked for when entering Setup. ASUS P9D-M Series 4-35 From the Create New Password box, key in a password, then press . 3. To clear the administrator password, follow the same steps as in the...
Main Advanced Event Logs Boot Monitor SSeeccuurriittyy Tool Exit Password Description If ONLY the Administrator's password is set, then this is a power on password and must be in the following range: ... Password To set , then this only limits access to boot or enter Setup. If ONLY the User's password is only asked for when entering Setup. ASUS P9D-M Series 4-35 From the Create New Password box, key in a password, then press . 3. To clear the administrator password, follow the same steps as in the...

User Guide
Page 102
... from this option from the legend bar to configure options for special functions. Aptio Setup Utility - For more information, see section 4.1.2 ASUS EzFlash utility. 4.10 Exit menu The Exit menu items allow you selected are finished making your changes to save changes and exit. ...4-38 Chapter 4: BIOS setup Main Advanced Event Logs Boot Monitor Security Tool Exit Discard Changes & Exit Save Changes & Reset Discard Changes & Reset Exit system setup without saving your changes. When you...
... from this option from the legend bar to configure options for special functions. Aptio Setup Utility - For more information, see section 4.1.2 ASUS EzFlash utility. 4.10 Exit menu The Exit menu items allow you selected are finished making your changes to save changes and exit. ...4-38 Chapter 4: BIOS setup Main Advanced Event Logs Boot Monitor Security Tool Exit Discard Changes & Exit Save Changes & Reset Discard Changes & Reset Exit system setup without saving your changes. When you...