
User Manual
Page 84
...boot device. Status Check Enabled SATA 6G 1 (Gray) Not Present SATA 6G 2 (Gray) Not Present SATA 3G 3 (Blue) ASUS CB-521 ATAPI SATA 3G 4 (Blue) Not Present SATA 3G 5 (Blue) Not Present SATA 3G 6 (Blue) Not Present Boot... Tool (1) IDE Mode. (2) AHCI Mode. (3) RAID Mode. Configuration options: [Enabled] [Disabled] 3.5.4 SATA Configuration While entering Setup, the BIOS automatically detects the presence of SATA devices. Chapter 3 3-16 Chapter 3: BIOS setup Advanced Mode Exit Main Back Ai Tweaker Advanced Advanced\ SATA Configuration...
...boot device. Status Check Enabled SATA 6G 1 (Gray) Not Present SATA 6G 2 (Gray) Not Present SATA 3G 3 (Blue) ASUS CB-521 ATAPI SATA 3G 4 (Blue) Not Present SATA 3G 5 (Blue) Not Present SATA 3G 6 (Blue) Not Present Boot... Tool (1) IDE Mode. (2) AHCI Mode. (3) RAID Mode. Configuration options: [Enabled] [Disabled] 3.5.4 SATA Configuration While entering Setup, the BIOS automatically detects the presence of SATA devices. Chapter 3 3-16 Chapter 3: BIOS setup Advanced Mode Exit Main Back Ai Tweaker Advanced Advanced\ SATA Configuration...
User Manual
Page 107
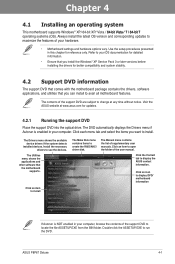
... Pack 3 or later versions before installing the drivers for detailed information. • Ensure that you want to change at www.asus.com for reference only. Always install the latest OS version and corresponding updates to maximize the features of your computer, browse the... the Contact tab to create the RAID/AHCI driver disk. The Manual menu contains the list of the user manual. Use the setup procedures presented in this chapter for updates. 4.2.1 Running the support DVD Place the support DVD into the optical drive. ASUS P8P67 Deluxe 4-1 Chapter 4: Chapter 4 Software ...
... Pack 3 or later versions before installing the drivers for detailed information. • Ensure that you want to change at www.asus.com for reference only. Always install the latest OS version and corresponding updates to maximize the features of your computer, browse the... the Contact tab to create the RAID/AHCI driver disk. The Manual menu contains the list of the user manual. Use the setup procedures presented in this chapter for updates. 4.2.1 Running the support DVD Place the support DVD into the optical drive. ASUS P8P67 Deluxe 4-1 Chapter 4: Chapter 4 Software ...

User Manual
Page 120
..., fault tolerance, and higher storage capacity. Use four new hard disk drives or use an existing drive and a new drive for this setup. A RAID array over 2TB cannot be set as a single drive but at a sustained data transfer rate, double that of a single disk alone,... thus improving data access and storage. The RAID 5 configuration is required for this setup. Use of two new identical hard disk drives is best suited for transaction processing, relational database applications, enterprise resource planning, ...
..., fault tolerance, and higher storage capacity. Use four new hard disk drives or use an existing drive and a new drive for this setup. A RAID array over 2TB cannot be set as a single drive but at a sustained data transfer rate, double that of a single disk alone,... thus improving data access and storage. The RAID 5 configuration is required for this setup. Use of two new identical hard disk drives is best suited for transaction processing, relational database applications, enterprise resource planning, ...
User Manual
Page 121
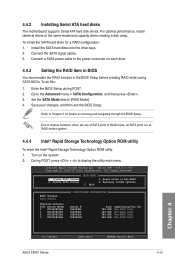
... 149.0GB 149.0GB Type/Status(Vol ID) Non-RAID Disk Non-RAID Disk Non-RAID Disk Non-RAID Disk Chapter 4 [↑↓]-Select ASUS P8P67 Deluxe [ESC]-Exit [ENTER]-Select Menu 4-15 To install the SATA hard disks for details on entering and navigating through the BIOS Setup. Install the SATA hard disks into the drive bays...
... 149.0GB 149.0GB Type/Status(Vol ID) Non-RAID Disk Non-RAID Disk Non-RAID Disk Non-RAID Disk Chapter 4 [↑↓]-Select ASUS P8P67 Deluxe [ESC]-Exit [ENTER]-Select Menu 4-15 To install the SATA hard disks for details on entering and navigating through the BIOS Setup. Install the SATA hard disks into the drive bays...

User Manual
Page 122
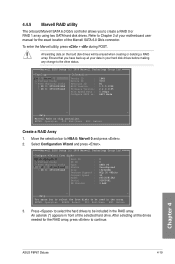
...the Disks item is selected, press to select the hard disk drives you to move through the menus and select the menu options. The RAID BIOS setup screens shown in creating the volume. [↑↓]-Prev/Next [SPACE]-SelectDisk [ENTER]-Done Chapter 4 4-16 Chapter 4: Software support The utility...0GB 149.0GB 149.0GB 149.0GB Status Non-RAID Disk Non-RAID Disk Non-RAID Disk Non-RAID Disk Select 2 to 6 disks to create, and then press . 4. Option ROM - Enter a name for the RAID set : 1. Create RAID Volume and press . When the RAID Level item is 16 characters or less. [↑&#...
...the Disks item is selected, press to select the hard disk drives you to move through the menus and select the menu options. The RAID BIOS setup screens shown in creating the volume. [↑↓]-Prev/Next [SPACE]-SelectDisk [ENTER]-Done Chapter 4 4-16 Chapter 4: Software support The utility...0GB 149.0GB 149.0GB 149.0GB Status Non-RAID Disk Non-RAID Disk Non-RAID Disk Non-RAID Disk Select 2 to 6 disks to create, and then press . 4. Option ROM - Enter a name for the RAID set : 1. Create RAID Volume and press . When the RAID Level item is 16 characters or less. [↑&#...
User Manual
Page 125
... the hard drives to continue. All exisiting data on chip controller. ENTER: Operation SPACE: Select F10: Exit/Save ESC: Return 3. Chapter 4 ASUS P8P67 Deluxe 4-19 Marvell BIOS Setup (c) 2009 Marvell Technology Group Ltd. ENTER: Operation F10: Exit/Save ESC: Return Create a RAID Array 1. After selecting all your data in your motherboard user manual for the...
... the hard drives to continue. All exisiting data on chip controller. ENTER: Operation SPACE: Select F10: Exit/Save ESC: Return 3. Chapter 4 ASUS P8P67 Deluxe 4-19 Marvell BIOS Setup (c) 2009 Marvell Technology Group Ltd. ENTER: Operation F10: Exit/Save ESC: Return Create a RAID Array 1. After selecting all your data in your motherboard user manual for the...

User Manual
Page 126
...size slightly smaller than the existing physical disk. Move the selection bar to configure further RAID settings. The new RAID array appears under Virtual Disks, as e-mails and documents. Marvell BIOS Setup (c) 2009 Marvell Technology Group Ltd. In general, a larger stripe size is better... warning message appears: Create Virtual Disk Do you want to cancel. Chapter 4 4-20 Chapter 4: Software support Configuration options: [RAID 0] [RAID 1] Stripe Size: Specifies the size of the smaller physical disk included in the image below. The capacity of the rebuilt virtual...
...size slightly smaller than the existing physical disk. Move the selection bar to configure further RAID settings. The new RAID array appears under Virtual Disks, as e-mails and documents. Marvell BIOS Setup (c) 2009 Marvell Technology Group Ltd. In general, a larger stripe size is better... warning message appears: Create Virtual Disk Do you want to cancel. Chapter 4 4-20 Chapter 4: Software support Configuration options: [RAID 0] [RAID 1] Stripe Size: Specifies the size of the smaller physical disk included in the image below. The capacity of the rebuilt virtual...

User Manual
Page 127
Yes No Press to exit from Marvell BIOS Setup? ENTER: Operation F10: Exit/Save ESC: Return Chapter 4 ASUS P8P67 Deluxe 4-21 Select Delete and press . Marvell BIOS Setup (c) 2009 Marvell Technology Group Ltd. Delete an existing RAID Array 1. ENTER: Operation F10: Exit/Save ESC: Return...├ Virtual Disks Name │ └ VD 0: New_VD Status │ ├ PD 0: ST3160[8D1e2lAeSte]Stripte Size │ └ PD 8: ST3160812AS RAID Mode └ Free Physical Disks Size BGA Status Number of PDs Members : 0 : New_VD : Functional : 64K : RAID0 : 304128MB : N/A : 2 ...
Yes No Press to exit from Marvell BIOS Setup? ENTER: Operation F10: Exit/Save ESC: Return Chapter 4 ASUS P8P67 Deluxe 4-21 Select Delete and press . Marvell BIOS Setup (c) 2009 Marvell Technology Group Ltd. Delete an existing RAID Array 1. ENTER: Operation F10: Exit/Save ESC: Return...├ Virtual Disks Name │ └ VD 0: New_VD Status │ ├ PD 0: ST3160[8D1e2lAeSte]Stripte Size │ └ PD 8: ST3160812AS RAID Mode └ Free Physical Disks Size BGA Status Number of PDs Members : 0 : New_VD : Functional : 64K : RAID0 : 304128MB : N/A : 2 ...

User Manual
Page 128
Yes No Press to exit from Marvell BIOS Setup? The following warning message appears: Exit Do you want to delete the selected RAID array. 2. Yes No Press to delete MBR from the selected RAID array. 3. The following warning message appears: Delete Virtual Disk Do you want to delete the Master Boot Record (MBR) from... 4 4-22 Chapter 4: Software support Yes No Press to delete this virtual disk ? The following warning message appears: Delete MBR Do you want to save the RAID setting and exit the Marvell...
Yes No Press to exit from Marvell BIOS Setup? The following warning message appears: Exit Do you want to delete the selected RAID array. 2. Yes No Press to delete MBR from the selected RAID array. 3. The following warning message appears: Delete Virtual Disk Do you want to delete the Master Boot Record (MBR) from... 4 4-22 Chapter 4: Software support Yes No Press to delete this virtual disk ? The following warning message appears: Delete MBR Do you want to save the RAID setting and exit the Marvell...
User Manual
Page 129
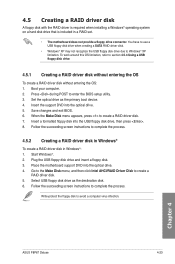
... floppy disk to complete the process. Follow the succeeding screen instructions to enter the BIOS setup utility. 3. Chapter 4 ASUS P8P67 Deluxe 4-23 Press during POST to complete the process. 4.5.2 Creating a RAID driver disk in Windows® To create a RAID driver disk in a RAID set. • The motherboard does not provide a floppy drive connector. Save changes and exit...
... floppy disk to complete the process. Follow the succeeding screen instructions to enter the BIOS setup utility. 3. Chapter 4 ASUS P8P67 Deluxe 4-23 Press during POST to complete the process. 4.5.2 Creating a RAID driver disk in Windows® To create a RAID driver disk in a RAID set. • The motherboard does not provide a floppy drive connector. Save changes and exit...


