
User Manual
Page 68
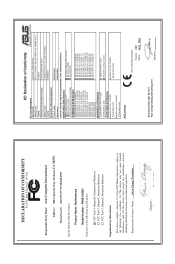
... 112, TAIWAN R.O.C. Country: TAIWAN Authorized representative in Europe: ASUS COMPUTER GmbH Address, City: HARKORT STR. 21-23, 40880 RATINGEN Country: GERMANY declare the following apparatus: Product name : Motherboard Model name : P8H61;P8H61 PLUS conform with the essential requirements of the following specifications:..., and (2) this device must accept any interference received, including interference that the product Product Name : Motherboard Model Number : P8H61,P8H61 PLUS Conforms to the following directives: 2004/108/EC-EMC Directive EN 55022:2006+A1:2007 EN 61000...
... 112, TAIWAN R.O.C. Country: TAIWAN Authorized representative in Europe: ASUS COMPUTER GmbH Address, City: HARKORT STR. 21-23, 40880 RATINGEN Country: GERMANY declare the following apparatus: Product name : Motherboard Model name : P8H61;P8H61 PLUS conform with the essential requirements of the following specifications:..., and (2) this device must accept any interference received, including interference that the product Product Name : Motherboard Model Number : P8H61,P8H61 PLUS Conforms to the following directives: 2004/108/EC-EMC Directive EN 55022:2006+A1:2007 EN 61000...
User Manual
Page 69
..., including interference that may cause undesired operation. Phone/Fax No: (510)739-3777/(510)608-4555 hereby declares that the product Product Name : Motherboard Model Number : P8H61/USB3 Conforms to the following specifications: FCC Part 15, Subpart B, Unintentional Radiators FCC Part 15, Subpart C, Intentional Radiators FCC Part 15, Subpart E, ... Conformity We, the undersigned, Manufacturer: Address, City: ASUSTek COMPUTER INC. DECLARATION OF CONFORMITY Per FCC Part 2 Section 2. 1077(a) Responsible Party Name: Asus Computer International Address: 800 Corporate Way, Fremont, CA 94539.
..., including interference that may cause undesired operation. Phone/Fax No: (510)739-3777/(510)608-4555 hereby declares that the product Product Name : Motherboard Model Number : P8H61/USB3 Conforms to the following specifications: FCC Part 15, Subpart B, Unintentional Radiators FCC Part 15, Subpart C, Intentional Radiators FCC Part 15, Subpart E, ... Conformity We, the undersigned, Manufacturer: Address, City: ASUSTek COMPUTER INC. DECLARATION OF CONFORMITY Per FCC Part 2 Section 2. 1077(a) Responsible Party Name: Asus Computer International Address: 800 Corporate Way, Fremont, CA 94539.

User Manual
Page 1
Motherboard P8H61 P8H61 PLUS P8H61/USB3
Motherboard P8H61 P8H61 PLUS P8H61/USB3

User Manual
Page 3
Contents Notices...vi Safety information vii About this guide viii P8H61 Series specifications summary ix Chapter 1: Product introduction 1.1 Welcome 1-1 1.2 Package contents 1-1 1.3 Special features 1-1 1.3.1 Product highlights 1-1 1.3.2 Innovative ASUS features 1-3 1.4 Before you proceed 1-5 1.5 Motherboard overview 1-6 1.5.1 Placement direction 1-6 1.5.2 Screw holes 1-6 1.5.3 Motherboard layout 1-7 1.5.4 Layout contents 1-8 1.6 Central Processing Unit (CPU 1-9 1.6.1 Installing the CPU 1-9 1.6.2 Installing the CPU heatsink and fan 1-12...
Contents Notices...vi Safety information vii About this guide viii P8H61 Series specifications summary ix Chapter 1: Product introduction 1.1 Welcome 1-1 1.2 Package contents 1-1 1.3 Special features 1-1 1.3.1 Product highlights 1-1 1.3.2 Innovative ASUS features 1-3 1.4 Before you proceed 1-5 1.5 Motherboard overview 1-6 1.5.1 Placement direction 1-6 1.5.2 Screw holes 1-6 1.5.3 Motherboard layout 1-7 1.5.4 Layout contents 1-8 1.6 Central Processing Unit (CPU 1-9 1.6.1 Installing the CPU 1-9 1.6.2 Installing the CPU heatsink and fan 1-12...

User Manual
Page 7
... and staples away from the system, ensure that the power cables for disposal of electronic products. Operation safety • Before installing the motherboard and adding devices on a stable surface. • If you encounter technical problems with the product, contact a qualified service technician or your... the chemical substances in municipal waste. DO NOT throw the mercury-containing button cell battery in our products at ASUS REACH website at http://csr.asus.com/english/REACH.htm. This symbol of the electrical outlet you are unplugged. • Seek professional assistance before...
... and staples away from the system, ensure that the power cables for disposal of electronic products. Operation safety • Before installing the motherboard and adding devices on a stable surface. • If you encounter technical problems with the product, contact a qualified service technician or your... the chemical substances in municipal waste. DO NOT throw the mercury-containing button cell battery in our products at ASUS REACH website at http://csr.asus.com/english/REACH.htm. This symbol of the electrical outlet you are unplugged. • Seek professional assistance before...

User Manual
Page 8
...you MUST follow to the following sources for additional information and for product and software updates. 1. ASUS websites The ASUS website provides updated information on ASUS hardware and software products. These documents are also provided. Typography Bold text Italics ++ Indicates a menu...information you must press two or more information Refer to complete a task. Used to the ASUS contact information. 2. If you need when installing and configuring the motherboard. Refer to emphasize a word or a phrase. Example: ++ viii Optional documentation Your ...
...you MUST follow to the following sources for additional information and for product and software updates. 1. ASUS websites The ASUS website provides updated information on ASUS hardware and software products. These documents are also provided. Typography Bold text Italics ++ Indicates a menu...information you must press two or more information Refer to complete a task. Used to the ASUS contact information. 2. If you need when installing and configuring the motherboard. Refer to emphasize a word or a phrase. Example: ++ viii Optional documentation Your ...
User Manual
Page 13
... most powerful and energy efficient CPUs in your motherboard package for buying an ASUS® P8H61 Series motherboard! Chapter 1: Product introduction 1-1 Before you for the following items. Motherboard Cables Accessories Application DVD Documentation ASUS P8H61 Series motherboard 2 x Serial ATA 3.0Gb/s cables 1 x I/O shield ASUS motherboard support DVD User Manual • P8H61 Series motherboards include P8H61, P8H61 PLUS, and P8H61/USB3 three models. Chapter 1 Product introduction 1.1 Welcome! This...
... most powerful and energy efficient CPUs in your motherboard package for buying an ASUS® P8H61 Series motherboard! Chapter 1: Product introduction 1-1 Before you for the following items. Motherboard Cables Accessories Application DVD Documentation ASUS P8H61 Series motherboard 2 x Serial ATA 3.0Gb/s cables 1 x I/O shield ASUS motherboard support DVD User Manual • P8H61 Series motherboards include P8H61, P8H61 PLUS, and P8H61/USB3 three models. Chapter 1 Product introduction 1.1 Welcome! This...

User Manual
Page 14
...P8H61/USB3 only) Experience ultra-fast data transfer at 4.8Gbps with USB 3.0 - Built to connect easily with next-generation components and peripherals, USB 3.0 transfers data 10x faster and is a highly integrated Gb LAN controller. PCI Express 2.0 support This motherboard supports PCI Express 2.0 devices for durability, improved lifespan, and enhanced thermal capacity. 1-2 ASUS P8H61...advanced operating systems. 100% All High-quality Conductive Polymer Capacitors (P8H61 PLUS and P8H61/USB3 only) This motherboard uses all high-quality conductive polymer capacitors for double speed and ...
...P8H61/USB3 only) Experience ultra-fast data transfer at 4.8Gbps with USB 3.0 - Built to connect easily with next-generation components and peripherals, USB 3.0 transfers data 10x faster and is a highly integrated Gb LAN controller. PCI Express 2.0 support This motherboard supports PCI Express 2.0 devices for durability, improved lifespan, and enhanced thermal capacity. 1-2 ASUS P8H61...advanced operating systems. 100% All High-quality Conductive Polymer Capacitors (P8H61 PLUS and P8H61/USB3 only) This motherboard uses all high-quality conductive polymer capacitors for double speed and ...

User Manual
Page 15
... CPU and chassis fan speeds according to achieve a quiet and cool environment. ASUS Anti-Surge Protection This special design prevents expensive devices and the motherboard from damage caused by different climate conditions in different geographic regions and your PC's loading. ASUS EPU ASUS EPU is for a more flexible and convenient mouse controls. Chapter 1: Product...
... CPU and chassis fan speeds according to achieve a quiet and cool environment. ASUS Anti-Surge Protection This special design prevents expensive devices and the motherboard from damage caused by different climate conditions in different geographic regions and your PC's loading. ASUS EPU ASUS EPU is for a more flexible and convenient mouse controls. Chapter 1: Product...

User Manual
Page 16
C.P.R. (CPU Parameter Recall) The BIOS C.P.R. eliminates the need to their default settings. C.P.R. ASUS CrashFree BIOS 3 ASUS CrashFree BIOS 3 is an auto-recovery tool that allows you to restore a corrupted BIOS file using the bundled support DVD or USB flash... automatically restores the CPU default settings when the system hangs due to reduce carbon footprint of the product and thus mitigate environmental impacts. 1-4 ASUS P8H61 Series ErP ready The motherboard is in regards to energy consumptions. ASUS EZ Flash 2 ASUS EZ Flash 2 is a utility that contains the latest BIOS file.
C.P.R. (CPU Parameter Recall) The BIOS C.P.R. eliminates the need to their default settings. C.P.R. ASUS CrashFree BIOS 3 ASUS CrashFree BIOS 3 is an auto-recovery tool that allows you to restore a corrupted BIOS file using the bundled support DVD or USB flash... automatically restores the CPU default settings when the system hangs due to reduce carbon footprint of the product and thus mitigate environmental impacts. 1-4 ASUS P8H61 Series ErP ready The motherboard is in regards to energy consumptions. ASUS EZ Flash 2 ASUS EZ Flash 2 is a utility that contains the latest BIOS file.

User Manual
Page 17
...supply. The illustration below shows the location of the following precautions before you install motherboard components or change any motherboard component. P8H61 Series SB_PWR ON OFF Standby Power Powered Off P8H61 Series Onboard LED Chapter 1: Product introduction 1-5 Failure to do so may cause severe... damage to avoid touching the ICs on them due to static electricity. • Hold components by the edges to the motherboard, peripherals, or components....
...supply. The illustration below shows the location of the following precautions before you install motherboard components or change any motherboard component. P8H61 Series SB_PWR ON OFF Standby Power Powered Off P8H61 Series Onboard LED Chapter 1: Product introduction 1-5 Failure to do so may cause severe... damage to avoid touching the ICs on them due to static electricity. • Hold components by the edges to the motherboard, peripherals, or components....

User Manual
Page 18
... the chassis in the image below. 1.5.2 Screw holes Place six screws into the holes indicated by circles to secure the motherboard to the chassis. Ensure that you unplug the power cord before installing or removing the motherboard. The edge with external ports goes to the rear part of the chassis P8H61 Series 1-6 ASUS P8H61 Series
... the chassis in the image below. 1.5.2 Screw holes Place six screws into the holes indicated by circles to secure the motherboard to the chassis. Ensure that you unplug the power cord before installing or removing the motherboard. The edge with external ports goes to the rear part of the chassis P8H61 Series 1-6 ASUS P8H61 Series

User Manual
Page 19
... 1.5.3 Motherboard layout 1 2 32 4 20.3cm(8.0in) KBMS ATX12V EPU CPU_FAN COM1 LPT DDR3 DIMM_A1 (64bit, 240-pin module) DDR3 DIMM_B1 (64bit, 240-pin module) USB3_12 LGA1155 LAN_USB12 1 30.5cm(12.0in) EATXPWR AUDIO RTL 8111E AAFP asmedia ASM1042 CHA_FAN Lithium Cell CMOS Power P8H61 Series... PCIEX16 Super I/O PCIEX1_1 PCIEX1_2 ASM 1083 Intel® H61 PCI1 PCI2 ALC 887 CLRTC 5 32Mb BIOS PCI3 SATA3G_4 SATA3G_3 SPDIF_OUT USB56 USB78 USB910 F_PANEL 6 SATA3G_2 SATA3G_1 SB_PWR SPEAKER 12 11 10 9 87 P8H61/USB3 only Here labeled ...
... 1.5.3 Motherboard layout 1 2 32 4 20.3cm(8.0in) KBMS ATX12V EPU CPU_FAN COM1 LPT DDR3 DIMM_A1 (64bit, 240-pin module) DDR3 DIMM_B1 (64bit, 240-pin module) USB3_12 LGA1155 LAN_USB12 1 30.5cm(12.0in) EATXPWR AUDIO RTL 8111E AAFP asmedia ASM1042 CHA_FAN Lithium Cell CMOS Power P8H61 Series... PCIEX16 Super I/O PCIEX1_1 PCIEX1_2 ASM 1083 Intel® H61 PCI1 PCI2 ALC 887 CLRTC 5 32Mb BIOS PCI3 SATA3G_4 SATA3G_3 SPDIF_OUT USB56 USB78 USB910 F_PANEL 6 SATA3G_2 SATA3G_1 SB_PWR SPEAKER 12 11 10 9 87 P8H61/USB3 only Here labeled ...

User Manual
Page 21
..., do not remove the PnP cap unless you see any damage to the right (B) until it is on the motherboard. ASUS will shoulder the cost of the motherboard, ensure that the PnP cap is released from incorrect CPU installation/removal, or misplacement/loss/incorrect removal of the PnP... the socket contacts resulting from the retention tab. Contact your thumb (A), and then move it to the PnP cap/socket contacts/motherboard components. P8H61 Series P8H61 Series CPU socket LGA1155 2. Press the load lever with your retailer immediately if the PnP cap is shipment/transit-related. •...
..., do not remove the PnP cap unless you see any damage to the right (B) until it is on the motherboard. ASUS will shoulder the cost of the motherboard, ensure that the PnP cap is released from incorrect CPU installation/removal, or misplacement/loss/incorrect removal of the PnP... the socket contacts resulting from the retention tab. Contact your thumb (A), and then move it to the PnP cap/socket contacts/motherboard components. P8H61 Series P8H61 Series CPU socket LGA1155 2. Press the load lever with your retailer immediately if the PnP cap is shipment/transit-related. •...

User Manual
Page 24
...only. 1-12 ASUS P8H61 Series Place the heatsink on top of CPU heatsink and fan assembly may differ, but the installation steps and functions should remain the same. If you purchased a separate CPU heatsink and fan assembly, ensure that you have installed the motherboard to the CPU... applied Thermal Interface Material to the chassis before you buy a CPU separately, ensure that the four fasteners match the holes on the motherboard. The illustration above is incompatible with the LGA775 and LGA1366 sockets in a diagonal sequence to the CPU fan connector. 2. Ensure that...
...only. 1-12 ASUS P8H61 Series Place the heatsink on top of CPU heatsink and fan assembly may differ, but the installation steps and functions should remain the same. If you purchased a separate CPU heatsink and fan assembly, ensure that you have installed the motherboard to the CPU... applied Thermal Interface Material to the chassis before you buy a CPU separately, ensure that the four fasteners match the holes on the motherboard. The illustration above is incompatible with the LGA775 and LGA1366 sockets in a diagonal sequence to the CPU fan connector. 2. Ensure that...

User Manual
Page 25
... errors can occur if you fail to connect the CPU fan connector! CPU_FAN CPU FAN PWM CPU FAN IN CPU FAN PWR GND P8H61 Series P8H61 Series CPU fan connector Do not forget to plug this connector. 1.6.3 Uninstalling the CPU heatsink and fan To uninstall the CPU heatsink and... fan: 1. Rotate each fastener counterclockwise. 3. Pull up two fasteners at a time in a diagonal sequence to the connector on the motherboard. 2. Connect the CPU...
... errors can occur if you fail to connect the CPU fan connector! CPU_FAN CPU FAN PWM CPU FAN IN CPU FAN PWR GND P8H61 Series P8H61 Series CPU fan connector Do not forget to plug this connector. 1.6.3 Uninstalling the CPU heatsink and fan To uninstall the CPU heatsink and... fan: 1. Rotate each fastener counterclockwise. 3. Pull up two fasteners at a time in a diagonal sequence to the connector on the motherboard. 2. Connect the CPU...

User Manual
Page 26
... the heatsink and fan assembly from the motherboard. 5. Rotate each fastener clockwise to prevent installation on a DDR2 DIMM socket. The figure illustrates the location of the DDR3 DIMM sockets: DIMM_A1 DIMM_B1 P8H61 Series Channel Channel A Channel B Sockets DIMM_A1 DIMM_B1 P8H61 Series 240-pin DDR3 DIMM sockets 1-14 ASUS P8H61 Series A DDR3 module has the same...
... the heatsink and fan assembly from the motherboard. 5. Rotate each fastener clockwise to prevent installation on a DDR2 DIMM socket. The figure illustrates the location of the DDR3 DIMM sockets: DIMM_A1 DIMM_B1 P8H61 Series Channel Channel A Channel B Sockets DIMM_A1 DIMM_B1 P8H61 Series 240-pin DDR3 DIMM sockets 1-14 ASUS P8H61 Series A DDR3 module has the same...

User Manual
Page 27
...actual usable memory for the OS can be about 3GB or less. Chapter 1: Product introduction 1-15 For effective use a more on the motherboard. • This motherboard does not support DIMMs made up of 512Mb (64MB) chips or less. • The maximum 16GB memory capacity can be supported with ...the lower-sized channel for single-channel operation. • According to protect the CPU. • Always install DIMMs with 8GB or above DIMMs. ASUS will update the memory QVL once the DIMMs are using a 32-bit Windows® OS. - The system maps the total size of accessing information...
...actual usable memory for the OS can be about 3GB or less. Chapter 1: Product introduction 1-15 For effective use a more on the motherboard. • This motherboard does not support DIMMs made up of 512Mb (64MB) chips or less. • The maximum 16GB memory capacity can be supported with ...the lower-sized channel for single-channel operation. • According to protect the CPU. • Always install DIMMs with 8GB or above DIMMs. ASUS will update the memory QVL once the DIMMs are using a 32-bit Windows® OS. - The system maps the total size of accessing information...

User Manual
Page 31
... fits in only one direction. DO NOT force a DIMM into the socket until the retaining clips snap back in the wrong direction to both the motherboard and the components. 1. Simultaneously press the retaining clips outward to unlock a DIMM socket. 2. Firmly insert the DIMM into a socket in place 3 and the DIMM is...
... fits in only one direction. DO NOT force a DIMM into the socket until the retaining clips snap back in the wrong direction to both the motherboard and the components. 1. Simultaneously press the retaining clips outward to unlock a DIMM socket. 2. Firmly insert the DIMM into a socket in place 3 and the DIMM is...
User Manual
Page 32
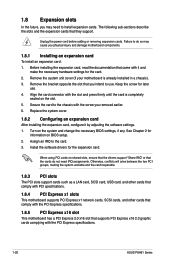
...cards that comply with PCI specifications. 1.8.4 PCI Express x1 slots This motherboard supports PCI Express x1 network cards, SCSI cards, and other cards that comply with the PCI Express specifications. 1-20 ASUS P8H61 Series Keep the screw for the expansion card. Replace the system cover... x16 2.0 graphic cards complying with the PCI Express specifications. 1.8.5 PCI Express x16 slot This motherboard has a PCI Express 2.0 x16 slot that you physical injury and damage motherboard components. 1.8.1 Installing an expansion card To install an expansion card: 1. Remove the system unit...
...cards that comply with PCI specifications. 1.8.4 PCI Express x1 slots This motherboard supports PCI Express x1 network cards, SCSI cards, and other cards that comply with the PCI Express specifications. 1-20 ASUS P8H61 Series Keep the screw for the expansion card. Replace the system cover... x16 2.0 graphic cards complying with the PCI Express specifications. 1.8.5 PCI Express x16 slot This motherboard has a PCI Express 2.0 x16 slot that you physical injury and damage motherboard components. 1.8.1 Installing an expansion card To install an expansion card: 1. Remove the system unit...


