P8H61-M LX3 PLUS R2.0 User's Manual
Page 17
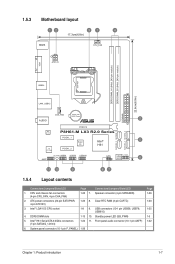
DDR3 DIMM slots 1-13 10. Clear RTC RAM (3-pin CLRTC) 3. Standby power LED (SB_PWR) 5. Intel® LGA1155 CPU socket 1-8 9. Intel® H61 Serial ATA 3.0Gb/s connectors (7-pin SATA3G_1/2/3/4) 1-24 11. CPU and...240-pin module) DDR3 DIMM_B1 (64bit, 240-pin module) LGA1155 USB34 22.6cm(8.9in) LAN1_USB12 EATXPWR CHA_FAN Lithium Cell CMOS Power AUDIO 2 PCIEX16 RTL 8111F P8H61-M LX3 R2.0 Series SATA3G_3 SATA3G_1 SATA3G_4 SATA3G_2 PCIEX1_1 Super Intel® 5 I/O H61 VIA VT1708S PCIEX1_2 AAFP SB_PWR USB56 USB78 USB910 CLRTC F_PANEL 64Mb BIOS 6 SPEAKER 11 10...
DDR3 DIMM slots 1-13 10. Clear RTC RAM (3-pin CLRTC) 3. Standby power LED (SB_PWR) 5. Intel® LGA1155 CPU socket 1-8 9. Intel® H61 Serial ATA 3.0Gb/s connectors (7-pin SATA3G_1/2/3/4) 1-24 11. CPU and...240-pin module) DDR3 DIMM_B1 (64bit, 240-pin module) LGA1155 USB34 22.6cm(8.9in) LAN1_USB12 EATXPWR CHA_FAN Lithium Cell CMOS Power AUDIO 2 PCIEX16 RTL 8111F P8H61-M LX3 R2.0 Series SATA3G_3 SATA3G_1 SATA3G_4 SATA3G_2 PCIEX1_1 Super Intel® 5 I/O H61 VIA VT1708S PCIEX1_2 AAFP SB_PWR USB56 USB78 USB910 CLRTC F_PANEL 64Mb BIOS 6 SPEAKER 11 10...
P8H61-M LX3 PLUS R2.0 User's Manual
Page 30
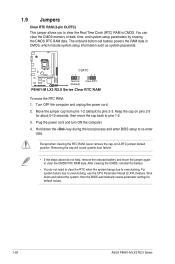
... cell battery powers the RAM data in CMOS. Turn OFF the computer and unplug the power cord. 2. Plug the power cord and turn ON the computer. 4. Shut down the key during the boot process and enter BIOS setup to default values. 1-20 ASUS P8H61-M LX3 R2.0 Series Hold down and... reboot the system, then the BIOS automatically resets parameter settings to re-enter data. Except when clearing the RTC RAM, never remove the cap on pins 2-3 for about 5-10 seconds, ...
... cell battery powers the RAM data in CMOS. Turn OFF the computer and unplug the power cord. 2. Plug the power cord and turn ON the computer. 4. Shut down the key during the boot process and enter BIOS setup to default values. 1-20 ASUS P8H61-M LX3 R2.0 Series Hold down and... reboot the system, then the BIOS automatically resets parameter settings to re-enter data. Except when clearing the RTC RAM, never remove the cap on pins 2-3 for about 5-10 seconds, ...
P8H61-M LX3 PLUS R2.0 User's Manual
Page 44
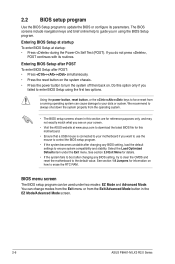
... motherboard if you do not press , POST continues with its parameters. 2.2 BIOS setup program Use the BIOS Setup program to erase the RTC RAM. Entering BIOS Setup after POST To enter BIOS Setup after changing any BIOS setting, load the default settings to the default value. You can...from the operating system. • The BIOS setup screens shown in this option only if you in the EZ Mode/Advanced Mode screen. 2-6 ASUS P8H61-M LX3 R2.0 Series The BIOS screens include navigation keys and brief online help to guide you failed to your data or system. Entering BIOS Setup at ...
... motherboard if you do not press , POST continues with its parameters. 2.2 BIOS setup program Use the BIOS Setup program to erase the RTC RAM. Entering BIOS Setup after POST To enter BIOS Setup after changing any BIOS setting, load the default settings to the default value. You can...from the operating system. • The BIOS setup screens shown in this option only if you in the EZ Mode/Advanced Mode screen. 2-6 ASUS P8H61-M LX3 R2.0 Series The BIOS screens include navigation keys and brief online help to guide you failed to your data or system. Entering BIOS Setup at ...

P8H61-M LX3 PLUS R2.0 User's Manual
Page 48
2.3 Main menu The Main menu screen appears when you enter the Advanced Mode of the screen show Installed. 2-10 ASUS P8H61-M LX3 R2.0 Series Configuration options: [English] [Español 2.3.2 System Date [Day xx/xx/xxxx] Allows you to set the system date. 2.3.3 System Time [xx:... password, these items show the default Not Installed. After you have forgotten your BIOS password, erase the CMOS Real Time Clock (RTC) RAM to erase the RTC RAM. • The Administrator or User Password items on how to clear the BIOS password. See section 1.9 Jumpers for information on top of...
2.3 Main menu The Main menu screen appears when you enter the Advanced Mode of the screen show Installed. 2-10 ASUS P8H61-M LX3 R2.0 Series Configuration options: [English] [Español 2.3.2 System Date [Day xx/xx/xxxx] Allows you to set the system date. 2.3.3 System Time [xx:... password, these items show the default Not Installed. After you have forgotten your BIOS password, erase the CMOS Real Time Clock (RTC) RAM to erase the RTC RAM. • The Administrator or User Password items on how to clear the BIOS password. See section 1.9 Jumpers for information on top of...


