
P8H61-M LX3 PLUS R2.0 User's Manual
Page 1
Motherboard P8H61-M LX3 R2.0 Series • P8H61-M LX3 R2.0 • P8H61-M LX3 PLUS R2.0
Motherboard P8H61-M LX3 R2.0 Series • P8H61-M LX3 R2.0 • P8H61-M LX3 PLUS R2.0
P8H61-M LX3 PLUS R2.0 User's Manual
Page 3
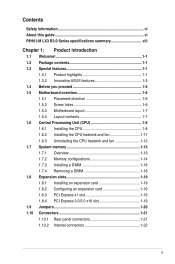
Contents Safety information vi About this guide vi P8H61-M LX3 R2.0 Series specifications summary viii Chapter 1: Product introduction 1.1 Welcome 1-1 1.2 Package contents 1-1 1.3 Special features 1-1 1.3.1 Product highlights 1-1 1.3.2 Innovative ASUS features 1-3 1.4 Before you proceed 1-5 1.5 Motherboard overview 1-6 1.5.1 Placement direction 1-6 1.5.2 Screw holes 1-6 1.5.3 Motherboard layout 1-7 1.5.4 Layout contents 1-7 1.6 Central Processing Unit (CPU 1-8 1.6.1 Installing the CPU 1-8 1.6.2 Installing the CPU heatsink and fan 1-11 1.6.3 Uninstalling the...
Contents Safety information vi About this guide vi P8H61-M LX3 R2.0 Series specifications summary viii Chapter 1: Product introduction 1.1 Welcome 1-1 1.2 Package contents 1-1 1.3 Special features 1-1 1.3.1 Product highlights 1-1 1.3.2 Innovative ASUS features 1-3 1.4 Before you proceed 1-5 1.5 Motherboard overview 1-6 1.5.1 Placement direction 1-6 1.5.2 Screw holes 1-6 1.5.3 Motherboard layout 1-7 1.5.4 Layout contents 1-7 1.6 Central Processing Unit (CPU 1-8 1.6.1 Installing the CPU 1-8 1.6.2 Installing the CPU heatsink and fan 1-11 1.6.3 Uninstalling the...

P8H61-M LX3 PLUS R2.0 User's Manual
Page 6
...extremes. How this guide This user guide contains the information you add a device. • Before connecting or removing signal cables from the motherboard, ensure that came with the product, contact a qualified service technician or your retailer. If you are using, contact your area. Detailed descriptions ...of the motherboard and the new technology it may become wet. • Place the product on it by yourself. Do not place the product in...
...extremes. How this guide This user guide contains the information you add a device. • Before connecting or removing signal cables from the motherboard, ensure that came with the product, contact a qualified service technician or your retailer. If you are using, contact your area. Detailed descriptions ...of the motherboard and the new technology it may become wet. • Place the product on it by yourself. Do not place the product in...
P8H61-M LX3 PLUS R2.0 User's Manual
Page 11
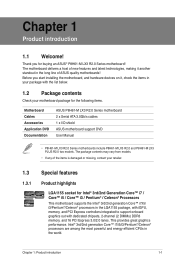
... with the list below. 1.2 Package contents Check your retailer. 1.3 1.3.1 Special features Product highlights LGA1155 socket for the following items. Motherboard Cables Accessories Application DVD Documentation ASUS P8H61-M LX3 R2.0 Series motherboard 2 x Serial ATA 3.0Gb/s cables 1 x I/O shield ASUS motherboard support DVD User Manual • P8H61-M LX3 R2.0 Series motherboards include P8H61-M LX3 R2.0 and P8H61-M LX3 PLUS R2.0 two models. This provides great graphics performance. Thank you start installing the...
... with the list below. 1.2 Package contents Check your retailer. 1.3 1.3.1 Special features Product highlights LGA1155 socket for the following items. Motherboard Cables Accessories Application DVD Documentation ASUS P8H61-M LX3 R2.0 Series motherboard 2 x Serial ATA 3.0Gb/s cables 1 x I/O shield ASUS motherboard support DVD User Manual • P8H61-M LX3 R2.0 Series motherboards include P8H61-M LX3 R2.0 and P8H61-M LX3 PLUS R2.0 two models. This provides great graphics performance. Thank you start installing the...
P8H61-M LX3 PLUS R2.0 User's Manual
Page 12
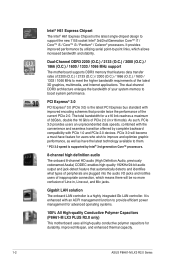
... is enhanced with PCIe 1.0 and PCIe 2.0 devices. The total bandwidth for durability, improved lifespan, and enhanced thermal capacity. 1-2 ASUS P8H61-M LX3 R2.0 Series It is supported by Intel® 3rd generation Core™ processors. 8-channel high definition audio The onboard 8-channel HD audio... system memory to provide efficient power management for advanced operating systems. 100% All High-quality Conductive Polymer Capacitors (P8H61-M LX3 PLUS R2.0 only) This motherboard uses all high-quality conductive polymer capacitors for a x16 link reaches a maximum of 32Gb/s, double the 16...
... is enhanced with PCIe 1.0 and PCIe 2.0 devices. The total bandwidth for durability, improved lifespan, and enhanced thermal capacity. 1-2 ASUS P8H61-M LX3 R2.0 Series It is supported by Intel® 3rd generation Core™ processors. 8-channel high definition audio The onboard 8-channel HD audio... system memory to provide efficient power management for advanced operating systems. 100% All High-quality Conductive Polymer Capacitors (P8H61-M LX3 PLUS R2.0 only) This motherboard uses all high-quality conductive polymer capacitors for a x16 link reaches a maximum of 32Gb/s, double the 16...
P8H61-M LX3 PLUS R2.0 User's Manual
Page 14
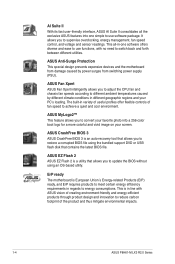
... caused by power surges from damage caused by different climate conditions in different geographic regions and your screen. ErP ready The motherboard is an auto-recovery tool that allows you to restore a corrupted BIOS file using an OS-based utility. AI Suite ...and thus mitigate environmental impacts. 1-4 ASUS P8H61-M LX3 R2.0 Series This all the exclusive ASUS features into a 256-color boot logo for a more colorful and vivid image on your PC's loading. ASUS Anti-Surge Protection This special design prevents expensive devices and the motherboard from switching power supply (PSU). ...
... caused by power surges from damage caused by different climate conditions in different geographic regions and your screen. ErP ready The motherboard is an auto-recovery tool that allows you to restore a corrupted BIOS file using an OS-based utility. AI Suite ...and thus mitigate environmental impacts. 1-4 ASUS P8H61-M LX3 R2.0 Series This all the exclusive ASUS features into a 256-color boot logo for a more colorful and vivid image on your PC's loading. ASUS Anti-Surge Protection This special design prevents expensive devices and the motherboard from switching power supply (PSU). ...
P8H61-M LX3 PLUS R2.0 User's Manual
Page 15
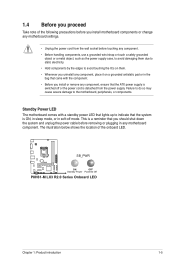
... the wall socket before removing or plugging in soft-off mode. This is ON, in sleep mode, or in any motherboard component. The illustration below shows the location of the following precautions before you install or remove any component, ensure that the...; Before you install motherboard components or change any component, place it on a grounded antistatic pad or in the bag that came with a standby power LED that lights up to the motherboard, peripherals, or components. SB_PWR P8H61-M LX3 R2.0 Series ON OFF Standby Power Powered Off P8H61-M LX3 R2.0 Series Onboard LED Chapter...
... the wall socket before removing or plugging in soft-off mode. This is ON, in sleep mode, or in any motherboard component. The illustration below shows the location of the following precautions before you install or remove any component, ensure that the...; Before you install motherboard components or change any component, place it on a grounded antistatic pad or in the bag that came with a standby power LED that lights up to the motherboard, peripherals, or components. SB_PWR P8H61-M LX3 R2.0 Series ON OFF Standby Power Powered Off P8H61-M LX3 R2.0 Series Onboard LED Chapter...

P8H61-M LX3 PLUS R2.0 User's Manual
Page 16
... chassis as indicated in the correct orientation. Place this side towards the rear of the chassis P8H61-M LX3 R2.0 Series 1-6 ASUS P8H61-M LX3 R2.0 Series Do not overtighten the screws! Doing so can cause you physical injury and damage motherboard components. 1.5.1 Placement direction When installing the motherboard, ensure that you unplug the power cord before installing or removing the...
... chassis as indicated in the correct orientation. Place this side towards the rear of the chassis P8H61-M LX3 R2.0 Series 1-6 ASUS P8H61-M LX3 R2.0 Series Do not overtighten the screws! Doing so can cause you physical injury and damage motherboard components. 1.5.1 Placement direction When installing the motherboard, ensure that you unplug the power cord before installing or removing the...
P8H61-M LX3 PLUS R2.0 User's Manual
Page 17
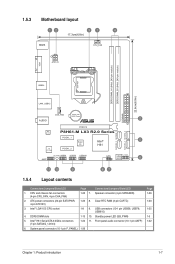
1.5.3 Motherboard layout 12 31 4 17.3cm(6.8in) KBMS CPU_FAN ATX12V VGA DDR3 DIMM_A1 (64bit, 240-pin module) DDR3 DIMM_B1 (64bit, 240-pin module) LGA1155 USB34 22.6cm(8.9in) LAN1_USB12 EATXPWR CHA_FAN Lithium Cell CMOS Power AUDIO 2 PCIEX16 RTL 8111F P8H61-M LX3 R2.0 Series SATA3G_3 SATA3G_1 SATA3G_4 SATA3G_2 PCIEX1_1 Super Intel® 5 I/O H61 VIA VT1708S PCIEX1_2...
1.5.3 Motherboard layout 12 31 4 17.3cm(6.8in) KBMS CPU_FAN ATX12V VGA DDR3 DIMM_A1 (64bit, 240-pin module) DDR3 DIMM_B1 (64bit, 240-pin module) LGA1155 USB34 22.6cm(8.9in) LAN1_USB12 EATXPWR CHA_FAN Lithium Cell CMOS Power AUDIO 2 PCIEX16 RTL 8111F P8H61-M LX3 R2.0 Series SATA3G_3 SATA3G_1 SATA3G_4 SATA3G_2 PCIEX1_1 Super Intel® 5 I/O H61 VIA VT1708S PCIEX1_2...
P8H61-M LX3 PLUS R2.0 User's Manual
Page 18
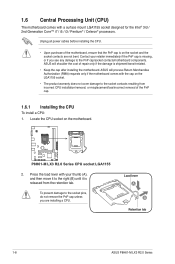
... cap. 1.6.1 Installing the CPU To install a CPU: 1. Load lever A B Retention tab 1-8 ASUS P8H61-M LX3 R2.0 Series ASUS will shoulder the cost of repair only if the damage is shipment/transit-related. • Keep the cap after installing the motherboard. 1.6 Central Processing Unit (CPU) The motherboard comes with your retailer immediately if the PnP cap is missing, or...
... cap. 1.6.1 Installing the CPU To install a CPU: 1. Load lever A B Retention tab 1-8 ASUS P8H61-M LX3 R2.0 Series ASUS will shoulder the cost of repair only if the damage is shipment/transit-related. • Keep the cap after installing the motherboard. 1.6 Central Processing Unit (CPU) The motherboard comes with your retailer immediately if the PnP cap is missing, or...
P8H61-M LX3 PLUS R2.0 User's Manual
Page 21
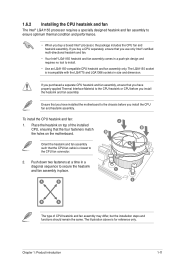
... thermal condition and performance. • When you install the CPU fan and heatsink assembly. Place the heatsink on the motherboard. B B Orient the heatsink and fan assembly A such that you have installed the motherboard to the chassis before you buy a CPU separately, ensure that you have properly applied Thermal Interface Material to the...
... thermal condition and performance. • When you install the CPU fan and heatsink assembly. Place the heatsink on the motherboard. B B Orient the heatsink and fan assembly A such that you have installed the motherboard to the chassis before you buy a CPU separately, ensure that you have properly applied Thermal Interface Material to the...

P8H61-M LX3 PLUS R2.0 User's Manual
Page 22
... at a time in a diagonal sequence to connect the CPU fan connector! CPU_FAN CPU FAN PWM CPU FAN IN CPU FAN PWR GND P8H61-M LX3 R2.0 Series P8H61-M LX3 R2.0 Series CPU fan connector Do not forget to disengage the heatsink and fan assembly from the connector on the motherboard labeled CPU_FAN. Rotate each fastener counterclockwise. 3. 3. A B A B B A B A 1-12 ASUS P8H61-M LX3 R2.0 Series
... at a time in a diagonal sequence to connect the CPU fan connector! CPU_FAN CPU FAN PWM CPU FAN IN CPU FAN PWR GND P8H61-M LX3 R2.0 Series P8H61-M LX3 R2.0 Series CPU fan connector Do not forget to disengage the heatsink and fan assembly from the connector on the motherboard labeled CPU_FAN. Rotate each fastener counterclockwise. 3. 3. A B A B B A B A 1-12 ASUS P8H61-M LX3 R2.0 Series
P8H61-M LX3 PLUS R2.0 User's Manual
Page 23
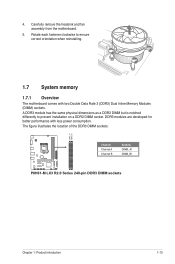
... is notched differently to ensure correct orientation when reinstalling. 1.7 System memory 1.7.1 Overview The motherboard comes with less power consumption. The figure illustrates the location of the DDR3 DIMM sockets: DIMM_A1 DIMM_B1 P8H61-M LX3 R2.0 Series Channel Channel A Channel B Sockets DIMM_A1 DIMM_B1 P8H61-M LX3 R2.0 Series 240-pin DDR3 DIMM sockets Chapter 1: Product introduction 1-13 DDR3 modules are...
... is notched differently to ensure correct orientation when reinstalling. 1.7 System memory 1.7.1 Overview The motherboard comes with less power consumption. The figure illustrates the location of the DDR3 DIMM sockets: DIMM_A1 DIMM_B1 P8H61-M LX3 R2.0 Series Channel Channel A Channel B Sockets DIMM_A1 DIMM_B1 P8H61-M LX3 R2.0 Series 240-pin DDR3 DIMM sockets Chapter 1: Product introduction 1-13 DDR3 modules are...
P8H61-M LX3 PLUS R2.0 User's Manual
Page 24
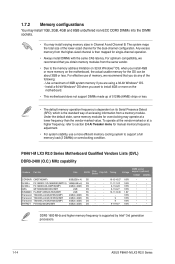
... the default state, some memory modules for single-channel operation. • Always install DIMMs with the same CAS latency. P8H61-M LX3 R2.0 Series Motherboard Qualified Vendors Lists (QVL) DDR3-2400 (O.C.) MHz capability Vendors Part No. The system maps the total size of accessing ...modules from a memory module. For effective use a more on the motherboard. • This motherboard does not support DIMMs made up of 512Mb (64MB) chips or less. • The default memory operation frequency is supported by Intel® 3rd generation processors. 1-14 ASUS P8H61-M LX3 R2.0 Series
... the default state, some memory modules for single-channel operation. • Always install DIMMs with the same CAS latency. P8H61-M LX3 R2.0 Series Motherboard Qualified Vendors Lists (QVL) DDR3-2400 (O.C.) MHz capability Vendors Part No. The system maps the total size of accessing ...modules from a memory module. For effective use a more on the motherboard. • This motherboard does not support DIMMs made up of 512Mb (64MB) chips or less. • The default memory operation frequency is supported by Intel® 3rd generation processors. 1-14 ASUS P8H61-M LX3 R2.0 Series
P8H61-M LX3 PLUS R2.0 User's Manual
Page 28
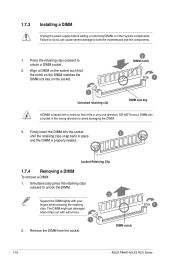
...avoid damaging the DIMM. 3. The DIMM might get damaged when it fits in only one direction. Remove the DIMM from the socket. DIMM notch 1-18 ASUS P8H61-M LX3 R2.0 Series DO NOT force a DIMM into the socket until the retaining clips snap back in the wrong direction to unlock the DIMM. 2 Support the DIMM... a DIMM: 1. 1.7.3 Installing a DIMM Unplug the power supply before adding or removing DIMMs or other system components. Press the retaining clips outward to both the motherboard and the components. 1. Failure to do so can cause severe damage to unlock a DIMM socket. 2.
...avoid damaging the DIMM. 3. The DIMM might get damaged when it fits in only one direction. Remove the DIMM from the socket. DIMM notch 1-18 ASUS P8H61-M LX3 R2.0 Series DO NOT force a DIMM into the socket until the retaining clips snap back in the wrong direction to unlock the DIMM. 2 Support the DIMM... a DIMM: 1. 1.7.3 Installing a DIMM Unplug the power supply before adding or removing DIMMs or other system components. Press the retaining clips outward to both the motherboard and the components. 1. Failure to do so can cause severe damage to unlock a DIMM socket. 2.
P8H61-M LX3 PLUS R2.0 User's Manual
Page 29
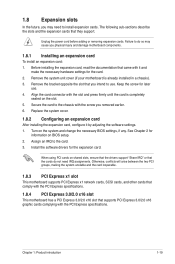
..., conflicts will arise between the two PCI groups, making the system unstable and the card inoperable. 1.8.3 PCI Express x1 slot This motherboard supports PCI Express x1 network cards, SCSI cards, and other cards that comply with the slot and press firmly until the card is... cards. Secure the card to the card. 3. Align the card connector with the PCI Express specifications. 1.8.4 PCI Express 3.0/2.0 x16 slot This motherboard has a PCI Express 3.0/2.0 x16 slot that they support. The following sub‑sections describe the slots and the expansion cards that supports PCI...
..., conflicts will arise between the two PCI groups, making the system unstable and the card inoperable. 1.8.3 PCI Express x1 slot This motherboard supports PCI Express x1 network cards, SCSI cards, and other cards that comply with the slot and press firmly until the card is... cards. Secure the card to the card. 3. Align the card connector with the PCI Express specifications. 1.8.4 PCI Express 3.0/2.0 x16 slot This motherboard has a PCI Express 3.0/2.0 x16 slot that they support. The following sub‑sections describe the slots and the expansion cards that supports PCI...

P8H61-M LX3 PLUS R2.0 User's Manual
Page 32
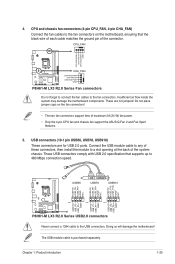
...end of the front panel audio I /O module that you connect a high-definition front panel audio module to this connector to avail of the motherboard's high-definition audio capability. • If you want to connect a high-definition front panel audio module to this connector, set the Front Panel..., set to this connector is for USB 2.0/1.1 devices. 7. 6. These two 4-pin Universal Serial Bus (USB) ports are for details. 1-22 ASUS P8H61-M LX3 R2.0 Series Front panel audio connector (10-1 pin AAFP) This connector is set the item to a PS/2 keyboard. 1.10.2 Internal connectors 1.
...end of the front panel audio I /O module that you connect a high-definition front panel audio module to this connector to avail of the motherboard's high-definition audio capability. • If you want to connect a high-definition front panel audio module to this connector, set the Front Panel..., set to this connector is for USB 2.0/1.1 devices. 7. 6. These two 4-pin Universal Serial Bus (USB) ports are for details. 1-22 ASUS P8H61-M LX3 R2.0 Series Front panel audio connector (10-1 pin AAFP) This connector is set the item to a PS/2 keyboard. 1.10.2 Internal connectors 1.
P8H61-M LX3 PLUS R2.0 User's Manual
Page 35
...24 W) fan power. • Only the 4-pin CPU fan and chassis fan support the ASUS Q-Fan 2 and Fan Xpert features. 5. Insufficient air flow inside the system may damage the motherboard components. Connect the USB module cable to any of these connectors, then install the module to...+5V USB_P5USB_P5+ GND USB+5V USB_P7USB_P7+ GND USB+5V USB_P9USB_P9+ GND P8H61-M LX3 R2.0 Series PIN 1 PIN 1 PIN 1 P8H61-M LX3 R2.0 Series USB2.0 connectors Never connect a 1394 cable to the fan connectors. Do not place jumper caps on the motherboard, ensuring that supports up to a slot opening at the back of...
...24 W) fan power. • Only the 4-pin CPU fan and chassis fan support the ASUS Q-Fan 2 and Fan Xpert features. 5. Insufficient air flow inside the system may damage the motherboard components. Connect the USB module cable to any of these connectors, then install the module to...+5V USB_P5USB_P5+ GND USB+5V USB_P7USB_P7+ GND USB+5V USB_P9USB_P9+ GND P8H61-M LX3 R2.0 Series PIN 1 PIN 1 PIN 1 P8H61-M LX3 R2.0 Series USB2.0 connectors Never connect a 1394 cable to the fan connectors. Do not place jumper caps on the motherboard, ensuring that supports up to a slot opening at the back of...
P8H61-M LX3 PLUS R2.0 User's Manual
Page 37
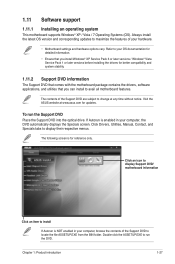
...maximize the features of the Support DVD are subject to change at www.asus.com for better compatibility and system stability. 1.11.2 Support DVD information The Support DVD that comes with the motherboard package contains the drivers, software applications, and utilities that you can install... DVD into the optical drive. Visit the ASUS website at any time without notice. The following screen is NOT enabled in your hardware. • Motherboard settings and hardware options vary. Click an icon to display Support DVD/ motherboard information Click an item to display their respective...
...maximize the features of the Support DVD are subject to change at www.asus.com for better compatibility and system stability. 1.11.2 Support DVD information The Support DVD that comes with the motherboard package contains the drivers, software applications, and utilities that you can install... DVD into the optical drive. Visit the ASUS website at any time without notice. The following screen is NOT enabled in your hardware. • Motherboard settings and hardware options vary. Click an icon to display Support DVD/ motherboard information Click an item to display their respective...

P8H61-M LX3 PLUS R2.0 User's Manual
Page 39
... FTP site, select the BIOS version that allows you to manage, save, and update the motherboard BIOS in Windows® environment. • ASUS Update requires an Internet connection either of the original motherboard BIOS file to a USB flash disk in case you wish to download then click Next. ... instructions to launch the AI Suite II utility. Click Update button from the Quick Bar, and then click ASUS Update from the Internet, then click Next. c. Copy the original motherboard BIOS using this utility. Click the Utilities tab, then click AI Suite II. 3. Place the support DVD...
... FTP site, select the BIOS version that allows you to manage, save, and update the motherboard BIOS in Windows® environment. • ASUS Update requires an Internet connection either of the original motherboard BIOS file to a USB flash disk in case you wish to download then click Next. ... instructions to launch the AI Suite II utility. Click Update button from the Quick Bar, and then click ASUS Update from the Internet, then click Next. c. Copy the original motherboard BIOS using this utility. Click the Utilities tab, then click AI Suite II. 3. Place the support DVD...


