
User Guide
Page 33
... system This motherboard supports Windows® XP / Vista / 7 Operating Systems (OS). Visit the ASUS website at any time without notice. Double-click the ASSETUP.EXE to locate the file ASSETUP.EXE from the BIN folder. Chapter 1: Product introduction 1-23 The contents of the Support DVD... • Motherboard settings and hardware options vary. Click Drivers, Utilities, Manual, Contact, and Specials tabs to change at www.asus.com for updates. Always install the latest OS version and corresponding updates to avail all motherboard features. If Autorun is for better...
... system This motherboard supports Windows® XP / Vista / 7 Operating Systems (OS). Visit the ASUS website at any time without notice. Double-click the ASSETUP.EXE to locate the file ASSETUP.EXE from the BIN folder. Chapter 1: Product introduction 1-23 The contents of the Support DVD... • Motherboard settings and hardware options vary. Click Drivers, Utilities, Manual, Contact, and Specials tabs to change at www.asus.com for updates. Always install the latest OS version and corresponding updates to avail all motherboard features. If Autorun is for better...

User Guide
Page 35
.... 2. Quit all Windows® applications before you to manage, save, and update the motherboard BIOS in Windows® environment. • ASUS Update requires an Internet connection either of the original motherboard BIOS file to a USB flash disk in case you to complete the installation. Select Update BIOS from the popup menu. The...
.... 2. Quit all Windows® applications before you to manage, save, and update the motherboard BIOS in Windows® environment. • ASUS Update requires an Internet connection either of the original motherboard BIOS file to a USB flash disk in case you to complete the installation. Select Update BIOS from the popup menu. The...

User Guide
Page 36
...Go to the Tool menu to select ASUS EZ Flash Utility and press to the USB port. 2. To update the BIOS using this utility, download the latest BIOS file from a BIOS file a. ASUSTek EZ Flash BIOS ROM Utility V01.04 Flash Info MODEL: P8H61-I LX R2.0 File Path: Drive fs0:\ VER: 0304 ... Info 04/27/12 10:23p 4194304 Exit DATE: 04/27/2012 H61ILXR2.CAP File Info MODEL: Help Info VER: DATE [Enter] Select or Load [Tab] Switch [Up/Down/PageUp/PageDown/Home/End] Move [Esc] Exit 2-2 ASUS P8H61-I LX R2.0 Enter the Advanced Mode of updating itself through the Internet. The...
...Go to the Tool menu to select ASUS EZ Flash Utility and press to the USB port. 2. To update the BIOS using this utility, download the latest BIOS file from a BIOS file a. ASUSTek EZ Flash BIOS ROM Utility V01.04 Flash Info MODEL: P8H61-I LX R2.0 File Path: Drive fs0:\ VER: 0304 ... Info 04/27/12 10:23p 4194304 Exit DATE: 04/27/2012 H61ILXR2.CAP File Info MODEL: Help Info VER: DATE [Enter] Select or Load [Tab] Switch [Up/Down/PageUp/PageDown/Home/End] Move [Esc] Exit 2-2 ASUS P8H61-I LX R2.0 Enter the Advanced Mode of updating itself through the Internet. The...

User Guide
Page 37
... be the latest version. Download the latest BIOS file from the ASUS website at www.asus.com. The utility automatically checks the devices for the BIOS file. When found, the utility reads the BIOS file and enters ASUS EZ Flash 2 utility automatically. 4. Doing so can restore a corrupted BIOS file using the motherboard support DVD or a USB flash...
... be the latest version. Download the latest BIOS file from the ASUS website at www.asus.com. The utility automatically checks the devices for the BIOS file. When found, the utility reads the BIOS file and enters ASUS EZ Flash 2 utility automatically. 4. Doing so can restore a corrupted BIOS file using the motherboard support DVD or a USB flash...

User Guide
Page 38
... press to the USB port. 2. Download the latest BIOS file and BIOS Updater from Drive C (optical drive) to update BIOS in NTFS format. 3. NTFS is not supported under DOS environment. Welcome to boot using defaults 3. C:\>d: D:\> 2-4 ASUS P8H61-I LX R2.0 Prepare the motherboard support DVD and a USB flash drive...and single partition. 2. At the FreeDOS prompt, type d: and press to switch the disk from the ASUS website at http://support.asus.com and save the BIOS file and BIOS Updater to a hard disk drive or USB flash drive in DOS environment. This utility also ...
... press to the USB port. 2. Download the latest BIOS file and BIOS Updater from Drive C (optical drive) to update BIOS in NTFS format. 3. NTFS is not supported under DOS environment. Welcome to boot using defaults 3. C:\>d: D:\> 2-4 ASUS P8H61-I LX R2.0 Prepare the motherboard support DVD and a USB flash drive...and single partition. 2. At the FreeDOS prompt, type d: and press to switch the disk from the ASUS website at http://support.asus.com and save the BIOS file and BIOS Updater to a hard disk drive or USB flash drive in DOS environment. This utility also ...

User Guide
Page 39
... to confirm BIOS update. Updating the BIOS file To update the BIOS file using BIOS Updater 1. The BIOS Updater screen appears as below. Yes No 4. D:\>bupdater /pc /g 2. Are you to section 2.9 Exit menu for DOS V1.18 Current ROM BOARD: P8H61-I LX R2.0 VER: 0304 DATE: 04/27/2012...Up/Down/Home/End] Move [Tab] Switch [B] Backup [V] Drive Info [Esc] Exit 3. When BIOS update is done, press to select the BIOS file and press . ASUSTek BIOS Updater for details. • Ensure to ensure system compatibility and stability. Select Yes and press . Select the Load Optimized Defaults...
... to confirm BIOS update. Updating the BIOS file To update the BIOS file using BIOS Updater 1. The BIOS Updater screen appears as below. Yes No 4. D:\>bupdater /pc /g 2. Are you to section 2.9 Exit menu for DOS V1.18 Current ROM BOARD: P8H61-I LX R2.0 VER: 0304 DATE: 04/27/2012...Up/Down/Home/End] Move [Tab] Switch [B] Backup [V] Drive Info [Esc] Exit 3. When BIOS update is done, press to select the BIOS file and press . ASUSTek BIOS Updater for details. • Ensure to ensure system compatibility and stability. Select Yes and press . Select the Load Optimized Defaults...

User Guide
Page 40
... Setup program to enter BIOS Setup using the BIOS Setup program. Entering BIOS Setup at startup To enter BIOS Setup at www.asus.com to download the latest BIOS file for information on . See section 2.9 Exit Menu for details. • If the system fails to boot after changing any BIOS ... after POST To enter BIOS Setup after changing any BIOS setting, try to clear the CMOS and reset the motherboard to erase the RTC RAM. 2-6 ASUS P8H61-I LX R2.0 See section 1.9 Jumpers for this motherboard. • Ensure that a USB mouse is connected to guide you in using the first two options. ...
... Setup program to enter BIOS Setup using the BIOS Setup program. Entering BIOS Setup at startup To enter BIOS Setup at www.asus.com to download the latest BIOS file for information on . See section 2.9 Exit Menu for details. • If the system fails to boot after changing any BIOS ... after POST To enter BIOS Setup after changing any BIOS setting, try to clear the CMOS and reset the motherboard to erase the RTC RAM. 2-6 ASUS P8H61-I LX R2.0 See section 1.9 Jumpers for this motherboard. • Ensure that a USB mouse is connected to guide you in using the first two options. ...
User Guide
Page 60
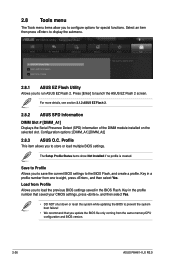
... that you update the BIOS file only coming from Profile Allows you to the BIOS Flash, and create a profile. Load from the same memory/CPU configuration and BIOS version. 2-26 ASUS P8H61-I LX R2.0 Advanced Mode Exit Main Ai Tweaker > ASUS EZ Flash Utility > ASUS SPD Information > ASUS O.C. Configuration options: [DIMM_A1] [DIMM_A2] 2.8.3 ASUS O.C. The Setup Profile Status items...
... that you update the BIOS file only coming from Profile Allows you to the BIOS Flash, and create a profile. Load from the same memory/CPU configuration and BIOS version. 2-26 ASUS P8H61-I LX R2.0 Advanced Mode Exit Main Ai Tweaker > ASUS EZ Flash Utility > ASUS SPD Information > ASUS O.C. Configuration options: [DIMM_A1] [DIMM_A2] 2.8.3 ASUS O.C. The Setup Profile Status items...


