
User Manual
Page 1
P8H61 EVO Motherboard
P8H61 EVO Motherboard

User Manual
Page 3
Contents Notices...vi Safety information vii About this guide vii P8H61 EVO specifications summary ix Chapter 1 Product introduction 1.1 Welcome 1-1 1.2 Package contents 1-1 1.3 Special features 1-1 1.3.1 Product highlights 1-1 1.3.2 Innovative ASUS features 1-3 1.4 Before you proceed 1-5 1.5 Motherboard overview 1-6 1.5.1 Placement direction 1-6 1.5.2 Screw holes 1-6 1.5.3 Motherboard layout 1-7 1.5.4 Layout contents 1-7 1.6 Central Processing Unit (CPU 1-8 1.6.1 Installing the CPU 1-8 1.6.2 Installing the CPU heatsink and fan 1-11 1.6.3 Uninstalling...
Contents Notices...vi Safety information vii About this guide vii P8H61 EVO specifications summary ix Chapter 1 Product introduction 1.1 Welcome 1-1 1.2 Package contents 1-1 1.3 Special features 1-1 1.3.1 Product highlights 1-1 1.3.2 Innovative ASUS features 1-3 1.4 Before you proceed 1-5 1.5 Motherboard overview 1-6 1.5.1 Placement direction 1-6 1.5.2 Screw holes 1-6 1.5.3 Motherboard layout 1-7 1.5.4 Layout contents 1-7 1.6 Central Processing Unit (CPU 1-8 1.6.1 Installing the CPU 1-8 1.6.2 Installing the CPU heatsink and fan 1-11 1.6.3 Uninstalling...
User Manual
Page 13
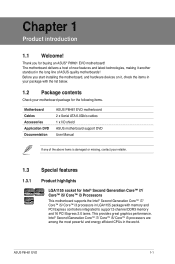
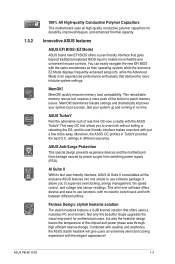
..., contact your retailer. 1.3 1.3.1 Special features Product highlights LGA1155 socket for buying an ASUS® P8H61 EVO motherboard! Intel® Second Generation Core™ i7/ Core™ i5/ Core™...motherboard delivers a host of new features and latest technologies, making it , check the items in your motherboard package for the following items. Motherboard Cables Accessories Application DVD Documentation ASUS P8H61 EVO motherboard 2 x Serial ATA 6.0Gb/s cables 1 x I/O shield ASUS motherboard support DVD User Manual If any of ASUS quality motherboards! ASUS P8H61 EVO...
..., contact your retailer. 1.3 1.3.1 Special features Product highlights LGA1155 socket for buying an ASUS® P8H61 EVO motherboard! Intel® Second Generation Core™ i7/ Core™ i5/ Core™...motherboard delivers a host of new features and latest technologies, making it , check the items in your motherboard package for the following items. Motherboard Cables Accessories Application DVD Documentation ASUS P8H61 EVO motherboard 2 x Serial ATA 6.0Gb/s cables 1 x I/O shield ASUS motherboard support DVD User Manual If any of ASUS quality motherboards! ASUS P8H61 EVO...
User Manual
Page 15
... the same smoothness as their operating system, while the exclusive EZ Mode displays frequently-accessed setup info, while the Advanced Mode is for motherboard users, but also the heatsink design lowers the temperature of the chipset and power phase area through high efficient heat-exchange. Get your ...The stylish heatsink features a 0-dB thermal solution that demand far more flexible and convenient mouse controls. Combined with usability and aesthetics, the ASUS stylish heatsink will give users an extremely silent and cooling experience with just a few clicks away. ASUS P8H61 EVO 1-3
... the same smoothness as their operating system, while the exclusive EZ Mode displays frequently-accessed setup info, while the Advanced Mode is for motherboard users, but also the heatsink design lowers the temperature of the chipset and power phase area through high efficient heat-exchange. Get your ...The stylish heatsink features a 0-dB thermal solution that demand far more flexible and convenient mouse controls. Combined with usability and aesthetics, the ASUS stylish heatsink will give users an extremely silent and cooling experience with just a few clicks away. ASUS P8H61 EVO 1-3

User Manual
Page 17
...• Before you install motherboard components or change any motherboard settings. • Unplug the power cord from the wall socket before touching any component, ensure that the ATX power supply is switched off or the power cord is detached from the power supply. ASUS P8H61 EVO 1-5 Failure to do so... may cause severe damage to avoid touching the ICs on them due to static electricity. • Hold components by the edges to the motherboard, peripherals, or components.
...• Before you install motherboard components or change any motherboard settings. • Unplug the power cord from the wall socket before touching any component, ensure that the ATX power supply is switched off or the power cord is detached from the power supply. ASUS P8H61 EVO 1-5 Failure to do so... may cause severe damage to avoid touching the ICs on them due to static electricity. • Hold components by the edges to the motherboard, peripherals, or components.

User Manual
Page 18
... cord before installing or removing the motherboard. The edge with external ports goes to the rear part of the chassis P8H61 EVO 1-6 Chapter 1: Product introduction Failure to do so can damage the motherboard. 1.5 Motherboard overview Before you install the motherboard, study the configuration of your chassis to ensure that the motherboard fits into it into the holes...
... cord before installing or removing the motherboard. The edge with external ports goes to the rear part of the chassis P8H61 EVO 1-6 Chapter 1: Product introduction Failure to do so can damage the motherboard. 1.5 Motherboard overview Before you install the motherboard, study the configuration of your chassis to ensure that the motherboard fits into it into the holes...

User Manual
Page 20
...the PnP cap unless you see any damage to the right (B) until it to the PnP cap/socket contacts/motherboard components. ASUS will shoulder the cost of repair only if the damage is shipment/transit-related. • Keep the cap after installing the... the motherboard. Locate the CPU socket on the socket and the socket contacts are installing a CPU. Unplug all power cables before installing the CPU. • Upon purchase of the PnP cap. 1.6.1 Installing the CPU To install a CPU: 1. Load lever A B Retention tab 1-8 Chapter 1: Product introduction P8H61 EVO P8H61 EVO CPU ...
...the PnP cap unless you see any damage to the right (B) until it to the PnP cap/socket contacts/motherboard components. ASUS will shoulder the cost of repair only if the damage is shipment/transit-related. • Keep the cap after installing the... the motherboard. Locate the CPU socket on the socket and the socket contacts are installing a CPU. Unplug all power cables before installing the CPU. • Upon purchase of the PnP cap. 1.6.1 Installing the CPU To install a CPU: 1. Load lever A B Retention tab 1-8 Chapter 1: Product introduction P8H61 EVO P8H61 EVO CPU ...

User Manual
Page 23
... A The type of the installed CPU, ensuring that the four fasteners match the holes on the motherboard. The illustration above is incompatible with the LGA775 and LGA1366 sockets in size and dimension. ASUS P8H61 EVO 1-11 If you purchased a separate CPU heatsink and fan assembly, ensure that you have installed the... motherboard to the CPU fan connector. 2. 1.6.2 Installing the CPU heatsink and ...
... A The type of the installed CPU, ensuring that the four fasteners match the holes on the motherboard. The illustration above is incompatible with the LGA775 and LGA1366 sockets in size and dimension. ASUS P8H61 EVO 1-11 If you purchased a separate CPU heatsink and fan assembly, ensure that you have installed the... motherboard to the CPU fan connector. 2. 1.6.2 Installing the CPU heatsink and ...

User Manual
Page 24
... cable to disengage the heatsink and fan assembly from the connector on the motherboard labeled CPU_FAN. Disconnect the CPU fan cable from the motherboard. 3. Rotate each fastener counterclockwise. 3. CPU_FAN CPU FAN PWM CPU FAN IN CPU FAN PWR GND P8H61 EVO P8H61 EVO CPU fan connector Do not forget to plug this connector. 1.6.3 Uninstalling the CPU...
... cable to disengage the heatsink and fan assembly from the connector on the motherboard labeled CPU_FAN. Disconnect the CPU fan cable from the motherboard. 3. Rotate each fastener counterclockwise. 3. CPU_FAN CPU FAN PWM CPU FAN IN CPU FAN PWR GND P8H61 EVO P8H61 EVO CPU fan connector Do not forget to plug this connector. 1.6.3 Uninstalling the CPU...

User Manual
Page 25
...: P8H61 EVO P8H61 EVO 240-pin DDR3 DIMM sockets DIMM_A1 DIMM_A2 DIMM_B1 DIMM_B2 ASUS P8H61 EVO 1-13 DDR3 modules are developed for better performance with four Double Data Rate 3 (DDR3) Dual Inline Memory Modules (DIMM) sockets. Carefully remove the heatsink and fan assembly from the motherboard. ...5. A DDR3 module has the same physical dimensions as a DDR2 DIMM but is notched differently to ensure correct orientation when reinstalling. 1.7 System memory 1.7.1 Overview The motherboard comes with less power consumption. Rotate each...
...: P8H61 EVO P8H61 EVO 240-pin DDR3 DIMM sockets DIMM_A1 DIMM_A2 DIMM_B1 DIMM_B2 ASUS P8H61 EVO 1-13 DDR3 modules are developed for better performance with four Double Data Rate 3 (DDR3) Dual Inline Memory Modules (DIMM) sockets. Carefully remove the heatsink and fan assembly from the motherboard. ...5. A DDR3 module has the same physical dimensions as a DDR2 DIMM but is notched differently to ensure correct orientation when reinstalling. 1.7 System memory 1.7.1 Overview The motherboard comes with less power consumption. Rotate each...
User Manual
Page 27
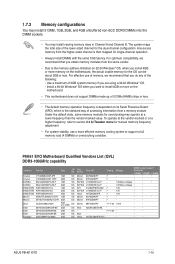
...174; OS, when you install 4GB or more efficient memory cooling system to support a full memory load (4 DIMMs) or overclocking condition. P8H61 EVO Motherboard Qualified Vendors List (QVL) DDR3-1066MHz capability Vendors Part No. Timing Voltage DIMM socket support (Optional) 1 DIMM 2 DIMM 4 DIMM...; Elixir M2Y2G64CBHC9N-BE 2GB DS Elixir - - - • Kingtiger 2GB DIMM PC3-8500 2GB DS Hynix H5TQ1G83AFP G7C - - • • ASUS P8H61 EVO 1-15 To operate at the vendor-marked or at a lower frequency than the vendor-marked value. Size SS/ Chip DS Brand Chip NO. Any excess...
...174; OS, when you install 4GB or more efficient memory cooling system to support a full memory load (4 DIMMs) or overclocking condition. P8H61 EVO Motherboard Qualified Vendors List (QVL) DDR3-1066MHz capability Vendors Part No. Timing Voltage DIMM socket support (Optional) 1 DIMM 2 DIMM 4 DIMM...; Elixir M2Y2G64CBHC9N-BE 2GB DS Elixir - - - • Kingtiger 2GB DIMM PC3-8500 2GB DS Hynix H5TQ1G83AFP G7C - - • • ASUS P8H61 EVO 1-15 To operate at the vendor-marked or at a lower frequency than the vendor-marked value. Size SS/ Chip DS Brand Chip NO. Any excess...
User Manual
Page 31
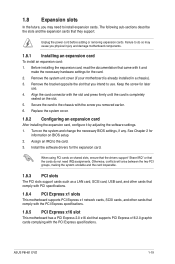
... the documentation that came with the PCI Express specifications. When using PCI cards on the slot. 5. See Chapter 2 for the card. 2. ASUS P8H61 EVO 1-19 1.8 Expansion slots In the future, you intend to use . 4. Remove the bracket opposite the slot that supports PCI Express x16 2.0... firmly until the card is already installed in a chassis). 3. Align the card connector with the screw you physical injury and damage motherboard components. 1.8.1 Installing an expansion card To install an expansion card: 1. Otherwise, conflicts will arise between the two PCI groups, making...
... the documentation that came with the PCI Express specifications. When using PCI cards on the slot. 5. See Chapter 2 for the card. 2. ASUS P8H61 EVO 1-19 1.8 Expansion slots In the future, you intend to use . 4. Remove the bracket opposite the slot that supports PCI Express x16 2.0... firmly until the card is already installed in a chassis). 3. Align the card connector with the screw you physical injury and damage motherboard components. 1.8.1 Installing an expansion card To install an expansion card: 1. Otherwise, conflicts will arise between the two PCI groups, making...

User Manual
Page 38
USB+5V USB_P8USB_P8+ GND NC USB+5V USB_P10USB_P10+ GND NC P8H61 EVO USB78 USB910 PIN 1 PIN 1 USB+5V USB_P7USB_P7+ GND USB+5V USB_P9USB_P9+ GND P8H61 EVO USB2.0 connectors Never connect a 1394 cable to a slot opening at the back of the system chassis...Product introduction These USB connectors comply with the USB 3.0 specification that supports up to 480Mbps connection speed. P8H61 EVO P8H61 EVO USB3.0 Front panel connector The USB 3.0 module is purchased separately. 7. Doing so will damage the motherboard! If the USB 3.0 front panel cable is for USB 2.0 ports. 6.
USB+5V USB_P8USB_P8+ GND NC USB+5V USB_P10USB_P10+ GND NC P8H61 EVO USB78 USB910 PIN 1 PIN 1 USB+5V USB_P7USB_P7+ GND USB+5V USB_P9USB_P9+ GND P8H61 EVO USB2.0 connectors Never connect a 1394 cable to a slot opening at the back of the system chassis...Product introduction These USB connectors comply with the USB 3.0 specification that supports up to 480Mbps connection speed. P8H61 EVO P8H61 EVO USB3.0 Front panel connector The USB 3.0 module is purchased separately. 7. Doing so will damage the motherboard! If the USB 3.0 front panel cable is for USB 2.0 ports. 6.

User Manual
Page 39
... connectors The CPU_FAN connector supports a CPU fan of the connector. Insufficient air flow inside the system may damage the motherboard components. They are not jumpers! ASUS P8H61 EVO 1-27 DO NOT place jumper caps on the motherboard, making sure that the black wire of each cable matches the ground pin of maximum 2A (24 W) fan...
... connectors The CPU_FAN connector supports a CPU fan of the connector. Insufficient air flow inside the system may damage the motherboard components. They are not jumpers! ASUS P8H61 EVO 1-27 DO NOT place jumper caps on the motherboard, making sure that the black wire of each cable matches the ground pin of maximum 2A (24 W) fan...
User Manual
Page 41
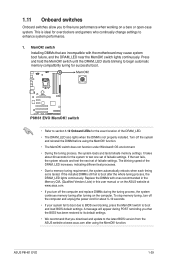
... message will appear during the tuning process, the system continues memory tuning after the whole tuning process, the DRAM_LED lights continuously. ASUS P8H61 EVO 1-29 P8H61 EVO P8H61 EVO MemOK! switch does not function under Windows® OS environment. • During the tuning process, the system loads and tests ... switch to BIOS overclocking, press the MemOK! switch lights continuously. function. • The MemOK! Replace the DIMMs with the motherboard may cause system boot failure, and the DRAM_LED near the MemOK! 1.11 Onboard switches Onboard switches allow you to fine-tune ...
... message will appear during the tuning process, the system continues memory tuning after the whole tuning process, the DRAM_LED lights continuously. ASUS P8H61 EVO 1-29 P8H61 EVO P8H61 EVO MemOK! switch does not function under Windows® OS environment. • During the tuning process, the system loads and tests ... switch to BIOS overclocking, press the MemOK! switch lights continuously. function. • The MemOK! Replace the DIMMs with the motherboard may cause system boot failure, and the DRAM_LED near the MemOK! 1.11 Onboard switches Onboard switches allow you to fine-tune ...

User Manual
Page 42
... shows the location of the onboard LED. Standby Power LED The motherboard comes with a standby power LED that lights up to indicate that you to enable or disable the Turbo Key II function. P8H61 EVO SB_PWR ON OFF Standby Power Powered Off P8H61 EVO Onboard LED 1-30 Chapter 1: Product introduction Turbo Key II switch ...This switch allows you should shut down the system and unplug the power cable before removing or plugging in soft-off mode. P8H61 EVO P8H61 EVO Turbo Key II switch 1.12 Onboard LEDs 1. This is a reminder that the system is ON, in sleep mode, or in any...
... shows the location of the onboard LED. Standby Power LED The motherboard comes with a standby power LED that lights up to indicate that you to enable or disable the Turbo Key II function. P8H61 EVO SB_PWR ON OFF Standby Power Powered Off P8H61 EVO Onboard LED 1-30 Chapter 1: Product introduction Turbo Key II switch ...This switch allows you should shut down the system and unplug the power cable before removing or plugging in soft-off mode. P8H61 EVO P8H61 EVO Turbo Key II switch 1.12 Onboard LEDs 1. This is a reminder that the system is ON, in sleep mode, or in any...

User Manual
Page 43
DRAM LED DRAM LED checks the DRAM in sequence during motherboard booting process. DRAM LED P8H61 EVO P8H61 EVO DRAM LED 3. O2LED2 P8H61 EVO P8H61 EVO Turbo Key II LED ASUS P8H61 EVO 1-31 If an error is solved. Turbo Key II LED The Turbo Key II LED lights when the Turbo Key II switch is turned to the error device will continue lighting until the problem is found , the LED next to Enable. 2. This user-friendly design provides an intuitional way to locate the root problem within a second.
DRAM LED DRAM LED checks the DRAM in sequence during motherboard booting process. DRAM LED P8H61 EVO P8H61 EVO DRAM LED 3. O2LED2 P8H61 EVO P8H61 EVO Turbo Key II LED ASUS P8H61 EVO 1-31 If an error is solved. Turbo Key II LED The Turbo Key II LED lights when the Turbo Key II switch is turned to the error device will continue lighting until the problem is found , the LED next to Enable. 2. This user-friendly design provides an intuitional way to locate the root problem within a second.
User Manual
Page 48
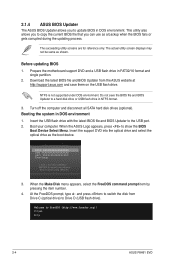
Prepare the motherboard support DVD and a USB flash drive in DOS environment 1. ...2. Booting the system in FAT32/16 format and single partition. 2. C:\>d: D:\> 2-4 ASUS P8H61 EVO The succeeding utility screens are for reference only. 2.1.4 ASUS BIOS Updater The ASUS BIOS Updater allows you can use as a backup when the BIOS fails or gets ...USB flash drive with the latest BIOS file and BIOS Updater to FreeDOS (http://www.freedos.org)! When the ASUS Logo appears, press to boot using defaults 3. Boot your computer. Please select boot device: SATA: XXXXXXXXXXXXXXXX USB...
Prepare the motherboard support DVD and a USB flash drive in DOS environment 1. ...2. Booting the system in FAT32/16 format and single partition. 2. C:\>d: D:\> 2-4 ASUS P8H61 EVO The succeeding utility screens are for reference only. 2.1.4 ASUS BIOS Updater The ASUS BIOS Updater allows you can use as a backup when the BIOS fails or gets ...USB flash drive with the latest BIOS file and BIOS Updater to FreeDOS (http://www.freedos.org)! When the ASUS Logo appears, press to boot using defaults 3. Boot your computer. Please select boot device: SATA: XXXXXXXXXXXXXXXX USB...

User Manual
Page 52
To access the Advanced Mode, click Exit/Advanced Mode, then select Advanced Mode. Displays the CPU/motherboard temperature, CPU/5V/3.3V/12V voltage output, CPU/chassis fan speed Exits the BIOS setup program without saving the changes, saves the changes and resets ... 12V 12.248V CHA_FAN1 N/A System Performance Quiet Performance Boot Priority Energy Saving Normal Use the mouse to drag or keyboard to navigate to the system. 2-8 ASUS P8H61 EVO EZ Mode By default, the EZ Mode screen appears when you installed to the system. • The Boot Menu(F8) button is available only when...
To access the Advanced Mode, click Exit/Advanced Mode, then select Advanced Mode. Displays the CPU/motherboard temperature, CPU/5V/3.3V/12V voltage output, CPU/chassis fan speed Exits the BIOS setup program without saving the changes, saves the changes and resets ... 12V 12.248V CHA_FAN1 N/A System Performance Quiet Performance Boot Priority Energy Saving Normal Use the mouse to drag or keyboard to navigate to the system. 2-8 ASUS P8H61 EVO EZ Mode By default, the EZ Mode screen appears when you installed to the system. • The Boot Menu(F8) button is available only when...

User Manual
Page 76
...112, TAIWAN R.O.C. Country: TAIWAN Authorized representative in Europe: ASUS COMPUTER GmbH Address, City: HARKORT STR. 21-23, 40880 RATINGEN Country: GERMANY declare the following apparatus: Product name : Motherboard Model name : P8H61 EVO conform with part 15 of Conformity We, the undersigned, Manufacturer...and (2) this device must accept any interference received, including interference that the product Product Name : Motherboard Model Number : P8H61 EVO Conforms to begin affixing CE marking:2011 Signature Operation is subject to the following directives: 2004/108/...
...112, TAIWAN R.O.C. Country: TAIWAN Authorized representative in Europe: ASUS COMPUTER GmbH Address, City: HARKORT STR. 21-23, 40880 RATINGEN Country: GERMANY declare the following apparatus: Product name : Motherboard Model name : P8H61 EVO conform with part 15 of Conformity We, the undersigned, Manufacturer...and (2) this device must accept any interference received, including interference that the product Product Name : Motherboard Model Number : P8H61 EVO Conforms to begin affixing CE marking:2011 Signature Operation is subject to the following directives: 2004/108/...


