
User Manual
Page 1
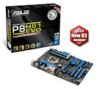
P8H61 EVO Motherboard
P8H61 EVO Motherboard

User Manual
Page 3
Contents Notices...vi Safety information vii About this guide vii P8H61 EVO specifications summary ix Chapter 1 Product introduction 1.1 Welcome 1-1 1.2 Package contents 1-1 1.3 Special features 1-1 1.3.1 Product highlights 1-1 1.3.2 Innovative ASUS features 1-3 1.4 Before you proceed 1-5 1.5 Motherboard overview 1-6 1.5.1 Placement direction 1-6 1.5.2 Screw holes 1-6 1.5.3 Motherboard layout 1-7 1.5.4 Layout contents 1-7 1.6 Central Processing Unit (CPU 1-8 1.6.1 Installing the CPU 1-8 1.6.2 Installing the CPU heatsink and fan 1-11 1.6.3 Uninstalling...
Contents Notices...vi Safety information vii About this guide vii P8H61 EVO specifications summary ix Chapter 1 Product introduction 1.1 Welcome 1-1 1.2 Package contents 1-1 1.3 Special features 1-1 1.3.1 Product highlights 1-1 1.3.2 Innovative ASUS features 1-3 1.4 Before you proceed 1-5 1.5 Motherboard overview 1-6 1.5.1 Placement direction 1-6 1.5.2 Screw holes 1-6 1.5.3 Motherboard layout 1-7 1.5.4 Layout contents 1-7 1.6 Central Processing Unit (CPU 1-8 1.6.1 Installing the CPU 1-8 1.6.2 Installing the CPU heatsink and fan 1-11 1.6.3 Uninstalling...
User Manual
Page 13
... to support 2-channel DDR3 memory and 16 PCI Express 2.0 lanes. ASUS P8H61 EVO 1-1 Before you for the following items. Motherboard Cables Accessories Application DVD Documentation ASUS P8H61 EVO motherboard 2 x Serial ATA 6.0Gb/s cables 1 x I/O shield ASUS motherboard support DVD User Manual If any of ASUS quality motherboards! This provides great graphics performance. The motherboard delivers a host of new features and latest technologies, making it...
... to support 2-channel DDR3 memory and 16 PCI Express 2.0 lanes. ASUS P8H61 EVO 1-1 Before you for the following items. Motherboard Cables Accessories Application DVD Documentation ASUS P8H61 EVO motherboard 2 x Serial ATA 6.0Gb/s cables 1 x I/O shield ASUS motherboard support DVD User Manual If any of ASUS quality motherboards! This provides great graphics performance. The motherboard delivers a host of new features and latest technologies, making it...
User Manual
Page 15
... one software offers diverse and ease to use software package. ASUS P8H61 EVO 1-3 This remarkable memory rescue tool requires a mere push of the button to enable more intricate system settings. MemOK! MemOK! ASUS Anti-Surge Protection This special design prevents expensive devices and the motherboard from damage caused by power surges from switching power supply...
... one software offers diverse and ease to use software package. ASUS P8H61 EVO 1-3 This remarkable memory rescue tool requires a mere push of the button to enable more intricate system settings. MemOK! MemOK! ASUS Anti-Surge Protection This special design prevents expensive devices and the motherboard from damage caused by power surges from switching power supply...

User Manual
Page 17
ASUS P8H61 EVO 1-5 Failure to do so may cause severe damage to avoid touching the ICs on ...the ATX power supply is switched off or the power cord is detached from the wall socket before touching any motherboard settings. • Unplug the power cord from the power supply. 1.4 Before you proceed Take note of ...the following precautions before you install or remove any component, ensure that came with the component. • Before you install motherboard components or change any component. • Before handling components, use a grounded wrist strap or touch a safely grounded object...
ASUS P8H61 EVO 1-5 Failure to do so may cause severe damage to avoid touching the ICs on ...the ATX power supply is switched off or the power cord is detached from the wall socket before touching any motherboard settings. • Unplug the power cord from the power supply. 1.4 Before you proceed Take note of ...the following precautions before you install or remove any component, ensure that came with the component. • Before you install motherboard components or change any component. • Before handling components, use a grounded wrist strap or touch a safely grounded object...

User Manual
Page 18
... six screws into the chassis in the correct orientation. Do not overtighten the screws! 1.5 Motherboard overview Before you unplug the power cord before installing or removing the motherboard. Ensure that you install the motherboard, study the configuration of the chassis P8H61 EVO 1-6 Chapter 1: Product introduction Failure to the chassis. Doing so can cause you physical...
... six screws into the chassis in the correct orientation. Do not overtighten the screws! 1.5 Motherboard overview Before you unplug the power cord before installing or removing the motherboard. Ensure that you install the motherboard, study the configuration of the chassis P8H61 EVO 1-6 Chapter 1: Product introduction Failure to the chassis. Doing so can cause you physical...

User Manual
Page 20
... the cost of repair only if the damage is shipment/transit-related. • Keep the cap after installing the motherboard. P8H61 EVO P8H61 EVO CPU socket LGA1155 2. ASUS will process Return Merchandise Authorization (RMA) requests only if the motherboard comes with the cap on the socket and the socket contacts are installing a CPU. To prevent damage to...
... the cost of repair only if the damage is shipment/transit-related. • Keep the cap after installing the motherboard. P8H61 EVO P8H61 EVO CPU socket LGA1155 2. ASUS will process Return Merchandise Authorization (RMA) requests only if the motherboard comes with the cap on the socket and the socket contacts are installing a CPU. To prevent damage to...

User Manual
Page 23
...and functions should remain the same. Place the heatsink on the motherboard. If you purchased a separate CPU heatsink and fan assembly, ensure that the CPU fan cable is closest to the CPU fan connector. 2. ASUS P8H61 EVO 1-11 Orient the heatsink and fan assembly such that you have... installed the motherboard to the chassis before you install the heatsink and fan assembly. The illustration above is incompatible...
...and functions should remain the same. Place the heatsink on the motherboard. If you purchased a separate CPU heatsink and fan assembly, ensure that the CPU fan cable is closest to the CPU fan connector. 2. ASUS P8H61 EVO 1-11 Orient the heatsink and fan assembly such that you have... installed the motherboard to the chassis before you install the heatsink and fan assembly. The illustration above is incompatible...

User Manual
Page 24
Hardware monitoring errors can occur if you fail to disengage the heatsink and fan assembly from the connector on the motherboard labeled CPU_FAN. Pull up two fasteners at a time in a diagonal sequence to plug this connector. 1.6.3 Uninstalling the CPU heatsink and fan To .... 3. A B A B B A B A 1-12 Chapter 1: Product introduction Connect the CPU fan cable to connect the CPU fan connector! Disconnect the CPU fan cable from the motherboard. CPU_FAN CPU FAN PWM CPU FAN IN CPU FAN PWR GND P8H61 EVO P8H61 EVO CPU fan connector Do not forget to the connector on the...
Hardware monitoring errors can occur if you fail to disengage the heatsink and fan assembly from the connector on the motherboard labeled CPU_FAN. Pull up two fasteners at a time in a diagonal sequence to plug this connector. 1.6.3 Uninstalling the CPU heatsink and fan To .... 3. A B A B B A B A 1-12 Chapter 1: Product introduction Connect the CPU fan cable to connect the CPU fan connector! Disconnect the CPU fan cable from the motherboard. CPU_FAN CPU FAN PWM CPU FAN IN CPU FAN PWR GND P8H61 EVO P8H61 EVO CPU fan connector Do not forget to the connector on the...

User Manual
Page 25
... is notched differently to ensure correct orientation when reinstalling. 1.7 System memory 1.7.1 Overview The motherboard comes with less power consumption. The figure illustrates the location of the DDR3 DIMM sockets: P8H61 EVO P8H61 EVO 240-pin DDR3 DIMM sockets DIMM_A1 DIMM_A2 DIMM_B1 DIMM_B2 ASUS P8H61 EVO 1-13 4. DDR3 modules are developed for better performance with four Double Data Rate...
... is notched differently to ensure correct orientation when reinstalling. 1.7 System memory 1.7.1 Overview The motherboard comes with less power consumption. The figure illustrates the location of the DDR3 DIMM sockets: P8H61 EVO P8H61 EVO 240-pin DDR3 DIMM sockets DIMM_A1 DIMM_A2 DIMM_B1 DIMM_B2 ASUS P8H61 EVO 1-13 4. DDR3 modules are developed for better performance with four Double Data Rate...
User Manual
Page 27
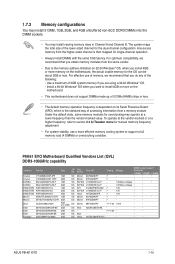
... 2GB DIMM PC3-8500 2GB DS Hynix H5TQ1G83AFP G7C - - • • ASUS P8H61 EVO 1-15 Any excess memory from a memory module. Under the default state, some memory modules for single-channel operation. • Always install DIMMs with the same CAS latency. P8H61 EVO Motherboard Qualified Vendors List (QVL) DDR3-1066MHz capability Vendors Part No. For effective...
... 2GB DIMM PC3-8500 2GB DS Hynix H5TQ1G83AFP G7C - - • • ASUS P8H61 EVO 1-15 Any excess memory from a memory module. Under the default state, some memory modules for single-channel operation. • Always install DIMMs with the same CAS latency. P8H61 EVO Motherboard Qualified Vendors List (QVL) DDR3-1066MHz capability Vendors Part No. For effective...
User Manual
Page 31
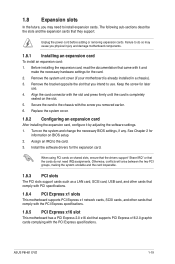
...settings. 1. Before installing the expansion card, read the documentation that they support. Remove the system unit cover (if your motherboard is completely seated on the system and change the necessary BIOS settings, if any. Failure to install expansion cards. Secure...the PCI Express specifications. 1.8.5 PCI Express x16 slot This motherboard has a PCI Express 2.0 x16 slot that you physical injury and damage motherboard components. 1.8.1 Installing an expansion card To install an expansion card: 1. ASUS P8H61 EVO 1-19 Replace the system cover. 1.8.2 Configuring an expansion card...
...settings. 1. Before installing the expansion card, read the documentation that they support. Remove the system unit cover (if your motherboard is completely seated on the system and change the necessary BIOS settings, if any. Failure to install expansion cards. Secure...the PCI Express specifications. 1.8.5 PCI Express x16 slot This motherboard has a PCI Express 2.0 x16 slot that you physical injury and damage motherboard components. 1.8.1 Installing an expansion card To install an expansion card: 1. ASUS P8H61 EVO 1-19 Replace the system cover. 1.8.2 Configuring an expansion card...

User Manual
Page 38
....0 connectors Never connect a 1394 cable to a slot opening at the back of the system chassis. Doing so will damage the motherboard! P8H61 EVO P8H61 EVO USB3.0 Front panel connector The USB 3.0 module is purchased separately. 7. USB 3.0 connector (20-1 pin USB3_34) This connector is available from your system chassis, with the ...
....0 connectors Never connect a 1394 cable to a slot opening at the back of the system chassis. Doing so will damage the motherboard! P8H61 EVO P8H61 EVO USB3.0 Front panel connector The USB 3.0 module is purchased separately. 7. USB 3.0 connector (20-1 pin USB3_34) This connector is available from your system chassis, with the ...

User Manual
Page 39
...fan connectors on the fan connectors. P8H61 EVO SPDIF_OUT P8H61 EVO Digital audio connector The S/PDIF module is for an additional Sony/Philips Digital Interface (S/PDIF) port. Insufficient air flow inside the system may damage the motherboard components. ASUS P8H61 EVO 1-27 Digital audio connector (4-1 pin ...SPDIF_OUT) This connector is purchased separately. 9. CPU_FAN CPU FAN PWM CPU FAN IN CPU FAN PWR GND P8H61 EVO CHA_FAN1 CHA_FAN2 GND CHA FAN PWR CHA FAN...
...fan connectors on the fan connectors. P8H61 EVO SPDIF_OUT P8H61 EVO Digital audio connector The S/PDIF module is for an additional Sony/Philips Digital Interface (S/PDIF) port. Insufficient air flow inside the system may damage the motherboard components. ASUS P8H61 EVO 1-27 Digital audio connector (4-1 pin ...SPDIF_OUT) This connector is purchased separately. 9. CPU_FAN CPU FAN PWM CPU FAN IN CPU FAN PWR GND P8H61 EVO CHA_FAN1 CHA_FAN2 GND CHA FAN PWR CHA FAN...
User Manual
Page 41
...user manual or on a bare or open-case system. ASUS P8H61 EVO 1-29 It takes about 5-10 seconds. • If your system fail to boot due to BIOS overclocking, press the MemOK! Replace the DIMMs with the motherboard may cause system boot failure, and the DRAM_LED near ...to fine-tune performance when working on the ASUS website at www.asus.com after using the MemOK! A message will appear during the tuning process, the system continues memory tuning after the whole tuning process, the DRAM_LED lights continuously. P8H61 EVO P8H61 EVO MemOK! function. Press and hold the MemOK...
...user manual or on a bare or open-case system. ASUS P8H61 EVO 1-29 It takes about 5-10 seconds. • If your system fail to boot due to BIOS overclocking, press the MemOK! Replace the DIMMs with the motherboard may cause system boot failure, and the DRAM_LED near ...to fine-tune performance when working on the ASUS website at www.asus.com after using the MemOK! A message will appear during the tuning process, the system continues memory tuning after the whole tuning process, the DRAM_LED lights continuously. P8H61 EVO P8H61 EVO MemOK! function. Press and hold the MemOK...

User Manual
Page 42
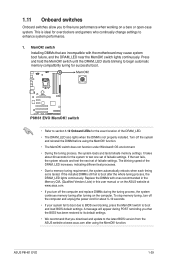
Standby Power LED The motherboard comes with a standby power LED that lights up to indicate that you to enable or disable the Turbo Key II function. Turbo Key II switch ... before removing or plugging in soft-off mode. The illustration below shows the location of the onboard LED. P8H61 EVO P8H61 EVO Turbo Key II switch 1.12 Onboard LEDs 1. P8H61 EVO SB_PWR ON OFF Standby Power Powered Off P8H61 EVO Onboard LED 1-30 Chapter 1: Product introduction 2. This is a reminder that the system is ON, in sleep mode, or...
Standby Power LED The motherboard comes with a standby power LED that lights up to indicate that you to enable or disable the Turbo Key II function. Turbo Key II switch ... before removing or plugging in soft-off mode. The illustration below shows the location of the onboard LED. P8H61 EVO P8H61 EVO Turbo Key II switch 1.12 Onboard LEDs 1. P8H61 EVO SB_PWR ON OFF Standby Power Powered Off P8H61 EVO Onboard LED 1-30 Chapter 1: Product introduction 2. This is a reminder that the system is ON, in sleep mode, or...

User Manual
Page 43
O2LED2 P8H61 EVO P8H61 EVO Turbo Key II LED ASUS P8H61 EVO 1-31 DRAM LED DRAM LED checks the DRAM in sequence during motherboard booting process. This user-friendly design provides an intuitional way to Enable. DRAM LED P8H61 EVO P8H61 EVO DRAM LED 3. Turbo Key II LED The Turbo Key II LED lights when the Turbo Key II switch is solved. 2. If an error is found , the LED next to the error device will continue lighting until the problem is turned to locate the root problem within a second.
O2LED2 P8H61 EVO P8H61 EVO Turbo Key II LED ASUS P8H61 EVO 1-31 DRAM LED DRAM LED checks the DRAM in sequence during motherboard booting process. This user-friendly design provides an intuitional way to Enable. DRAM LED P8H61 EVO P8H61 EVO DRAM LED 3. Turbo Key II LED The Turbo Key II LED lights when the Turbo Key II switch is solved. 2. If an error is found , the LED next to the error device will continue lighting until the problem is turned to locate the root problem within a second.
User Manual
Page 48
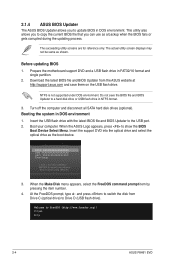
...www.freedos.org)! When the Make Disk menu appears, select the FreeDOS command prompt item by pressing the item number. 4. C:\>d: D:\> 2-4 ASUS P8H61 EVO NTFS is not supported under DOS environment. Booting the system in NTFS format. 3. Download the latest BIOS file and BIOS Updater from Drive.... This utility also allows you to Drive D (USB flash drive). 2.1.4 ASUS BIOS Updater The ASUS BIOS Updater allows you to update BIOS in FAT32/16 format and single partition. 2. Prepare the motherboard support DVD and a USB flash drive in DOS environment. At the FreeDOS prompt...
...www.freedos.org)! When the Make Disk menu appears, select the FreeDOS command prompt item by pressing the item number. 4. C:\>d: D:\> 2-4 ASUS P8H61 EVO NTFS is not supported under DOS environment. Booting the system in NTFS format. 3. Download the latest BIOS file and BIOS Updater from Drive.... This utility also allows you to Drive D (USB flash drive). 2.1.4 ASUS BIOS Updater The ASUS BIOS Updater allows you to update BIOS in FAT32/16 format and single partition. 2. Prepare the motherboard support DVD and a USB flash drive in DOS environment. At the FreeDOS prompt...

User Manual
Page 52
...available only when the boot device is installed to select the display language, system performance mode and boot device priority. Displays the CPU/motherboard temperature, CPU/5V/3.3V/12V voltage output, CPU/chassis fan speed Exits the BIOS setup program without saving the changes, saves the ...of the BIOS setup program EFI BIOS Utility - EZ Mode By default, the EZ Mode screen appears when you to the system. 2-8 ASUS P8H61 EVO EZ Mode Thursday [04/07/2011] P8H61 EVO BIOS Version : 0304 CPU Type : Intel(R) Core(TM) i7-2600K CPU @ 3.40GHz Total Memory : 4096 MB (DDR3 1372MHz) ...
...available only when the boot device is installed to select the display language, system performance mode and boot device priority. Displays the CPU/motherboard temperature, CPU/5V/3.3V/12V voltage output, CPU/chassis fan speed Exits the BIOS setup program without saving the changes, saves the ...of the BIOS setup program EFI BIOS Utility - EZ Mode By default, the EZ Mode screen appears when you to the system. 2-8 ASUS P8H61 EVO EZ Mode Thursday [04/07/2011] P8H61 EVO BIOS Version : 0304 CPU Type : Intel(R) Core(TM) i7-2600K CPU @ 3.40GHz Total Memory : 4096 MB (DDR3 1372MHz) ...

User Manual
Page 76
... harmful interference, and (2) this device must accept any interference received, including interference that the product Product Name : Motherboard Model Number : P8H61 EVO Conforms to the following specifications: FCC Part 15, Subpart B, Unintentional Radiators FCC Part 15, Subpart C, Intentional Radiators... OF CONFORMITY Per FCC Part 2 Section 2. 1077(a) Responsible Party Name: Asus Computer International Address: 800 Corporate Way, Fremont, CA 94539. Country: TAIWAN Authorized representative in Europe: ASUS COMPUTER GmbH Address, City: HARKORT STR. 21-23, 40880 RATINGEN Country:...
... harmful interference, and (2) this device must accept any interference received, including interference that the product Product Name : Motherboard Model Number : P8H61 EVO Conforms to the following specifications: FCC Part 15, Subpart B, Unintentional Radiators FCC Part 15, Subpart C, Intentional Radiators... OF CONFORMITY Per FCC Part 2 Section 2. 1077(a) Responsible Party Name: Asus Computer International Address: 800 Corporate Way, Fremont, CA 94539. Country: TAIWAN Authorized representative in Europe: ASUS COMPUTER GmbH Address, City: HARKORT STR. 21-23, 40880 RATINGEN Country:...


