User Manual
Page 6
... manuals 4-2 4.3 Software information 4-3 4.3.1 ASUS PC Probe II 4-3 4.3.2 ASUS AI Suite 4-4 4.3.3 ASUS Fan Xpert 4-5 4.3.4 ASUS EPU-6 Engine 4-6 4.3.5 ASUS Express Gate 4-7 4.3.6 VIA® High Definition Audio utility 4-8 4.4 ASUS Unique Overclocking Utility-TurboV EVO 4-9 4.4.1 Using ASUS TurboV 4-9 4.4.2 Using ASUS TurboV Auto Tuning Mode 4-10 4.4.3 Using ASUS Turbo Key 4-11 4.5 RAID configurations 4-12 4.5.1 RAID definitions 4-12 4.5.2 Installing Serial ATA hard disks 4-13 4.5.3 Setting the RAID...
... manuals 4-2 4.3 Software information 4-3 4.3.1 ASUS PC Probe II 4-3 4.3.2 ASUS AI Suite 4-4 4.3.3 ASUS Fan Xpert 4-5 4.3.4 ASUS EPU-6 Engine 4-6 4.3.5 ASUS Express Gate 4-7 4.3.6 VIA® High Definition Audio utility 4-8 4.4 ASUS Unique Overclocking Utility-TurboV EVO 4-9 4.4.1 Using ASUS TurboV 4-9 4.4.2 Using ASUS TurboV Auto Tuning Mode 4-10 4.4.3 Using ASUS Turbo Key 4-11 4.5 RAID configurations 4-12 4.5.1 RAID definitions 4-12 4.5.2 Installing Serial ATA hard disks 4-13 4.5.3 Setting the RAID...
User Manual
Page 53
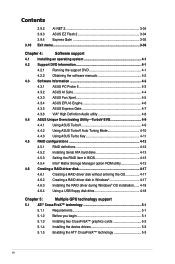
...later version. • When using Serial ATA hard disk drives. See section 3.4.2 Storage Configuration for Serial ATA hard disk drives and optical disc drives. In Standard IDE mode, you are set using these connectors. ASUS P7P55D 2-33 See section 3.4.2 Storage Configuration for details. ...• Before creating a RAID set, refer to section 4.5 RAID configurations or the RAID manual bundled in the BIOS to these connectors, set the Configure SATA as item in the motherboard support DVD. • You must install...
...later version. • When using Serial ATA hard disk drives. See section 3.4.2 Storage Configuration for Serial ATA hard disk drives and optical disc drives. In Standard IDE mode, you are set using these connectors. ASUS P7P55D 2-33 See section 3.4.2 Storage Configuration for details. ...• Before creating a RAID set, refer to section 4.5 RAID configurations or the RAID manual bundled in the BIOS to these connectors, set the Configure SATA as item in the motherboard support DVD. • You must install...
User Manual
Page 63
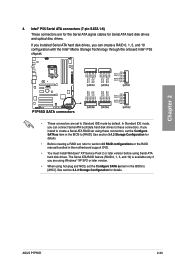
.... 3.2.1 ASUS Update utility The ASUS Update is potentially risky. Visit the ASUS website (www.asus.com) to download the latest BIOS file for system startup in Windows® environment. Copy the original motherboard BIOS using the current version of the BIOS may result in the system's failure to restore the BIOS in Windows® environment. 2. ASUS P7P55D 3-1
.... 3.2.1 ASUS Update utility The ASUS Update is potentially risky. Visit the ASUS website (www.asus.com) to download the latest BIOS file for system startup in Windows® environment. Copy the original motherboard BIOS using the current version of the BIOS may result in the system's failure to restore the BIOS in Windows® environment. 2. ASUS P7P55D 3-1

User Manual
Page 72
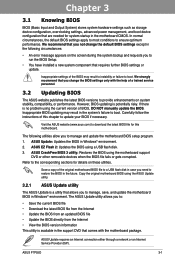
...Auto] DMA (Direct Memory Access) allows your device is installed. Setting to the processor. Block (Multi-Sector Transfer) M [Auto] Enables or disables data multi-sector transfers. [Auto] [Disabled] When set to [Disabled], the data transfer from the hard disk into a single 32-bit double word transfer to [... [Enabled] Sets the IDE controller to combine two 16-bit reads from and to [Auto], the data transfer from the hardware devices installed with LBA mode disabled. The DMA mode consists of the DMA mode. PIO Mode [Auto] [Auto] Allows automatic selection of the ...
...Auto] DMA (Direct Memory Access) allows your device is installed. Setting to the processor. Block (Multi-Sector Transfer) M [Auto] Enables or disables data multi-sector transfers. [Auto] [Disabled] When set to [Disabled], the data transfer from the hard disk into a single 32-bit double word transfer to [... [Enabled] Sets the IDE controller to combine two 16-bit reads from and to [Auto], the data transfer from the hardware devices installed with LBA mode disabled. The DMA mode consists of the DMA mode. PIO Mode [Auto] [Auto] Allows automatic selection of the ...
User Manual
Page 91
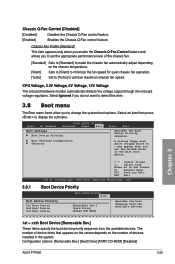
... Q-Fan control feature. [Enabled] Enables the Chassis Q-Fan control feature. Configuration options: [Removable Dev.] [Hard Drive] [ATAPI CD-ROM] [Disabled] ASUS P7P55D 3-29 The number of devices installed in the system. A virtual floppy disk drive (Floppy Drive B: ) may appear when you to set the CD-ROM drive as the first boot device. ←→...
... Q-Fan control feature. [Enabled] Enables the Chassis Q-Fan control feature. Configuration options: [Removable Dev.] [Hard Drive] [ATAPI CD-ROM] [Disabled] ASUS P7P55D 3-29 The number of devices installed in the system. A virtual floppy disk drive (Floppy Drive B: ) may appear when you to set the CD-ROM drive as the first boot device. ←→...
User Manual
Page 99
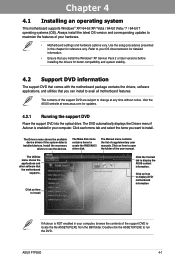
... contents of your hardware. • Motherboard settings and hardware options vary. The Make disk menu contains items to install. Refer to avail all motherboard features. Double-click the ASSETUP.EXE to use the devices. Install the necessary drivers to run the DVD. ASUS P7P55D 4-1 Chapter 4 Chapter 4: Software support 4.1 Installing an operating system This motherboard supports Windows® XP/ 64...
... contents of your hardware. • Motherboard settings and hardware options vary. The Make disk menu contains items to install. Refer to avail all motherboard features. Double-click the ASSETUP.EXE to use the devices. Install the necessary drivers to run the DVD. ASUS P7P55D 4-1 Chapter 4 Chapter 4: Software support 4.1 Installing an operating system This motherboard supports Windows® XP/ 64...

User Manual
Page 101
... Probe II PC Probe II is software-based, you can start monitoring your computer the moment you through the installation. Launch PC Probe II by clicking Start > All Programs > ASUS > PC Probe II > PC Probe II v1.xx.xx. PC Probe II main window Chapter 4 Button...window Opens the hard disk drive, memory, CPU usage window Shows/Hides the Preference section Minimizes the application Closes the application Refer to the software manual in the support DVD or visit the ASUS website at a healthy operating condition. ASUS P7P55D 4-3 Install PC Probe II from the motherboard support DVD. 2. ...
... Probe II PC Probe II is software-based, you can start monitoring your computer the moment you through the installation. Launch PC Probe II by clicking Start > All Programs > ASUS > PC Probe II > PC Probe II v1.xx.xx. PC Probe II main window Chapter 4 Button...window Opens the hard disk drive, memory, CPU usage window Shows/Hides the Preference section Minimizes the application Closes the application Refer to the software manual in the support DVD or visit the ASUS website at a healthy operating condition. ASUS P7P55D 4-3 Install PC Probe II from the motherboard support DVD. 2. ...

User Manual
Page 105
...you will be at least 1.2GB of available disk space. 4.3.5 ASUS Express Gate ASUS Express Gate is recommended for better performance. Notices about ASUS Express Gate • Ensure to install ASUS Express Gate from ODD and USB drives and ...motherboard chipsetcontrolled onboard SATA ports only. All onboard extended SATA ports and external SATA ports are NOT supported. See chapter 2 for detailed software instructions. Chapter 4 Click any of onboard SATA ports. • ASUS Express Gate supports file uploading from the motherboard support DVD before turning on the computer. ASUS P7P55D...
...you will be at least 1.2GB of available disk space. 4.3.5 ASUS Express Gate ASUS Express Gate is recommended for better performance. Notices about ASUS Express Gate • Ensure to install ASUS Express Gate from ODD and USB drives and ...motherboard chipsetcontrolled onboard SATA ports only. All onboard extended SATA ports and external SATA ports are NOT supported. See chapter 2 for detailed software instructions. Chapter 4 Click any of onboard SATA ports. • ASUS Express Gate supports file uploading from the motherboard support DVD before turning on the computer. ASUS P7P55D...
User Manual
Page 110
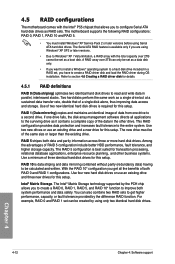
... by using Serial ATA hard disk drives. Refer to section 4.6 Creating a RAID driver disk for details. 4.5.1 RAID definitions RAID 0 (Data striping) optimizes two identical hard disk drives to create a RAID driver disk and load the RAID driver during OS installation. A RAID array over 2TB...both system performance and data safety. Intel® Matrix Storage. The new drive must install Windows® XP Service Pack 2 or later versions before using only two identical hard disk drives. The motherboard supports the following RAID configurations: RAID 0, RAID 1, RAID 10 and RAID 5. ...
... by using Serial ATA hard disk drives. Refer to section 4.6 Creating a RAID driver disk for details. 4.5.1 RAID definitions RAID 0 (Data striping) optimizes two identical hard disk drives to create a RAID driver disk and load the RAID driver during OS installation. A RAID array over 2TB...both system performance and data safety. Intel® Matrix Storage. The new drive must install Windows® XP Service Pack 2 or later versions before using only two identical hard disk drives. The motherboard supports the following RAID configurations: RAID 0, RAID 1, RAID 10 and RAID 5. ...
User Manual
Page 111
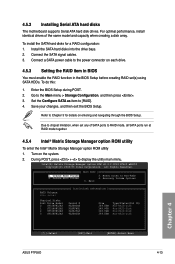
... 149.0GB 149.0GB 149.0GB 149.0GB Type/Status(Vol ID) Non-RAID Disk Non-RAID Disk Non-RAID Disk Non-RAID Disk Chapter 4 [↑↓]-Select [ESC]-Exit [ENTER]-Select Menu ASUS P7P55D 4-13 Connect a SATA power cable to the Main menu > Storage Configuration, and... main menu. To install the SATA hard disks for details on the system. 2. Recovery Volume Options 5. Delete RAID Volume 3. To do this: 1. Save your changes, and then exit the BIOS Setup. 4.5.2 Installing Serial ATA hard disks The motherboard supports Serial ATA hard disk drives. Intel(R) Matrix...
... 149.0GB 149.0GB 149.0GB 149.0GB Type/Status(Vol ID) Non-RAID Disk Non-RAID Disk Non-RAID Disk Non-RAID Disk Chapter 4 [↑↓]-Select [ESC]-Exit [ENTER]-Select Menu ASUS P7P55D 4-13 Connect a SATA power cable to the Main menu > Storage Configuration, and... main menu. To install the SATA hard disks for details on the system. 2. Recovery Volume Options 5. Delete RAID Volume 3. To do this: 1. Save your changes, and then exit the BIOS Setup. 4.5.2 Installing Serial ATA hard disks The motherboard supports Serial ATA hard disk drives. Intel(R) Matrix...
User Manual
Page 115
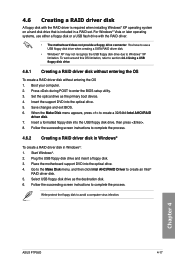
...instructions to section 4.6.4 Using a USB floppy disk drive. 4.6.1 Creating a RAID driver disk without entering the OS To create a RAID driver disk without entering the OS 1. 4.6 Creating a RAID driver disk A floppy disk with the RAID driver. • The motherboard does not provide a floppy drive connector. To... when installing Windows® XP operating system on a hard disk drive that is included in Windows®: 1. When the Make Disk menu appears, press to create an Intel® RAID driver disk. 5. Insert a formatted floppy disk into the optical drive. 5. Chapter 4 ASUS P7P55D 4-17...
...instructions to section 4.6.4 Using a USB floppy disk drive. 4.6.1 Creating a RAID driver disk without entering the OS To create a RAID driver disk without entering the OS 1. 4.6 Creating a RAID driver disk A floppy disk with the RAID driver. • The motherboard does not provide a floppy drive connector. To... when installing Windows® XP operating system on a hard disk drive that is included in Windows®: 1. When the Make Disk menu appears, press to create an Intel® RAID driver disk. 5. Insert a formatted floppy disk into the optical drive. 5. Chapter 4 ASUS P7P55D 4-17...
User Manual
Page 116
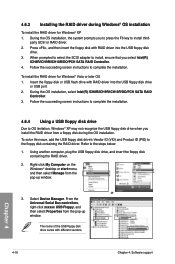
...select the SCSI adapter to OS limitation, Windows® XP may not recognize the USB floppy disk drive when you install the RAID driver from a floppy disk during Windows® OS installation To install the RAID driver for Windows® Vista or later OS 1. or 3. party SCSI or RAID...driver. 2. Follow the succeeding screen instructions to complete the installation. 4.6.4 Using a USB floppy disk drive Due to install, ensure that you to press the F6 key to the floppy disk containing the RAID driver. During the OS installation, the system prompts you select Intel(R) ICH8R/ICH9R/ICH10R/...
...select the SCSI adapter to OS limitation, Windows® XP may not recognize the USB floppy disk drive when you install the RAID driver from a floppy disk during Windows® OS installation To install the RAID driver for Windows® Vista or later OS 1. or 3. party SCSI or RAID...driver. 2. Follow the succeeding screen instructions to complete the installation. 4.6.4 Using a USB floppy disk drive Due to install, ensure that you to press the F6 key to the floppy disk containing the RAID driver. During the OS installation, the system prompts you select Intel(R) ICH8R/ICH9R/ICH10R/...


