User Manual
Page 6
...-TurboV EVO 4-10 4.4.1 Using ASUS TurboV 4-10 4.4.2 Using ASUS TurboV Auto Tuning Mode 4-11 4.4.3 Using ASUS Turbo Key 4-12 4.5 RAID configurations 4-13 4.5.1 RAID definitions 4-13 4.5.2 Installing Serial ATA hard disks 4-14 4.5.3 Setting the RAID item in BIOS 4-14 4.5.4 Intel® Matrix Storage Manager option ROM utility 4-14 4.6 Creating a RAID driver disk 4-18 4.6.1 Creating a RAID...
...-TurboV EVO 4-10 4.4.1 Using ASUS TurboV 4-10 4.4.2 Using ASUS TurboV Auto Tuning Mode 4-11 4.4.3 Using ASUS Turbo Key 4-12 4.5 RAID configurations 4-13 4.5.1 RAID definitions 4-13 4.5.2 Installing Serial ATA hard disks 4-14 4.5.3 Setting the RAID item in BIOS 4-14 4.5.4 Intel® Matrix Storage Manager option ROM utility 4-14 4.6 Creating a RAID driver disk 4-18 4.6.1 Creating a RAID...
User Manual
Page 7
Contents 5.2 NVIDIA® SLI™ technology 5-6 5.2.1 Requirements 5-6 5.2.2 Installing two SLI-ready graphics cards 5-6 5.2.3 Installing the device drivers 5-7 5.2.4 Enabling the NVIDIA® SLI™ technology 5-7 vii
Contents 5.2 NVIDIA® SLI™ technology 5-6 5.2.1 Requirements 5-6 5.2.2 Installing two SLI-ready graphics cards 5-6 5.2.3 Installing the device drivers 5-7 5.2.4 Enabling the NVIDIA® SLI™ technology 5-7 vii
User Manual
Page 14
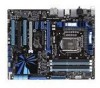
...P7P55D Deluxe specifications summary Internal I/O Connectors 3 x USB connectors support additional 6 USB ports 1 x IDE connector 7 x SATA connectors 2 x Drive Xpert SATA connectors (dark blue and gray) 1 x CPU Fan connector 2 x Chassis Fan connectors (1 x 4-pin, 1 x 3-pin) 1 x Power Fan connector 1 x IEEE1394a connector Front panel audio connector 1 x S/PDIF Out Header 1 x CD audio in 1 x 24-pin ATX... WOL by PME, WOR by PME, PXE Support DVD Contents Drivers ASUS Utilities ASUS Update Anti-virus software (OEM version) Form Factor ATX Form Factor, 12"x 9.6" (30.5cm x 24.4cm) *Specifications are ...
...P7P55D Deluxe specifications summary Internal I/O Connectors 3 x USB connectors support additional 6 USB ports 1 x IDE connector 7 x SATA connectors 2 x Drive Xpert SATA connectors (dark blue and gray) 1 x CPU Fan connector 2 x Chassis Fan connectors (1 x 4-pin, 1 x 3-pin) 1 x Power Fan connector 1 x IEEE1394a connector Front panel audio connector 1 x S/PDIF Out Header 1 x CD audio in 1 x 24-pin ATX... WOL by PME, WOR by PME, PXE Support DVD Contents Drivers ASUS Utilities ASUS Update Anti-virus software (OEM version) Form Factor ATX Form Factor, 12"x 9.6" (30.5cm x 24.4cm) *Specifications are ...
User Manual
Page 40
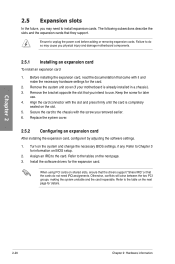
...or removing expansion cards. Align the card connector with the screw you physical injury and damage motherboard components. 2.5.1 Installing an expansion card To install an expansion card 1. Install the software drivers for later use . Refer to Chapter 3 for information on the next page for the card... the system and change the necessary BIOS settings, if any. Remove the system unit cover (if your motherboard is completely seated on shared slots, ensure that the drivers support "Share IRQ" or that came with it by adjusting the software settings. 1. Otherwise, conflicts will...
...or removing expansion cards. Align the card connector with the screw you physical injury and damage motherboard components. 2.5.1 Installing an expansion card To install an expansion card 1. Install the software drivers for later use . Refer to Chapter 3 for information on the next page for the card... the system and change the necessary BIOS settings, if any. Remove the system unit cover (if your motherboard is completely seated on shared slots, ensure that the drivers support "Share IRQ" or that came with it by adjusting the software settings. 1. Otherwise, conflicts will...
User Manual
Page 54
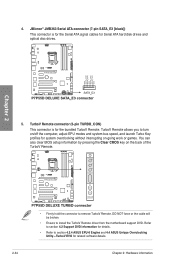
DO NOT force or the cable will be broken. • Ensure to section 4.3.4 ASUS EPU-6 Engine and 4.4 ASUS Unique Overclocking Utlity-TurboV EVO for related software details. 2-34 Chapter 2: Hardware information Refer to section 4.2 Support DVD information for ...TurboV Remote connector (5-pin TURBO_CON) This connector is for the Serial ATA signal cables for details. • Refer to install the TurboV Remote driver from the motherboard support DVD. TurboV Remote allows you to remove TurboV Remote. JMicron® JMB363 Serial ATA connector (7-pin SATA_E3 [black]) This connector is...
DO NOT force or the cable will be broken. • Ensure to section 4.3.4 ASUS EPU-6 Engine and 4.4 ASUS Unique Overclocking Utlity-TurboV EVO for related software details. 2-34 Chapter 2: Hardware information Refer to section 4.2 Support DVD information for ...TurboV Remote connector (5-pin TURBO_CON) This connector is for the Serial ATA signal cables for details. • Refer to install the TurboV Remote driver from the motherboard support DVD. TurboV Remote allows you to remove TurboV Remote. JMicron® JMB363 Serial ATA connector (7-pin SATA_E3 [black]) This connector is...
User Manual
Page 74
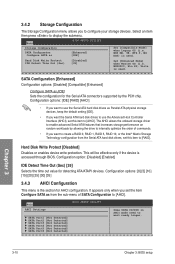
... protection. Configuration option: [Disabled] [Enabled] IDE Detect Time Out (Sec) [35] Selects the time out value for AHCI configuration. The AHCI allows the onboard storage driver to enable advanced Serial ATA features that increases storage performance on random workloads by the PCH chip. WIN ME, 98, NT4.0, MS DOS) is the...
... protection. Configuration option: [Disabled] [Enabled] IDE Detect Time Out (Sec) [35] Selects the time out value for AHCI configuration. The AHCI allows the onboard storage driver to enable advanced Serial ATA features that increases storage performance on random workloads by the PCH chip. WIN ME, 98, NT4.0, MS DOS) is the...
User Manual
Page 86
... AHCI (Advabced Host Controller Interface). Onboard 1394 Controller [Enabled] [Enabled] Enables the onboard 1394 Controller. [Disabled] Disables the controller. The AHCI allows the onboard storage driver to enable advanced Serial ATA features that increases storage performance on random workloads by allowing the drive to high-definition audio. Serial Port1 Address [3F8...
... AHCI (Advabced Host Controller Interface). Onboard 1394 Controller [Enabled] [Enabled] Enables the onboard 1394 Controller. [Disabled] Disables the controller. The AHCI allows the onboard storage driver to enable advanced Serial ATA features that increases storage performance on random workloads by allowing the drive to high-definition audio. Serial Port1 Address [3F8...
User Manual
Page 98
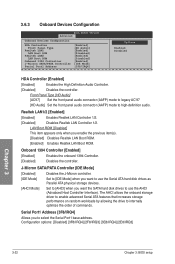
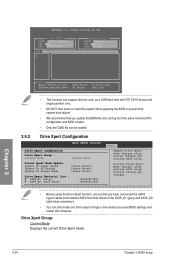
Profile Utility V2.00b Current CMOS BOARD: P7P55D Deluxe VER: 0166 DATE: 07/08/2009 Restore CMOS BOARD: Unknown VER: Unknown DATE: Unknown PATH: A:\ A: Chapter 3 Note [Enter] Select or Load [Up/Down/Home/End] ... version. • Only the CMO file can be loaded. 3.9.2 Drive Xpert Configuration BIOS SETUP UTILITY Drive Xpert configuration Drive Xpert Group : Current Mode :Normal Mode Driver Xpert Mode Update: Update To Super Speed Update To EZ Backup Update To Normal Mode [Press Enter] [Press Enter] [Press Enter] Drive Xpert Device(s) List...
Profile Utility V2.00b Current CMOS BOARD: P7P55D Deluxe VER: 0166 DATE: 07/08/2009 Restore CMOS BOARD: Unknown VER: Unknown DATE: Unknown PATH: A:\ A: Chapter 3 Note [Enter] Select or Load [Up/Down/Home/End] ... version. • Only the CMO file can be loaded. 3.9.2 Drive Xpert Configuration BIOS SETUP UTILITY Drive Xpert configuration Drive Xpert Group : Current Mode :Normal Mode Driver Xpert Mode Update: Update To Super Speed Update To EZ Backup Update To Normal Mode [Press Enter] [Press Enter] [Press Enter] Drive Xpert Device(s) List...
User Manual
Page 103
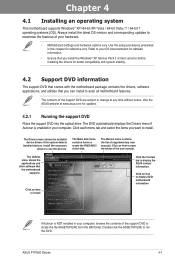
...subject to locate the file ASSETUP.EXE from the BIN folder. The Drivers menu shows the available device drivers if the system detects installed devices. Install the necessary drivers to create the RAID/AHCI driver disk. The Make disk menu contains items to use the devices....support DVD into the optical drive. ASUS P7P55D Deluxe 4-1 The Manual menu contains the list of the user manual. Click an item to install Click the Contact tab to run the DVD. Chapter 4 Chapter 4: Software support 4.1 Installing an operating system This motherboard supports Windows® XP/ 64-...
...subject to locate the file ASSETUP.EXE from the BIN folder. The Drivers menu shows the available device drivers if the system detects installed devices. Install the necessary drivers to create the RAID/AHCI driver disk. The Make disk menu contains items to use the devices....support DVD into the optical drive. ASUS P7P55D Deluxe 4-1 The Manual menu contains the list of the user manual. Click an item to install Click the Contact tab to run the DVD. Chapter 4 Chapter 4: Software support 4.1 Installing an operating system This motherboard supports Windows® XP/ 64-...

User Manual
Page 110
... VIA® H��i�g�h��D��e�f�in the support DVD or visit the ASUS website at www.asus.com for Windows® Vista™ / Windows® 7™ Output source select Volume control Minimize button Output... jack indicator Fold / unfold interface Configuration options B. Follow the installation wizard to install the VIA® Audio Driver from the support CD/DVD that came with the motherboard...
... VIA® H��i�g�h��D��e�f�in the support DVD or visit the ASUS website at www.asus.com for Windows® Vista™ / Windows® 7™ Output source select Volume control Minimize button Output... jack indicator Fold / unfold interface Configuration options B. Follow the installation wizard to install the VIA® Audio Driver from the support CD/DVD that came with the motherboard...
User Manual
Page 115
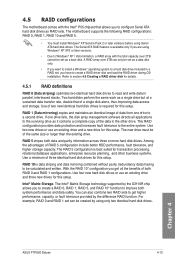
...be calculated and written. Use of the data in parallel, interleaved stacks. If one drive to a second drive. Chapter 4 ASUS P7P55D Deluxe 4-13 Refer to section 4.6 Creating a RAID driver disk for details. 4.5.1 RAID definitions RAID 0 (Data striping) optimizes two identical hard disk drives to read and write data...for this setup. The RAID 5 configuration is available only if you are using only two identical hard disk drives. 4.5 RAID configurations The motherboard comes with the total capacity over 2TB can only be set as a data disk only. • If you want to install a ...
...be calculated and written. Use of the data in parallel, interleaved stacks. If one drive to a second drive. Chapter 4 ASUS P7P55D Deluxe 4-13 Refer to section 4.6 Creating a RAID driver disk for details. 4.5.1 RAID definitions RAID 0 (Data striping) optimizes two identical hard disk drives to read and write data...for this setup. The RAID 5 configuration is available only if you are using only two identical hard disk drives. 4.5 RAID configurations The motherboard comes with the total capacity over 2TB can only be set as a data disk only. • If you want to install a ...

User Manual
Page 120
... destination disk. 6. Insert a formatted floppy disk into the optical drive. 4. Start Windows®. 2. Place the motherboard support DVD into the USB floppy disk drive, then press . 8. 4.6 Creating a RAID driver disk A floppy disk with the RAID driver. • The motherboard does not provide a floppy drive connector. To work around this OS limitation, refer to enter...
... destination disk. 6. Insert a formatted floppy disk into the optical drive. 4. Start Windows®. 2. Place the motherboard support DVD into the USB floppy disk drive, then press . 8. 4.6 Creating a RAID driver disk A floppy disk with the RAID driver. • The motherboard does not provide a floppy drive connector. To work around this OS limitation, refer to enter...

User Manual
Page 121
... Windows® XP 1. Select Device Manager. The name of the USB floppy disk drive varies with RAID driver into the USB floppy disk drive. 3. Chapter 4 ASUS P7P55D Deluxe 4-19 During the OS installation, the system prompts you select Intel(R) ICH8R/ICH9R/ICH10R/DO/PCH SATA RAID Controller. 4. Press , and then insert the floppy ...
... Windows® XP 1. Select Device Manager. The name of the USB floppy disk drive varies with RAID driver into the USB floppy disk drive. 3. Chapter 4 ASUS P7P55D Deluxe 4-19 During the OS installation, the system prompts you select Intel(R) ICH8R/ICH9R/ICH10R/DO/PCH SATA RAID Controller. 4. Press , and then insert the floppy ...

User Manual
Page 122
4. The Vendor ID (VID) and Product ID (PID) are displayed. 5. A window appears, allowing you to open the file. Chapter 4 4-20 Chapter 4: Software support Double-click the file. Use Notepad to select the program for opening the oem file. 7. Browse the contents of the RAID driver disk to locate the file txtsetup.oem. 6. Click Details tab.
4. The Vendor ID (VID) and Product ID (PID) are displayed. 5. A window appears, allowing you to open the file. Chapter 4 4-20 Chapter 4: Software support Double-click the file. Use Notepad to select the program for opening the oem file. 7. Browse the contents of the RAID driver disk to locate the file txtsetup.oem. 6. Click Details tab.

User Manual
Page 125
... to Control Panel > Programs and Features. 3. For Windows Vista, select Uninstall. 5. Select your computer. ASUS P7P55D Deluxe 5-1 Download the latest driver from the AMD website (www.amd.com). • Ensure that allows you to install multigraphics processing units ...drivers before installing ATI CrossFireX graphics cards to your system. See Chapter 2 for better thermal environment. • The ATI Triple CrossFireX technology is currently supported by your system. Chapter 5 Chapter 5: 5.1 Multiple GPU technology support ATI® CrossFireX™ technology The motherboard...
... to Control Panel > Programs and Features. 3. For Windows Vista, select Uninstall. 5. Select your computer. ASUS P7P55D Deluxe 5-1 Download the latest driver from the AMD website (www.amd.com). • Ensure that allows you to install multigraphics processing units ...drivers before installing ATI CrossFireX graphics cards to your system. See Chapter 2 for better thermal environment. • The ATI Triple CrossFireX technology is currently supported by your system. Chapter 5 Chapter 5: 5.1 Multiple GPU technology support ATI® CrossFireX™ technology The motherboard...
User Manual
Page 128
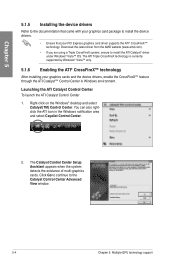
... rightclick the ATI icon in Windows environment. Launching the ATI Catalyst Control Center To launch the ATI Catalyst Control Center 1. Download the latest driver from the AMD website (www.amd.com). • If you are using a Triple CrossFireX system, ensure to the Catalyst Control Center Advanced...Right-click on the Windows® desktop and select Catalyst(TM) Control Center. Click Go to continue to install the ATI Catalyst® driver under Windows® Vista™ OS. The ATI Triple CrossFireX technology is currently supported by Windows® Vista™ only. 5.1.6 Enabling ...
... rightclick the ATI icon in Windows environment. Launching the ATI Catalyst Control Center To launch the ATI Catalyst Control Center 1. Download the latest driver from the AMD website (www.amd.com). • If you are using a Triple CrossFireX system, ensure to the Catalyst Control Center Advanced...Right-click on the Windows® desktop and select Catalyst(TM) Control Center. Click Go to continue to install the ATI Catalyst® driver under Windows® Vista™ OS. The ATI Triple CrossFireX technology is currently supported by Windows® Vista™ only. 5.1.6 Enabling ...
User Manual
Page 130
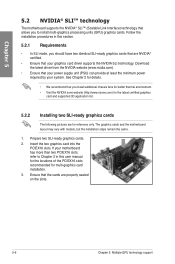
...should have two identical SLI-ready graphics cards that are properly seated on the slots. 5-6 Chapter 5: Multiple GPU technology support Download the latest driver from the NVIDIA website (www.nvidia.com). • Ensure that the cards are NVIDIA® certified. • Ensure that you to ... recommended for details. • We recommend that your graphics card driver supports the NVIDIA SLI technology. Ensure that your power supply unit (PSU) can provide at least the minimum power required by your motherboard has more than two PCIEX16 slots, refer to install multi-graphics ...
...should have two identical SLI-ready graphics cards that are properly seated on the slots. 5-6 Chapter 5: Multiple GPU technology support Download the latest driver from the NVIDIA website (www.nvidia.com). • Ensure that the cards are NVIDIA® certified. • Ensure that you to ... recommended for details. • We recommend that your graphics card driver supports the NVIDIA SLI technology. Ensure that your power supply unit (PSU) can provide at least the minimum power required by your motherboard has more than two PCIEX16 slots, refer to install multi-graphics ...
User Manual
Page 131
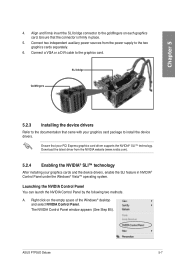
...You can launch the NVIDIA Control Panel by the following two methods. The NVIDIA Control Panel window appears (See Step B5). ASUS P7P55D Deluxe 5-7 Ensure that the connector is firmly in NVIDIA® Control Panel under the Windows® Vista™ operating system. Right.... SLI bridge Goldfingers 5.2.3 Installing the device drivers Refer to the documentation that your graphics cards and the device drivers, enable the SLI feature in place. 5. Download the latest driver from the power supply to install the device drivers. A. Connect two independent auxiliary power sources ...
...You can launch the NVIDIA Control Panel by the following two methods. The NVIDIA Control Panel window appears (See Step B5). ASUS P7P55D Deluxe 5-7 Ensure that the connector is firmly in NVIDIA® Control Panel under the Windows® Vista™ operating system. Right.... SLI bridge Goldfingers 5.2.3 Installing the device drivers Refer to the documentation that your graphics cards and the device drivers, enable the SLI feature in place. 5. Download the latest driver from the power supply to install the device drivers. A. Connect two independent auxiliary power sources ...


